Very good build Uwe, your build log is exceptional and will be of great help to those building or thinking of building this wonderful kit
-

Win a Free Custom Engraved Brass Coin!!!
As a way to introduce our brass coins to the community, we will raffle off a free coin during the month of August. Follow link ABOVE for instructions for entering.
-

PRE-ORDER SHIPS IN SCALE TODAY!
The beloved Ships in Scale Magazine is back and charting a new course for 2026!
Discover new skills, new techniques, and new inspirations in every issue.
NOTE THAT OUR FIRST ISSUE WILL BE JAN/FEB 2026
- Home
- Forums
- Ships of Scale Group Builds and Projects
- Le Coureur 1776 1:48 PoF Group Build
- Le Coureur 1776 1:48 Group Build Logs
You are using an out of date browser. It may not display this or other websites correctly.
You should upgrade or use an alternative browser.
You should upgrade or use an alternative browser.
LE COUREUR - french Lugger 1776 - POF kit from CAF in 1:48 by Uwe
- Joined
- Mar 19, 2020
- Messages
- 206
- Points
- 213

Slick work as usual Uwe. I see you installed frame 3 and 2. What did you use as reference, the 3 D drawings from Manual 1 or the larger 6-3 drawing which does not clearly indicate where frames 2 and 3 need to be fixed to the deadwoodSo I started with the inner planking works first with the first four rows.
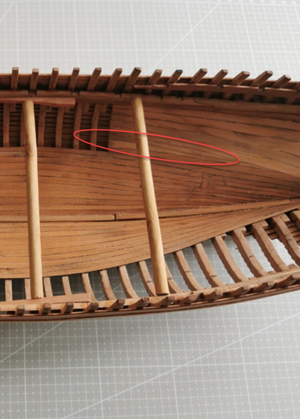
And you see, that I left between the keel and the first plank a gap for the limber board
View attachment 193020
You maybe recognize the dark stain on the planks - this was my fault, due to the fact, that I was butting a steel weight on top of the planks during watering - hope that I can remove it later on with sanding....
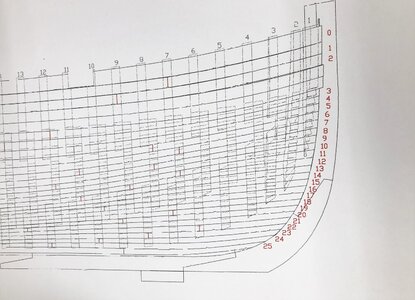
Where to start with the first plank I tried to follow this drawing from CAF
View attachment 193036
Here are the planks shown also with the limber board gap
and now the planking finished with sheet "1 O"
View attachment 193021
View attachment 193022
View attachment 193023
Two hints, which are helping maybe also other modelers:
1) Put the strips for some time in water before you try to adjust and install them - this is making them much more flexibel and you can adjust them
2) It is every time not easy to fix inner planks correctly during the glue is drying - so I used wood glue on every 50% of the frames and 50% superglue, especially at the ends of the planking -> for me this way was working very good
I think it is the second you mentioned -> the drawing for the outer planking where you can recognize the location of the teeth in every frameSlick work as usual Uwe. I see you installed frame 3 and 2. What did you use as reference, the 3 D drawings from Manual 1 or the larger 6-3 drawing which does not clearly indicate where frames 2 and 3 need to be fixed to the deadwood
Last edited:
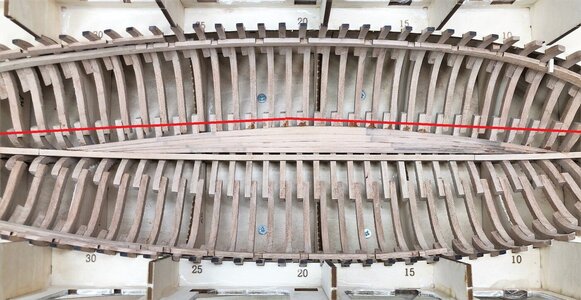
As always, clearly arranged and very well done. I am curios how the limber board will look like. There is probably no thicker plank after the 5th plank from the keel, as shown in the Boudriot Plan?
Yes, I did not make the thick stuff like shown in the Boudriot cross section. The problem is also, that the thick stuff planks is following the area where the parts of each frame are connected.As always, clearly arranged and very well done. I am curios how the limber board will look like. There is probably no thicker plank after the 5th plank from the keel, as shown in the Boudriot Plan?
This would mean, that I had to change the complete planking in order to adjust
The thick stuff plank would follow somehow the red line from bow towards the stern (I think so)
The limber board I will prepare later on with some spare strips - shorter elements with some finger holes - I will see
These limber holes were prepared in such a way, that two seamen could easily lift them by hand
Thanks for the prompt response. What you mean is absolutely plausible.
This is superb work Uwe.
I am happy, when I can be of some help for future modelers of this kit - also in a way, to see and help to make decisions sometimes in another direction, to solve or make things in a different way.Terrific, I was wondering what type glue you were using. I will be starting my Coureur in Dec. , and I'm sure I
will be referencing your posts frequently . Thank you for all the info.
Like myself! I am also trying to find some answers on my questions in the photos published by CAF - and I recognize, that some things and parts of the kit were changed in the meantime.
I am looking forward to see your build in the building log - very good
Many Thanks to you and others for all your kind words and likes
So once more as a reference we should take a look at the photos from the test-model and the 3D-sketches published so far
Here once more the manual sketch
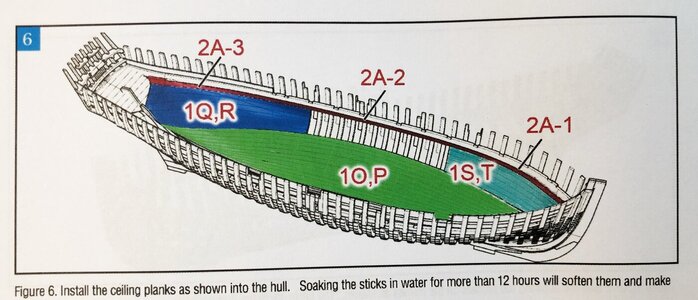
First the aft area (parts sheet 1 Q and 1 R
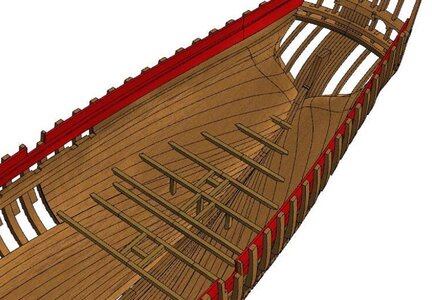
and the model
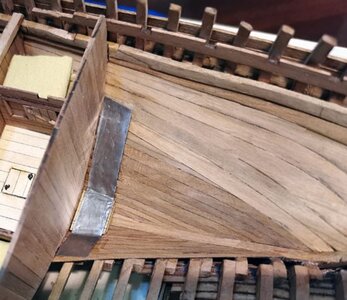
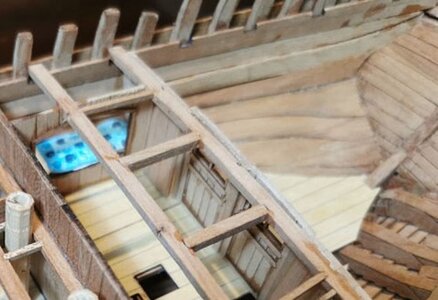
and fore near the bow (parts sheet 1 S and 1 T
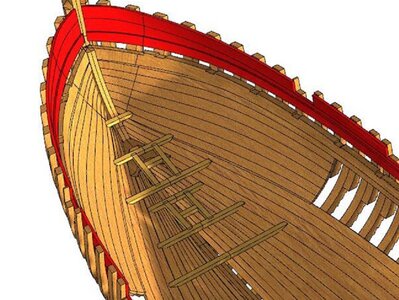
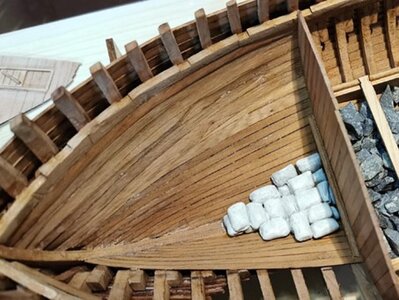
In the following post I will show, how it is looking at my model
Here once more the manual sketch

First the aft area (parts sheet 1 Q and 1 R

and the model


and fore near the bow (parts sheet 1 S and 1 T


In the following post I will show, how it is looking at my model
Now these are the parts of sheet 1Q, which have to be installed aft near the stern
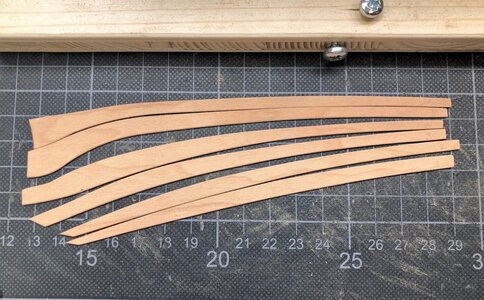
and I had to adjust the top two of the "planks" very much, in order to fix them and following the curvature of the frames
BTW I also realized, that the test kit model has a completely different planking - so I guess in the meantime they were revised
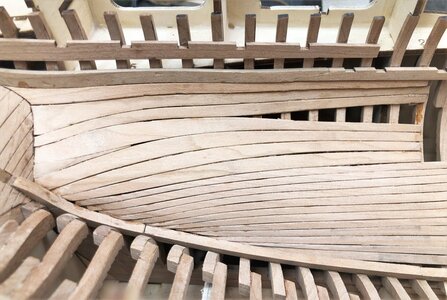
So I do not know, where I made the mistake, or is it a mistake, or how to make it better - maybe on the other side I will find out
The fore near the bow was much easier to install, but here the planks had much more "normal" form, so it was fastly done
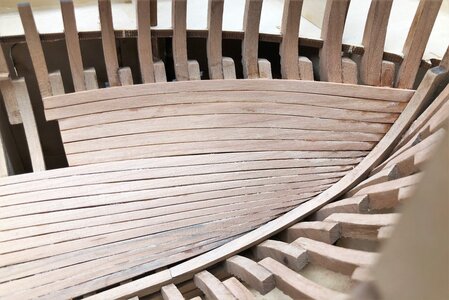
The birds eye view of this status
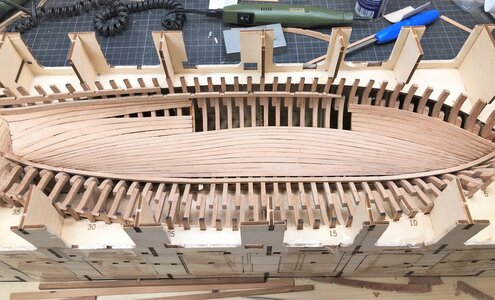
and after closing the gap of the planking with some stealers
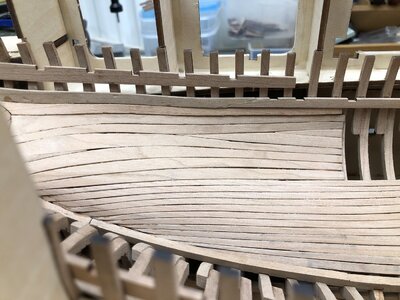
I know, that this part of the planking is technically / historical not correct done, but most of the area will be not visible - so I will put some barrels and other stuff over it
this is my actual status
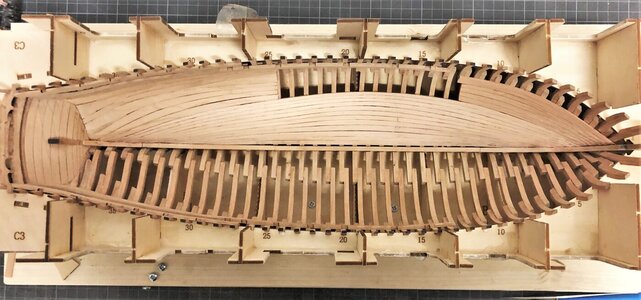

and I had to adjust the top two of the "planks" very much, in order to fix them and following the curvature of the frames
BTW I also realized, that the test kit model has a completely different planking - so I guess in the meantime they were revised

So I do not know, where I made the mistake, or is it a mistake, or how to make it better - maybe on the other side I will find out
The fore near the bow was much easier to install, but here the planks had much more "normal" form, so it was fastly done

The birds eye view of this status

and after closing the gap of the planking with some stealers

I know, that this part of the planking is technically / historical not correct done, but most of the area will be not visible - so I will put some barrels and other stuff over it
this is my actual status

One detail you can recognize, if you check my photos carefully
Where have the planks to end correctly?
So on one side I finished them at the centerline of the frame - like on a butt joint of deck planking
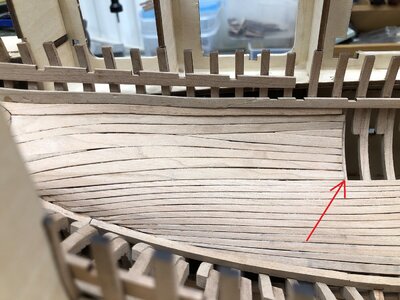
On the other side I finished with the planks after overlapping the complete frame
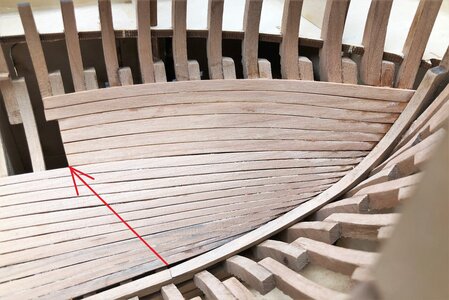
I will see later one, when installing the interior walls, what will be the correct location
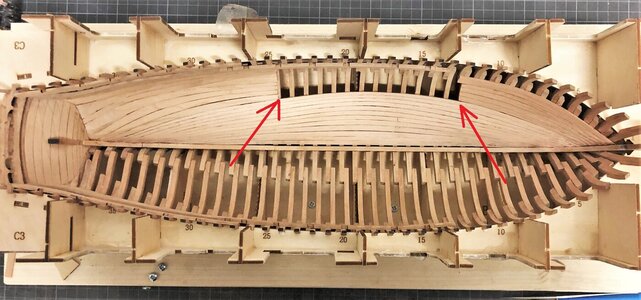
So hopefully the following modelers will be able to end both sides of the planking correct
Where have the planks to end correctly?
So on one side I finished them at the centerline of the frame - like on a butt joint of deck planking

On the other side I finished with the planks after overlapping the complete frame

I will see later one, when installing the interior walls, what will be the correct location

So hopefully the following modelers will be able to end both sides of the planking correct
Did the top plank of your section 1O fit with the bottom of the measuring sticks ?
Do you think maybe for section 1Q it would be an idea to start from the top just below 2A-3 and then working downwards towards section 1O?
Do you think maybe for section 1Q it would be an idea to start from the top just below 2A-3 and then working downwards towards section 1O?
- Joined
- Mar 19, 2020
- Messages
- 206
- Points
- 213

I have to say I am really surprised that the 6 timbers for 1Q and 1 R need so much adjustment plus the need for stealers whilst the the parts each have such a unique shape on the sheet. I certainly was puzzled when I tried to dry fit them. Curious to see Uwe if you run into the same issue with the other side but I can’t see where you went wrong.
Hallo Poul,I'm not 100% sure but at the @CAFmodel build it also looks to me as if there are a couple of stealers. Only a bit lower than yours:
View attachment 193360
 I saw this also before I made my planking, so for me at this time it seems, that it is the only way
Yes and No - It is slightly differentDid the top plank of your section 1O fit with the bottom of the measuring sticks ?
1O are the long planks in the hold, which are "parallel" to the keelson. (blue marked area)
1Q are the special formed planks (green marked area) and between the top plank of 1Q we have in addition a thicker clamp 2A-3 (red arrows).
The top of 2A-3 is in contact with the bottom of the beam clamp 3A-3 (yellow arrows, this one with the notches for the deck beams)
and the 2A-3 clamp is just over the measuring sticks - so the height should be correct
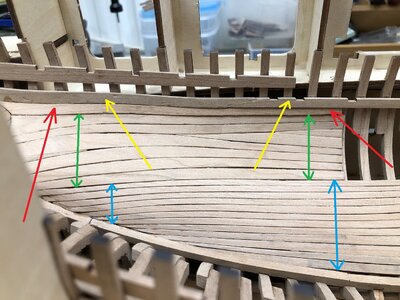
I was thinking about this way, but I thought, that if I have to adjust the lowest one more, than it will be later on much more visible.Do you think maybe for section 1Q it would be an idea to start from the top just below 2A-3 and then working downwards towards section 1O?
Also the lower special planks of 1Q parts are fitting much better to the form of 1O planks, than the upper one to the form of the clamp 2A-3 -> With this knowledge there is a possibility, that at the end you have to adjust all of the planks
I made it in this way and in the following photo you can see the order:
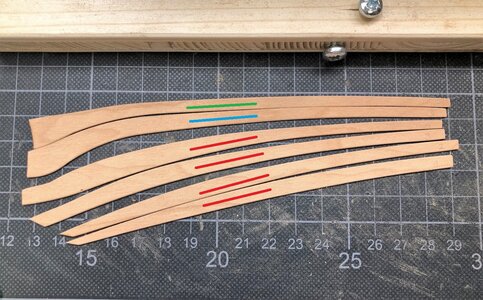
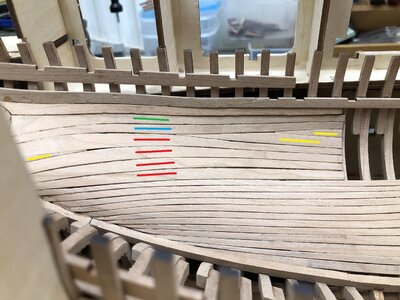
First I installed the red ones from bottom to up with more or less no adjustments of the form necessary - with this I produced the small stealer on the left side
The next one was the green one with only small adjustments
Afterwards the blue one with much adjustments to fit into the gap
and the last were the yellow marked stealers
Uwe, many thanks,there is no better way to show it. You learn something there. In Swabian: Do learnsch ebbes.
Like Chello I don't get it. The shapes of the 1Q boards are very complex - to say the least. Why having all the trouble designing such complex shapes if they does not fit anyway? It simply doesn't make sense to me.
BTW: I did not mean the measurement sticks above the deck clamps. Maybe I'm wrong but to me it looks like there are also some measurement sticks for the topmost of the 12 planks in section 1O:
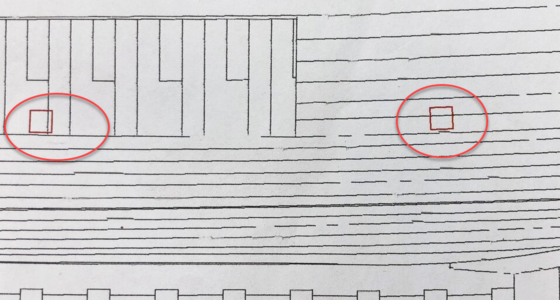
BTW: I did not mean the measurement sticks above the deck clamps. Maybe I'm wrong but to me it looks like there are also some measurement sticks for the topmost of the 12 planks in section 1O:

Last edited:
- Joined
- Mar 19, 2020
- Messages
- 206
- Points
- 213

Counting the planks I think you are right PoulLike Chello I don't get it. The shapes of the 1Q boards are very complex - to say the least. Why having all the trouble designing such complex shapes if they does not fit anyway? It simply doesn't make sense to me.
BTW: I did not mean the measurement sticks above the deck clamps. Maybe I'm wrong but to me it looks like there are also some measurement sticks for the topmost of the 12 planks in section 1O:
View attachment 193460
BTW: I did not mean the measurement sticks above the deck clamps. Maybe I'm wrong but to me it looks like there are also some measurement sticks for the topmost of the 12 planks in section 1O:
View attachment 193460
Counting the planks I think you are right Poul
Take a look at my post #191 - here I showed the drawing with the counted 12 planks
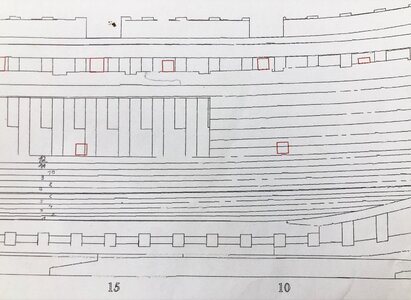
The location of the measuring sticks are also shown on the sides of the jig
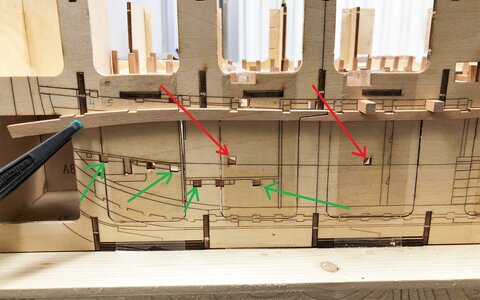
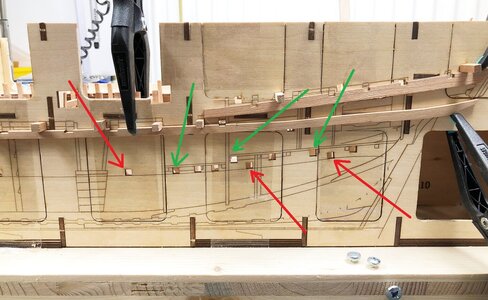
The red arrows are showing the location of measuring sticks as the top level of the inner planking 1O - you are right.
And these levels are more or less (tendency is going more to "more") the upper end of this planking.
Starting with plank 12 down to 1 will produce other problems I think, so I could imagine that you have to produce a scratch plank 1 which fits towards plank 2 and the correct space and location to the keelson.
This can only be checked, if somebody else will try this way of installation
But definitely on my way, plank 12 is close to the measuring sticks -> so this can not be the main problem with the special planks of 1Q
BTW: The green arrows are the location of the measuring sticks for the later small decks inside the hull
Here I do not see the advantage to have them, because measured level lines on the frames you make before based on the measuring sticks will be later covered and get invisible by the inner planking
For me also notLike Chello I don't get it. The shapes of the 1Q boards are very complex - to say the least. Why having all the trouble designing such complex shapes if they does not fit anyway? It simply doesn't make sense to me.
- still I do not know where my mistake was (if there was a mistake)
definitely the test build by CAF is showing also different special planks 1Q


