Mühsam ernährt sich das Eichhörnchen !Good progess Uwe.
I have only 7 frames ready.
Christian
Aber alles hat einmal ein Ende
 |
As a way to introduce our brass coins to the community, we will raffle off a free coin during the month of August. Follow link ABOVE for instructions for entering. |
 |
 |
The beloved Ships in Scale Magazine is back and charting a new course for 2026! Discover new skills, new techniques, and new inspirations in every issue. NOTE THAT OUR FIRST ISSUE WILL BE JAN/FEB 2026 |
 |
Mühsam ernährt sich das Eichhörnchen !Good progess Uwe.
I have only 7 frames ready.
Christian


Fantastic planking job! I wouldn't attempt clinker planking in million years. The only thing you can sand here is individual plank, right? Thanks for sharing.Mühsam ernährt sich das Eichhörnchen
The squirrel has a hard time feeding itself
View attachment 205723
View attachment 205724
View attachment 205725
View attachment 205726
View attachment 205727
Once the plank is installed, only a careful sanding of each individual plank is possible - correct.Fantastic planking job! I wouldn't attempt clinker planking in million years. The only thing you can sand here is individual plank, right? Thanks for sharing.

You are correct. Frame 1 was not installed. And I have to be honest.Uwe, I could not help noticing you have not installed frame one yet. Are you planning to do this after or do I need my eyes testing?

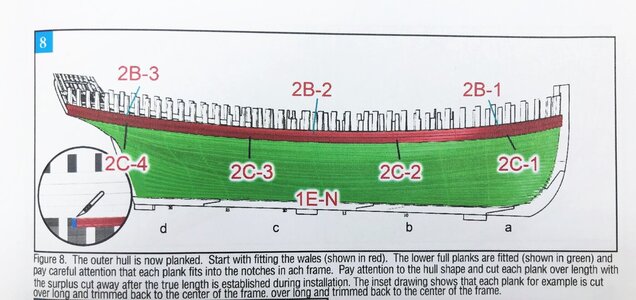
Wow nice workSo, the planking under the wales is now finished -
in the following some images showing the complete planking with the details and different perspectives
View attachment 206553
View attachment 206554
View attachment 206567
View attachment 206568
View attachment 206555
View attachment 206556
View attachment 206557
View attachment 206558
View attachment 206559
View attachment 206560
View attachment 206561
View attachment 206562
View attachment 206563
View attachment 206565View attachment 206566
View attachment 206569
Fantastic Uwe! Now the other side waits...So, the planking under the wales is now finished -
in the following some images showing the complete planking with the details and different perspectives
View attachment 206553
View attachment 206554
View attachment 206567
View attachment 206568
View attachment 206555
View attachment 206556
View attachment 206557
View attachment 206558
View attachment 206559
View attachment 206560
View attachment 206561
View attachment 206562
View attachment 206563
View attachment 206565View attachment 206566
View attachment 206569

