LE COUREUR - french Lugger 1776 - POF kit from CAF in 1:48 by Uwe

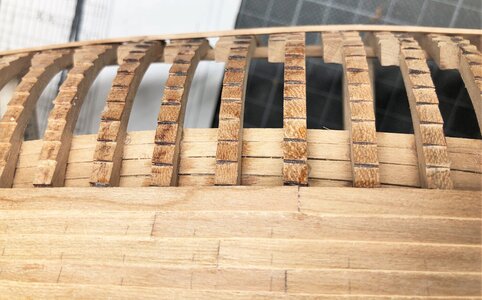
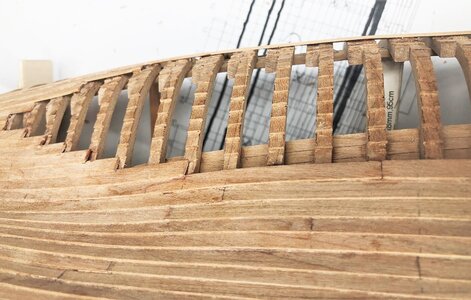
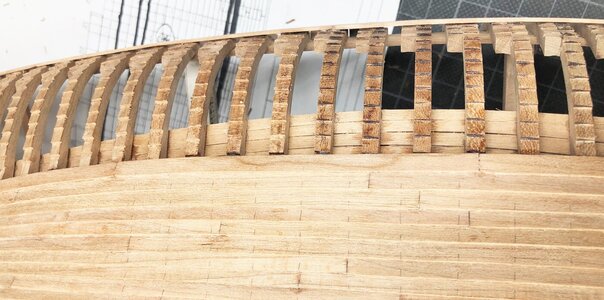
The next working step on the Le Coureur is the final cleaning of the frames from rest of laser char.
For this work I am using a sharp chisel

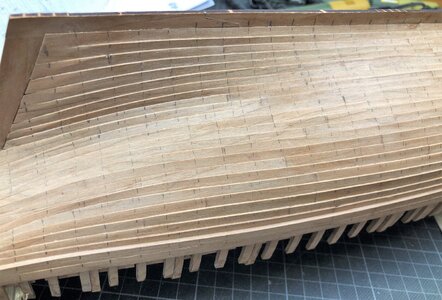
first of all a photo showing the frames before this work
IMG-5668.jpg

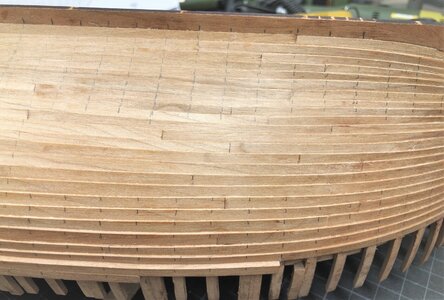
and here an area, which I cleaned already - only a final sanding in the "direction of plank" will be necessary
IMG-5669.jpg

and here you can compare directly the areas - I think this work of cleaning is worth to do
IMG-5670.jpg
 
Ahoy!

How much time the modeler loses on the cleaning of remainders after the laser char?
This is depending off course how much a modeler wants to clean.
For this final cleaning of the steps of the frames on one hull side I spent appr. 2 or 3 hours.
I guess over the complete construction of such a model it is taking maybe 5% to 10% of the time. One some parts it is only some seconds and on other parts it is taking minutes...... but you are getting used to it.... A model like this one needs maybe 500 working hours, maybe more, so it is over all a lot of hours off course
Some very accurate, fine and small parts can be done only with laser.
A combination of cnc cut and laser cut parts is at the end the optimum for the modeler - a good example herefore is the new HMS Granado kit from CAF
 
Ahoy!

How much time the modeler loses on the cleaning of remainders after the laser char?
Frankly speaking, I have been wondering about this too :) Le Coureur is my first and only kit and till now have only build a small part of it but for some of the parts I feel quite certain that I could have made a new part from scratch in less time than I used to remove the char. My conclusion (based on extremely little experience): For some parts I would have preferred if the kit manufacture had supplied a blank plate / lists of wood in the right thickness and a technical drawing of the individual part. It is not only the time to remove the char but in some cases also time to make simulated joints between virtual planks etc. Even more important: then we could also avoid parts where the grain is running across a plank perpendicular to the length.
Another thought (dream) I had in this connection: That way it should also be possible for the kit manufactures to make some really nice POF kits in scale 1:36 and 1:24
 
Ahoy!

Another thought (dream) I had in this connection: That way it should also be possible for the kit manufactures to make some really nice POF kits in scale 1:36 and 1:24

@PoulD - I think that the price of such set/kit can be very high ( scale and a large number of elements)

Cutting with water it's a little expensive, but cutting with a CNC milling machine is acceptable.
 
JUST MY VERY HUMBLE OPION,EXCEPT FOR THE LECOURER WHAT I DO IS TRY TO INCORPORATE THE CHAR AS PART OF THE MODEL HAVE DONE THAT SUCESSFULLY TO ME ON A COUPLE OF MODELS HAD NO PROBLEM WITH GLUE ADHEREING SO FAR, ON SMALLER MODEL LIKE LE FLURION X SECTION TO ME IT IS IMPOSSIBLE TO REMOCE THE CHAR WITHOUT BREAKING NUMEROUS PARTS AND EVEN ON THE LARGER ONES I SEEM TO SOMEHOW DESTROY THE SHAPE, JUST ME. GOD BLESS STAY SAFE ALL DON
 
I found that filing or chiseling the char away tends is an arduous process. I used a fine wire brush attachment on a Dremel rotary tool to knock most of it off in less than hour. It can't reach everywhere but the resulting cleanup is not too bad.

Take care though as this leaves a fairly rough surface behind which needs to be cleaned up with a sanding stick (still *much* easier than manually removing the char).
 
Small tip for the planking works

-> I call it "Dry Bending"

If you do not want to water or steam the planks for bending, these planks can also be bend (for 90% of the cases on this ship model dry.

I show in principle this way I did on most of my planks for the Le Coureur.

Here you see a plank streight and only sanded on top of a hobby / cutting mat - The black rod next to the plank is a small metalic chisel
View attachment 212514

Now take the rod with two hands (for the photo I needed the right one for making the photo) and run up and down (green arros) above the plank with relatively high pressure (red arrows)
View attachment 212519

after some run you will realize, that the plank is starting to bend
View attachment 212516

View attachment 212517

The reduction of the thickness is minimal - the bending is suitable for most areas of this model
View attachment 212518


Good way to give your planks an arch form. My problem is to bend it the other way against the grain.
For that I’m building my own version of a PVC steam box and will post photos soon.
 
Frankly speaking, I have been wondering about this too :) Le Coureur is my first and only kit and till now have only build a small part of it but for some of the parts I feel quite certain that I could have made a new part from scratch in less time than I used to remove the char. My conclusion (based on extremely little experience): For some parts I would have preferred if the kit manufacture had supplied a blank plate / lists of wood in the right thickness and a technical drawing of the individual part. It is not only the time to remove the char but in some cases also time to make simulated joints between virtual planks etc. Even more important: then we could also avoid parts where the grain is running across a plank perpendicular to the length.
Another thought (dream) I had in this connection: That way it should also be possible for the kit manufactures to make some really nice POF kits in scale 1:36 and 1:24
OK, some more of my two cents on this subject.
We have to be aware, that cnc cuting needs more time of the machine, than laser cutting, and I guess, that also the investement in the machines are higher (but I do not really know) and also slightly more wood - time is money and so the costs are higher.
And in addition, for parts like the frame elements, you would need also additional laser marks for the bevelling, so you have the sheet of wood twice in a machine.

And: The frames of the Le Coureur needs a lot of beveling and fairing adjustments, so therefore you have to sand them with a file anyhow.
If you do not want to leave some areas of the hull open, there is no finetuning with removing the last areas of char away necessary, because they are covered by the planks.

For some scratch parts, often the rest of a sheet is enough, where you can find enough space to make a new part, but I agree, that two or three not lasered wooden sheets in addition could help...... but once more, additional weight for postage and additional costs, and not every modeler will need them.

POF kits in bigger scale - I would be also very happy, to have maybe the La Volage in 1:36, but the costs would be high and I think, that the market is small for such kits...... but maybe
 
Markings for the planking nails

During the weekend I finally cleaned the planking on both sides of the hull from any rests of glue etc.
Afterwards I tried another way of making accurate pencil marks for the rows of "treenails" on the hull of the Le Coureur.
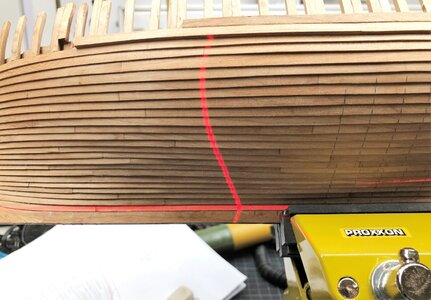
I remembered my small laser so I gave it a try

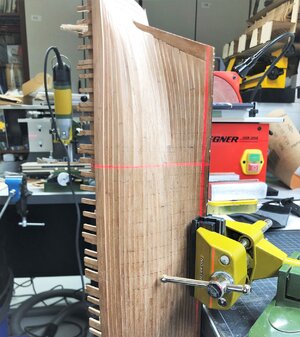
my first attempt with the vertical ship - I realized very fast, that the moving from one row of nails to the next one is very problematic. but possible when the laser is on a tripod (for a photo camera) which has a vertical adjustment
IMG-5676.jpg

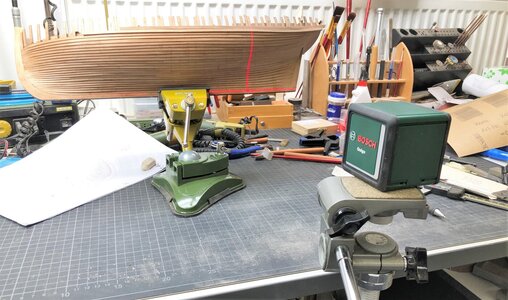
Happy to have a laser with permanent two lines (one horizontal and one vertical in exact 90° -> I turned the complete system by 90° and viola
IMG-5677.jpg

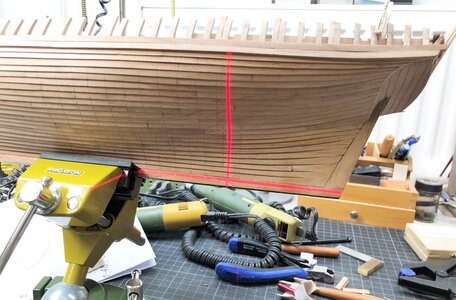
IMG-5678.jpg

There are two things important
1) the horizontal line of the laser light has to follow exactly the keel on which the frames are sitting rectangular
2) the hull has to be exactly in 90° rectangular to the laser source - otherwise you will get a curved laser line because of the curvatur / deflection of the hull
-> if it is not rectangular you will get such a laser line
IMG-5679.jpg

With this system I was able to mark the lines on the planks...... During the nailing procedure I will make some small adjustments and missing lines, so for now these marks are good enough for my needs
IMG-5680.jpg

IMG-5681.jpg
 
Many Thanks for your kind words and also all the likes received ..... such words are helping to be motivated, although it is sometimes hard.....

Sometimes in our hobby we suffer some setback, so it is necessary to go forward with new optimism and ideas (which I do not have in the moment)

But let me explain step by step

I bought, based on the information from @Maarten in his building log of his HMS Alert, which has also a clinkered hull, the special burrs to form the heads of the planking bolts

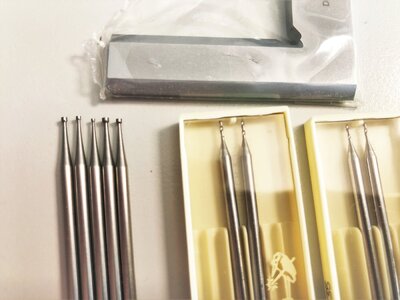
The burrs are the five on the left side - five different sizes from 0,8mm to 1,4mm (so called Finierfräser (Busch) )
I have the "Hohlbohrer 411" from page 22 of the Busch catalogue


IMG-5673.jpg


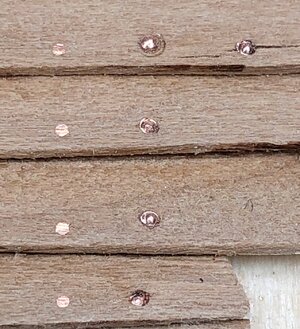
I made some sample "heads" on a trial planking sheet with copper nails of 0,7mm diamtere and they looked relatively good -
IMG-5688.jpg

so I decided to make it also on my hull of the Le Coureur
IMG-5683.jpg

IMG-5684.jpg

IMG-5685.jpg

IMG-5686.jpg

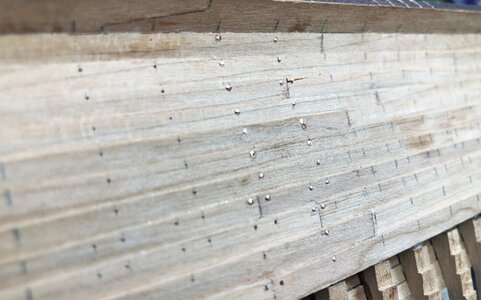
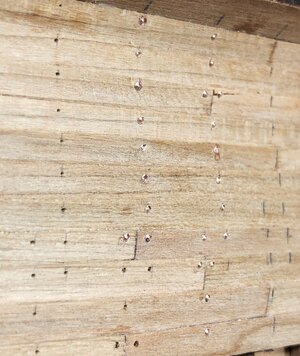
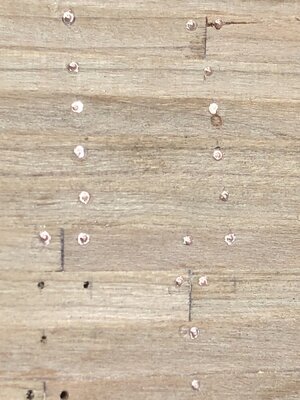
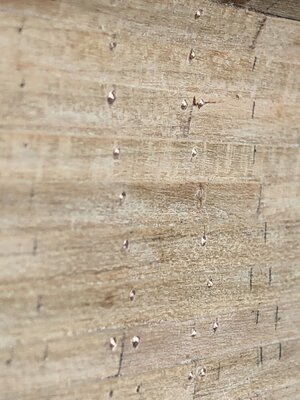
and I broke up - it is looking terrible

The biggest problem is the fact, that after 4 or 5 bolts the burr is filled with the milled copper rest / dust, so that the burr is starting to swim on top of the nail and loosing the contact - with this the burr is wandering on top of the timber and demage the surface of the plank - you can see some marks on the timber
Maybe this kind of burr, I am using the smallest one, is not the best for this task, I realized, that the wire @Maarten is using is much bigger, also the burrs he is using.

Maybe some other burrs are better - there are also some (not so small in diameter) with some openings

or the twincut


thinken about a solution and hope of some advise

If it is not working, I will go back to my original idea and make only small 0,6mm copper nails and sand them down flat with the surface of the planking
 
Halo my friend.
The bolts looking good. I think the idea of using 'cup' burs is great conceptually. The biggest challenge perhaps is to find the starting point at the center. Have tried to use a drill press or even mill? This way if you tight the 'bolt' in a vise perfectly vertical the bur you can achieve a better centering. The first bur is the size of the 'washer', then, without moving the vise change the smaller bur for the 'bolt head' This should work... I will check if I have the wire for this diameter and will try it myself. ;)
 
Back
Top