-

Win a Free Custom Engraved Brass Coin!!!
As a way to introduce our brass coins to the community, we will raffle off a free coin during the month of August. Follow link ABOVE for instructions for entering.
-

PRE-ORDER SHIPS IN SCALE TODAY!
The beloved Ships in Scale Magazine is back and charting a new course for 2026!
Discover new skills, new techniques, and new inspirations in every issue.
NOTE THAT OUR FIRST ISSUE WILL BE JAN/FEB 2026
- Home
- Forums
- Ships of Scale Group Builds and Projects
- Le Coureur 1776 1:48 PoF Group Build
- Le Coureur 1776 1:48 Group Build Logs
You are using an out of date browser. It may not display this or other websites correctly.
You should upgrade or use an alternative browser.
You should upgrade or use an alternative browser.
LE COUREUR - french Lugger 1776 - POF kit from CAF in 1:48 by Uwe
Now I have one tip for the Le Coureur newbies which will start the build and the works with the frames.
Each normal frame is build with the use of five elements / parts. Take a close look at the description of the manual
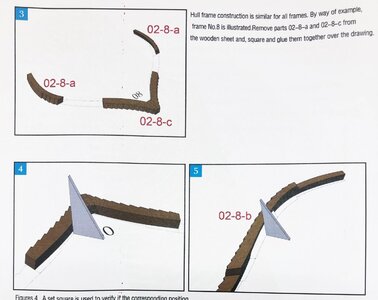
Part "c" are the floor timber - every frame has one
Parts "a" are the top timbers - every frame has two, which have the same form, but different mirrored laser lines (for fairing)
Parts "b" are the futtocks - every frame has two, which have the same form, but different mirrored laser lines (for fairing)
Here you can see construction of frame 32, which is showing the fairing lines very good and it easy to see by the fairing line to find out, which one has to be installed on the left and which one on the right side of the frame. With the red arrow is shown that this futtock has to be put on top
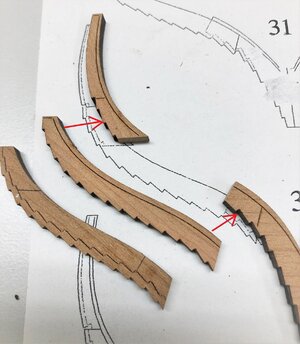
The other futtock (marked with green arrows) has to be turned around by 180 degrees, so that the areas marked in red have to touch each other
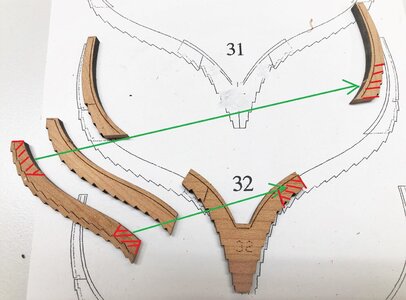
Remark: This is valid for the bigger number of frames, but.....
Unfortunately this rule is not followed on all frames - some are different
-> so you have take a good care and take two times a look of the shown fairing lines
f.e. take a look at the first frames I made:
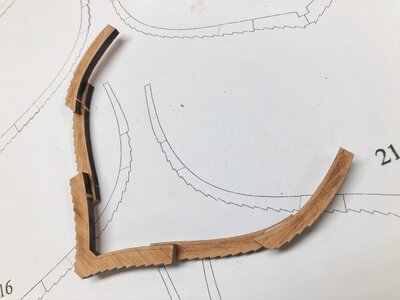
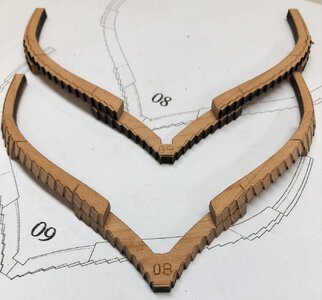
So please be patient and never switch of the brain - latest when you start to fair you will realize a mistake
Each normal frame is build with the use of five elements / parts. Take a close look at the description of the manual

Part "c" are the floor timber - every frame has one
Parts "a" are the top timbers - every frame has two, which have the same form, but different mirrored laser lines (for fairing)
Parts "b" are the futtocks - every frame has two, which have the same form, but different mirrored laser lines (for fairing)
Here you can see construction of frame 32, which is showing the fairing lines very good and it easy to see by the fairing line to find out, which one has to be installed on the left and which one on the right side of the frame. With the red arrow is shown that this futtock has to be put on top

The other futtock (marked with green arrows) has to be turned around by 180 degrees, so that the areas marked in red have to touch each other

Remark: This is valid for the bigger number of frames, but.....
Unfortunately this rule is not followed on all frames - some are different
-> so you have take a good care and take two times a look of the shown fairing lines
f.e. take a look at the first frames I made:


So please be patient and never switch of the brain - latest when you start to fair you will realize a mistake
and another small but very helpful hint.
When I prepare the single parts for a frame, before gluing them together, I am sanding shortly also the two surfaces of the parts (in order to remove some char dust and to smoothen the surface.
Before you put the five parts together and you arrange them at the correct place, take a stiff brush and remove the sanding dust away from the fairing lines.
Simple working step, but you will recognize the lines much much better than without brushing.
Here you can see the differences:
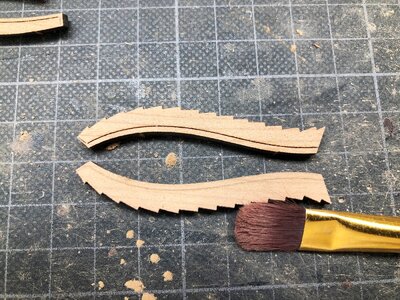
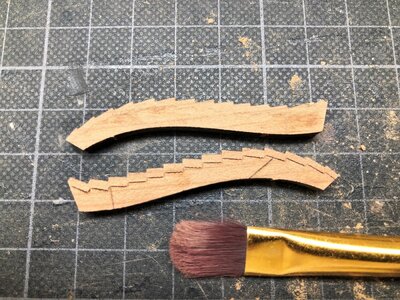
When you see the lines better you can adjust the location much easier and the result is much more accurate....
When I prepare the single parts for a frame, before gluing them together, I am sanding shortly also the two surfaces of the parts (in order to remove some char dust and to smoothen the surface.
Before you put the five parts together and you arrange them at the correct place, take a stiff brush and remove the sanding dust away from the fairing lines.
Simple working step, but you will recognize the lines much much better than without brushing.
Here you can see the differences:


When you see the lines better you can adjust the location much easier and the result is much more accurate....
- Joined
- Mar 19, 2020
- Messages
- 206
- Points
- 213

Hi Uwe, does this “turning the right futtocks 180 degrees “ start from a certain frame nr ?Now I have one tip for the Le Coureur newbies which will start the build and the works with the frames.
Each normal frame is build with the use of five elements / parts. Take a close look at the description of the manual
View attachment 183720
Part "c" are the floor timber - every frame has one
Parts "a" are the top timbers - every frame has two, which have the same form, but different mirrored laser lines (for fairing)
Parts "b" are the futtocks - every frame has two, which have the same form, but different mirrored laser lines (for fairing)
Here you can see construction of frame 32, which is showing the fairing lines very good and it easy to see by the fairing line to find out, which one has to be installed on the left and which one on the right side of the frame. With the red arrow is shown that this futtock has to be put on top
View attachment 183721
The other futtock (marked with green arrows) has to be turned around by 180 degrees, so that the areas marked in red have to touch each other
View attachment 183722
Remark: This is valid for the bigger number of frames, but.....
Unfortunately this rule is not followed on all frames - some are different
-> so you have take a good care and take two times a look of the shown fairing lines
f.e. take a look at the first frames I made:
View attachment 183738
View attachment 183736
So please be patient and never switch of the brain - latest when you start to fair you will realize a mistake
No - I was also thinking first about the midship frame towards fore and aft..... but NoHi Uwe, does this “turning the right futtocks 180 degrees “ start from a certain frame nr ?
I marked the frames with red color - so it is 8, 9, 10, 16, 17, 21 and 22 which are different (Remark: I did not make frames 1 to 7 until now)
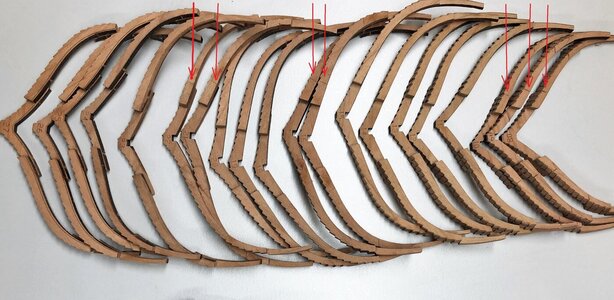
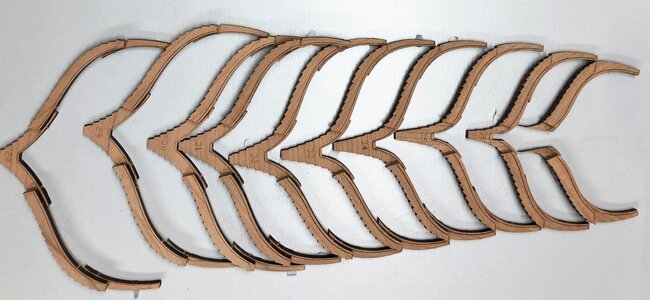
I guess it happened with arranging the parts on the wooden billets - every billet is lasered from both sides
BTW: I had one rule in production: the lasered frame number on the floor timber was every time visible when I glued the frame-parts together, and the lasered frame number is every time only on one side of the timber
- Joined
- Mar 19, 2020
- Messages
- 206
- Points
- 213

I found that using the jig to fit the frame also helps in checking the fairing, particularly how the top of the frames fit into the slots which indicate the exact angle.At the end - it is important and the aim, that the frames are looking like this
View attachment 183754
When all frames of the Le Coureur are prepared and installed on the keel, I will compare the reality with this CAF - drawing - Let us see the result in some time
Does something like this (see below) is also happening to you sometimes?
Yesterday evening I was working / fairing some frames - and during this I was thinking about the postings here (post #42ff) in our forum.
With this in mind I wanted to store the already prepared frames in two frame-"towers" with one from midship fore and one midship aft, in order also to see the "nice fairing" for the clinker planking.
And I got a shock

 - it seemed that in direction aft the frames were all prepared wrong.
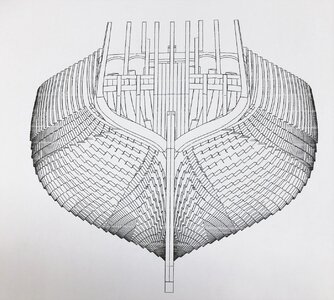
With these drawings (excerpts in the following) in mind, showing, that all floor timbers are into direction aft!
sideview and topview
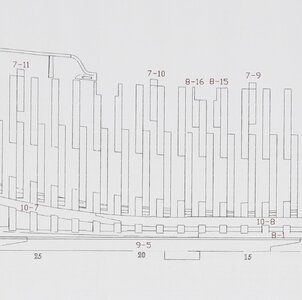
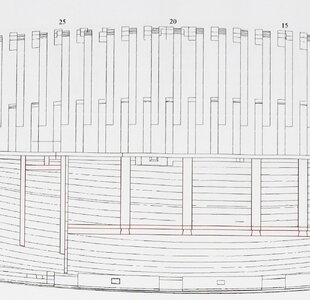
and I got a 15 minutes "panic-attack" - I already wanted to write an e-mail to CAF asking for spare frames to make everything new....
How can this happen?
Why to me? Especially because at the same day I wrote such post like #42 !?!?
and I remembered also the last post by @Chello talking about the jig (#47) ..... best to check the frames inside the jig - a last prove before I write to Tom from CAF
So fast I removed the parts of the jig and stick some of the main parts dry together - putting the keel inside (it fitted well btw) and put all made frames on top of the keel inside the jig
AND:
Everything fine
all frames are in the correct direction (floor timbers in direction aft) and all frames faired until now also correct - PUH
I do not know, why I was thinking somehow completely in the wrong direction - black out
So here some photos of yesterday late evening (for info: jig only partly dry installed and no accurate arrangement of the frames - pure check situation)
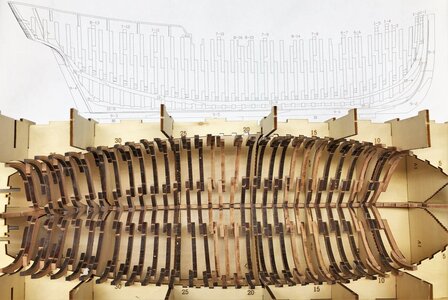
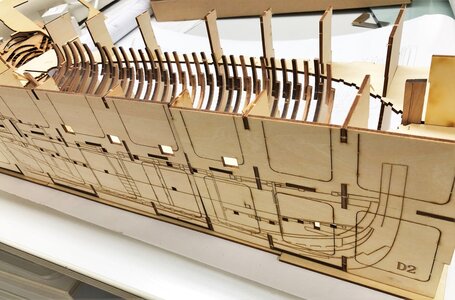
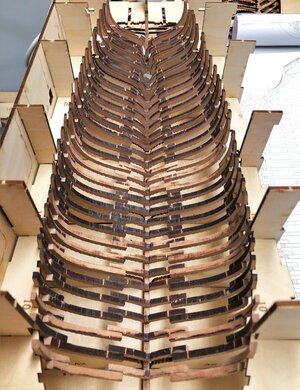
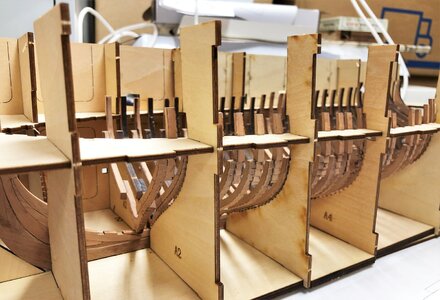
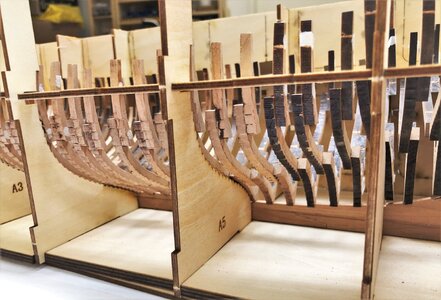
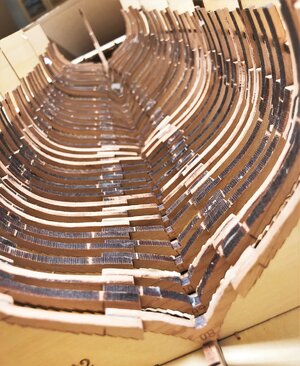
Yesterday evening I was working / fairing some frames - and during this I was thinking about the postings here (post #42ff) in our forum.
With this in mind I wanted to store the already prepared frames in two frame-"towers" with one from midship fore and one midship aft, in order also to see the "nice fairing" for the clinker planking.
And I got a shock

With these drawings (excerpts in the following) in mind, showing, that all floor timbers are into direction aft!
sideview and topview


and I got a 15 minutes "panic-attack"
 - I already wanted to write an e-mail to CAF asking for spare frames to make everything new....
How can this happen?
Why to me? Especially because at the same day I wrote such post like #42 !?!?
and I remembered also the last post by @Chello talking about the jig (#47) ..... best to check the frames inside the jig - a last prove before I write to Tom from CAF
So fast I removed the parts of the jig and stick some of the main parts dry together - putting the keel inside (it fitted well btw) and put all made frames on top of the keel inside the jig
AND:
Everything fine

all frames are in the correct direction (floor timbers in direction aft) and all frames faired until now also correct - PUH
I do not know, why I was thinking somehow completely in the wrong direction - black out
So here some photos of yesterday late evening (for info: jig only partly dry installed and no accurate arrangement of the frames - pure check situation)


- Joined
- Mar 19, 2020
- Messages
- 206
- Points
- 213

Does something like this (see below) is also happening to you sometimes?
Yesterday evening I was working / fairing some frames - and during this I was thinking about the postings here (post #42ff) in our forum.
With this in mind I wanted to store the already prepared frames in two frame-"towers" with one from midship fore and one midship aft, in order also to see the "nice fairing" for the clinker planking.
And I got a shock

- it seemed that in direction aft the frames were all prepared wrong.
With these drawings (excerpts in the following) in mind, showing, that all floor timbers are into direction aft!
sideview and topview
View attachment 183933 View attachment 183934
and I got a 15 minutes "panic-attack"- I already wanted to write an e-mail to CAF asking for spare frames to make everything new....
How can this happen?
Why to me? Especially because at the same day I wrote such post like #42 !?!?
and I remembered also the last post by @Chello talking about the jig (#47) ..... best to check the frames inside the jig - a last prove before I write to Tom from CAF
So fast I removed the parts of the jig and stick some of the main parts dry together - putting the keel inside (it fitted well btw) and put all made frames on top of the keel inside the jig
AND:
Everything fine
all frames are in the correct direction (floor timbers in direction aft) and all frames faired until now also correct - PUH
I do not know, why I was thinking somehow completely in the wrong direction - black out
So here some photos of yesterday late evening (for info: jig only partly dry installed and no accurate arrangement of the frames - pure check situation)
View attachment 183935
View attachment 183937
View attachment 183936
View attachment 183938
View attachment 183940
View attachment 183939
I certainly recognise that state of panic, I have it regularly!
Hallo Uwe,
it looks so great. Besides I experience such shock situations more often. But when you're fully occupied with your work and you take it very seriously,it's probably normal.
Besides, you motivate me so much that I started with the keel yesterday.
it looks so great. Besides I experience such shock situations more often. But when you're fully occupied with your work and you take it very seriously,it's probably normal.
Besides, you motivate me so much that I started with the keel yesterday.
Very good and I am very happy to hear this!Hallo Uwe,
it looks so great. Besides I experience such shock situations more often. But when you're fully occupied with your work and you take it very seriously,it's probably normal.
Besides, you motivate me so much that I started with the keel yesterday.
So I hope we can expect in short time the start of your building log, or ??? Please
- Joined
- Mar 19, 2020
- Messages
- 206
- Points
- 213

That’s great news!! I strongly advice to start a log and I can tell you from experience how it is helping me. It’s not about show boating skills but all about sharing and learning together. Give it a go!Hallo Uwe,
it looks so great. Besides I experience such shock situations more often. But when you're fully occupied with your work and you take it very seriously,it's probably normal.
Besides, you motivate me so much that I started with the keel yesterday.
Hello Chello,That’s great news!! I strongly advice to start a log and I can tell you from experience how it is helping me. It’s not about show boating skills but all about sharing and learning together. Give it a go!
I will do my best. thank you.
Panic attacks are normal and I had my share, believe me. It is often that you wish you could back-up a step and
correct a wrong, make something a little more perfect, or re-adjust a shoddy glue job. We all strive for perfection
that is almost impossible to obtain.
I look forward to presenting my Courier log soon.
jb
correct a wrong, make something a little more perfect, or re-adjust a shoddy glue job. We all strive for perfection
that is almost impossible to obtain.
I look forward to presenting my Courier log soon.
jb
Yesterday I was able to make and to fair some more frames.
And I was finally able (this time without panic ) to make the two "frame-towers" - really nice to see the future form of the hull growing - step by step I am coming to the end, which is planned for coming weekend
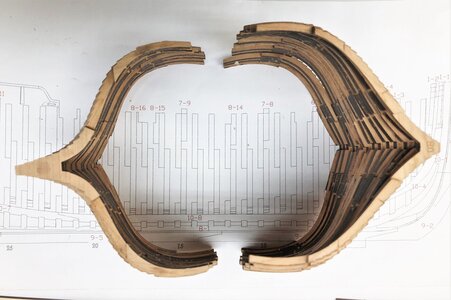
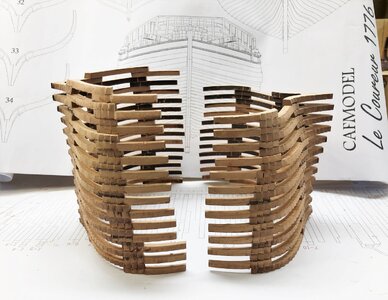
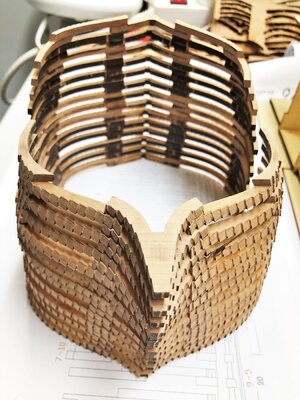
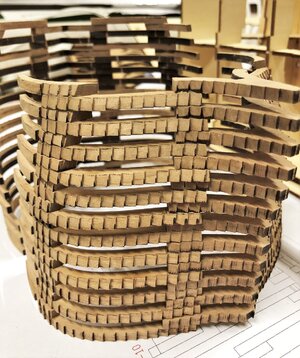
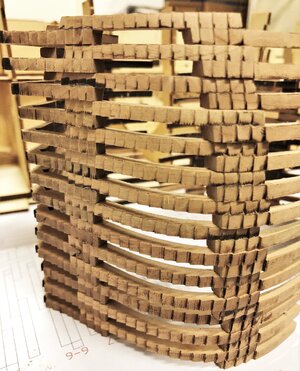
BTW: all together you have to sand and fair more than 1.500 steps
And I was finally able (this time without panic


BTW: all together you have to sand and fair more than 1.500 steps

Congrats on your first milestone Uwe! So...just to sum up for other builders... You have to bevel each 'notch' on the frame. Can you bevel\shape before assembling the frame parts together, or it is not practical\possible?
Possible definitely! I was asking myself also the same thing and decided to make the beveling after the parts of one frame are fixed togetherCongrats on your first milestone Uwe! So...just to sum up for other builders... You have to bevel each 'notch' on the frame. Can you bevel\shape before assembling the frame parts together, or it is not practical\possible?
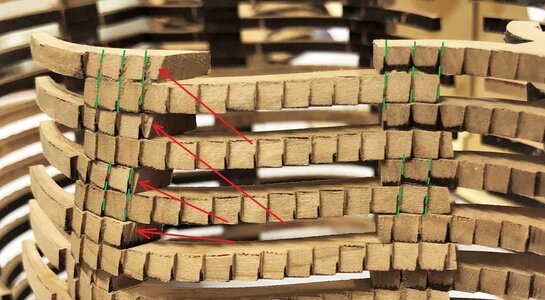
After I made some experience with the frames I think it will be better to make it really afterwards.
1) With this you can achieve a more accurate edge on the teeth where the frames are "double"-sided, means at the connections between futtock and floor timber or futtock and top timber - see here the green lines
2) also on some frames the last step is not a complete one, so it would be more problematic to bevel these areas in the correct angle - see here the red arrows
BTW: all together you have to sand and fair more than 1.500 steps
Great milestone in your build!
- I'm sure you can't await planking now - to drill and place treenails in more than 3000 holes
Milestone will be (hopefully) during weekend....... I have still some frames to make


