Le Fleuron 1729 - 64 Gun Ship PoB Scratch Build in 1:48 - (Ancre Monograph-J. Boudriot/G. Delacroix)

Hi Ken

Nice subject and proven construction method.I don't know what advantage you would have gained using thick bulkheads other than more fairing.Does the thicker frame represent the full frame thickness of the original in 1/48?

One thing to keep in mind, you have not made any allowance for sanding the three layers, you would at least loose 1mm in total.

I will be interested how you tackle the keel area at the stern.The total thicknesses of the layers on both sides will be greater than the width of the keel itself.

Kind Regards

Nigel
 
Hah, Maarten, I actually look forward to the build of the decorative stern and gallery elements. I DO have ADD, so when I need to take a small break for any reason I will start preparations for the decorative carvings. First task will be my approach and of course I will start some test carvings to determine exactly where my carving skills lie. I do have some experience, but that is for another day. ;) Heck, it will be some time before my project even starts to resemble a ship! ROTF

On another note, I am looking forward to you restarting your magnificent RC.

Cheers Mate!
 
Nigel thanks for visiting! As far as the reason for the thick frames, I believe the reason for having the wide/thick bulkheads is to provide a wider purchase for the shell's planks. If we think about it, these planks are not hull planks, but shell planks. Their sole purpose is to provide a strong foundational structure that can stand on its own. Sort of an exoskeleton of an insect. When I lay the 3 layers I will change the directional course of each layer, much like the layers of plywood, which gives the structure the strength I'm looking for.

Now here is the one concern I DO have and may be directly related to the thick frames. When I lay the 2nd and 3rd layers, in different directions, when that glue starts to dry there will be some shrinkage along the grain of the wood. I know this will put some forces on the underlying layer of planks. I just don't yet know how much force. This is an area that concerns me. As it is unknown, I will be very deliberate and test it on a small portion and see how it reacts. Then make adjustments. I would love to lay each subsequent layer 90 degrees to the underlying layer, but I don't think that will work. We'll see.

On your second point. VERY astute. This is a great question!!!! ;)ThumbsupThumbsup Although I did not explicitly state it in the log previously, I have accounted for material removal by the sanding process. ALL my estimates are overages by a percentage. So the external hull measurements are over from the start by 3mm total. My estimates are I will be removing approximately 1mm per layer's sanding. This approach also allows me some latitude if I find low spots in the hull. I can take down the high spots knowing I have marginal tolerances to do so.

My rationale, it is better to have extra planking thickness and not need it (I can sand it away) than to need more thickness and not have it, which would require me to add more shell planks. This is a situation that is potentially messy and I want to avoid.

I will be measuring the hull at every bulkhead after every layer, using a negative from the plans.

Thanks for visiting Nigel. Please continue asking me great questions or offer any advice. I welcome your knowledge!

Cheers
 
Ken I think you can go 90 degrees with the second layer provided you prebend your strips so they are pretty close as not to distort the first layer.

I have only seen subsequent layering of strips done at angles when the shell is built around a solid form ala Alexey Banarov with copious use of staples to hold the planks firm to the form.

On other I found on the Polish forum is that builders on there used a layer of material between two of the strip layers.I get that when the material is soaked in PVA it provides strength in all directions but quite how this is carried out I am unsure of.

Kind Regards

Nigel
 
Thanks Nigel. Once again you are on point. ;) Although I'm a long way from the step, I will be "painting" the hull with PVA, very thin diluted layer, only after each layer has been sanded. I expect I will be cutting approximately 1,200 planks and potentially use 5k-6k staples when it's all said and done. I'm glad you have knowledge in this method. Please let me know if you see me taking a wrong turn. My goal is to only performs tasks once! :) Although I don't think this is rational thinking, just my hopes.
 
One concern Ken is that you are planning on using staples.Without a solid form behind, i.e between bulkheads, you may get some breakout on the inside of the first layer.I would try on some scrap first.How are you adding the staples? Compressed air gun, electric stapler or manually?

If you are planning on painting with dilute PVA,use builder's PVA, not Titebond etc.Subsequent gluing of strips will reactivate builders PVA, whereas your Aliphatics and waterproof wood glues will form more of a bonding barrier in you laminations.
 
Nigel, for the first layer, staples will just be targeted on the bulkheads themselves. Subsequent layers will allow me to staple where needed. stapler.jpg

I found a rechargeable power stapler. If I had to manually staple 5k staples I don't think I'd be able to hold my toothbrush afterwards. ROTF

I have tested it and seems to work fine without being overly powerful as to damage anything. Once again, we will see...hah. So many unknowns. It's exciting!

Thanks again.
 
Ken,yes I did think hand stapling into wood may result in a receptive strain injury :oops: Compressed air stapling guns are extremely powerful and have managed to drive a staple into the bone of my finger as a teenager. Your gun should be a nice happy medium

Kind Regards

Nigel
 
Hi Ken,

Why not drill holes through the 3 layers and add wooded dowels instead of the staples.
Adding staples would also create issues when you need to drill holes in the hull in a later stage.
When using wooden dowel and glue these with pva your hull will be a solid wooden hull creating no issues when you need to cut gunports or have to drill a hole.
 
Last edited:
Hello Ken!
I'm glad you chose this way to build the hull. I watch with interest.
Thick frames are needed primarily for fixing of the planking with a stapler, this method of fastening allows you to work quickly enough compared to nails
 
Hi Maarten, Great question. The staples will be temporary. Once each layer's glue has dried, I will go back and remove every single staple. And I imagine removing every staple will take much longer than inserting them with an automatic stapler. :oops: Three layers of directionally opposing planks should make the structure VERY strong. Also the shell will stand on its own only from the 1st gun deck up, where the spine and top half of the bulkheads will be removed. Below the 1st gun deck the bulkheads will remain and between them filler blocks. I hope I explained this well. I will add some illustrations soon helping in this area.

This method building a hull is as new to me as it is for many. I truly hope it catches on as I believe it provides an innovative and simple process to do so. As I find myself saying a lot lately, "We will see." ROTF

I have most of this in my head, theoretically. I will be making many adjustments along the way, I'm certain.

Thanks for your questions Maarten. Keep them coming. Every question I can answer tells me I'm on the right track. Any question I can't answer will force me to go get the answer and get back on the right track.Thumbsup;)

Thanks for following along and keep those questions coming!!
 
Last edited:
Thanks for visiting Igor. Yes, when I first saw this method, I knew I would be building my next ship this way. I've actually tested my new stapler with actual dimensional materials I will be using. I've taken 3 pieces of 6mm plywood and made a few shell planks and fastened them. Seems to work well. We shall see for real when the time comes. :)
 
I expect and hope my build offers some value to other SoS members Paul. If only because of the unusual method. I would say, I would not have the skills ready to take on this project if I had not learned so much from so many skilled SoS modelers already.

I truly see build logs as being symbiotic. They are alive, in a sense. Views asking questions to build their knowledge and by asking those questions, for the build log owner to build his or her knowledge. Mutually beneficial in many ways. Not to mention that great friendships are built along the way.

Now to get to your statement. It is the only thing childlike about you. ROTF I respect your humility, but your skills are amazing to me. I will be very please to approach your skill level in building Le Fleuron. I will attempt to do so, but no promises.;)
 
Ok, so after 2 cups of coffee and a few "Honey Do" tasks that bought my freedom for a while, I'll start the backbone of Le Fleuron, 9mm plywood.

I will add a many visuals that I can as I do understand "A picture is worth 1,000 words." I feel navigating a large project like the Le Fleuron is much like navigating a real large ship. If you need to make a turn/adjustment, you need to start the turn well in advance as a large project/ship cannot turn "on a dime" like a small speedboat. Planning and testing...for me is the key. There have been so many times I've been certain I have a solution and only after testing it, "what was I thinking?" ROTF

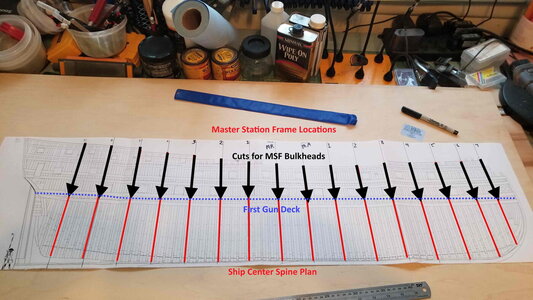
Anyway, below is the plan plate I will use to construct the backbone of the ship, from 9mm plywood. Cuts, 6mm wide, will be made vertically down to the 1st gun deck, indicated by the dotted blue line. Black arrows illustrate those cuts. Once the hull's shell is completed, bulkheads and backbone all will be removed, leaving only the shell above the 1st gun deck (dotted blue line).
Ship Center Spine Plan.jpg

Till next time...
 
I have the 9mm plywood backbone between 2 pieces of 1/2 inch tempered glass, glue drying. Throughout the project I will be changing gears to work on other things within the project, sometimes waiting for the previous step to cure, dry, etc. Sometimes out of my ADD needing a change.

There are quite a few items that are still not finalized.
1. Exactly what elements will I include, internally.
2. The final approach on the stern's construction. Will I build transom timbers? If so, how?
3. How will I transition the keel, stem & stern posts from 9mm plywood to a finished, presentable material?
4. Do I include some ambient lighting?
5. I do not plan to paint ANYTHING, hopefully. What wood combinations will be used? Need testing here.
6. What are my wood requirements?

Ok, so I do have a couple of the requirements above mostly figured out, mostly. :) My planning has allowed me to determine my wood requirements, some traditional, some not, that I'm aware of.

Below is the wood I will be using, sourced from 4 different providers. The bulk of it from Dave Stevens (Dlumberyard). Some from my friend Sergey @bibigon, RarewoodsUSA, and Gilmer Wood.
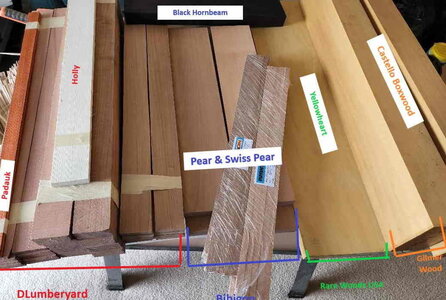
Le Fleuron Woods.jpg

All of the wood is of the highest quality, no exceptions. It is clear that if I cannot build a quality model, it's not because of the wood!

My thoughts on usage is Pear & Swiss Pear for the build of the functional element. There is enough color contrast to use them together to create some contrast, hopefully pleasing to the eye. Holly I will attempt to use to accent small elements, functional and decorative. The Padauk, is still an unknown, but thoughts of using it as accent wood, perhaps for gun port sills & borders, but not used in excess. The Yellowheart, which I later found under other names, Brazilian Satinwood, I am toying with using as external planking from the main wales up. A will need to test it and how it finishes and its workability, but I'm optimistic. Castello Boxwood with be for decorative accent pieces and carvings. I included approximately a 20% overage on my orders to account for unforeseen needs and Hoss Errors!

The X factor is the Black Hornbeam. Sergey @bibigon let me know it is in very short supply and to be fair to his customers he had to ration it. I completely understood and feel lucky to have been able to get any. With that said, I will need to be FLAWLESS in my processing of it as there is no extra. :confused: This concerns me and I think, ultimately I will need to order some more from the EU supply source Zoly provided.

It's always something. :rolleyes:

Till next time....
 
Last edited:
Welcome aboard Tobias! Thanks for following along. I love the work you're doing on your La Plame Corvette build. Please feel free to offer your knowledge and/or feedback. :)
 
Back
Top