Le Fleuron 1729 - 64 Gun Ship PoB Scratch Build in 1:48 - (Ancre Monograph-J. Boudriot/G. Delacroix)

Maarten, I wish you told me sooner, I could have borrowed your Vice Grips! :p Actually, I think I tested something like 2 specialized tools for removing staples I bought on Amazon, along with 6 or 7 types of pliers. The ones I am using now came out the winner.

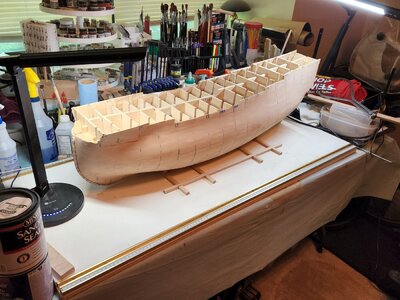
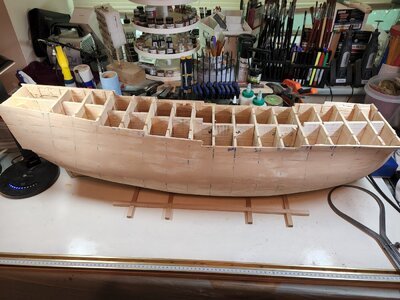
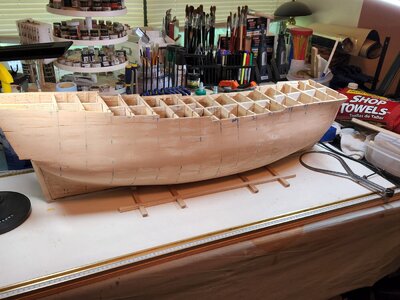
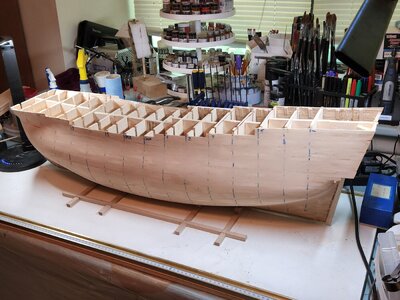
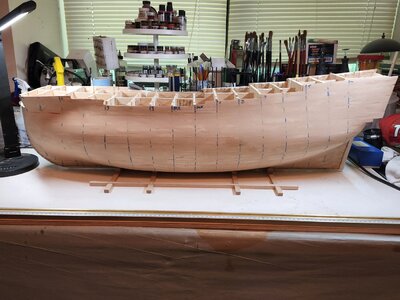
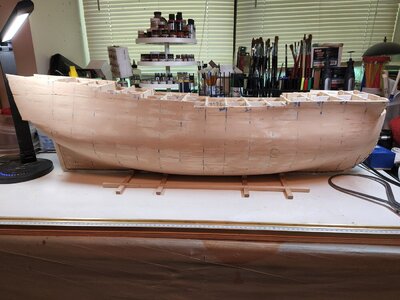
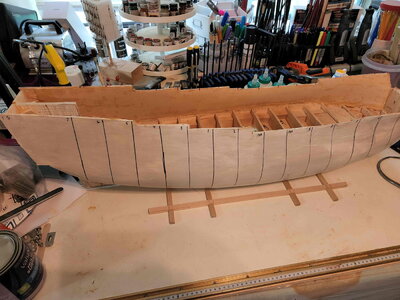
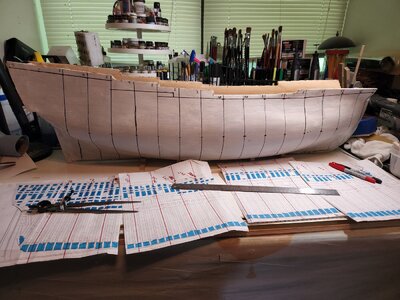
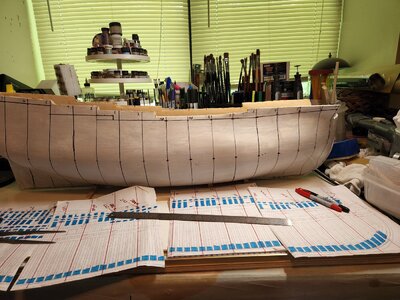
So I'm at the point in the planking where I need to see how close my hull is, compare to the plan. I have one last layer to make final adjustments, but I need to address any large issues now. To give myself confidence to move forward, I've cut out the negative bulkhead profiles from the Body/Elevation plan and cross my fingers that my work so far it not really far off.
View attachment 325639

I won't bore you with every bulkhead photo. I did measure every one, Port and Starboard. Some were fine compared to plan, some were off just a little bit and a couple had some issues. Most of the issues were at the bow, with the very first bulkhead, #7. The good news is that the measurement was wider compared to the plan and there for the fix was to sand the high spots.

Most of the cases the measurements are close enough to proceed to 3rd layer and adjusted after it is completed.
View attachment 325669View attachment 325695View attachment 325696View attachment 325697

Some require a bit of work.
View attachment 325674View attachment 325693View attachment 325698

And then the high spot on the bow. You can see the deviation starts on bulkhead #5, a little worse on #6 Then fairly large on #7.

View attachment 325714View attachment 325699View attachment 325700

Here is the question I need to answer myself. On #7, is the middle "high" or are the areas near the rails and keel "low"? At the moment I do not know. I have a method I think will help me figure that out clearly.

I will need to build a small cradle to ensure the hull/keel is resting at the correct height so I can take are mark vertical measurements and use calipers to compare the hull to the plan @ bulkheads #6 and #7 @ each vertical point.
View attachment 325715

I'll go off and build the cradle that will hold my "baby".

Thanks for following along.

Till next time...
Cheer

Thanks all for the likes, positive comments and suggestions.

Uwe, yes, I constantly refer to my Spurts and Sputters way of working. I make great progress when the right conditions exist, then sometimes almost slow to a stop when they don't.
I've been able to make very good progress lately for 2 main reasons. I've had time to work with my head down and probably most importantly, I have a clear understanding of what I need to do in this particular phase.

Once I've completed this phase things will slow waaaaaaaayyyyyyy down. This is because I will start to measure and plot important points on the hull, such as gun ports, deck lines, etc. This will be in preparation of cutting into the very hull I just created!!! o_OROTF I'm sure this is the moment where modelers get very nervous on their first scratch build. It is new territory for me and I will most likely ask the advice of people soon. I'm curious if I need to plot every point from the plan at each bulkhead and connect the points using French curves or use actual copies of the plans as stencils taped to the hull and plot the points that way.

Anyway, I don't have to worry about that just yet. I have a lot of sanding and finishing to go yet.

Thanks for following along.
Till next time...

Cheers.
It sure will slow way down. You might have a problem using the plans as a template as they're one dimensional and you need to go around curves ? I think plotting every point is the way to go. If you have several accurate datum points where all measurements can be taken from and checked against you'll be fine. 1mm off in one spot is 7 mm off down the line. That's the difficult part, trying to stop that from happening before you go too far to make corrections.
 
It sure will slow way down. You might have a problem using the plans as a template as they're one dimensional and you need to go around curves ? I think plotting every point is the way to go. If you have several accurate datum points where all measurements can be taken from and checked against you'll be fine. 1mm off in one spot is 7 mm off down the line. That's the difficult part, trying to stop that from happening before you go too far to make corrections.
Tony, this feedback is exactly the kind of information I'm looking for. I am looking for as diverse set of views as I can get. The bigger the data set...

Sometimes I can "over engineer" things. Someone once said, if I could, I would swat a fly with a shotgun! :rolleyes: I think they were exaggerating to make a point. I any case, I would like to work efficiently as I can, but not were it may affect the outcome.

I think I may plot key points and then see how they differ from the plans. So plotting points for each set of wales, decks at every bulkhead. Then lay a stencil for the gun ports using the plotted points on the hull with the same on the stencil as registration points to ensure the stencil is where it should be. Then mark the hull with gun port locations, step back and validate random gun port locations to the plan.

My greatest concern, if not already evident, is cutting the gun ports. Any other mistake can be easily remedied.

All opinions and suggestions are welcome.

Thanks Tony. I think you've confirmed my thinking. Better to be overly cautious here.

Cheers.
 
Over engineer ! You ain’t the only one !
Measuring and making sure things are correct is something I get stuck on for many hours or days sometimes. Measure twice then measure another 3 or 4 times. That’s the OCD talking !
 
Hello Everyone,
So throughout this build I will be multitasking. While waiting for glue to dry or just when I need a break from what I'm doing, I'll "change gears" and do some testing, where I need to to understand my options for future tasks or the way to build certain ship elements or treat wood, etc.
I have finished the 3rd layer of shell planks and rough sanding. I've coated the hull with a diluted PVA solution and waiting for it to dry. In the meantime I wanted to share my findings on a test I just finished.

Test: Ebonizing Wood
A while back I was looking for an option to working with Ebony or purchasing Black Hornbeam as it was hard to find and expensive. Dave Stevens responded to my request with a post on ebonizing woods.


I watched many videos and read a few posts, but still needed to see for myself.

The wood I tested needed to be a wood that milled well. Also, because this process works the best with woods with a good tannin content, I did not test Boxwood or Castello Boxwood. I chose Pear and Swiss Pear.

Ebonizing Solutions

Iron Acetate

Iron Acetate is the actual ebonizing solution. Your can apply brush it onto wood and it will turn the wood darker. The depth of ebony color it imparts depend on the wood's tannin content. I'm not sure if you can purchase it commercially. I did not look. So I made mine. You can find the recipe on almost every video or article about ebonizing wood. I will share the way I made mine. It is quite easy.

Recipe​

I should have taken photos of the steps, but did not. I did not measure anything exactly. I do not think it matters, other than the general ratio
1.) Steel wool, the finest I could find(0000). Soak it in warm water with some dish soap to remove any oils, which will allow it to react more readily. I wore Nitrile gloves and rinsed under warm water until all the soap was washed away. Then put in the oven @ 200F until dry.
2.) I tore apart the steel wool to make it less dense. Then place the pieces into a glass jar until it filled it to the top. I did not press or force it in. Glass is used as it will not react or interfere with the chemical reaction.
3.) I poured Whit Vinegar into the glass jar until it covered all of the steel wool. Securely placed a lid on the jar and put it away for 5 days. Some recipes call for Apple Cider Vinegar as it has the highest acetic acid content of all the vinegars, although White Vinegar worked fine for me.
4.) After the 5 days, I strained the liquid through a coffee filter to remove all solids. Most of the steel wool was dissolved. What solids were left looked more like sludge than steel wool. What was left was a liquid that was a little cloudy.

Tea
While the Iron Acetate is the actual solution that ebonizing the wood, tea is a catalyst to make it more effective. This is because the tea contains tannins. By applying tea to the wood prior to applying the Iron Acetate, it creates a darker shade of Black. While I don't think I need to provide a recipe for tea :rolleyes:, it is important to note, the darker the tea, by type of tea is important as they contain a higher level of tannins. Also, the stronger the brew of that tea seems to make it even more effective.

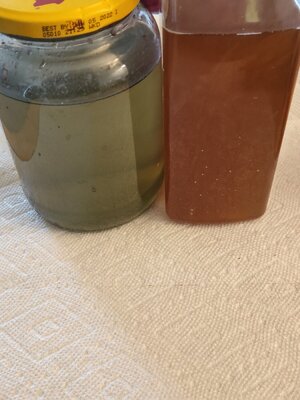
Below are the two solutions. Iron Acetate on the left and Tea on the right, if it's not obvious, or for anyone colorblind. ROTF
20220901_121650.jpg

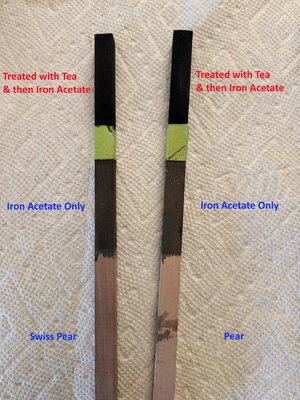
So for the test I took two 10mm X 10mm wood sticks, one Pear and the other Swiss Pear. I used painters tape to separate the treated areas. The photo explains the results.
20220901_121536.jpg


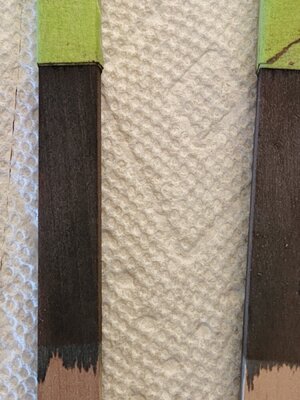
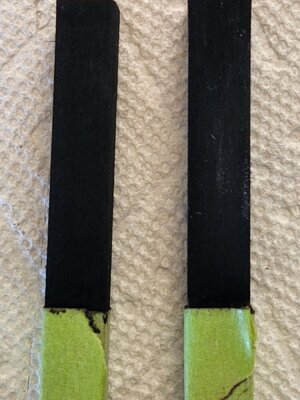
Very good results were realized. Also, even though the Swiss Pear seemed a little darker, it was negligible. Close ups below.20220901_121546.jpg20220901_121553.jpg

There are some unknowns still. One of them I need to discover is how deep does the treatment go into the wood. If I sand it, will it disappear? We will see. With that said, I think I would most likely complete the finish of the wood, i.e. cutting, forming, rough sanding prior to treatment, then seal it. Finishing ebonized wood is another test I need to perform. What will it look like with an oil or poly finish applied.

This is important to me as I will be using Black Hornbeam throughout the model and I would not like to have any significant appearance between the hornbeam and ebonized wood. If there is, I will not use this method.

The reason I performed this test was because I was looking at building trail board of the stem out of Black Hornbeam, but would have resulted in needless waste of expensive wood.

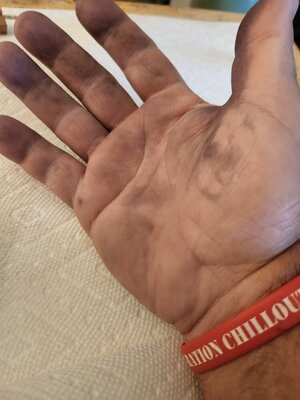
And while I used gloves when preparing the Iron Acetate, I did not wear them during the application process. This led to a little piece of trivia knowledge. It seems human hands contain tannins as well as wood. :rolleyes:

20220901_121846.jpg


Hopefully this provides some useful information for those why might want to use it. I will be performing many more tests as it is my nature to understand things. I will be sure to share any that might have some value.

Until next time...
Cheers, and wear your gloves!!!!
 
Last edited:
And while I used gloves when preparing the Iron Acetate, I did not wear them during the application process. This led to a little piece of trivia knowledge. It seems human hands contain tannins as well as wood. :rolleyes:
it is just a nice way to justify your fingerprints while in police (God forbid)...we understand, no worries. :p
 
Hey Guys,

So a significant milestone reached. I've finished the 3rd layer of planking, marked the bulkheads (master station frames) for the third time and took measurements and compared to the plan. I'm satisfied with the results. I've applied a finishing coat of fine filler and sanded it down.

20220710_122630.jpg20220710_122521.jpg20220710_122409.jpg20220710_122630.jpg20220710_122654.jpg20220710_122619.jpg20220710_122511.jpg

The answer is "Yes" to those of you with sharp eyes. The vertical height of the hull exceeds the plan at the rails, across all decks. I wanted to be sure I had a solid structure, and then cut back to plan after finished. I have not yet done that. I will check the measurements many times over the next few days before I make the cuts.

Before that, however, I will begin the next milestone step, removing the bulkheads above the first gun deck. This is the moment that will tell whether I planned well or was just dreaming this would work. ROTF To be honest, it's a little exciting and a little scary at the same time.

Then, if they all come out without issue, I will start to finish the inside of the hull. Staples left many splinters on the very first layer of planks. It looks like it was shot with a million musket balls. Sanding, sanding, sanding again. I'm tired of sanding. This is the opportunity for me to also measure the thickness of the hull at key locations to ensure the thickness of the hull equals that of the frames in the plan. Otherwise the internal measurements for all items will be off. Then a finish coat of filler on the inside of the hull will prepare it for planking of the quickwork, which will cover it.

Before any of that, a final diluted coat of tinted with white/gray acrylic to create a smooth finish for mark up.

That's all for now. Thanks for following along.
Till next time...

Cheers.
 
Hello Everyone,
So throughout this build I will be multitasking. While waiting for glue to dry or just when I need a break from what I'm doing, I'll "change gears" and do some testing, where I need to to understand my options for future tasks or the way to build certain ship elements or treat wood, etc.
I have finished the 3rd layer of shell planks and rough sanding. I've coated the hull with a diluted PVA solution and waiting for it to dry. In the meantime I wanted to share my findings on a test I just finished.

Test: Ebonizing Wood
A while back I was looking for an option to working with Ebony or purchasing Black Hornbeam as it was hard to find and expensive. Dave Stevens responded to my request with a post on ebonizing woods.


I watched many videos and read a few posts, but still needed to see for myself.

The wood I tested needed to be a wood that milled well. Also, because this process works the best with woods with a good tannin content, I did not test Boxwood or Castello Boxwood. I chose Pear and Swiss Pear.

Ebonizing Solutions

Iron Acetate

Iron Acetate is the actual ebonizing solution. Your can apply brush it onto wood and it will turn the wood darker. The depth of ebony color it imparts depend on the wood's tannin content. I'm not sure if you can purchase it commercially. I did not look. So I made mine. You can find the recipe on almost every video or article about ebonizing wood. I will share the way I made mine. It is quite easy.

Recipe​

I should have taken photos of the steps, but did not. I did not measure anything exactly. I do not think it matters, other than the general ratio
1.) Steel wool, the finest I could find(0000). Soak it in warm water with some dish soap to remove any oils, which will allow it to react more readily. I wore Nitrile gloves and rinsed under warm water until all the soap was washed away. Then put in the oven @ 200F until dry.
2.) I tore apart the steel wool to make it less dense. Then place the pieces into a glass jar until it filled it to the top. I did not press or force it in. Glass is used as it will not react or interfere with the chemical reaction.
3.) I poured Whit Vinegar into the glass jar until it covered all of the steel wool. Securely placed a lid on the jar and put it away for 5 days. Some recipes call for Apple Cider Vinegar as it has the highest acetic acid content of all the vinegars, although White Vinegar worked fine for me.
4.) After the 5 days, I strained the liquid through a coffee filter to remove all solids. Most of the steel wool was dissolved. What solids were left looked more like sludge than steel wool. What was left was a liquid that was a little cloudy.

Tea
While the Iron Acetate is the actual solution that ebonizing the wood, tea is a catalyst to make it more effective. This is because the tea contains tannins. By applying tea to the wood prior to applying the Iron Acetate, it creates a darker shade of Black. While I don't think I need to provide a recipe for tea :rolleyes:, it is important to note, the darker the tea, by type of tea is important as they contain a higher level of tannins. Also, the stronger the brew of that tea seems to make it even more effective.

Below are the two solutions. Iron Acetate on the left and Tea on the right, if it's not obvious, or for anyone colorblind. ROTF
View attachment 326352

So for the test I took two 10mm X 10mm wood sticks, one Pear and the other Swiss Pear. I used painters tape to separate the treated areas. The photo explains the results.
View attachment 326355


Very good results were realized. Also, even though the Swiss Pear seemed a little darker, it was negligible. Close ups below.View attachment 326358View attachment 326359

There are some unknowns still. One of them I need to discover is how deep does the treatment go into the wood. If I sand it, will it disappear? We will see. With that said, I think I would most likely complete the finish of the wood, i.e. cutting, forming, rough sanding prior to treatment, then seal it. Finishing ebonized wood is another test I need to perform. What will it look like with an oil or poly finish applied.

This is important to me as I will be using Black Hornbeam throughout the model and I would not like to have any significant appearance between the hornbeam and ebonized wood. If there is, I will not use this method.

The reason I performed this test was because I was looking at building trail board of the stem out of Black Hornbeam, but would have resulted in needless waste of expensive wood.

And while I used gloves when preparing the Iron Acetate, I did not wear them during the application process. This led to a little piece of trivia knowledge. It seems human hands contain tannins as well as wood. :rolleyes:

View attachment 326360


Hopefully this provides some useful information for those why might want to use it. I will be performing many more tests as it is my nature to understand things. I will be sure to share any that might have some value.

Until next time...
Cheers, and wear your gloves!!!!
Hi Ken. Thanks for sharing your experiment with ebonizing wood. I've bookmarked it for later reference. The addition of tea makes more difference than I would have expected.
 
Thanks Paul and everyone for the "likes'.
I do need to go slow now. Up until now there was no fear as there were few steps for mistakes and many opportunities for fixes. From this point the polarity of those two reverse. I am on plan as I wanted to get the shell completed and ready for creating the more interesting aspects of the build during the cooler ship building months of the North East. :)
 
Last edited:
Of course Herman. I'm very happy to share new discoveries. I've been the recipient of some many others doing the same. :)

After that test, I took the wood that was the darkest and did some further finishing, although I didn't take any photos. I gently sanded the raised grain with 320 grit paper, then wiped with a tack cloth, sealed with oil based sanding sealer and then gentle sand again with 320 and finally buffed with 0000 steel wool. The finish was very, very smooth and had a super looking satin sheen. Very happy with the test.

Cheers!
Good to hear that gently sanding is possible and finishing gives it a such a fine result. Later on I will make (amongst other parts) my lower wales dark and was contemplating to buy some ebony wood. But as ebony is really expensive, harder to work with and I have enough pear wood available I will try to ebonize it using your method. Thanks again.
 
Hello All,
A small update. Some good stuff and some not so good. Let's start with the good.

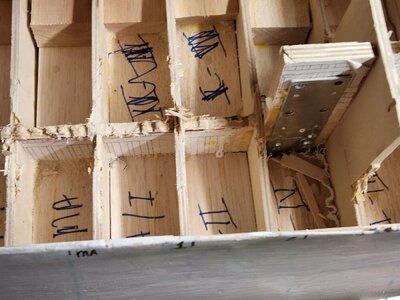
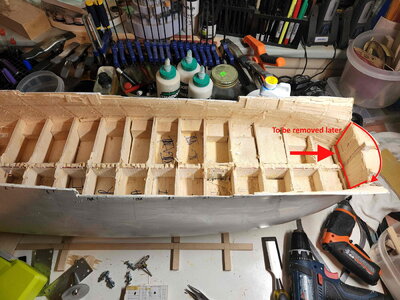
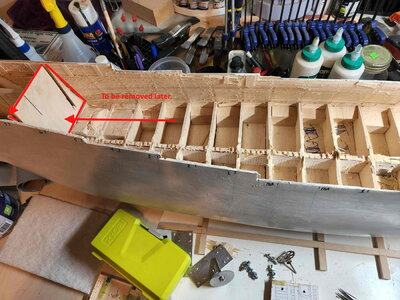
The bulkheads were removed with no issues. It seems the Vaseline worked well as a release agent, preventing the glued planks from sticking to them. The first image shows the upper reinforcement plate as I removed the screws so I could remove it and continue cutting away the center spine.

20220725_114407.jpg

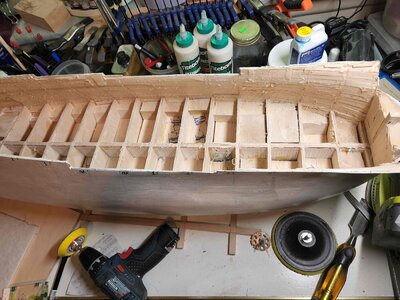
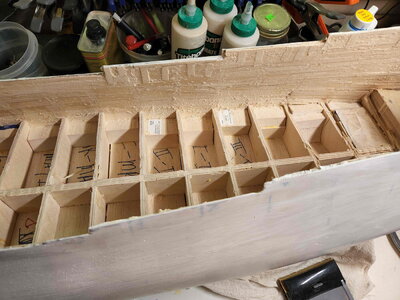
This 2 photos show the inner structure after the bulkheads were removed and prior to sanding. Note the bulkheads are relative smooth where they were pre-cut to ease removal, but the center spine is rough. I decided to leave the inner support structures for the bow and the stern in place for added support until I am ready to build those structures.

And finally, note the splintered inner hull walls, staple damage. Of no concern as this was anticipated.
20220725_115514.jpg20220725_115520.jpg

Next pics show a first sanding of the bulkheads and center spine in preparation of the deck beams, which on the first deck will have no deck clamps as they are not needed and won't be seen.
20220725_141615.jpg20220726_155617.jpg

Note: What I find incredible is the strength of the hull, although it is thin. This brings me to the bad. It is too thin! Which means the inner width of the ship is greater than it should be. I will not know exactly what the number is until I do a thorough examination. This will be a greater effort than I originally thought it would be.

It seems I did not allow enough tolerance for sanding along the way. Lesson learned. I will need to figure how I will build up the inner side, considering I will be fixing elements to it. It will depend on how much it is off from plan. TBD...

Next shows a light coat of filler after the sanding.
20220729_150411.jpg

And just a couple of shots as I start to measure and mark the hull.

20220730_140906.jpg20220730_140914.jpg

Thanks for following along.
Till next time...
 
Hi Ken

I would estimate you may be as much as 2mm too thin each side at lower deck level.Your best option is to line the inside with a layer of base planking but beware the shell should get thinner towards the top as it replicates frame thickness.I am doing the same on Soleil Royal simply because I decided later to detail the gun decks.

I followed Alexey Banarov's Cumberland build.This was built as shell over solid buck and planked in thin veneer.Somehow he built the shell to vary in thickness so the total thickness after veneer planking equalled that of the original at every position on the hull.Quite how he accomplished it is beyond me, but then again he sells his models.

Kind Regards

Nigel
 
Thank you Nigel. Your feedback is very much appreciated. I'm glad it is very much aligned with my own estimates. I will continue to measure and reveal my finding.

Cheers!
 
Ken, I am just basing that on my own guess of French ship of this period frame cross section of 7 - 7.5mm at the lower gun deck in this scale.I would not be surprised if this did not drop down to 4 - 4.5 at the top of the frame.Just a guess though as I don't have the Fleuron monograph.

Plenty of ways round this so nothing to worry about.

Kind Regards

Nigel
 
Looking very good. I am surprised how clean it ended up in the end. You've averted disaster during this process.
 
Hi Ken

I would estimate you may be as much as 2mm too thin each side at lower deck level.Your best option is to line the inside with a layer of base planking but beware the shell should get thinner towards the top as it replicates frame thickness.I am doing the same on Soleil Royal simply because I decided later to detail the gun decks.

I followed Alexey Banarov's Cumberland build.This was built as shell over solid buck and planked in thin veneer.Somehow he built the shell to vary in thickness so the total thickness after veneer planking equalled that of the original at every position on the hull.Quite how he accomplished it is beyond me, but then again he sells his models.

Kind Regards

Nigel
Baranov may use the same method as Dr Mike I'm not sure but if so the entire hull is made of frames with no space between them. It gives a very solid hull to then plank over.
 
Baranov may use the same method as Dr Mike I'm not sure but if so the entire hull is made of frames with no space between them. It gives a very solid hull to then plank over.

No, no bulkheads used at all.A three piece solid softwood former was used that was the internal shape of the "shell". Two sides and a central piece.Removal of the centre section allowed the two outers to be removed out of the hull.

The "shell" compromised of layers of Alder strip stapled to the solid form with Parcel tape used to prevent the strips from sticking to the form.

Alexey has now progressed to milling sections of hull from a solid billet of timber on a multi axis CNC mill and joining these sections to form the "Shell"
 
Back
Top