Le Fleuron 1729 - 64 Gun Ship PoB Scratch Build in 1:48 - (Ancre Monograph-J. Boudriot/G. Delacroix)

Wow, I am truly humbled by everyone's support. Thank you very much. SoS is so much more than a site of model ship builders. It is a forum of friends, (FoF)!!! It makes me feel safe in sharing some of my personal challenges. My Mom passed two months ago. My time, along with that of my brothers and sisters was taken up managing/resolving her estate.

Two weeks after that, my Dad, who is 89 was diagnosed with 3 aortic aneurisms. One of which is very large and the medical recommendation was to perform a stint procedure. Once again, 6 of his 8 kids met to visit him at his home to discuss the different aspects of it all. Literally, days after we all arrived back at our homes, his wife, 80 performed an in-home Cologuard test which came back positive for colon cancer.

I'm sharing this with everyone as your support makes me feel like I'm not alone. A large family really helps, but a family outside the family is equally comforting. Thank you again.

There is a high probability that I, along with some of my siblings will need to travel to SC again to help, when called. We all understand these things are all part of life's journey. I expect there will be more Le Fleuron "sputters" on the horizon.

All of these recent things made one thing very obvious to me. Building model ships is not just a problem solving exercise that keeps my mind sharp. But, more importantly, it is therapy for me, something that was never more clear than it is now.

Thank you again, EVERYONE. You guys are special!
Dear Ken
Our forum become a sort of one big family, that supports all members regardless of their age and situation.
We are glad that our words were able to help improve your feeling , we are here for you and not just for the hobby, be strong and brave our dear friend.
I wish you and your family a good and healthy time.
Regards Shota :)
 
Hi Ken,

Shipmodelling can wait in times when there are far more important things to do.
Looks like you have a lot of sibblings to share these difficult times with. Whishing you and your family the best in these hard times.
 
Hello Everyone,

First, thank you all for your well wishes, prayers and support for my family. Everyone is well now. I am back home in NJ again. My Dad went through successful surgery to place a stint into a 5cm aortic aneurism. He is home and taking it easy. Although his wife said he wanted to change the tire on his car with a floor jack. :rolleyes:o_O She did talk him out of that.

Anyway, it's been some time since I posted anything. My next step in my workflow was to plot element points on the hull using the plans and a digital height gauge, but it was not realistic to take it with me to South Carolina when I was staying with my Dad and his wife. I did work on some small things, keel, stem/beakhead and stern elements, but I will save sharing those until later.

Just a couple of photos of the port side of the hull and plotted elements. There are a couple of issues I need to work out on the starboard side so I'll share that once I've addressed them.

We all have our own way of working and I'm no exception to that. I have to be able to visualize things. I needed to translate, visuals from the hull plan, to a spreadsheet, and then plot them using the height gauge back onto the physical hull. I've seen some builders make a copy of the hull plan and tape it onto the hull, but taking a 2 dimensional image and putting onto a 3 dimensional hull to transfer elements makes me shiver with fright.

So....
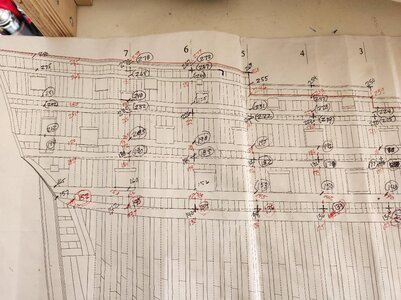
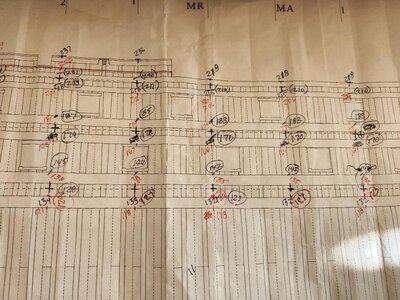
I measured each element where it intersected with the master frame (bulkhead), noted it on the plan. When done I hade blurred vision and the numbers looked like a bunch of ants running around on the paper.
thumbnail (6).jpgthumbnail (5).jpg

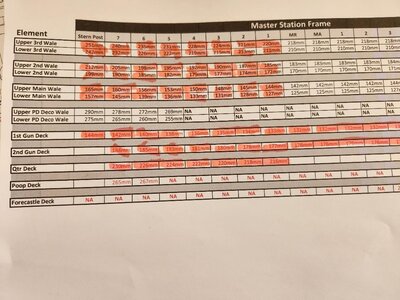
Organized into a spreadsheet, for my poor eyes.
thumbnail (4).jpg

As I transferred measurements to the hull, I made sure to highlight them as not to lose my place. ROTF;)

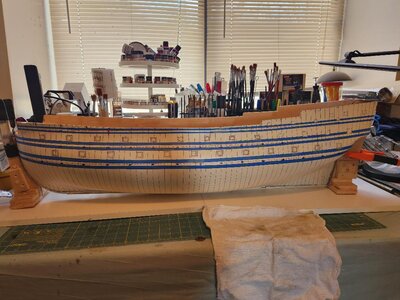
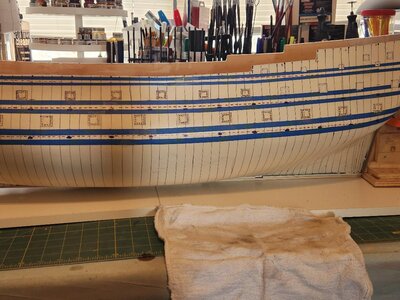
I decided to mark the wales using thin painter's tape. Decks indicated with a dashed red line. The deck line (for the main gun deck only) are plotted 3mm shy of the actual measurement to account for 3mm plywood that will make up the false deck. I decided on this as no elements below this deck will be visible and did not want to bury pretty pearwood deck beams under it. The blue marks below the deck lines are where I will place the supports. Ignore the blue markings on the upper decks as every beam will be constructed. Gun ports plotted, marked and predrilled.
thumbnail (2).jpgthumbnail.jpg

I know we have skilled modelers with skilled eyes. For you guys, disregard the space under the keep forward. The ship is not on the build board, which is perfectly flat. The table it is on has a high spot in the middle. I moved the ship for some quick photos, which I apologize for lack of quality. I will be looking to provide a more structured approach presenting updates, both from photo quality and organization standpoint. I just wanted to share something as it has been a while since I last did so.

Thanks for visiting. Till next time.
 
Many thanks for the update
Good to hear, that your Dad is better now and step by step the things get normal
Very good preparation works - I am looking forward to see the next saw-dust ....
 
Hi Ken. I am happy to hear that the operation was a success and that your dad's recovery is going well. I am equally happy to hear that you are back at the bench. I will be following along, as usual.
 
Hello All,

First, thank you guys for your continued support, taking an interest in my fun and all the "likes".

Just a brief update. I have been taking this phase very slowly. Gunports: measuring, remeasuring, vertically, horizontally, relationally. Once I cut the hull there is no turning back. I cut each port just inside the plan's line so I could check again. Slowly, I'm in no hurry. I'm only 66 yrs old. ROTF

As I progressed, I realized I had to address another issue. No big worries, but I need to come up with a workable solution.

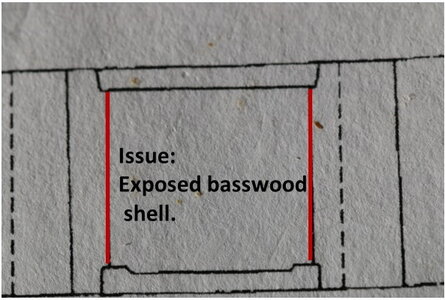
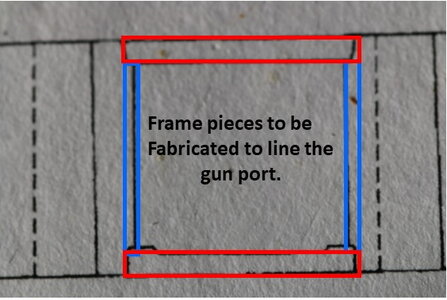
Normally the upper and lower gunport sills are cut into the frames, or is some cases into filling timbers when a frame is not adjacent. So normally the sides of the gunport would be nice hardwood would show. In my ship's case it is not pretty pear wood. It is 3 layer basswood laminate....ugly. Sick As I will not be painting any wood on this model, I will take some liberties by cutting 1-1.5mm on each side of each gunport and lining with a hardwood, yet to be determined.

Example:

Slide1.JPG

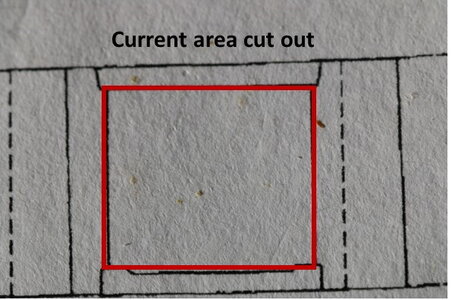
So far, I've made the cut shown below on each port.
Slide2.JPG

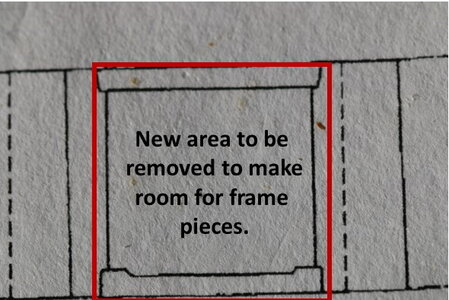
My next cut will be wider to accommodate the new gunport frames.
Slide3.JPG
Instead of the upper sill being cut into the frames, I will support them with the vertical lining pieces (Blue).
Slide4.JPG
As I work through different phases, I will be painting with wood. Not huge contrasts, but subtle.

The upper wales in the next few photos contains an optical illusion due to the shape of.

Please disregard the seemingly misaligned upper wale. It partially an area of tape that grew about 0.5mm along with the shape/bend of the upper hull which causes a bit of an optical illusion. Every element will be checked long again before anything is dry fitted, let alone glued. Also, I've been thinking on fixing temporary wales to provide the relative alignment for other work. If they get scuffed up during work on other things at least I won't be damaging my pretty black hornbeam.

Also, please be patient with my lack of photography skills. They are a work in progress. I will be working on lighting and field of view, etc.

IMG_0271[1].jpg

IMG_0273[1].jpgIMG_0274[1].jpg

Still need to cut the quarter gallery access doors. Should keep me busy until my new Byrnes thickness sander gets here. It will help me the dimensions of the gunport frames are uniform.

That's all for now. Thanks for dropping in.
Until next time....
 
Hello All,

First, thank you guys for your continued support, taking an interest in my fun and all the "likes".

Just a brief update. I have been taking this phase very slowly. Gunports: measuring, remeasuring, vertically, horizontally, relationally. Once I cut the hull there is no turning back. I cut each port just inside the plan's line so I could check again. Slowly, I'm in no hurry. I'm only 66 yrs old. ROTF

As I progressed, I realized I had to address another issue. No big worries, but I need to come up with a workable solution.

Normally the upper and lower gunport sills are cut into the frames, or is some cases into filling timbers when a frame is not adjacent. So normally the sides of the gunport would be nice hardwood would show. In my ship's case it is not pretty pear wood. It is 3 layer basswood laminate....ugly. Sick As I will not be painting any wood on this model, I will take some liberties by cutting 1-1.5mm on each side of each gunport and lining with a hardwood, yet to be determined.

Example:

View attachment 341860

So far, I've made the cut shown below on each port.
View attachment 341861

My next cut will be wider to accommodate the new gunport frames.
View attachment 341862
Instead of the upper sill being cut into the frames, I will support them with the vertical lining pieces (Blue).
View attachment 341863
As I work through different phases, I will be painting with wood. Not huge contrasts, but subtle.

The upper wales in the next few photos contains an optical illusion due to the shape of.

Please disregard the seemingly misaligned upper wale. It partially an area of tape that grew about 0.5mm along with the shape/bend of the upper hull which causes a bit of an optical illusion. Every element will be checked long again before anything is dry fitted, let alone glued. Also, I've been thinking on fixing temporary wales to provide the relative alignment for other work. If they get scuffed up during work on other things at least I won't be damaging my pretty black hornbeam.

Also, please be patient with my lack of photography skills. They are a work in progress. I will be working on lighting and field of view, etc.

View attachment 341864

View attachment 341866View attachment 341867

Still need to cut the quarter gallery access doors. Should keep me busy until my new Byrnes thickness sander gets here. It will help me the dimensions of the gunport frames are uniform.

That's all for now. Thanks for dropping in.
Until next time....
Very meticulous, Ken!
 
Hi Ken,
I am trying to play catchup - all I can say is wow - you have a lot of talent to be able to do this (modification) to the hull as you did - way above my ability.
 
Hi Ken!

I was a little skeptical at first about the uncoventional construction of your model! However, that has changed fundamentally. The Fleuron has developed into a very good model in terms of measurment and unconventional processing techniques. It is not always necessary to use the classic construction pattern of the "old masters".

Best regards
Thomas
 
Very meticulous, Ken!
Vic, you are very generous with the term. :) And I thank you. I tend to a little, shall we say, untidy with things that are not critical, but try and focus on the things that are. Thanks for visiting.

Hi Ken,
I am trying to play catchup - all I can say is wow - you have a lot of talent to be able to do this (modification) to the hull as you did - way above my ability.
Hi Donnie, you really do humble me, sir. It was YOU who helped me so much with my 2nd build. Your Santisima Trinidad build was instrumental in helping me in every way. When I wasn't sure, directionally, what task was next, I just looked to see how you addressed the same and it helped me EVERY time. I have not counted, but my ST folder is full of downloaded photos of your build log.

So I will say now, thank you for all your help with my ST build. :DThumbsup
Hi Ken!

I was a little skeptical at first about the uncoventional construction of your model! However, that has changed fundamentally. The Fleuron has developed into a very good model in terms of measurment and unconventional processing techniques. It is not always necessary to use the classic construction pattern of the "old masters".

Best regards
Thomas
Hi Thomas. Thank you for your support and kind words. My decision to choose the unconventional build process was almost entirely due to the fact I knew I was not ready, skill-wise, time-wise and patience-wise to build a full set of frames. From a purely logical standpoint I was confident I could take this on, with only the slightest trepidation. :rolleyes:ROTF

I thought, well this is only wood. It's not like I'm cutting an expensive diamond and if I slipped, OMG! I can sand it, cut away mistakes and rebuild it right and if all else fails, I can throw it in the fireplace and keep myself warm for a short period! ROTF

Thank yo Thomas for following my build and your support.

I hope to have some updates soon

Cheers guys!
 
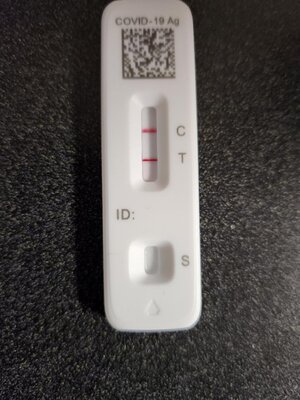
Hello everyone. First, I'm not soliciting sympathy. Just letting you know I will most likely not be working on my ship for a couple of weeks. Woke up and felt like I was coming down with a cold, but for some reason I felt compelled to take a drive to CVS and get a test kit.thumbnail (6).jpg
Looks like I have to the bug. Just mild flu symptoms, but all I want to do is sleep. COVID doesn't stand a chance with me. I'm too ornery~~:cool:

Hope to be back in circulation soon.

Cheers!
 
Back
Top