Wow Tobias, just catching up on your build. Beautiful work. 
-

Win a Free Custom Engraved Brass Coin!!!
As a way to introduce our brass coins to the community, we will raffle off a free coin during the month of August. Follow link ABOVE for instructions for entering.
-

PRE-ORDER SHIPS IN SCALE TODAY!
The beloved Ships in Scale Magazine is back and charting a new course for 2026!
Discover new skills, new techniques, and new inspirations in every issue.
NOTE THAT OUR FIRST ISSUE WILL BE JAN/FEB 2026
You are using an out of date browser. It may not display this or other websites correctly.
You should upgrade or use an alternative browser.
You should upgrade or use an alternative browser.
LE ROCHEFORT - Harbour yacht from 1787 1:36 by Tobias (Monograph by ANCRE)
- Thread starter Tobias
- Start date
- Watchers 71
-
- Tags
- ancre group build le rochefort
- Joined
- Dec 9, 2019
- Messages
- 964
- Points
- 403

Witaj
Pięknie położona deska wewnątrz co jest bardzo trudne, kołkowanie super , kawał pięknej pracy Tobiaszu . Pozdrawiam Mirek
Hello
A beautifully laid board inside, which is very difficult, the pegging is great, great work by Tobiasz. Regards, Mirek
Pięknie położona deska wewnątrz co jest bardzo trudne, kołkowanie super , kawał pięknej pracy Tobiaszu . Pozdrawiam Mirek
Hello
A beautifully laid board inside, which is very difficult, the pegging is great, great work by Tobiasz. Regards, Mirek
Last edited by a moderator:
Good morning Tobias. I echo all the other compliments- so good. Cheers GrantGood evening colleagues,
thanks again to everyone for your holiday wishes. We returned safe and sound and on Saturday I got lost in my workshop, tidied up a bit and got my hands on Le Rochefort.
View attachment 396571
View attachment 396572
The first 800 or 900 tree nails have found their place in the interior and now I'm waiting for my new tool, a long-necked angle drill, to drill the holes in the upper section (about 400 more holes). The mast bearing has been installed and now I have arrived at the cross beams for the floor for the cargo. Since only the starboard side is planked, I decided to use single planks on the port side to create a support surface for the cross beams.
View attachment 396573
View attachment 396574
Thank you for your interest and there will be a new update soon.
@GrantTyler @Mirek @Bryian @Peter Voogt @pianoforte @Steef66
Thank you for your comments and to everyone else, thank you for your interest and likes.
Hi Paul @dockattner , in answer to your question, here is a picture of La Palme.
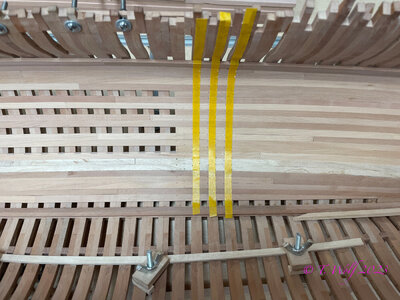
I use masking tape in the case of Le Rochefort, the nails are about 7mm apart and I used a 6mm tape which I tape to the centre of the frame and then drill right at the edge of the tape.
@shota70 to your question about the long-neck angle drill, here is a picture of the Proxxon WB 220E.

I already had difficulties drilling the upper planks with La Palme because you can no longer drill perpendicular to the plank, but it was still possible. With Le Rochefort I don't have a chance anymore so I had to get the new drill. It should arrive today or tomorrow, then I can show pictures of the model again.
Thank you for your comments and to everyone else, thank you for your interest and likes.
Hi Paul @dockattner , in answer to your question, here is a picture of La Palme.

I use masking tape in the case of Le Rochefort, the nails are about 7mm apart and I used a 6mm tape which I tape to the centre of the frame and then drill right at the edge of the tape.
@shota70 to your question about the long-neck angle drill, here is a picture of the Proxxon WB 220E.

I already had difficulties drilling the upper planks with La Palme because you can no longer drill perpendicular to the plank, but it was still possible. With Le Rochefort I don't have a chance anymore so I had to get the new drill. It should arrive today or tomorrow, then I can show pictures of the model again.
I'm sorry to bother you again - but are the holes filled? Or are they left as open holes? The photo of the completed job looks like they are filled??? With what?
I'm sorry to bother you again - but are the holes filled? Or are they left as open holes? The photo of the completed job looks like they are filled??? With what?
Paul everything no problem.
Yes, the holes are imitated with tree nails. I use a thin wooden strip of approx. 1x1 millimetre that I point at the disc sander and put it into the hole without glue. Then I pinch it off and when I have made about 5 ribs I sand them with sandpaper. It is important with this method that you always sand in one direction only, otherwise you run the risk that half of the small pins fall out. The finish is with 240 grit and stainless steel wool 000. A later sealing with varnish or oil fixes everything again.
Since I still have a few holes, I can gladly make a pictorial instruction.
Thank you, Tobias!Paul everything no problem.
Yes, the holes are imitated with tree nails. I use a thin wooden strip of approx. 1x1 millimetre that I point at the disc sander and put it into the hole without glue. Then I pinch it off and when I have made about 5 ribs I sand them with sandpaper. It is important with this method that you always sand in one direction only, otherwise you run the risk that half of the small pins fall out. The finish is with 240 grit and stainless steel wool 000. A later sealing with varnish or oil fixes everything again.
Since I still have a few holes, I can gladly make a pictorial instruction.
Have a good evening everyone,
well Paul @dockattner asked today how I do my tree nails. Here I would like to show you my method. As already mentioned, I use 1x1 millimetre fine wooden sticks and sharpen them on the disc sander.
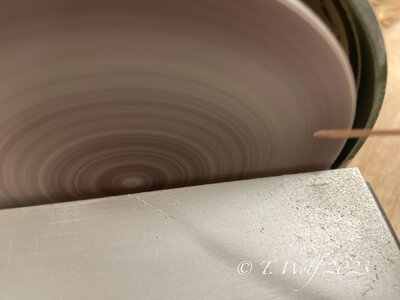
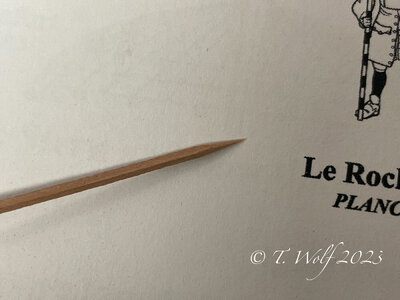
Then, with light pressure, I turn the wooden nail into the hole and pinch it off.
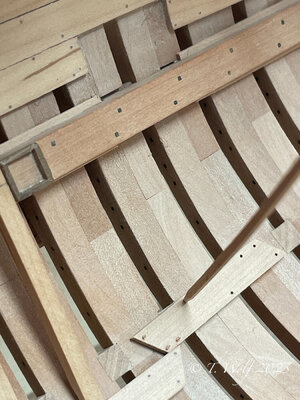
In the next step I sand in one direction with 120, 180 and 240 until the nail darkens. The finish is done with stainless steel wool 000.
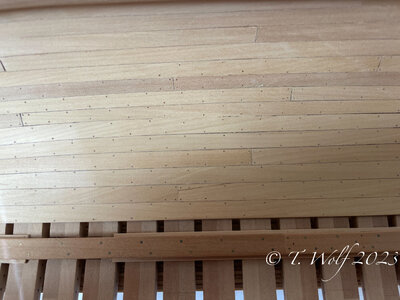
well Paul @dockattner asked today how I do my tree nails. Here I would like to show you my method. As already mentioned, I use 1x1 millimetre fine wooden sticks and sharpen them on the disc sander.


Then, with light pressure, I turn the wooden nail into the hole and pinch it off.

In the next step I sand in one direction with 120, 180 and 240 until the nail darkens. The finish is done with stainless steel wool 000.

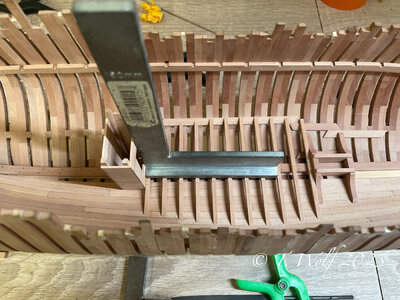
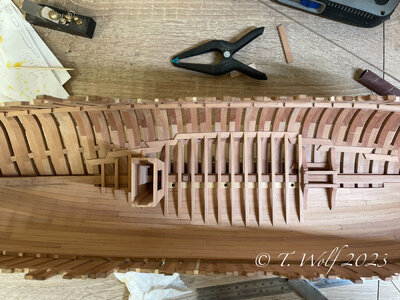
Today I fitted most of the crossbeams for the hold floor, adding a pair of planks on the port side to provide a bearing surface. This is not absolutely necessary as the beams also rest on the keelson.
A matter of taste, I would say .
.
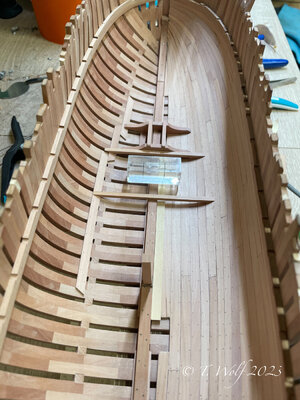
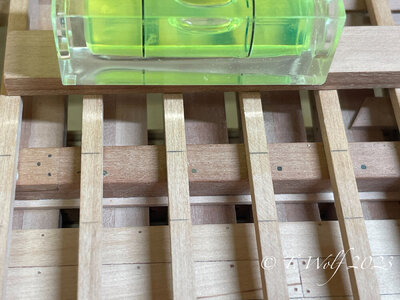
The challenge is to ensure that all the beams are the same height to provide a straight surface for the boards to rest on. Under the beam are the limber boards, to be able to take them out I have milled holes (2,5mm) that would be at 1:36 -> 9cm to be able to reach in with the hand. For reasons of space, the ring eyelets I had in mind are not possible.
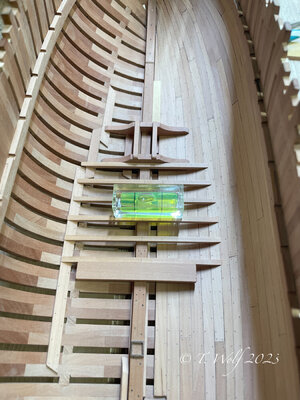
Thanks for looking in, see you soon.
A matter of taste, I would say


The challenge is to ensure that all the beams are the same height to provide a straight surface for the boards to rest on. Under the beam are the limber boards, to be able to take them out I have milled holes (2,5mm) that would be at 1:36 -> 9cm to be able to reach in with the hand. For reasons of space, the ring eyelets I had in mind are not possible.


Thanks for looking in, see you soon.
This is just excellent work in all regards Tobias! My respect!
- Joined
- Oct 23, 2018
- Messages
- 886
- Points
- 403

Really nice progress, Tobias. The result is looking excellent.
Very good result - on my next project, I will try this treenailing method - slightly more work, but in my opinion with a better (more regular) result
Beautiful precise work Tobias

Beautiful work Tobias, I agree with all the previous comments and posts. Your planking and treenailing is superb. I’ll have to remember your method of using tape for lining up the treenails. Also the method you use, thanks for showing us.
Fantastic work! I am getting ready for some treenailing and decided to give your method a whirl on some scrap. Amazing result and so easy! A handheld drill, disk sander, flush cutter, a little sanding, and it looks fantastic. I tried birch vs. bamboo toothpicks, birch was noticeably better. They came out slightly darker than bamboo with some Danish oil and just looked cleaner. Thanks for sharing this cool, simple technique; I put my draw plate away.
Good morning Tobias. Immaculate. I concur with all the other commentsToday I fitted most of the crossbeams for the hold floor, adding a pair of planks on the port side to provide a bearing surface. This is not absolutely necessary as the beams also rest on the keelson.
A matter of taste, I would say.
View attachment 396828
View attachment 396829
The challenge is to ensure that all the beams are the same height to provide a straight surface for the boards to rest on. Under the beam are the limber boards, to be able to take them out I have milled holes (2,5mm) that would be at 1:36 -> 9cm to be able to reach in with the hand. For reasons of space, the ring eyelets I had in mind are not possible.
View attachment 396830
View attachment 396831
View attachment 396832
Thanks for looking in, see you soon.
 . Cheers Grant
“Nice&Precise” as usual, Tobias. A lust for the eyes.Today I fitted most of the crossbeams for the hold floor, adding a pair of planks on the port side to provide a bearing surface. This is not absolutely necessary as the beams also rest on the keelson.
A matter of taste, I would say.
View attachment 396828
View attachment 396829
The challenge is to ensure that all the beams are the same height to provide a straight surface for the boards to rest on. Under the beam are the limber boards, to be able to take them out I have milled holes (2,5mm) that would be at 1:36 -> 9cm to be able to reach in with the hand. For reasons of space, the ring eyelets I had in mind are not possible.
View attachment 396830
View attachment 396831
View attachment 396832
Thanks for looking in, see you soon.
Regards, Peter


