Mantua Sergal's Le Soleil Royal

Gary,
that is a HUGE accomplishment so far !!!! this is going to be a very beautiful ship indeed !!! Very impressive hull I must say. Wow - all those figures of diameters -- I am afraid that I did not put that much emphasis into mine, but all I can say is that your abilities are paying off.

Donnie
 
Last edited by a moderator:
Thanks a lot Donnie. There will be some more sizes when I list the running rigging which I have also calculated. I tried to put it in table form but the program removes any tabs or extra spaces. This makes the list look very confusing, impressive and long.
 
Hi Gary

Your ship is looking fantastic now, very nice work.
when rigged i bet she is going to shine like a pearl.
Børge
 
Thanks Borge. I think it almost a gem already.
I am glad I have been collecting rigging line for years and bought some Cuttyhulk when they were still making it. Most of the rigging diameters I can come within 0.01 mm. This is the first one that I thought would be worthy of calculating the sizes. Thus, it will be interesting to see how much of a difference it will make
 
I have rigged the lower foremast. I thing using the proper sizes of rope make the ship seem more realistic looking. At the time when this ship was constructed, the futtock staves were rope. The futtock shroud would come down and rap around this and the lower shroud and get seized twice to the shroud below the stave. The distance the stave was mounted below the platform is equal to the distance from the top of the platform to the bottom mast cap. Crows feet came into use around 1660. The euphroe was attached to the stay with a simple tackle. Only the main and foremast had these on this vessel.The stay is held in place on the bowsprit like the gammons

.
 

Attachments

  • Le Soleil Royal 50.jpg
    Le Soleil Royal 50.jpg
    296.2 KB · Views: 32
  • Le Soleil Royal 51.jpg
    Le Soleil Royal 51.jpg
    203.9 KB · Views: 30
  • Le Soleil Royal 52.jpg
    Le Soleil Royal 52.jpg
    265.5 KB · Views: 30
Last edited:
VERY nice Gary. It is neat and clean rigging. You did what I should have done. I see that you left off the upper mast so that you can wrap your shrouds. I did not do this. Good work !

Donnie
 
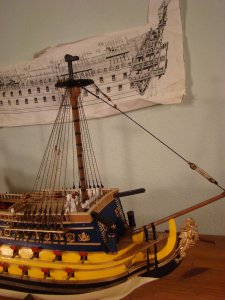
Thanks Donnie. There are two more levels of mast and flag poles that go above the current ones. I build each layer separately as I go up. Thus, all lower mast standing rigging is done first. Next, all topmast are done before the topgallant. This helps prevent accidents and gives a freer work area. I do inset the next bare mast into the cap to check that it will still run free after each pendant and shroud has been wrapped around the mast being rigged.
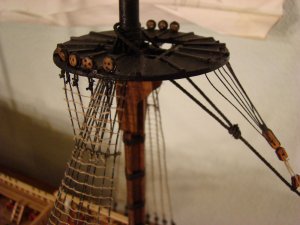
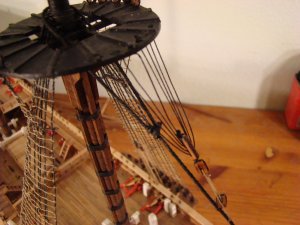
The close shot of the crows feet show you how Titebond transparent glue works on the rigging. To get an idea of the real size of everything in this picture, the actual mast platform is 72 mm across. Some of the shiny rigging is where super glue was used. Titebond transparent is a little tricky in that I apply it and then use my hands to press it in place an take of the excess. After that, it should not be touched until it is dry. If manipulated during the drying stage it turns white and stays this color.
 
Last edited:
When I started to do the main mast, I realized that I forgot to mention that the pendants use a double block on the top and a triple block block below on the front fore mast pendant and a sister block and double block on the back pendant. The order is reversed on the main mast. The blocks are 5 mm on the fore and 6 mm on the main mast. Note: the part that does not run trough any blocks was tarred like all the standing rigging and only allowed the running part to swing when in use. Thus, it is rigged with the standing rigging. The garnet follows the same pattern even though it is usually one of the last lines to be set up. The sister and double block has a 5 part advantage and the double and triple block is 6 part.

View attachment 27418
 
Just a note: I have seen where the rope that ties deadeyes together is not black. Running rigging is anything that has to pass over sheaves. Deadeyes do not have these and their lines do not run but are only tightened or loosened when necessary. Thus, they are tarred and black in color.
 
Gary,
I need to keep you in mind as my Tutor when I progress into my running rigging to the belaying pins !!!
 
Donnie: Be glad to help in anyway. The most important thing to know is the date the ship was constructed or refitted if representing the updated version. Thank goodness we have mentors that spent hours doing research and analysis and published books of their findings. It truly is amazing all the changes that were made and the variance between different countries. No other hobby has such a long history or greater variety than this one.
 
Thanks a lot Popeye. I am working on the main mast and the use of the right size rigging is noticeable. Once it is cased, not sure if it will still be that noticeable but will be different enough that each level will still caught the eye as the lines get thinner.
 
Thanks Popeye. Glad you enjoyed it. It was really easier than I thought and almost got spoiled working in a 1:12 scale. It only took 700 hours to do and has almost 5,000 shingles on it. The doll house industry does have some nice items that work when nothing else would.
 
Sorry to here that you were sick. It is that season and the one going around here has killed some folks. Glad you are up and about. Below is the picture Mantua sends to show how the completed unmodified ship would look.
 

Attachments

  • Le Soleil Royal 54.jpg
    Le Soleil Royal 54.jpg
    406.2 KB · Views: 25
Last edited:
I do not know what happened. It said it did not exist anymore. So I deleted the reference and then reloaded. It should now be OK. This is the poster that is sent with the kit to guide you in the build.
 
Glad you can see it now.
I am working on the main mast and I can see the difference in using the right size rigging. There is a lot of knots needed to tie the ratlines. I guess you can say that I am going through a time in my live . If your read my article on serving, you know I will not be seizing the ends of the ratlines. I might think about it when I do the San Felipe since it is 1:50, but we will see.
 
I know that I mentioned using Titebond transparent glue somewhere in these logs. It works on items that you do not have to move after it is applied. If you have to move anything to adjust it, you have only a few seconds or the adjustment will cause the glue to turn white or leave a film. I did not notice this on small rope, but on doing my ratlines, it may take a while to get them adjusted correctly. Because of the thick shrouds, it became apparent that a film can happen easily and is not the glue to use on rope work.
 
Gary,

What's time when you're havin' fun ... Impressive kit 'Le soleil royale'. I'm glad my first is slightly smaller

It seems to me you are managing quite well. I like the colour scheme, very lively

Cheers,
Carl
 
Thanks Carl. I like a challenge and kit bashing the product has surely given me that. Of course, all of us here like a challenge or we would have chosen an easier hobby. The real fun is overcoming these and being able to sit back and say "I did it" and get that great feeling of accomplishment that is indescribable. Model railroading come close, but you never seem to be finished with the product.
 
Back
Top