
-

SUBSCRIBE TO SHIPS IN SCALE TODAY!
The beloved Ships in Scale Magazine is back and charting a new course for 2026!
Discover new skills, new techniques, and new inspirations in every issue.
NOTE THAT OUR NEXT ISSUE WILL BE MARCH/APRIL 2026 -

Win a Free Custom Engraved Brass Coin!!!
As a way to introduce our brass coins to the community, we will raffle off a free coin during the month of August. Follow link ABOVE for instructions for entering.
You are using an out of date browser. It may not display this or other websites correctly.
You should upgrade or use an alternative browser.
You should upgrade or use an alternative browser.
Marisstella Cog 1:48
- Thread starter Bluebeard
- Start date
- Watchers 15
-
- Tags
- cog marisstella


I have another inquiry.
Is there a section in this forum where you could sell unwanted models from our collections .
Go to FORUMS in the menu and you will discover how many are
Sell, Give away: Kits, Tools, Books, and Other
Sell or give away (your stuff, kits, tools, books)
shipsofscale.com
Cheers
Daniel
Go to FORUMS in the menu and you will discover how many are
Sell, Give away: Kits, Tools, Books, and Other
Sell or give away (your stuff, kits, tools, books)shipsofscale.com
Cheers
Daniel
Thanks, I will take a look at it.
Good morning guys.
Here is my version of how to make the horse doors.
Zoran advised me to cut the opening after planking the outside.
Maybe I’m hard header but I thought that my way would be different and easier for me.
Maybe you guys with so manny models build under your belt could tell me if did right or wrong.
Here is my version of how to make the horse doors.
Zoran advised me to cut the opening after planking the outside.
Maybe I’m hard header but I thought that my way would be different and easier for me.
Maybe you guys with so manny models build under your belt could tell me if did right or wrong.
Last edited:
I attached two small pieces of 1.5 thick to the sides of the bulkhead 11 and 12, just to make the opening flushed with the thickness of the upper crossbeam.
So in other words...the top of the door should be flushed with the bottom of the upper deck.
After making a copy of the actual blueprints door, I glue it to the place to be cut and cut just above of the actual bottom opening.
So in other words...the top of the door should be flushed with the bottom of the upper deck.
After making a copy of the actual blueprints door, I glue it to the place to be cut and cut just above of the actual bottom opening.
Last edited:

Next thing I did was to add the bottom piece.
You will have four pieces for each side.
Once word of advise here is to make a copy of the blueprints of all of this parts and lay them on top because this parts have only one way to apply since they are laser cut to match the contour of the hull.
So you have to make sure you are using the correct curved part for the starboard and port.
But before adding the threshold I glue one piece 1/8 x 1/8” to the bottom so I could have enough surface to glue the threshold.
 This is the threshold.
As you can see, I used as a guide, a piece of planking to get as close to it, but I stuck it out just a hair and when all pieces were glued in place, I did the faring together with the bulkheads.
Attachments

Last edited:


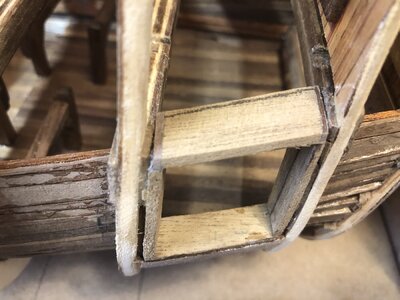
Make sure that the highest side of the door points to the stern.
Here you can also see that I added a piece of 4 x 4mm to the bottom just to have a gluing base for when I plank the hull.
This is just like making a gun port.
(This is my first trying) I have never build a ship that needed gun ports.
That proves “I’m a rookie”


This picture shows that I had to add two small pieces to the top sides because the original wasn’t wide enough to seat side or side between the bulkheads.
Here you can also see that I added a piece of 4 x 4mm to the bottom just to have a gluing base for when I plank the hull.
This is just like making a gun port.
(This is my first trying) I have never build a ship that needed gun ports.
That proves “I’m a rookie”
This picture shows that I had to add two small pieces to the top sides because the original wasn’t wide enough to seat side or side between the bulkheads.
Attachments

Last edited:
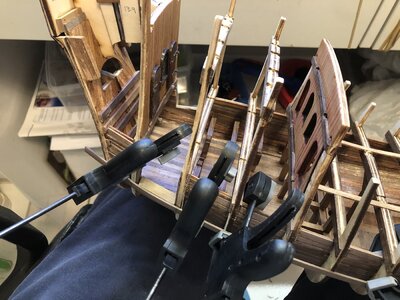
I’m about to finish the horses ramp so later on I will post this process.
Thanks to all the guys that pointed out where to get the loose material I’m planning to place in the Bay Area on from if the horses.
Here you could see my first time trying the ramp but still needs working since it seats sideways.
Thanks to all the guys that pointed out where to get the loose material I’m planning to place in the Bay Area on from if the horses.
Here you could see my first time trying the ramp but still needs working since it seats sideways.
Last edited:

A very nice project. Love the detailing in this kit.
Thank You Maarten.A very nice project. Love the detailing in this kit.
I finally solved the horses door issue.
I will let the pictures tell the story.


The ramp base is made out two 1.5 x 5mm glue together. You will need 6 pieces, three per ramp.
The separation in between them is also 5mm.
The instructions does not mention a word about how to create the ramp and if you try to match the blueprints, you’ll find out that there is no material included in the kit that matches the material that goes on top of the ramp.
So, I used from my own stock 1.5 x 3mm mahogany. And also used the thin side (1.5) to create the separation between each step.
I will let the pictures tell the story.
The ramp base is made out two 1.5 x 5mm glue together. You will need 6 pieces, three per ramp.
The separation in between them is also 5mm.
The instructions does not mention a word about how to create the ramp and if you try to match the blueprints, you’ll find out that there is no material included in the kit that matches the material that goes on top of the ramp.
So, I used from my own stock 1.5 x 3mm mahogany. And also used the thin side (1.5) to create the separation between each step.


Now,...pull out your long tweezers because you will need them.
Also I removed the strips that was holding together 9-12 bulkheads because that’s the only way to have enough clear space to place the ramp.
I finished the ramps and the entire interior
with three coats of satin clear lacquer.


Also I removed the strips that was holding together 9-12 bulkheads because that’s the only way to have enough clear space to place the ramp.
I finished the ramps and the entire interior
with three coats of satin clear lacquer.


This is from back in the days when I used to compete with plastic ships.
This is THE GOLDEN HIND 1/70 scale, also from my favorite model company “Imai”.
It took first place on an International IPMS show in Orlando 20 years ago under “Sailing Ships”.
Great Scale Magazine was at the show and I was lucky to have my model exposed in their magazine.


This is THE GOLDEN HIND 1/70 scale, also from my favorite model company “Imai”.
It took first place on an International IPMS show in Orlando 20 years ago under “Sailing Ships”.
Great Scale Magazine was at the show and I was lucky to have my model exposed in their magazine.