-

Win a Free Custom Engraved Brass Coin!!!
As a way to introduce our brass coins to the community, we will raffle off a free coin during the month of August. Follow link ABOVE for instructions for entering.
-

PRE-ORDER SHIPS IN SCALE TODAY!
The beloved Ships in Scale Magazine is back and charting a new course for 2026!
Discover new skills, new techniques, and new inspirations in every issue.
NOTE THAT OUR FIRST ISSUE WILL BE JAN/FEB 2026
You are using an out of date browser. It may not display this or other websites correctly.
You should upgrade or use an alternative browser.
You should upgrade or use an alternative browser.
MarisStella Ragusian Carrack by Signet [COMPLETED BUILD]
Thanks for those kind words, Ken. Like Columbus, I know where I want my journey to take me, but it has been fraught with detours and I probably won't end up quite where I expected. But hope the result will be good nonetheless.A very well thought through and well executed build with a good interesting log. Thanks for taking us on your journey. Ken
I think the railing turned out very nice!
I love the spindles and rails! They look great! Magic Mike
Signet I admire your ambitious project. I briefly considered this model but opted for the Blandford instead. I have a POB of the Constitution and Confideracy in progress. I too admire Olha’s skills!I purchased this kit some time ago, but did not start until recently. The impetus and inspiration for getting this particular model was (surprise) Olha Batchvarov's wonderful topic and series of videos, posted here on ShipsOfScale.com. I didn't even care for this type of ship before drooling over her posts, photos and videos; I thought they were "cartoony" and didn't really look that way. But I grew to love the look as I admired her presentation.
So why am I posting a thread about building this model? I have none of Olya's skills or experience. The ship has also been well-covered here by Jack Aubrey, and in that other ship forum by GreatGalleons. Certainly I can't compete with those builds. This will be, after all, my first full ship model build in over 60 years (the last being a solid hull Xebec from Popular Mechanics Magazine), and my first, last and only planked hull over bulkhead model. Well, to be honest, I'm hoping to gain more from you great modelers who I hope will follow my build, with suggestions, comments and criticisms. Plus, I have a nasty habit of trying new things, many of which don't work out, and it might be fun to watch me dig myself out of the holes I dig along the line.
With that introduction, I'm sure you're all anxious to follow my build. I hope you will, and hope you will comment freely, as well as help answer the many questions already forming in my mind.
For any of you unfamiliar with this kit, I'll just post a pic of what I hope to accomplish over the next months and, probably, years:
View attachment 359544
It's been a while since I've posted, mostly because I've been planning my rigging, so as to order new blocks and ropes. In addition to spreadsheets, from which I calculated the proper size of ropes and blocks, I've made made drawings (with the help of HiSModel - below) marking each block and rope size and location, and since there are more than was indicated in the kit, figured out belaying and connection locations. One spreadsheet I've made I entered measured lengths of each size of rope, added extra for the ends and scrap, etc., prior to ordering ropes. This gives you an idea of the preparations for this:
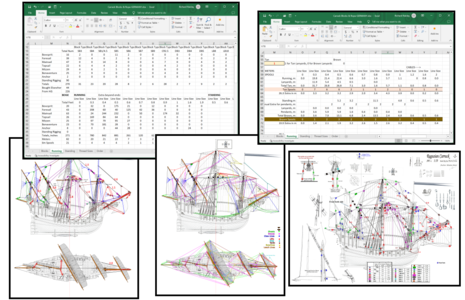
Yeah, I know. I'm a retired engineer, and I LOVE me my spreadsheets and drawings! My wife tells the story that many years ago she asked me a question she felt would result in a Yes or No answer; two days later I answered her by showing her a graph. Engineers! Ugh!
Anyhow, during all of this process, Radimir Beseda of HiSModel Historic Ship Models in the Czech Republic worked with me, and for me, to provide rigging diagrams and block lists for this specific model, even though he had not done it before for this model. He did research as well to provide the best answers. And speaking of answers, he answered promptly and cheerfully my numerous questions (I've been emailing and working with him since June!). He now has on his web site a complete kit of the required blocks to build this model (241 blocks in 20 different sizes/types, including some spares, although I did make some changes from the original), with separate kits available for the gun tackle blocks (one kit with all single blocks as shown on the plans, another with double and single blocks in the more standard way). I highly recommend this to anyone building this model.
I ordered the blocks from him on September 18, they were sent out to me on the 19th and I received them this past Tuesday, only 7 days after they were sent! Their CNC blocks are of walnut and are excellent quality, the ones I got made in the traditional Continental style that suited this model (including triangular deadeyes), are priced as low or lower than most, can be ordered individually (no ordering 10 when you need only 2), and he only charged $8.23 to send the package to the U.S.A., insured and tracked, less than most U.S. suppliers charge!
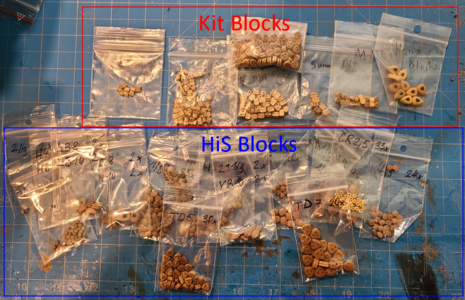
The photo below shows the blocks included with the MarisStella kit (NOT impressed) and the ones from HiS:
Sorry I sound like an advertisement, but I'm very happy with the help, information, quality, price and service on these blocks.
I'll continue shortly with the limited progress I've made on the model itself. I wanted to get the rigging planning out of the way, as I expected it to be a month or so to have the parts delivered, although of course that did not take long at all.

Yeah, I know. I'm a retired engineer, and I LOVE me my spreadsheets and drawings! My wife tells the story that many years ago she asked me a question she felt would result in a Yes or No answer; two days later I answered her by showing her a graph. Engineers! Ugh!
Anyhow, during all of this process, Radimir Beseda of HiSModel Historic Ship Models in the Czech Republic worked with me, and for me, to provide rigging diagrams and block lists for this specific model, even though he had not done it before for this model. He did research as well to provide the best answers. And speaking of answers, he answered promptly and cheerfully my numerous questions (I've been emailing and working with him since June!). He now has on his web site a complete kit of the required blocks to build this model (241 blocks in 20 different sizes/types, including some spares, although I did make some changes from the original), with separate kits available for the gun tackle blocks (one kit with all single blocks as shown on the plans, another with double and single blocks in the more standard way). I highly recommend this to anyone building this model.
I ordered the blocks from him on September 18, they were sent out to me on the 19th and I received them this past Tuesday, only 7 days after they were sent! Their CNC blocks are of walnut and are excellent quality, the ones I got made in the traditional Continental style that suited this model (including triangular deadeyes), are priced as low or lower than most, can be ordered individually (no ordering 10 when you need only 2), and he only charged $8.23 to send the package to the U.S.A., insured and tracked, less than most U.S. suppliers charge!
The photo below shows the blocks included with the MarisStella kit (NOT impressed) and the ones from HiS:

Sorry I sound like an advertisement, but I'm very happy with the help, information, quality, price and service on these blocks.
I'll continue shortly with the limited progress I've made on the model itself. I wanted to get the rigging planning out of the way, as I expected it to be a month or so to have the parts delivered, although of course that did not take long at all.
Last edited:
I’ve also done business with them on a couple of occasions. I was very satisfied.It's been a while since I've posted, mostly because I've been planning my rigging, so as to order new blocks and ropes. In addition to spreadsheets, from which I calculated the proper size of ropes and blocks, I've made made drawings (with the help of HiSModel - below) marking each block and rope size and location, and since there are more than was indicated in the kit, figured out belaying and connection locations. One spreadsheet I've made I entered measured lengths of each size of rope, added extra for the ends and scrap, etc., prior to ordering ropes. This gives you an idea of the preparations for this:
View attachment 397435
Yeah, I know. I'm a retired engineer, and I LOVE me my spreadsheets and drawings! My wife tells the story that many years ago she asked me a question she felt would result in a Yes or No answer; two days later I answered her by showing her a graph. Engineers! Ugh!
Anyhow, during all of this process, Radimir Beseda of HiSModel Historic Ship Models in the Czech Republic worked with me, and for me, to provide rigging diagrams and block lists for this specific model, even though he had not done it before for this model. He did research as well to provide the best answers. And speaking of answers, he answered promptly and cheerfully my numerous questions (I've been emailing and working with him since June!). He now has on his web site a complete kit of the required blocks to build this model (241 blocks in 20 different sizes/types, including some spares, although I did make some changes from the original), with separate kits available for the gun tackle blocks (one kit with all single blocks as shown on the plans, another with double and single blocks in the more standard way). I highly recommend this to anyone building this model.
I ordered the blocks from him on September 18, they were sent out to me on the 19th and I received them this past Tuesday, only 7 days after they were sent! Their CNC blocks are of walnut and are excellent quality, the ones I got made in the traditional Continental style that suited this model (including triangular deadeyes), are priced as low or lower than most, can be ordered individually (no ordering 10 when you need only 2), and he only charged $8.23 to send the package to the U.S.A., insured and tracked, less than most U.S. suppliers charge!
The photo below shows the blocks included with the MarisStella kit (NOT impressed) and the ones from HiS:
View attachment 397440
Sorry I sound like an advertisement, but I'm very happy with the help, information, quality, price and service on these blocks.
I'll continue shortly with the limited progress I've made on the model itself. I wanted to get the rigging planning out of the way, as I expected it to be a month or so to have the parts delivered, although of course that did not take long at all.
Continuing with the railing, I noticed that one side of the model was not the same as the other:
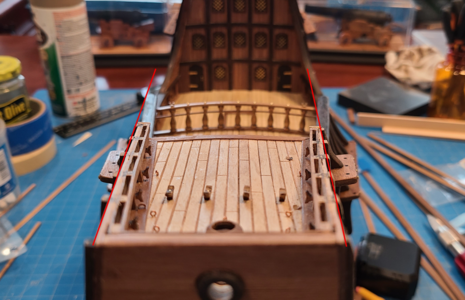
The red lines highlight the difference: the right side rail is not at all in line with the poop deck. (I told you my thread would not be about perfection, but oftentimes working with a complete lack of perfection, or even quality.)
The left side rail top can be made to fit without a problem:
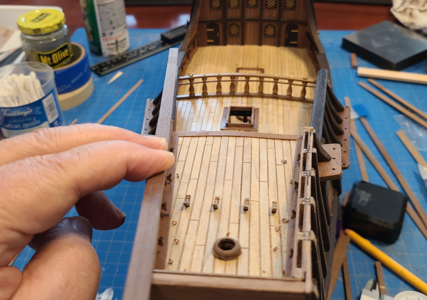
The right side, however, is the problem:
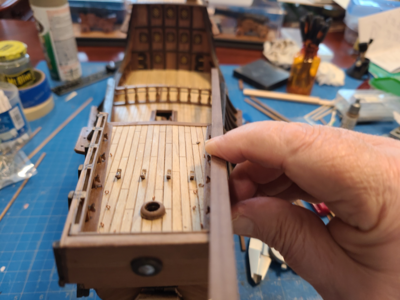
So, I took a wider piece of walnut, and shaped it to better fit the top rail:
I took two pieces of scrap and cut them to fit the topsides of the quarterdeck, then drilled holes in them where my vertical rail supports would go. I've had bad luck keeping such small parts in place, and therefore pin them top and bottom.
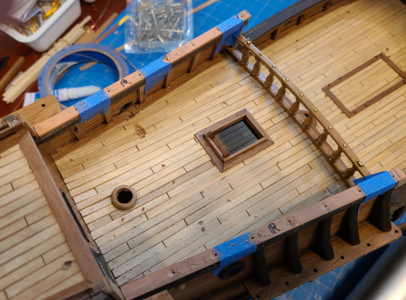
I then placed these strips atop my cut rails, and drilled matching holes:
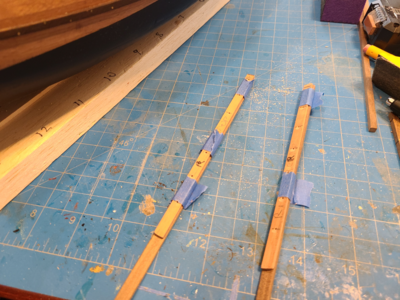
The vertical rail sections had to have holes centered in both ends, so I made a simple jig to get them right:
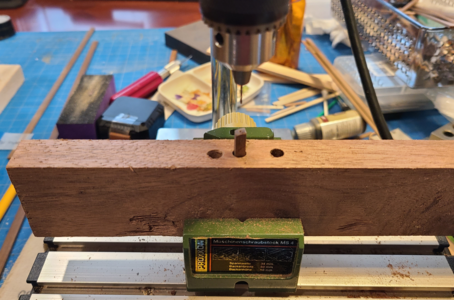
The vertical portions, with glued steel wire in the bottoms inserted into the drilled holes, are glued in place
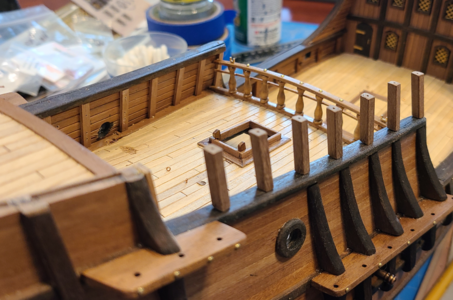
and before the glue dries and hardens, I placed the matching rails in place, gluing the top rail in place:
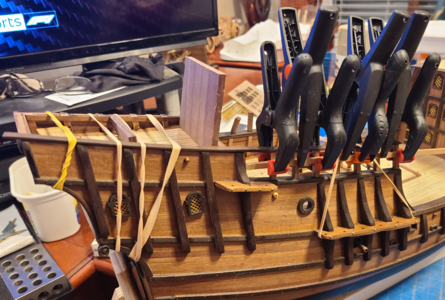
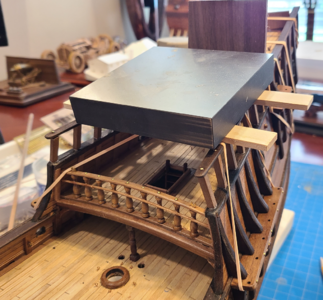
Afterwards, I removed the temporary pins at the top of each spindle and inserted small brass nails, which I think look good on this model (not accurate, just good - this is a display model, after all) and hold it securely in place.
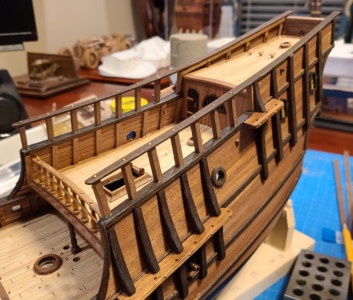
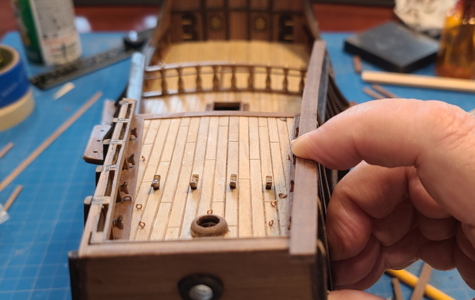
The crooked right side rail is noticeable at this angle, but not so much from normal viewing angles:
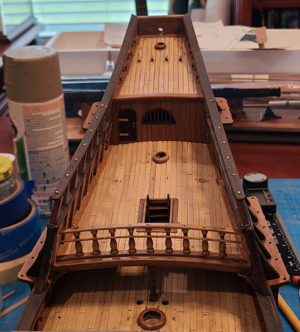
A similar method is used on the Forecastle. After adding horizontal strips to the rails, the rail system is basically done:
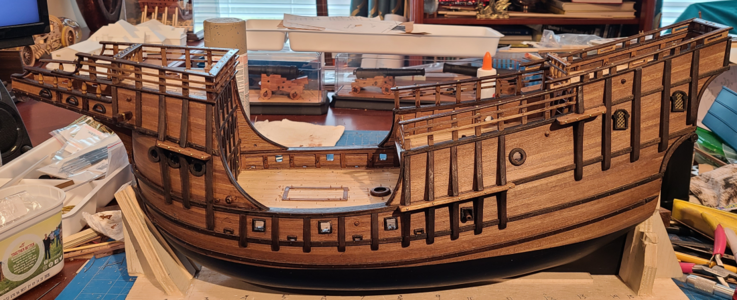
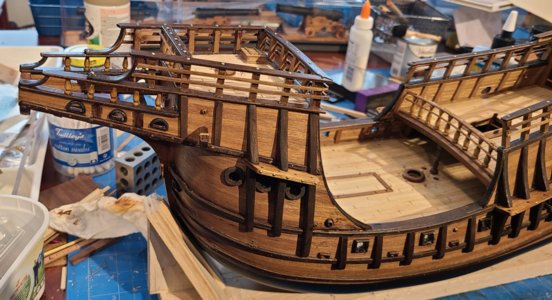
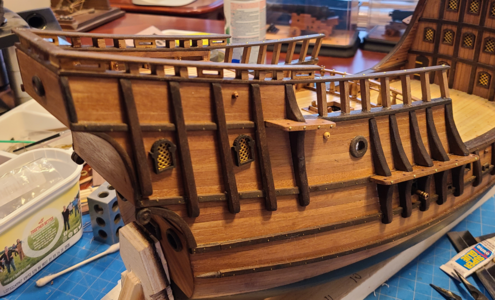
I used thicker pieces than the plans show under the poop deck rail to make the assembly stronger. In most cases, I think they look okay.
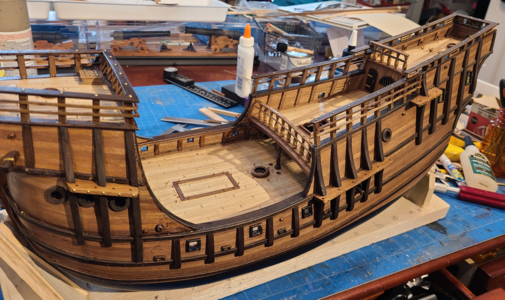
I've been avoiding the main deck guns, but looks like they may be next. We'll see.

The red lines highlight the difference: the right side rail is not at all in line with the poop deck. (I told you my thread would not be about perfection, but oftentimes working with a complete lack of perfection, or even quality.)
The left side rail top can be made to fit without a problem:

The right side, however, is the problem:

So, I took a wider piece of walnut, and shaped it to better fit the top rail:

I took two pieces of scrap and cut them to fit the topsides of the quarterdeck, then drilled holes in them where my vertical rail supports would go. I've had bad luck keeping such small parts in place, and therefore pin them top and bottom.

I then placed these strips atop my cut rails, and drilled matching holes:

The vertical rail sections had to have holes centered in both ends, so I made a simple jig to get them right:

The vertical portions, with glued steel wire in the bottoms inserted into the drilled holes, are glued in place

and before the glue dries and hardens, I placed the matching rails in place, gluing the top rail in place:


Afterwards, I removed the temporary pins at the top of each spindle and inserted small brass nails, which I think look good on this model (not accurate, just good - this is a display model, after all) and hold it securely in place.

The crooked right side rail is noticeable at this angle, but not so much from normal viewing angles:

A similar method is used on the Forecastle. After adding horizontal strips to the rails, the rail system is basically done:


I used thicker pieces than the plans show under the poop deck rail to make the assembly stronger. In most cases, I think they look okay.

I've been avoiding the main deck guns, but looks like they may be next. We'll see.
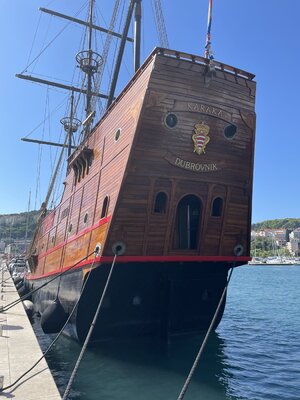
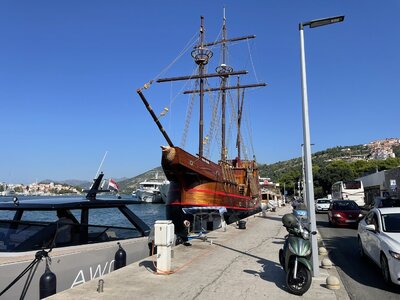
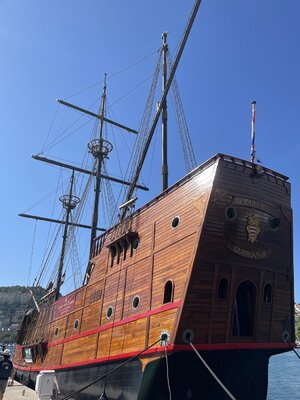
Thanks for posting those. I'd seen faraway pics of this ship, but not anything this good. Although I have to say, to me, the ship does not look very authentic. Perhaps building a more accurate Carrack would be much harder and more expensive? I know I prefer the looks of the carrack I am building.Hello Signet, sorry I completely forgot. Actually, I wanted to visit Maris Stella, but I couldn't make it. But I saw the Karaka Dubrovnik in Dubrovnik harbour and thought of you, so I'm sending you the following pictures.
View attachment 397922
Yes - this ship has nothing to do with a sailing ship - steel hull and on top some pseudo masts - these masts had never seen any sail and will never see someThanks for posting those. I'd seen faraway pics of this ship, but not anything this good. Although I have to say, to me, the ship does not look very authentic. Perhaps building a more accurate Carrack would be much harder and more expensive? I know I prefer the looks of the carrack I am building.
Done some time ago now, I installed the 4 pieces of grating at the bow:
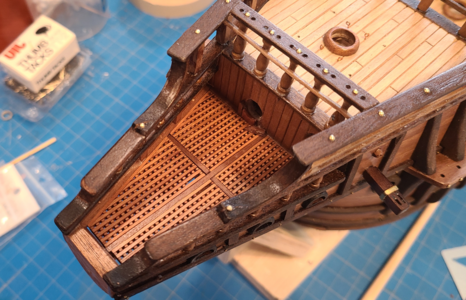
The two slots are for the bowsprit gammoning. It is mounted off-center on this ship, to clear the foremast, and angles in so that the tip is at the center of the ship. Hopefully, the holes for gammoning will line up well enough with the bowsprit.
From underneath:
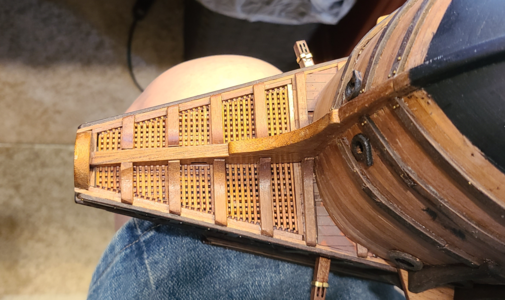
I'm afraid this shot shows a lot of my poor workmanship, but it is what it is. I've got to pick my battles.

The two slots are for the bowsprit gammoning. It is mounted off-center on this ship, to clear the foremast, and angles in so that the tip is at the center of the ship. Hopefully, the holes for gammoning will line up well enough with the bowsprit.
From underneath:

I'm afraid this shot shows a lot of my poor workmanship, but it is what it is. I've got to pick my battles.
I've found that the 0.7mm holes drilled to accept the ring bolts for gun breechings and tackles are almost impossible for me to hit with the ring bolts to install. And of course, much larger holes are too loose. So I got some tapered diamond reamers, and drilled some tapered holes:
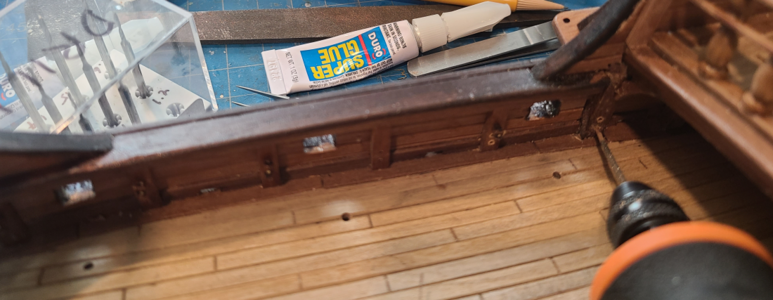
Notice above I've drilled holes for nails that will protrude through the bottom of the gun carriages, to help keep them in place.
These allow me to hit the holes, and due to the taper, with an ample amount of CA, they hold well enough, and the larger hole can't be seen. So my new favorite tool is:
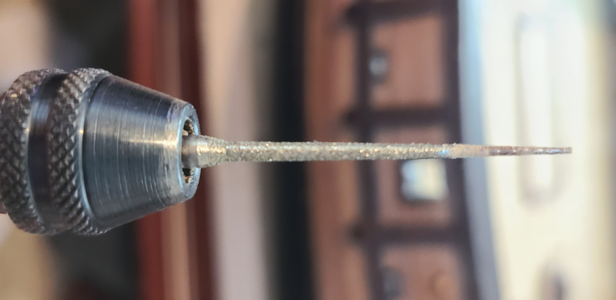
These have a tip of under 0.5mm and work well for this purpose. I also bought one of the Arrowmax pen-drills, which works great with this tapered tool and can fit in much smaller spaces.
I had installed two guns previously, which are mounted under the quarterdeck, and now make up six more (one was too shy to photograph) for the remaining guns on the main deck:
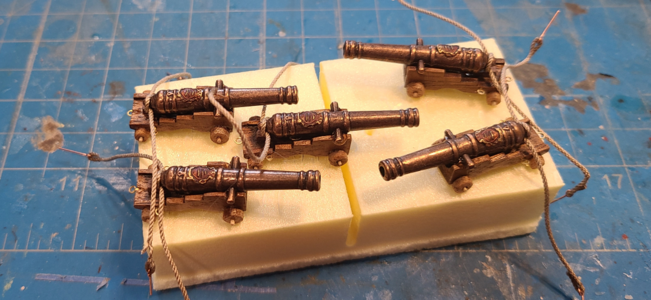
The barrels were originally bronze, I think, and I like this color. Much like other objects on this build, this is a decoration, and while I like historic authenticity, I like certain looks better than others.
I tried using the photo-etched brass carriage hardware for these guns, but they are so tiny that all I could do was break most of the parts. Between 80 year old eyes and 80 year old hands, I figure I have 320 years of those appendages, and they did not fail to disappoint. I can't understand it, but parts that are dropped several times to the floor, bounce, roll or just plain disappear, and when they are found, are always covered with cat fur. I really have to finish that brass magnet I've been working on. I did use the pins, eyes and hooks from the kits, though.
The main deck guns are now mounted in place, waiting for connection of the breeching ropes and, later, the tackles:
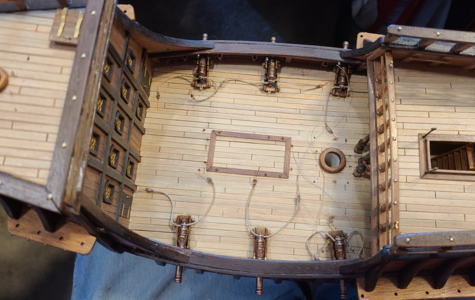
After failing with the brass capsquare pieces, I used a thin brass pen to paint them on. My eyes can't tell the difference from normal distances, although admittedly photographs tell all. I've had to really resist "fuzzing" the photos to better simulate what I see close-up.
Even though I'm continuing on the same day, I'll end this post and start another.

Notice above I've drilled holes for nails that will protrude through the bottom of the gun carriages, to help keep them in place.
These allow me to hit the holes, and due to the taper, with an ample amount of CA, they hold well enough, and the larger hole can't be seen. So my new favorite tool is:

These have a tip of under 0.5mm and work well for this purpose. I also bought one of the Arrowmax pen-drills, which works great with this tapered tool and can fit in much smaller spaces.
I had installed two guns previously, which are mounted under the quarterdeck, and now make up six more (one was too shy to photograph) for the remaining guns on the main deck:

The barrels were originally bronze, I think, and I like this color. Much like other objects on this build, this is a decoration, and while I like historic authenticity, I like certain looks better than others.
I tried using the photo-etched brass carriage hardware for these guns, but they are so tiny that all I could do was break most of the parts. Between 80 year old eyes and 80 year old hands, I figure I have 320 years of those appendages, and they did not fail to disappoint. I can't understand it, but parts that are dropped several times to the floor, bounce, roll or just plain disappear, and when they are found, are always covered with cat fur. I really have to finish that brass magnet I've been working on. I did use the pins, eyes and hooks from the kits, though.
The main deck guns are now mounted in place, waiting for connection of the breeching ropes and, later, the tackles:

After failing with the brass capsquare pieces, I used a thin brass pen to paint them on. My eyes can't tell the difference from normal distances, although admittedly photographs tell all. I've had to really resist "fuzzing" the photos to better simulate what I see close-up.
Even though I'm continuing on the same day, I'll end this post and start another.
I posted previously that I didn't care for the 2 smaller guns included for the quarterdeck. While the manufacturer assures me they're accurate, they just don't look like it, to me:
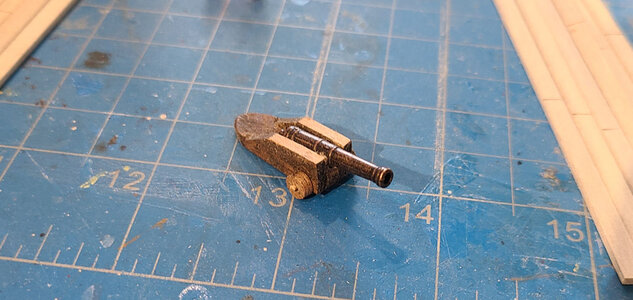
Above, I had lowered the brackets some, and eliminated the trunnion, trying to make it look like I thought it possibly should (there's a goal for you). Later, I removed the trucks and thinned down the sides, but still wasn't happy.
I found a 3D STL file that I liked, and thought looked like what I though a smaller gun on this ship might look like:
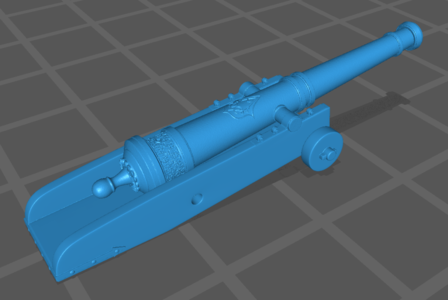
I had my son make some 3D prints of them, and thought they looked good, but 1) preferred wood for the carriage, and 2) it was difficult to paint the carriage and barrel neatly. So I had him make some separate barrels, and thought I'd create the carriages in wood.
I first made a crude U-shape for the carriage:
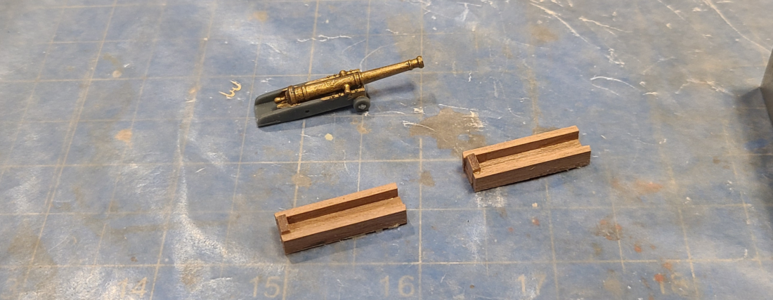
To drill half-holes for the trunnion, square but without messing up the wood, I inserted a piece of scrap:
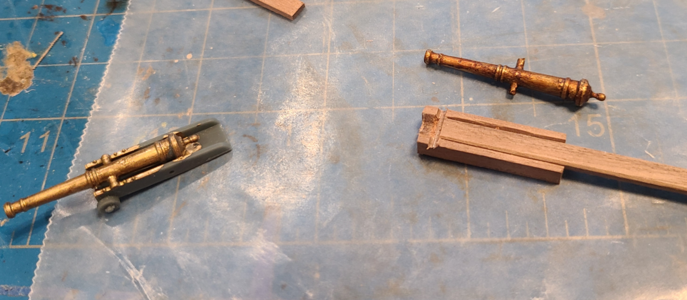
then mounted in in a small drill press to accurate drill holes for the axtrees and trunnion:
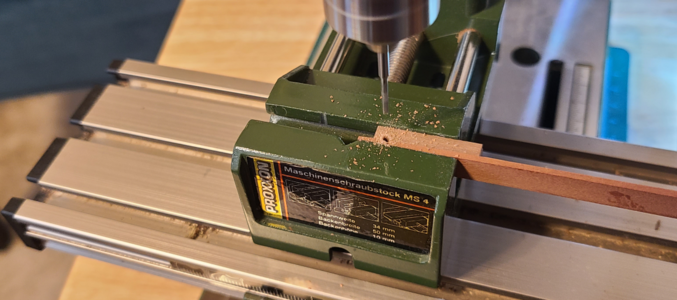
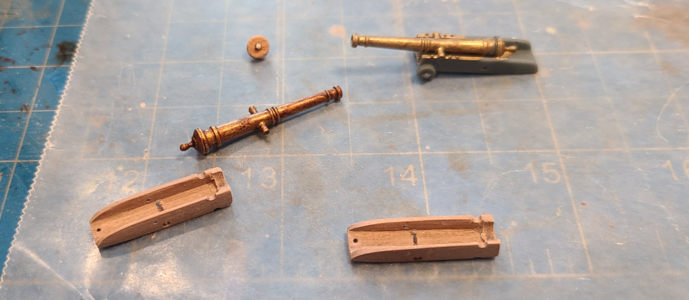
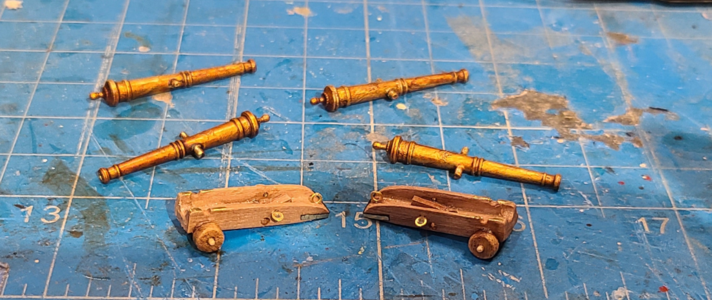
The result:
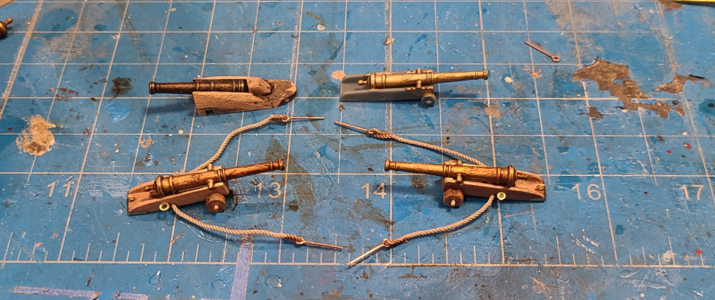
Upper left is a (very) poorly modified carriage from the kit, upper right is the all-3D model, and the two lower guns are my resulting wood carriage with 3D barrels. I think they worked out okay, at least to these eyes.
Again, I mounted the carriages with bolts for extra strength, but left the barrels off until everything else was done:
I got 2mm and 1.59mm ball bearings to simulate 15# and 7# cannonballs, and used a torch to "rust" or discolor the stainless steel. (Stainless steel is not really stainless, you know.) Whether it was the heat, variations in my method, or whatever, they didn't come out to be a consistent color:
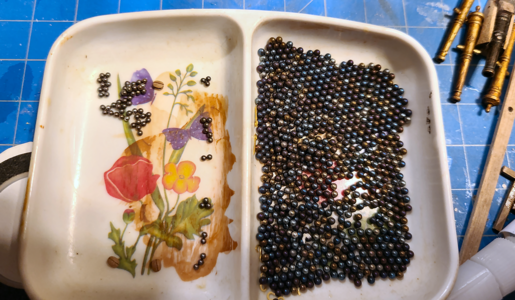
but there were enough of a decent color for me to use. I had mixed the two sizes together when heating them, figuring I could easily pick out the smaller ones later, but of course these eyes left me down again. Surprisingly, and VERY luckily, I found the smaller balls were attracted to a magnet, while the larger ones were not! Not surprising, because 400 series stainless is magnetic, while 300 is not, but surprising because I would have expected to be the same material.
Being lazy as I am, I made the square holder for the ball pyramids in the manner below:
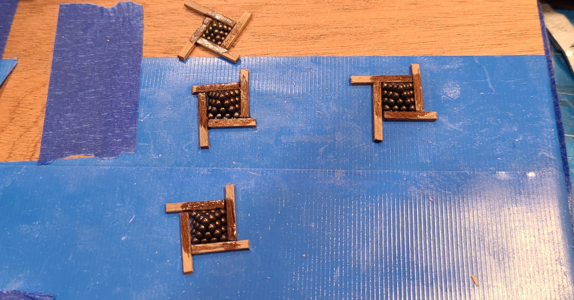
In this way, I could keep the sides fairly tight with the balls, and later trim them flush. Plus this is stronger than trying to do angle cuts. , maybe not stronger, just easier.
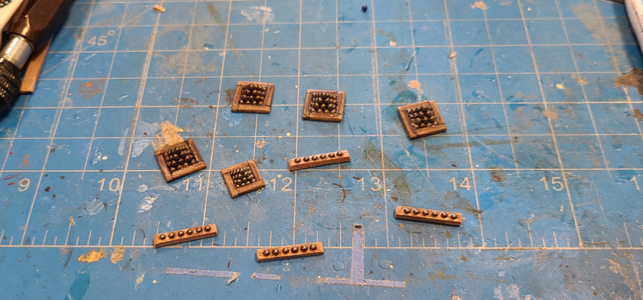
I accidentally made one pyramid with the small balls first, so decided to use it, even though it's not on the plans, which show only wood strips with the smaller balls in place. Using the drill press with holes spaced every 2.5mm using the calibrated holder allowed me to get them spaced well.
In the process of mounting the gun tackles:
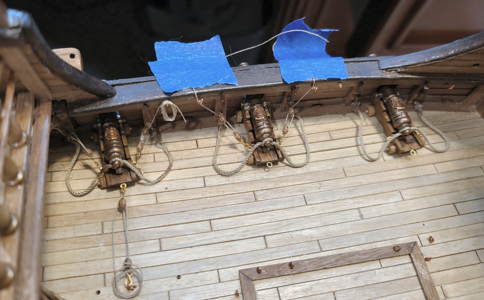
The captain of the ship HATES ropes neatly coiled and laid on the deck. He claims they are trippers, tend to waterlog the ropes, and take too much time away from the sailors that have more important work to do. So he had the ship's carpenter and blacksmith create hooks on either side of the guns to hang the rope coils from. Not that neat, but it suits his purposes.
  Since Olha's husband has determined that we know pretty much nothing about these ships, I'm not going to argue with the captain.
Naturally, I cheated when doing the gun tackles, ending them at the hooks, and making separate hanging coils using a foam block (from Stanley Steemer furniture riser blocks) and pins, and a semi-natural hanging position:
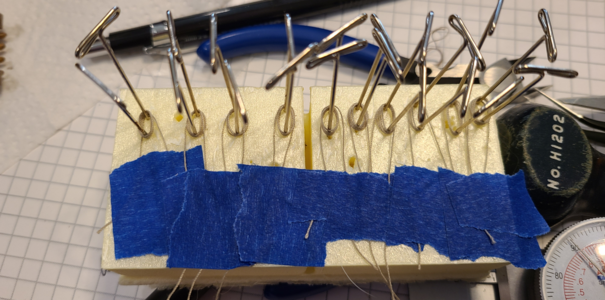
The result may not be great (or perfect), but it works for me (and the captain):
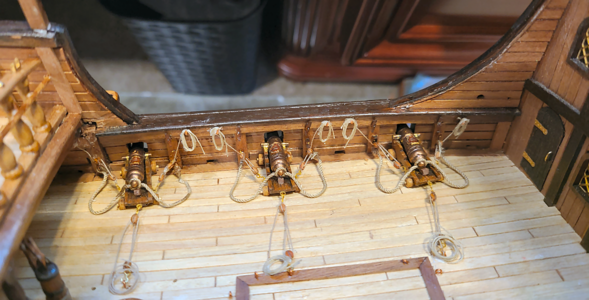
Yes, I know the rope coils at the rear of the gun carriages are lying on the deck, but there was no reasonable place to put hooks, and the sailors try to lay them on the tackles and hooks to help keep them dry and out of the way.
I added a few 3D barrels in various positions (posted previously), emulating a ship recently at sea with excessive supplies:
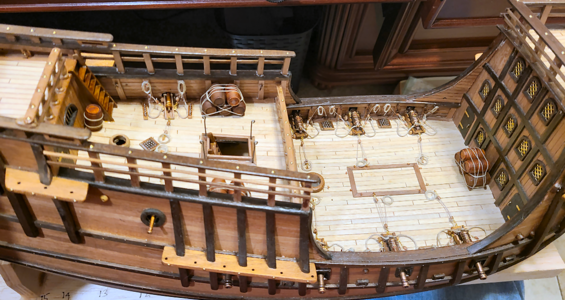
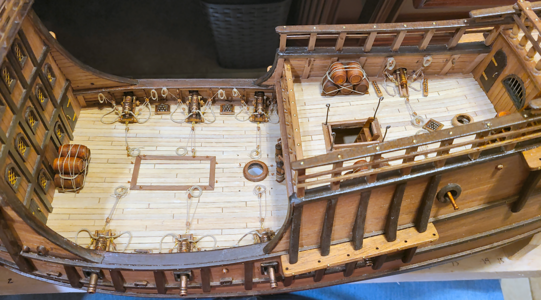
Cannonballs are now in place as well. I'm surprised I went though 6 yards of 0.3mm rope, almost 50 blocks and numerous hooks and eyes for just those tackles. Of course, half of them are still under my desk covered in cat fur. I can't take a chance on vacuuming down there; who knows what treasures would be gobbled up!
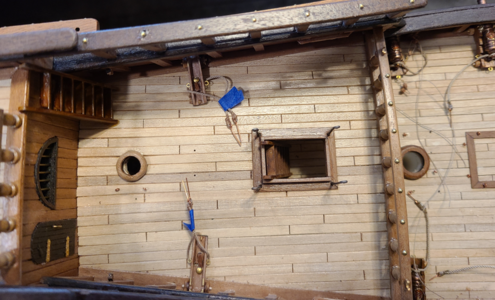
Oh, after complaints from the ship's doctor of having to set multiple broken legs, the captain ordered a rope railing be placed around the quarterdeck ladder opening, so again the blacksmith complied with the uprights, as shown above, and the rope will be added later.
That's it for now.

Above, I had lowered the brackets some, and eliminated the trunnion, trying to make it look like I thought it possibly should (there's a goal for you). Later, I removed the trucks and thinned down the sides, but still wasn't happy.
I found a 3D STL file that I liked, and thought looked like what I though a smaller gun on this ship might look like:

I had my son make some 3D prints of them, and thought they looked good, but 1) preferred wood for the carriage, and 2) it was difficult to paint the carriage and barrel neatly. So I had him make some separate barrels, and thought I'd create the carriages in wood.
I first made a crude U-shape for the carriage:

To drill half-holes for the trunnion, square but without messing up the wood, I inserted a piece of scrap:

then mounted in in a small drill press to accurate drill holes for the axtrees and trunnion:


The result:

Upper left is a (very) poorly modified carriage from the kit, upper right is the all-3D model, and the two lower guns are my resulting wood carriage with 3D barrels. I think they worked out okay, at least to these eyes.
Again, I mounted the carriages with bolts for extra strength, but left the barrels off until everything else was done:

I got 2mm and 1.59mm ball bearings to simulate 15# and 7# cannonballs, and used a torch to "rust" or discolor the stainless steel. (Stainless steel is not really stainless, you know.) Whether it was the heat, variations in my method, or whatever, they didn't come out to be a consistent color:

but there were enough of a decent color for me to use. I had mixed the two sizes together when heating them, figuring I could easily pick out the smaller ones later, but of course these eyes left me down again. Surprisingly, and VERY luckily, I found the smaller balls were attracted to a magnet, while the larger ones were not! Not surprising, because 400 series stainless is magnetic, while 300 is not, but surprising because I would have expected to be the same material.
Being lazy as I am, I made the square holder for the ball pyramids in the manner below:

In this way, I could keep the sides fairly tight with the balls, and later trim them flush. Plus this is stronger than trying to do angle cuts.
 , maybe not stronger, just easier.
I accidentally made one pyramid with the small balls first, so decided to use it, even though it's not on the plans, which show only wood strips with the smaller balls in place. Using the drill press with holes spaced every 2.5mm using the calibrated holder allowed me to get them spaced well.
In the process of mounting the gun tackles:

The captain of the ship HATES
Naturally, I cheated when doing the gun tackles, ending them at the hooks, and making separate hanging coils using a foam block (from Stanley Steemer furniture riser blocks) and pins, and a semi-natural hanging position:

The result may not be great (or perfect), but it works for me (and the captain):

Yes, I know the rope coils at the rear of the gun carriages are lying on the deck, but there was no reasonable place to put hooks, and the sailors try to lay them on the tackles and hooks to help keep them dry and out of the way.
I added a few 3D barrels in various positions (posted previously), emulating a ship recently at sea with excessive supplies:


Cannonballs are now in place as well. I'm surprised I went though 6 yards of 0.3mm rope, almost 50 blocks and numerous hooks and eyes for just those tackles. Of course, half of them are still under my desk covered in cat fur. I can't take a chance on vacuuming down there; who knows what treasures would be gobbled up!
Oh, after complaints from the ship's doctor of having to set multiple broken legs, the captain ordered a rope railing be placed around the quarterdeck ladder opening, so again the blacksmith complied with the uprights, as shown above, and the rope will be added later.
That's it for now.
Hi Signet,
I love your work. The new cannons for the aft deck look fantastic.
I love your work. The new cannons for the aft deck look fantastic.
That's a wonderfully busy and detailed deck! Great job!
I just discover your thread. How I missed it I do not know.
You made a great work, and you will be an inspiration source for my own Carrack. Don't feel sorry about the marketing of HIS. Your collaboration with them will be beneficial for us. Great share of work.
It will be my turn too feel a little bit bad or sorry (good english ???), it could be very kind if you accept to share your files (Excel and pics). I can give you a proof of my purchased of the Carrack to be fair about the Marisstella original plans.
Thanks,
Michel
Thank you VERY much, Tobias. I so much admire your work, and know this is not on that level, but am still enjoying it and glad that people like this thread.Hi Signet,
I love your work. The new cannons for the aft deck look fantastic.
Thank you! Yes, I very much like the idea of a busy deck. I'll be adding the bits, hatch and ship's boat shortly, which will add to that.That's a wonderfully busy and detailed deck! Great job!
I'll be happy to help in any way I can, Michel. Just to clarify, HiS is the company that helped determine all the blocks necessary, and they make excellent parts, plus spent a huge amount of time with me. I assume you're referring to my rigging spreadsheets and pics, when you ask about sharing the files, to assist in your own model? I'd be happy to do that, but the pics are done in PaintShop Pro (old version 9, I think), with separate layers for each sail. And they can be a bit sloppy, but still have been a big help to me, mostly, I think, to just think long and hard about each line, what it does, where it goes, what size it should be, etc. But sure, I can make them available.I just discover your thread. How I missed it I do not know.
You made a great work, and you will be an inspiration source for my own Carrack. Don't feel sorry about the marketing of HIS. Your collaboration with them will be beneficial for us. Great share of work.
It will be my turn too feel a little bit bad or sorry (good english ???), it could be very kind if you accept to share your files (Excel and pics). I can give you a proof of my purchased of the Carrack to be fair about the Marisstella original plans.
Thanks,
Michel
Maybe PM me, as much of that won't be of interest to anyone not building the model.
Last edited:


