-

Win a Free Custom Engraved Brass Coin!!!
As a way to introduce our brass coins to the community, we will raffle off a free coin during the month of August. Follow link ABOVE for instructions for entering.
-

PRE-ORDER SHIPS IN SCALE TODAY!
The beloved Ships in Scale Magazine is back and charting a new course for 2026!
Discover new skills, new techniques, and new inspirations in every issue.
NOTE THAT OUR FIRST ISSUE WILL BE JAN/FEB 2026
- Home
- Forums
- Ships of Scale Build Logs
- Super Detailing Static Models / Other Genres
- Historical Trailways, Guns, Aircraft, and Cars
You are using an out of date browser. It may not display this or other websites correctly.
You should upgrade or use an alternative browser.
You should upgrade or use an alternative browser.
Model Airways Sopwith Camel 1/16 scale [COMPLETED BUILD]
- Joined
- Dec 11, 2021
- Messages
- 287
- Points
- 238

Looking good.
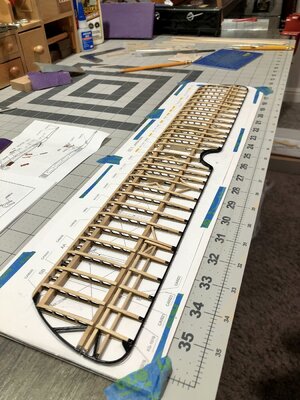
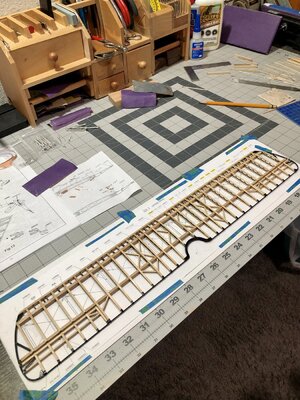
Shame about the holes in the ribs showing the laser char. At least it's uniform.
I pugwash, don't forget that at that time there was a lot of dust in the air and on the runways! And on the wings there was only canvas ... I think Dean studied it well leaving the char on the ribs ...
Well... I could have sanded all the char off, but didn't see any reason to, because I actually like the way it accents the cutouts! 
- Joined
- Sep 3, 2021
- Messages
- 5,190
- Points
- 738

Valid argument.Well... I could have sanded all off the char off, but didn't see any reason to, because I actually like the way it accents the cutouts!
- Joined
- Dec 11, 2021
- Messages
- 287
- Points
- 238

Well... I could have sanded all the char off, but didn't see any reason to, because I actually like the way it accents the cutouts!
Right Dean! As I said, you thought well to leave them in their place ....
I totally agree with this argument. It gives a nice accent. The wing looks nice, Dean. One more to go.Well... I could have sanded all the char off, but didn't see any reason to, because I actually like the way it accents the cutouts!
Last edited:
True... it is all subjective! I like it with the char.Right Dean! As I said, you thought well to leave them in their place ....
Thank you Peter!I totally agree withthis argument. It gives a nice accent. The wing looks nice, Dean. One more to go.
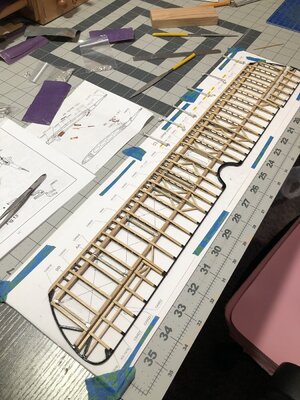
I am not done with this one yet! I still have to add the hinges for the ailerons, and the control horns for them. Then add the compression bars and the turnbuckles and wires for tension lines. Then I can start the lower, but should be faster with the gained experience on this one.
Sometimes you wanted my BN two steps ahead. Now I want that .........Thank you Peter!
I am not done with this one yet! I still have to add the hinges for the ailerons, and the control horns for them. Then add the compression bars and the turnbuckles and wires for tension lines. Then I can start the lower, but should be faster with the gained experience on this one.

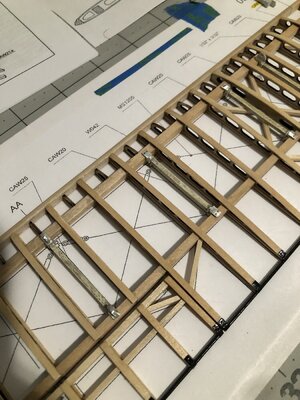
Not much to show, however the next step is the hinges or compression braces. I decided to go with the compression braces.
First step is to clean them up with a file, then you have to drill a small hole #69 bit (.023” dia) thru on each side to run the tension wires through…
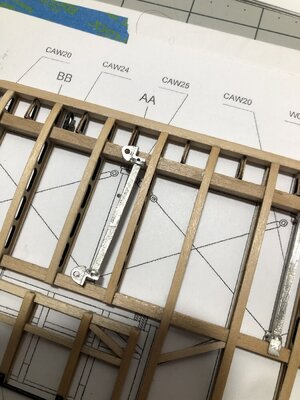
Take care to drill straight and not break the part.
Another thing to note, it’s good I paid attention and looked ahead prior to adding the wood cross braces. They have to be installed at the bottom edge of the ribs, because the compression brace goes on top of them. If the cross braces were centered in the wing, the compression brace would not fit.
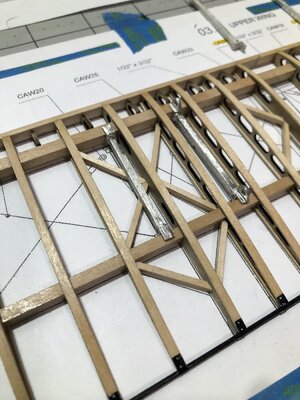
As you see it’s a tight fit, between cross braces and compression braces. In addition the tension wires and turnbuckles have to fit in there. A busy area!
After an hour I had 5 prepared for painting. Not sure the scheme I will use, but I have an idea.
Anyway, I hope to get this wing finished this weekend! So a lot ahead of me! Running the tension wires is basically aircraft rigging!
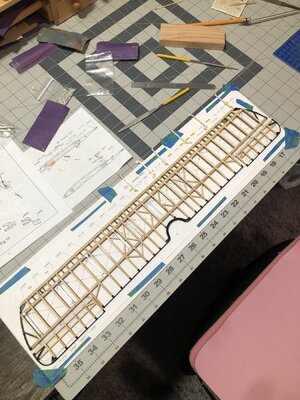
First step is to clean them up with a file, then you have to drill a small hole #69 bit (.023” dia) thru on each side to run the tension wires through…

Take care to drill straight and not break the part.
Another thing to note, it’s good I paid attention and looked ahead prior to adding the wood cross braces. They have to be installed at the bottom edge of the ribs, because the compression brace goes on top of them. If the cross braces were centered in the wing, the compression brace would not fit.

As you see it’s a tight fit, between cross braces and compression braces. In addition the tension wires and turnbuckles have to fit in there. A busy area!
After an hour I had 5 prepared for painting. Not sure the scheme I will use, but I have an idea.
Anyway, I hope to get this wing finished this weekend! So a lot ahead of me! Running the tension wires is basically aircraft rigging!

It’s looking good, the partly painted braces, Dean. The metal brackets make now the accent.
I am looking forward to the ‘standing’ rigging of you airship.
Regards, Peter
I am looking forward to the ‘standing’ rigging of you airship.
Regards, Peter
Char or not, leave it on or file it off, it just looks great what you're doing. BTW, I would also leave it as a contrast.
Hi Dean, your painting of the compression bracing to look like wood was a great idea! I love it!
Thank you Peter!It’s looking good, the partly painted braces, Dean. The metal brackets make now the accent.
I am looking forward to the ‘standing’ rigging of you airship.
Regards, Peter
Thank you Adi!Char or not, leave it on or file it off, it just looks great what you're doing. BTW, I would also leave it as a contrast.

