
I appreciate the details you have added and your willingness to get it correctly done.A little progress at weekend.
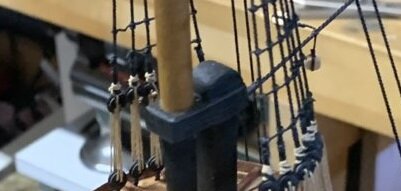
I made all necessary wrapping and placed all fore mast lower shrouds. All deadeyes tied down to the shrouds.
I wrapped the shrouds slightly long more than needed. I didnt glue the edges of wrapped thread, just tied . So I can easly untie them and unwrapped the excess lenght.
View attachment 210035View attachment 210036View attachment 210037
So far so good I think.
View attachment 210039
View attachment 210038
Ant it's time to warm up for thousands of clowe hitches.
View attachment 210040
I use beeswax on threads. I realized from the photos that real colors of threads cant be seen because of beeswax. So I decided to use hot air with hair drying machine on threads. I satisfied with the result. Check this before and after photo :
View attachment 210041
That's all for now.
Best regards from Turkey.

-

SUBSCRIBE TO SHIPS IN SCALE TODAY!
The beloved Ships in Scale Magazine is back and charting a new course for 2026!
Discover new skills, new techniques, and new inspirations in every issue.
NOTE THAT OUR NEXT ISSUE WILL BE MARCH/APRIL 2026 -

Win a Free Custom Engraved Brass Coin!!!
As a way to introduce our brass coins to the community, we will raffle off a free coin during the month of August. Follow link ABOVE for instructions for entering.
You are using an out of date browser. It may not display this or other websites correctly.
You should upgrade or use an alternative browser.
You should upgrade or use an alternative browser.
Montañes by Occre Build Log
- Thread starter Bilal ZEYBEKOĞLU
- Start date
- Watchers 27
Looking very good Bilal! Great work wrapping the shroud lines.A little progress at weekend.
I made all necessary wrapping and placed all fore mast lower shrouds. All deadeyes tied down to the shrouds.
I wrapped the shrouds slightly long more than needed. I didnt glue the edges of wrapped thread, just tied . So I can easly untie them and unwrapped the excess lenght.
View attachment 210035View attachment 210036View attachment 210037
So far so good I think.
View attachment 210039
View attachment 210038
Ant it's time to warm up for thousands of clowe hitches.
View attachment 210040
I use beeswax on threads. I realized from the photos that real colors of threads cant be seen because of beeswax. So I decided to use hot air with hair drying machine on threads. I satisfied with the result. Check this before and after photo :
View attachment 210041
That's all for now.
Best regards from Turkey.

Thanks for your kind words Paul.I appreciate the details you have added and your willingness to get it correctly done.
")
Last edited:
Thank you Dean. Step by step she’s growing up.Looking very good Bilal! Great work wrapping the shroud lines.
Last edited:

YOUR BUILD IS GOING EXTREMELY WELL UNTIL now. I have nothing to add more than the old navy "WELL DONE MATE" will add a pic. of the oriental CAP. As you can see, it is easy to build. the lower part a thinner Inglish CAP. The upper part, measure a piece of the right diameter of a wooden mast, past it on top of the other cap and make some cut on the round part.A little progress at weekend.
I made all necessary wrapping and placed all fore mast lower shrouds. All deadeyes tied down to the shrouds.
I wrapped the shrouds slightly long more than needed. I didnt glue the edges of wrapped thread, just tied . So I can easly untie them and unwrapped the excess lenght.
View attachment 210035View attachment 210036View attachment 210037
So far so good I think.
View attachment 210039
View attachment 210038
Ant it's time to warm up for thousands of clowe hitches.
View attachment 210040
I use beeswax on threads. I realized from the photos that real colors of threads cant be seen because of beeswax. So I decided to use hot air with hair drying machine on threads. I satisfied with the result. Check this before and after photo :
View attachment 210041
That's all for now.
Best regards from Turkey.
and divided in. you get then two half circels
Attachments
I was busy last week but managed to built main and mizzen mast's lower parts and main mast shrouds.


 s lower
s lowerLooks really GOOD. I like the re-enforcement -instead of the real stay- which will have to be treated as the shroud- seizing-to maintain the mast, as they should. just for your info. I have just seen another build of Montañes. Have a look, as he has built the hull, as I dis with Bow, Stern fillers and between the Bulkheads, which gave him a very smush Planking.I was busy last week but managed to built main and mizzen mast's lower parts and main mast shrouds.
View attachment 212264View attachment 212265View attachment 212266View attachment 212267View attachment 212268View attachment 212269s lower
Attachments
Thanks for your compliment Poul. I removed the bowsprit while renewing the fore shrouds. Bowsprit is really long and can be easily broken while rigging. So I decided to use temporary stays instead of the real ones in order to maintain the position of masts. I'm also following the other two Montanes logs. Scottola and Mirek do really god job on their models.Looks really GOOD. I like the re-enforcement -instead of the real stay- which will have to be treated as the shroud- seizing-to maintain the mast, as they should. just for your info. I have just seen another build of Montañes. Have a look, as he has built the hull, as I dis with Bow, Stern fillers and between the Bulkheads, which gave him a very smush Planking.
Best regards from Turkey.
Bilal, My goodness you have some serious talent. Once I get my finish up with bottom section of my Montanes an start in the finer things I'll be doing my best to emulate what you have going. I am really glad I have someone to follow on this.
Thanks
Thanks
just ask. do not be shy. There is NO SILLY questions, but many silly answers.Bilal, My goodness you have some serious talent. Once I get my finish up with bottom section of my Montanes an start in the finer things I'll be doing my best to emulate what you have going. I am really glad I have someone to follow on this.
Thanks
Thanks Scott. Also you’re doing good job with your model. Your compliments encourage me. I’m ready to do any help I can. That’s what SOS for.Bilal, My goodness you have some serious talent. Once I get my finish up with bottom section of my Montanes an start in the finer things I'll be doing my best to emulate what you have going. I am really glad I have someone to follow on this.
Thanks
Your ship really is looking fantastic Bilal! I really like the deck and the hull, and your mast and rigging really add to the overall precision and craftsmanship you have done so far. Great job!I was busy last week but managed to built main and mizzen mast's lower parts and main mast shrouds.
View attachment 212264View attachment 212265View attachment 212266View attachment 212267View attachment 212268View attachment 212269s lower
long times since new images, hope that you are well in healthYour ship really is looking fantastic Bilal! I really like the deck and the hull, and your mast and rigging really add to the overall precision and craftsmanship you have done so far. Great job!
Thanks for the comliment Dean.Your ship really is looking fantastic Bilal! I really like the deck and the hull, and your mast and rigging really add to the overall precision and craftsmanship you have done so far. Great job!
Hi Poul.long times since new images, hope that you are well in health
Thanks for your post. Well I’m ok but dealing with some business stuff even at nights. I am preparing a document and have no time for Montanes. I think I’l finish my job tomorrow and return to building my model.
Hey Bilal, over on my Montanes I am getting ready to put on the upper strakes. Looking at pic 67 in the instructions it looks like there is a groove right down the middle of the 2X2 strips I have bounced around all over the place looking for how to do this. I see that you did not do this and just used the 2X2 as is. Now that you are well past this phase are you happy with your decision? Or do you wish you had added the grove. I don't have a mini table saw so I'd need to spend a ton of time building some sort of contraption to put the groove in. I am leaning at skipping this like you did. Thoughts?

Hello @Scottola, I know you are asking this question of Bilal but I just happened to see your post. Check out these scraper tools - they are used to create these profiled moldings: https://www.micromark.com/Artesania-Latina-27300-Micro-Shapers-Set-A-3-Plates; https://www.micromark.com/Artesania-Latina-27301-Micro-Shapers-Set-B-3-Plates.Hey Bilal, over on my Montanes I am getting ready to put on the upper strakes. Looking at pic 67 in the instructions it looks like there is a groove right down the middle of the 2X2 strips I have bounced around all over the place looking for how to do this. I see that you did not do this and just used the 2X2 as is. Now that you are well past this phase are you happy with your decision? Or do you wish you had added the grove. I don't have a mini table saw so I'd need to spend a ton of time building some sort of contraption to put the groove in. I am leaning at skipping this like you did. Thoughts?
View attachment 215481
Hope this helps - and sorry for posting on your log Bilal!
two ways to do it. 1: Add a fine Metal Wire between the two lists. ": add the to list glued together, and with a Dremel with the right spindle let it run between the two lists. In the Plastic industry, you can get a very thin black paint, which is so diluted that it runs itself- only lift the ship a little. Is manly used the make aircraft panels-to0 highlight the panels? I used to add the wire in between, and then this special Paint, as it will only run where the metal wire is and at the same time gives the colour- use a syringe. it is very good too, to highlight other parts -you will have this later onHey Bilal, over on my Montanes I am getting ready to put on the upper strakes. Looking at pic 67 in the instructions it looks like there is a groove right down the middle of the 2X2 strips I have bounced around all over the place looking for how to do this. I see that you did not do this and just used the 2X2 as is. Now that you are well past this phase are you happy with your decision? Or do you wish you had added the grove. I don't have a mini table saw so I'd need to spend a ton of time building some sort of contraption to put the groove in. I am leaning at skipping this like you did. Thoughts?
View attachment 215481
Sorry? no no noHope this helps - and sorry for posting on your log Bilal!
I was trying to translate what I decided to write. Then I read your post and relaxed. You wrote which I was trying to translate. Thanks for that Doc
))