It is a good kit, appreciate your feedbackThis looks amazing , I have a victory in the box and will get started after I complete the USS Constitution from Modelshipways. Good luck
-

Win a Free Custom Engraved Brass Coin!!!
As a way to introduce our brass coins to the community, we will raffle off a free coin during the month of August. Follow link ABOVE for instructions for entering.
-

PRE-ORDER SHIPS IN SCALE TODAY!
The beloved Ships in Scale Magazine is back and charting a new course for 2026!
Discover new skills, new techniques, and new inspirations in every issue.
NOTE THAT OUR FIRST ISSUE WILL BE JAN/FEB 2026
You are using an out of date browser. It may not display this or other websites correctly.
You should upgrade or use an alternative browser.
You should upgrade or use an alternative browser.
My Swing at Caldercraft HMS Victory
- Thread starter Adiefenbach
- Start date
- Watchers 34
-
- Tags
- caldercraft jotika victory
Thanks very much, doing the best I can.Very clean and nit job.
I see you also paint your scalpel handles to find them easier! I've made wooden handles for some & dipped others in 'Plasticoat' liquid plastic.Have been watching TraumaDoc's progress with great interest as he is just a few weeks ahead of me. Also see that Maddog Harry is also embarking on the same voyage. I have been learning a lot from Paul Vicker's videos/log as well. I started my build on 23 November and have gotten the first planking done and just starting on the stern quarter gallerys. Have been sanding, and sanding, ...... and sanding on the hull to smooth everything out, think I am just about there. I don't have the equipment or talent to take great photos so I will not do a full build log but will try to chime in with lessons learned when I figure out something useful. I have been very impressed with the quality`of the materials provided by Caldercraft as well as the quantity. The first planking material is 1.5 by 6mm lime and every piece was spot on 6 mm. This has been an issue for me with other kits (planking width variations). Also, they provided 70 pieces and I have 20 remaining after finishing up the planking. The fit and finish on all the keel and bulkhead pieces is first rate as you would expect. It is a beast though, and is getting heavy. Here are some shots of progress to date:
View attachment 348559View attachment 348560
+View attachment 348561View attachment 348562
View attachment 348563View attachment 348565
View attachment 348566View attachment 348568
Just started with the stern quarter gallerys, using the walnut ply pieces provided. Quite a bit of fitting and concern with this but Paul's videos help a lot.
View attachment 348570
Also, on a previous kit I discovered these Marklin railroad screws to use where you just can't get a clamp to hold well enough. They were invaluable as I did the first planking and I still recommend them.
View attachment 348572
Anyway, having a lot of fun with this one so far and I really appreciate the work of those ahead of me who have helped illuminate the way. Happy New Year to all.
Yeah, no matter how hard I try, my work area is usually a mess, painting the handles did help.I see you also paint your scalpel handles to find them easier! I've made wooden handles for some & dipped others in 'Plasticoat' liquid plastic.
A simple way to check the windows is to place a packer under the rear of the keel to make the rear gunports level. Then attach a pencil to a height gauge and draw a line under the windows.Have seen a lot of discussion on that alignment. Hard to get an accurate visual. Followed the instructions as best I could and they look pretty close to yours. You have an interesting project there. Cheer
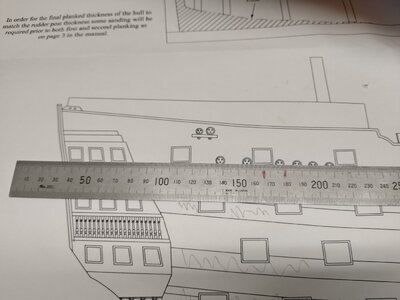
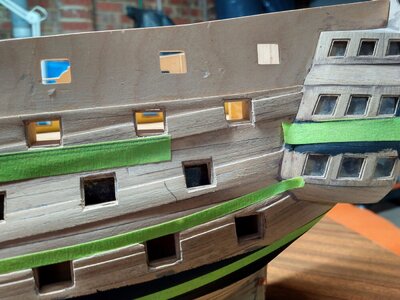
This is how they look when they're out of line. There are a number of faults I've found with this build, when I purchased it half built I thought I would just continue the build.
Tony
Appreciate the feedback. It is a beast!A simple way to check the windows is to place a packer under the rear of the keel to make the rear gunports level. Then attach a pencil to a height gauge and draw a line under the windows.View attachment 350331
View attachment 350332
This is how they look when they're out of line. There are a number of faults I've found with this build, when I purchased it half built I thought I would just continue the build.
Tony
I recently finished the Mamoli kit. There were several historical and structural discrepancies in the kit that required a good bit of kit-bashing and reconfiguring. For instance, the cupola on the poop deck was totally wrong as was the rear gallery. The kit had only two life boats but the actual ship had at least five, depending on the configuration you are building. If you do not have it, you might want to get the book, "Anatomy of Nelson's Ships" by Longridge which is totally about the VICTORY. Another good one is McKay's "The 100-Gun Ship Victory (Anatomy of the Ship)." This book is very expensive especially for a paperback. Some regard these as the best two books about the ship. They are available on Amazon. I cop a copy of the McKay book on inter-library loan. I wish I had them when I was building the kit.Have been watching TraumaDoc's progress with great interest as he is just a few weeks ahead of me. Also see that Maddog Harry is also embarking on the same voyage. I have been learning a lot from Paul Vicker's videos/log as well. I started my build on 23 November and have gotten the first planking done and just starting on the stern quarter gallerys. Have been sanding, and sanding, ...... and sanding on the hull to smooth everything out, think I am just about there. I don't have the equipment or talent to take great photos so I will not do a full build log but will try to chime in with lessons learned when I figure out something useful. I have been very impressed with the quality`of the materials provided by Caldercraft as well as the quantity. The first planking material is 1.5 by 6mm lime and every piece was spot on 6 mm. This has been an issue for me with other kits (planking width variations). Also, they provided 70 pieces and I have 20 remaining after finishing up the planking. The fit and finish on all the keel and bulkhead pieces is first rate as you would expect. It is a beast though, and is getting heavy. Here are some shots of progress to date:
View attachment 348559View attachment 348560
+View attachment 348561View attachment 348562
View attachment 348563View attachment 348565
View attachment 348566View attachment 348568
Just started with the stern quarter gallerys, using the walnut ply pieces provided. Quite a bit of fitting and concern with this but Paul's videos help a lot.
View attachment 348570
Also, on a previous kit I discovered these Marklin railroad screws to use where you just can't get a clamp to hold well enough. They were invaluable as I did the first planking and I still recommend them.
View attachment 348572fecently
Anyway, having a lot of fun with this one so far and I really appreciate the work of those ahead of me who have helped illuminate the way. Happy New Year to all.
I would suggest you do some research as you go along. I was very lucky to have found a very helpful gentleman who actually works on the ship. He .answered lots of questions, sent me photos and let me know how the restoration efforts are progressing. I am currently building the Corel cross-section of the VICTORY and it, too, has lots of omissions and just plain errors in the build. It has left off various lines, yards and structural details some of which I hope to add/fix. The McKay book has been a great help in this. It has some cross-sectional diagrams, extensive rigging drawings as well as other structural plates. Good luck w/your build.
It is a good kit, appreciate your feedback
Just finished the initial stage of second planking, keel up to but not including upper gunports. This is my first kit that called for second planking and I have to admit that I found planking with the second layer of 1 X 5 mm walnut to be significantly harder than the initial layer of 1.5 X 6 mm lime. I found that the walnut was much harder to spile and was generally less cooperative overall. I was able to maintain an acceptable pattern for everything above the waterline but thank goodness for the copper plating because I have a few bits of hash below the waterline. Happy to be done with hull planking for the moment, now off to hull sanding and prepping for deck installation.
As of today, have been at this Victory kit for 3 months. A lot of fun to build but it is a lot of work. Who knew there would be so many gunports on a first rate ship???  I have completed the second planking and last night fitted the last pieces of the lower wale. Have the middle and upper wales to go before getting to the much anticipated (not) gunport lining. Still some filling and sanding to do but getting close. So far, the materials have been excellent and plentiful, allowing for my ever present mistakes/repeats. I had the same upperdeck gunport elevation issues that Traumadoc has already discussed. A little judicious trimming and filling seems to have done the trick. Won't be sure until I try to mount some firepower. Have attached some progress pics below:
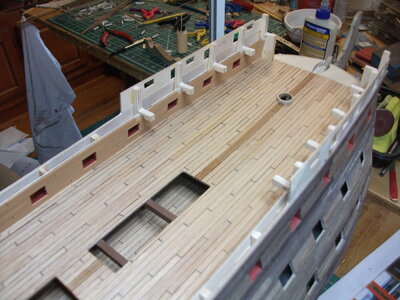
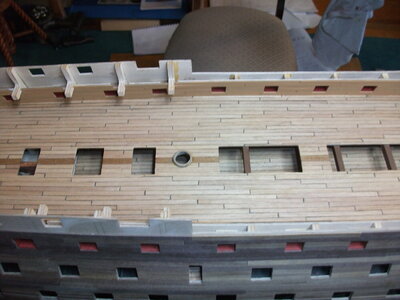
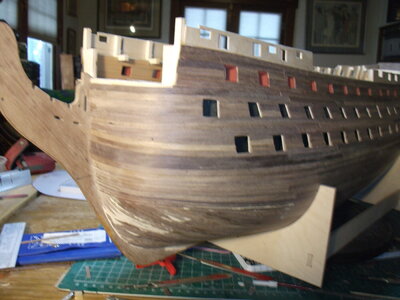
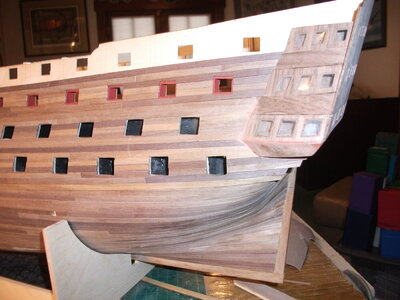
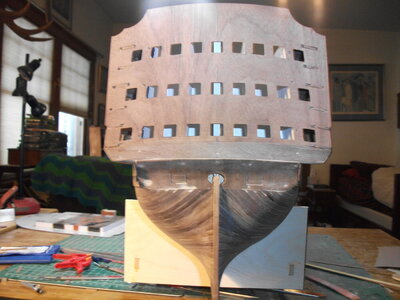
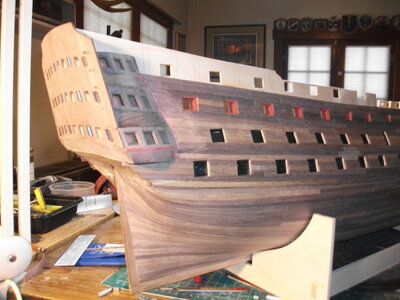
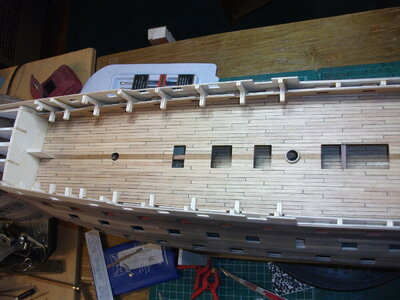
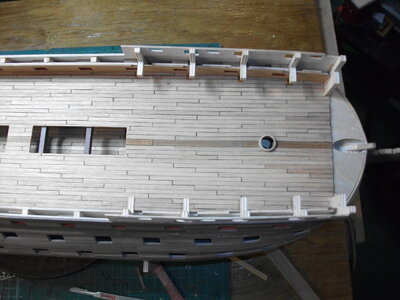
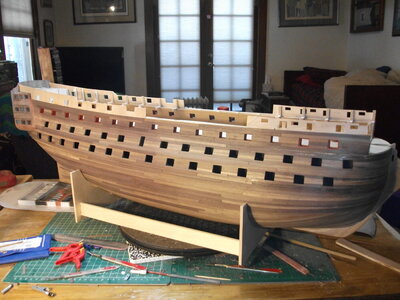
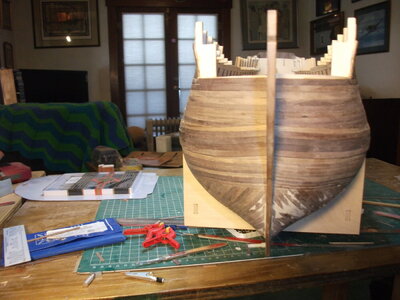


Looking good!!!! Seems like we are running parallel!
Thanks. You and Paul V are leading the way for me. Very much appreciate the pilotage.Looking good!!!! Seems like we are running parallel!
I have just found this build thread and enjoyed reading and seeing your progress. You deserve much applause and more than just likes.As of today, have been at this Victory kit for 3 months. A lot of fun to build but it is a lot of work. Who knew there would be so many gunports on a first rate ship???I have completed the second planking and last night fitted the last pieces of the lower wale. Have the middle and upper wales to go before getting to the much anticipated (not) gunport lining. Still some filling and sanding to do but getting close. So far, the materials have been excellent and plentiful, allowing for my ever present mistakes/repeats. I had the same upperdeck gunport elevation issues that Traumadoc has already discussed. A little judicious trimming and filling seems to have done the trick. Won't be sure until I try to mount some firepower. Have attached some progress pics below:
View attachment 359253View attachment 359254View attachment 359255View attachment 359256View attachment 359257View attachment 359258View attachment 359259View attachment 359260View attachment 359261View attachment 359262
My opinion is the Victory is one of the most difficult to build due to its size, shape and fame.
You should feel very pleased with your efforts so far. It looks very very good. Both your first and second layer planks looked excellent and this suggests the rest of your build will be very precise and well finished.
Congratulations so far. I will keep watching so please post more progress photos they are a joy to see.
Thanks very much for the kind words. She is a challenge. Previously I have completed Model Shipway's Essex and Confederacy which were both great kits and good prep for Victory I think. Rigging is still an undeveloped skill and I am looking forward to that challenge. Will try to post some more as things progress. Thanks againI have just found this build thread and enjoyed reading and seeing your progress. You deserve much applause and more than just likes.
My opinion is the Victory is one of the most difficult to build due to its size, shape and fame.
You should feel very pleased with your efforts so far. It looks very very good. Both your first and second layer planks looked excellent and this suggests the rest of your build will be very precise and well finished.
Congratulations so far. I will keep watching so please post more progress photos they are a joy to see.
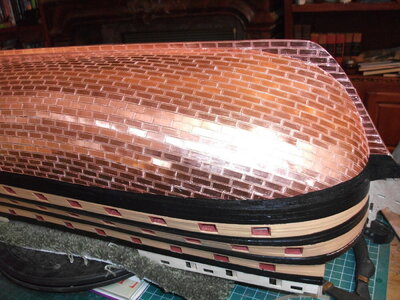
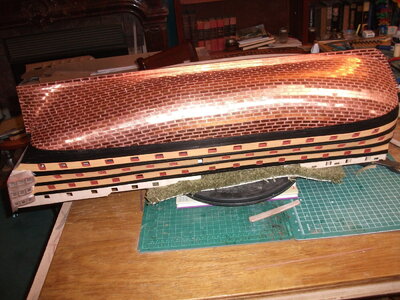
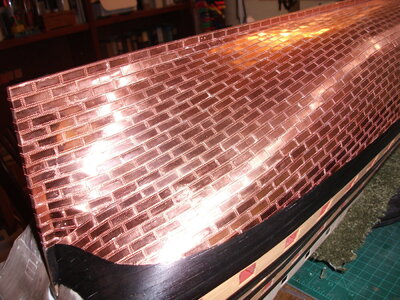
Have been applying the copper plates to the underwater hull for the past few/many weeks. Just finished the port side and touched up the waterline with black paint. Found the plating to be quite tedious and was anxious as to how it would finish up. Started along the keel as mentioned in the directions and just kept working from stern to bow. In the end, it finished up pretty well by my standards with only a few minor trims at the stern around row 13 of the install. Took some trimming right at the waterline. A lifesaver was a post by someone that I can no longer remember that when using CA glue, moisture makes the glue set much faster. Tried that and it worked great. Put a few drops of medium CA on each copper plate, took a paint brush with a little water and brushed the wood spot where the plate was destined to sit, and then applied the plate. Set in a few seconds. Also tried to very slightly bend the plates to conform with the curve of the hull where necessary before applying the plate. Again, just did the port side so that I could learn my lessons before starting the starboard side. Have attached a few photos to show how it turned out. 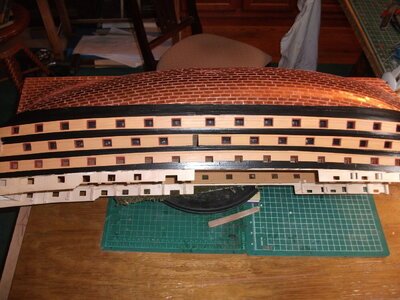
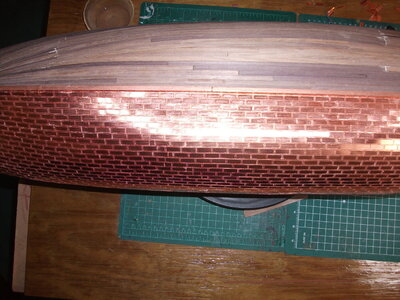
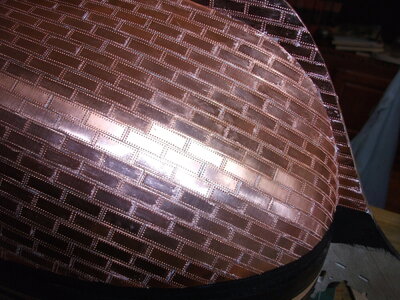


Getting heavy too!!Ooooooooh....shiiiiiinnnnnnnnyyyyyyyy.
Very nice plating. I have just started plating my Vanguard. So far had many unsightly plates with bad angles, gaps and the plates stained with glue etc. Too embarrassed to post pictures just yet.Have been applying the copper plates to the underwater hull for the past few/many weeks. Just finished the port side and touched up the waterline with black paint. Found the plating to be quite tedious and was anxious as to how it would finish up. Started along the keel as mentioned in the directions and just kept working from stern to bow. In the end, it finished up pretty well by my standards with only a few minor trims at the stern around row 13 of the install. Took some trimming right at the waterline. A lifesaver was a post by someone that I can no longer remember that when using CA glue, moisture makes the glue set much faster. Tried that and it worked great. Put a few drops of medium CA on each copper plate, took a paint brush with a little water and brushed the wood spot where the plate was destined to sit, and then applied the plate. Set in a few seconds. Also tried to very slightly bend the plates to conform with the curve of the hull where necessary before applying the plate. Again, just did the port side so that I could learn my lessons before starting the starboard side. Have attached a few photos to show how it turned out. View attachment 369542View attachment 369543View attachment 369544View attachment 369545View attachment 369547View attachment 369548
Did you clean or polish your plates with something to get that nice uniform shine?
Can you tell us how you cleaned them up please?
Are the plates metal or adhesive tapes?
You mentioned using CA glue, what brand and thickness did you use?
Thanks Adiefenbach for sharing.
- Joined
- Feb 20, 2022
- Messages
- 225
- Points
- 113

One word---WOW!!! Beautiful job from what I can see! Rick1011
Thanks. Did not clean them up prior to installation. There is no pre installed adhesive on these, just plain plates. I used the Model Expo medium CA, put a thin line of it on the back of the plate, moistened the hull very slightly where the plate was going, and used a tweezers to install and butt up against the adjacent plates. Used the point of the tweezers to hold in place and against the hull until dry, usually 5-10 seconds or so. Did use a clean rag to wipe them down a day or so later. Slight prebending of the plate to match hull contour where there was any significant bend was also helpful. Hope this helps.Very nice plating. I have just started plating my Vanguard. So far had many unsightly plates with bad angles, gaps and the plates stained with glue etc. Too embarrassed to post pictures just yet.
Did you clean or polish your plates with something to get that nice uniform shine?
Can you tell us how you cleaned them up please?
Are the plates metal or adhesive tapes?
You mentioned using CA glue, what brand and thickness did you use?
Thanks Adiefenbach for sharing.
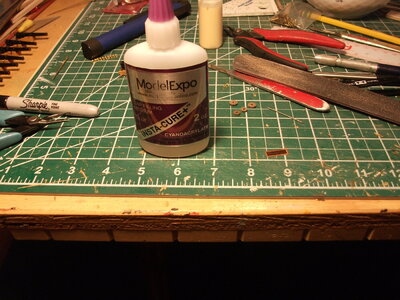
Same glue that I use, but not from Model Expo. I get mine from the local hobby shop in the 1/2 oz bottles.Thanks. Did not clean them up prior to installation. There is no pre installed adhesive on these, just plain plates. I used the Model Expo medium CA, put a thin line of it on the back of the plate, moistened the hull very slightly where the plate was going, and used a tweezers to install and butt up against the adjacent plates. Used the point of the tweezers to hold in place and against the hull until dry, usually 5-10 seconds or so. Did use a clean rag to wipe them down a day or so later. Slight prebending of the plate to match hull contour where there was any significant bend was also helpful. Hope this helps.
View attachment 369642


