Its a good tool for bending wide stock. And I bet the temp isn't a big issue because the wetted wood only needs heating for relatively short periods. And there is a possibility the current can be regulated with potentiometer or a variac transformer. But it is designed for bending wood so I 'm betting it isn't a big problem.@Philski,
That is quite the tool that Don is using. The specs are worry some, if I read them right the temperature settings are in Centigrade. After watching several of the videos of the tool in use and reading the reviews I think I prefer using my method.
So far this tool has worked great for me.
View attachment 370888
I’ve have two heating elements (30W,40W) I purchased from Walmart that I use with the Kolderstok tips. With patience I’ve been able to bend quite a few planks into their required shapes.
-

Win a Free Custom Engraved Brass Coin!!!
As a way to introduce our brass coins to the community, we will raffle off a free coin during the month of August. Follow link ABOVE for instructions for entering.
-

PRE-ORDER SHIPS IN SCALE TODAY!
The beloved Ships in Scale Magazine is back and charting a new course for 2026!
Discover new skills, new techniques, and new inspirations in every issue.
NOTE THAT OUR FIRST ISSUE WILL BE JAN/FEB 2026
You are using an out of date browser. It may not display this or other websites correctly.
You should upgrade or use an alternative browser.
You should upgrade or use an alternative browser.
Nikitin San Bartolome 1584 A.D. (Kit #35)
- Thread starter Pathfinder65
- Start date
- Watchers 85
- Joined
- Nov 30, 2022
- Messages
- 132
- Points
- 113

For the painting I use an airbrush with a 1.5 stroke and a pressure of 1.4 bar. I use the dyes without dilution. First the black patina which, as soon as it dries, I remove with a 240 grit sponge. Next, depending on the piece to be painted, I use the mahogany dye and the walnut dye, airbrushing with light coats and smoothing between coats. For the bridge, before painting, I completed the nailing with 0.9mm holes, then I used the black patin and the oak dye. In the end, only on the bulkheads, I gave a first coat of oilI love it . . . Have you thinned the dyes?
@giocomail,
Wow, you’ve been busy. You’ve done an incredible amount of work on that hull in a short time.
Jan
Wow, you’ve been busy. You’ve done an incredible amount of work on that hull in a short time.
Jan
A lesson learned - "I think". 

I have watched a lot of the YouTube videos of Pavel's San Bartolome build. The videos show a neat soldering iron combination that is used to set the planks at the bow and later at the stern. So I thought why not try to replicate that tool. Off I went to the hardware store and found an "inexpensive" 30W soldering iron, added a medium size Drywall screw and placed it my soldering iron holder to heat up. What could be simpler?

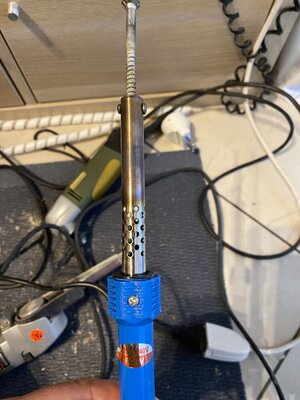
Two planks later (about an hour of the iron heating in the holder) I noticed a "slight" problem
The iron and tip before being placed in the holder.
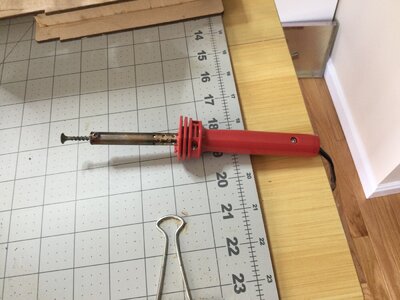
The iron in the holder. Everything looking as anticipated.
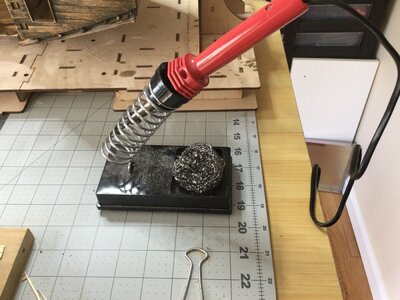
The "RO-OH" moment, Something didn't look right.
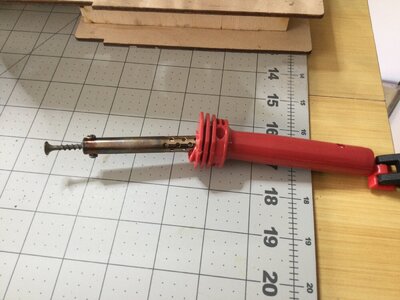
It actually looked much worse before the iron cooled down.
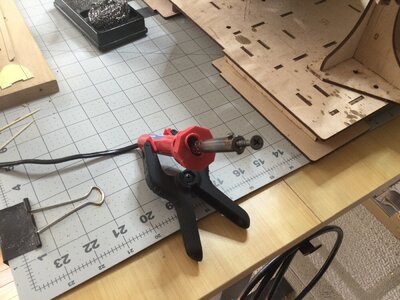
My conclusion, the combination of inexpensive soldering iron, the placement of that iron in the holder, the length of the iron being powered on, the short length of power cord plugged into a heavy extension cord and "gravity", all added up to the failed experiment.
I think if I had used one of those little prop up soldering iron stands there would have been a better outcome. But I had to try out the tool as demonstrated in the videos.
In the meantime it's back to my original tool, the "KolderstoK" tip.
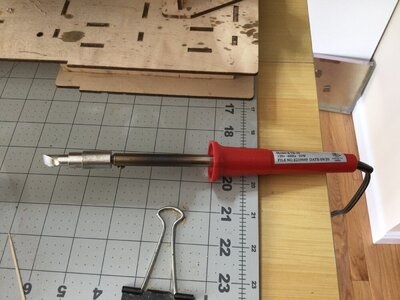
I can leave this one in my holder for long periods without any problems.
Jan
I have watched a lot of the YouTube videos of Pavel's San Bartolome build. The videos show a neat soldering iron combination that is used to set the planks at the bow and later at the stern. So I thought why not try to replicate that tool. Off I went to the hardware store and found an "inexpensive" 30W soldering iron, added a medium size Drywall screw and placed it my soldering iron holder to heat up. What could be simpler?
Two planks later (about an hour of the iron heating in the holder) I noticed a "slight" problem
The iron and tip before being placed in the holder.

The iron in the holder. Everything looking as anticipated.

The "RO-OH" moment, Something didn't look right.

It actually looked much worse before the iron cooled down.

My conclusion, the combination of inexpensive soldering iron, the placement of that iron in the holder, the length of the iron being powered on, the short length of power cord plugged into a heavy extension cord and "gravity", all added up to the failed experiment.
I think if I had used one of those little prop up soldering iron stands there would have been a better outcome. But I had to try out the tool as demonstrated in the videos.
In the meantime it's back to my original tool, the "KolderstoK" tip.

I can leave this one in my holder for long periods without any problems.
Jan
HI JAN AND ALL THE TOOL FROM AMAZON IS IN F I HAVE BENT VERY, VER, VER THIN STOCK LIKE THE CLAMPS ON THE JOHN SMITH SCHALLOP WITCH IS SUPER THIN, I JUST SET THE TEMP LOWER LIKE 100 DEG WET AND BEND JUST BRIEFLY, THICKER MATERIALS SET AT 25O TO 300 DEG WET AND BEND QUITE A FEW TIMES WORKS ON VERY NARROW AND QUITE WIDE MATERIAL TO ME WELL WORTH IT. GOD BLESS STAY SAFE DON
Hi, I found that the 30W iron worked fine the three or four times I used it. I think the problem was how the iron was manufactured. I do a lot micro-electronic circuit builds and have quite a few soldering irons of different wattages. All of them have some sort of mechanical protection around the irons heat element. Some have metal rings and others have an air gap.I also used a modified welder as seen in the video, prepared on the precise indications of the Russian model maker: the welder must have a power of 60W and the screw must protrude by 6 cm. I have to say it works great
View attachment 371879
My often referred to "K" (Kolderstok) irons are below, plank bender on the left and heating tool in the middle.
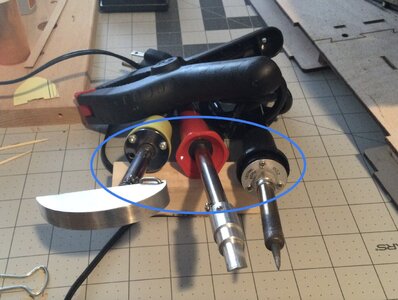
The problem iron has not much of a space for the heat escape vents and the vents are surrounded by a plastic collar.
When I went shopping it was the only soldering iron in the hardware store that had exterior screws so different tips could be inserted.
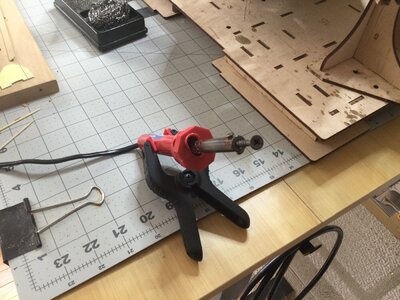
Also at $5.99 it wasn't that expensive to experiment with.
So for now I plan to stick to my "K" irons.
Hi Don, thank you for your post. I did check out the Amazon tool. Looks like a great way to bend stock. My experiment was to see if the tool on Pavel's videos was a better solution to gluing the planks at the bow of the Galleon by applying heat versus trying to figure to how to temporarily clamp the plank while the glue set. More curiosity than any thing else. As I posted above I'm quite happy with the plank bending tools I got from Hans.HI JAN AND ALL THE TOOL FROM AMAZON IS IN F I HAVE BENT VERY, VER, VER THIN STOCK LIKE THE CLAMPS ON THE JOHN SMITH SCHALLOP WITCH IS SUPER THIN, I JUST SET THE TEMP LOWER LIKE 100 DEG WET AND BEND JUST BRIEFLY, THICKER MATERIALS SET AT 25O TO 300 DEG WET AND BEND QUITE A FEW TIMES WORKS ON VERY NARROW AND QUITE WIDE MATERIAL TO ME WELL WORTH IT. GOD BLESS STAY SAFE DON
Jan
My snail like progress.
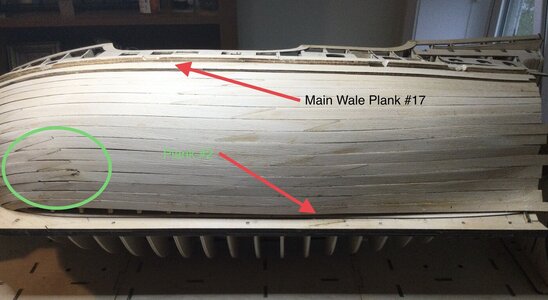
I managed to plank down to the keel. BUT plank #1 needs some serious work to finish closing in the hull. The space for that plank is a bit smaller than anticipated.
The circled area has been a wee bit of a problem. Several of the scarf joints separated when I was attaching the planks to the frames. The process of wetting and bending caused the PVA glue on the scarf joints to “ weaken”. I’ve been using Titebond II throughout the build but now need to find another type of glue for those joints.
Jan
Good morning Jan. Playing a little catch up this morning. You certainly did a proper job on that soldering iron- excellent workMy snail like progress.
View attachment 372159
I managed to plank down to the keel. BUT plank #1 needs some serious work to finish closing in the hull. The space for that plank is a bit smaller than anticipated.
The circled area has been a wee bit of a problem. Several of the scarf joints separated when I was attaching the planks to the frames. The process of wetting and bending caused the PVA glue on the scarf joints to “ weaken”. I’ve been using Titebond II throughout the build but now need to find another type of glue for those joints.
Jan
 . Scarf joints on the curve of the bow are always going to be a a problem child. Is it not a solution to glue each plank separately to the hull rather than pre join them? It does mean you will have to get the bend of each half of the scarf joints perfect tho? This way the water and heat won’t affect the bond of the PVa? Cheers Grant
A good point Grant. I did try that method, unfortunately most of the scarf joints are either at the edges or span the space between frames. I couldn’t properly clamp the separate pieces to get a good fit. I haven’t started planking the starboard side yet, so I have a lot of time to come up with a solution. Another lesson for the “How To Do This Manual”.Is it not a solution to glue each plank separately to the hull rather than pre join them? It does mean you will have to get the bend of each half of the scarf joints perfect tho? This way the water and heat won’t affect the bond of the PVA?
Jan
What if you build a support structure between the bulkheads where the scarf joints are going to be ? This could also be done in a way to use clips to hold the scarf joints in place while they dry….or maybe use fillers between the bulkheads and some tiny “removable “nails Anyway you will make a plan for sure. Cheers GrantA good point Grant. I did try that method, unfortunately most of the scarf joints are either at the edges or span the space between frames. I couldn’t properly clamp the separate pieces to get a good fit. I haven’t started planking the starboard side yet, so I have a lot of time to come up with a solution. Another lesson for the “How To Do This Manual”.
Jan
Grant,What if you build a support structure between the bulkheads where the scarf joints are going to be ? This could also be done in a way to use clips to hold the scarf joints in place while they dry….or maybe use fillers between the bulkheads and some tiny “removable “nails Anyway you will make a plan for sure. Cheers Grant
Those are all excellent suggestions, all have merit, something to contemplate as I muddle along. I'm positive that I will stumble on a lot more "Hmm, I will have to think about this" build problems.
Planking down toward the keel the joints fall on the circled frames. As I progress down the beaks of the scarf joint almost touch the frames but at the same time the bend in plank is more pronounced so the pressure on the joints is increased.
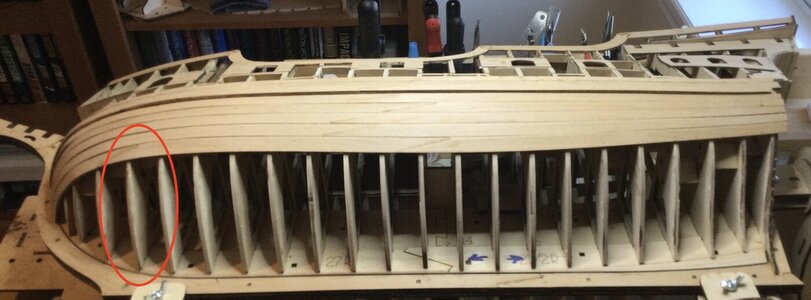
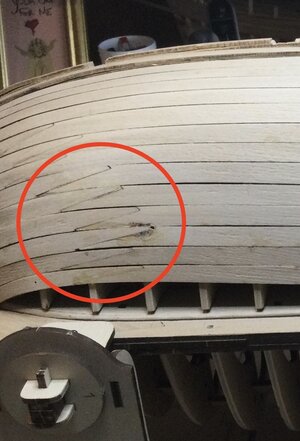
In the above photo you can see my "RE-DO" effort. Fortunately a bit of SANDING and the final paint job will camouflage this.
Jan
HOW DID YOU RE- DO IT LOOKS GOOD. GOD BLESS STAY SAFE YOU AND YOURS DON
Hi Don, thanks for stopping by.HOW DID YOU RE- DO IT LOOKS GOOD. GOD BLESS STAY SAFE YOU AND YOURS DON
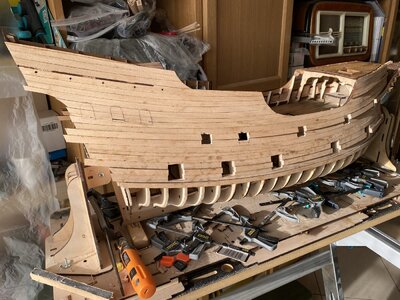
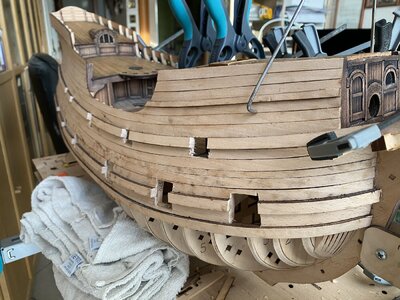
I did a very careful "RE-DO". I used Titebond III to re-glue the scarf joints, let the glue "cure" overnight and then glued the planks to the frames. A couple of the planks required a slight re-bend to get the proper fit. I only glue about six inches of plank at a time using 6" clamps and push pins to hold everything in place. It takes about an hour or so to do one plank once they are bent and dry fitted a couple of times.
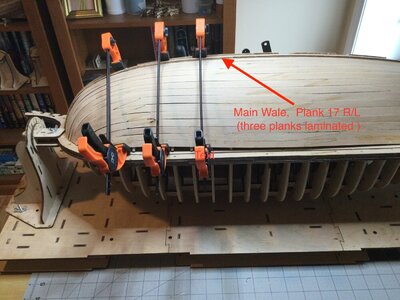
The Main Wale (Plank #17 R/L) is three planks laminated together and works great as a spot to hold the top of the clamps. My method is probably not the best but it works. The planks were held firmly in place.
Jan
- Joined
- Jan 9, 2020
- Messages
- 10,566
- Points
- 938

Hello Jan. What I find very interesting in the planking process, is that the instructions do not call for the garboard strakes to be installed much earlier. To me, this complicates matters. (I am sure that you are following the instructions to the "T".)
- Joined
- Nov 30, 2022
- Messages
- 132
- Points
- 113

Good job.Hi Don, thanks for stopping by.
I did a very careful "RE-DO". I used Titebond III to re-glue the scarf joints, let the glue "cure" overnight and then glued the planks to the frames. A couple of the planks required a slight re-bend to get the proper fit. I only glue about six inches of plank at a time using 6" clamps and push pins to hold everything in place. It takes about an hour or so to do one plank once they are bent and dry fitted a couple of times.
View attachment 372433
The Main Wale (Plank #17 R/L) is three planks laminated together and works great as a spot to hold the top of the clamps. My method is probably not the best but it works. The planks were held firmly in place.
Jan
Nice clamps. Could you tell me the brand and size? Thans
Hi Heinrich, great to see you have stopped by. The garboard strake is precut, as are all the other strakes. With that in mind there is very little wiggle room placing them. With myHello Jan. What I find very interesting in the planking process, is that the instructions do not call for the garboard strakes to be installed much earlier. To me, this complicates matters. (I am sure that you are following the instructions to the "T".)
Jan
Hi,Good job.
Nice clamps. Could you tell me the brand and size? Thans
I ordered the clamps from Amazon. The full span is 6 3/8 inches or 161mm. The jaw depth is 1 3/4 inches or 45mm.
Mr. Pen 6 inch clamps
Jan


