Nikitin San Bartolome 1584 A.D. (Kit #35)

The building progress has reached a milestone. We are at the start of Chapter two in the instructions.
12A3F962-D5BB-4DE3-8007-D55DD3B79443.jpeg

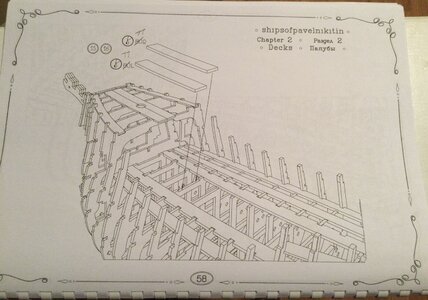
NOTE: The two pieces in the upper left corner marked 80L and 80R, I think should be 77L and 77R.


I had to move the hull to my adjustable workbench, sitting in my Office chair and working at desk level for any length of time proved to be to much. To give you a hint to the size of this build check out the tape measure at the bottom of the jig and the dimensions on the work mat. The width of my worktable is forty inches.
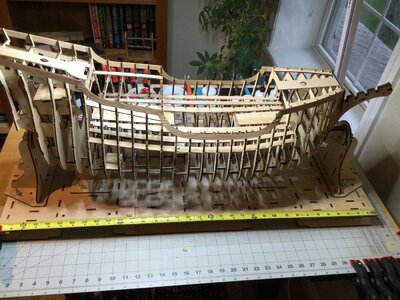
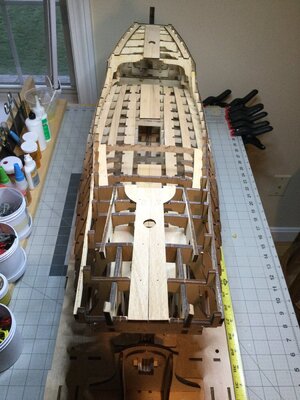
716434CA-3436-48A6-9673-EECEC5D00D87.jpeg

9F7D7BDF-D42A-4D91-A698-783F24B699EE.jpeg

The start of planking the deck is next. I’m trying to decide wether to pre-stain the planks with locally available paints or wait and order Pavel’s and the follow his paint video.
 
Last edited:
The building progress has reached a milestone. We are at the start of Chapter two in the instructions.

View attachment 342438

NOTE: The two pieces in the upper left corner marked 80L and 80R, I think should be 77L and 77R.


I had to move the hull to my adjustable workbench, sitting in my Office chair and working at desk level for any length of time proved to be to much. To give you a hint to the size of this build check out the tape measure at the bottom of the jig and the dimensions on the work mat. The width of my worktable is forty inches.

View attachment 342442

View attachment 342449

The start of planking the deck is next. I’m trying to decide wether to pre-stain the planks with locally available paints or wait and order Pavel’s and the follow his paint video.
It's a BEAST!
 
It sure is a big model, which should make adding the smaller details so much easier. Unfortunately, this type of model size is out of the question for me.

Indeed, the size is a big plus for a fumbler like me. Also I’m not constantly adjusting my head to see what I‘m doing because of bifocal glasses. Adding to that is that I’ve not “snapped off” any parts while handling the hull.:D
 
Indeed, the size is a big plus for a fumbler like me. Also I’m not constantly adjusting my head to see what I‘m doing because of bifocal glasses. Adding to that is that I’ve not “snapped off” any parts while handling the hull.:D
Good morning Jan. when it comes to small scale modelling I certainly agree with you re the benefit of size. “Lack of finesse Grant” needs big. ;)You are certainly moving ahead with this build- moving on the way to some fun planking and decking. Cheers Grant
 
Norėčiau sužinoti, ar Pavelas atnaujins neteisingas instrukcijas naujajame 1:64 rinkinyje
"I would like to know if Pavel will update the incorrect instructions in the new 1:64 kit"

I would like to know that as well, and also when the kit will be available.
Taip pat norėčiau žinoti, kada rinkinys bus prieinamas.
 
Good morning Jan. when it comes to small scale modelling I certainly agree with you re the benefit of size. “Lack of finesse Grant” needs big. ;)You are certainly moving ahead with this build- moving on the way to some fun planking and decking. Cheers Grant
Yup, I seem to be following the the same routine as in my model railroading hobby. I started with HO scale, moved to a new home and because of space restrictions switched to N scale, after retirement moved to a new home and had ample space to build a layout in G scale. I was very content putzing on my empire until the that fated day when the Constructo Enterprise kit landed on my doorstep. So that’s my story and I’m sticking to it.
 
Yup, I seem to be following the the same routine as in my model railroading hobby. I started with HO scale, moved to a new home and because of space restrictions switched to N scale, after retirement moved to a new home and had ample space to build a layout in G scale. I was very content putzing on my empire until the that fated day when the Constructo Enterprise kit landed on my doorstep. So that’s my story and I’m sticking to it.
Same hobby really... Grown men making small worlds.
 
Planking the main deck. A big step. I had to give that a bit of the “how am I going to do this” thought.

So…
Step #1 — Find the parts shown in the instructions.
Step #2 — Realize that all the parts used before had numbers etched into them, the deck planks don’t.
Step #3 — Label all the planks on the unfinished side.
Step #4 — Assemble all the main deck planks to get an idea of how they will fit.
Step #5 — Sand off all the char and get ready to start the glue process.

97B8D72F-9774-4126-A793-DA7ABB759DA7.jpeg
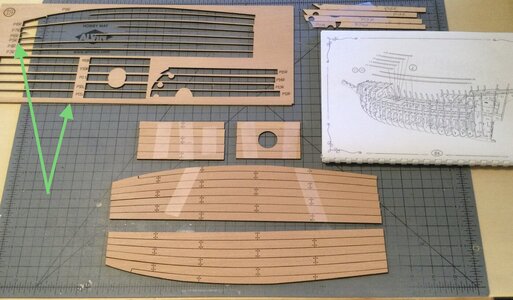
All the planks numbered (in the back), edges sanded and laid out in the deck pattern. The green arrows point to the plank pattern numbers.

E6DE933B-0099-4A17-A01A-17CE20BA9953.jpeg

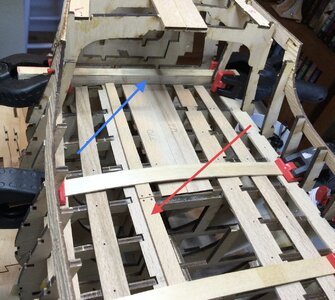
The blue arrow points to a temporary backstop for the deck planks to butt up to. The red arrow points to the first deck plank butted up against the backstop and the midship grating frame.

B81C994A-F222-412F-A847-DF4302A08747.jpeg

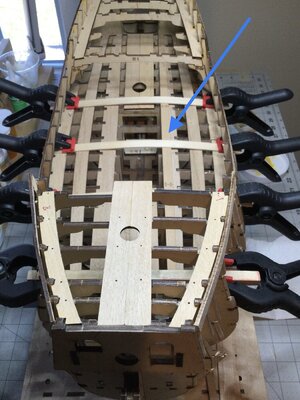
The first main deck plank fitted, glued and clamped in place. I think I’ve got this.
 
Planking the main deck. A big step. I had to give that a bit of the “how am I going to do this” thought.

So…
Step #1 — Find the parts shown in the instructions.
Step #2 — Realize that all the parts used before had numbers etched into them, the deck planks don’t.
Step #3 — Label all the planks on the unfinished side.
Step #4 — Assemble all the main deck planks to get an idea of how they will fit.
Step #5 — Sand off all the char and get ready to start the glue process.

View attachment 342612
All the planks numbered (in the back), edges sanded and laid out in the deck pattern. The green arrows point to the plank pattern numbers.

View attachment 342614

The blue arrow points to a temporary backstop for the deck planks to butt up to. The red arrow points to the first deck plank butted up against the backstop and the midship grating frame.

View attachment 342615

The first main deck plank fitted, glued and clamped in place. I think I’ve got this.
Good morning Jan. Excellent. The tree nails and caulking, Does the kit have these pre - marked? They look fantastic. Cheers Grant
 
Good morning Jan. Excellent. The tree nails and caulking, Does the kit have these pre - marked? They look fantastic. Cheers Grant
Hi Grant. The tree nails are “etched in”. There is a very slight depression between them to simulate the ends of the planks. The trick is to line all the tree nails up properly. The photo above shows my attempt at trying to see how all those planks fit together. Sleepyfish’s post noted that his plank alignment between the P and SB was different.
 
You seem to have the deck planking sorted out nicely, Jan. This is a kit which is certainly bringing some new things to the table for you and that must be exciting.
 
.You seem to have the deck planking sorted out nicely, Jan. This is a kit which is certainly bringing some new things to the table for you and that must be exciting.
Hi Heinrich.It certainly is a very interesting kit. The build instructions coupled with the various videos are excellent. I've found there are many "think ahead" moments before one starts a build step. I'm excited about starting the planking, up to now the hull looked like a big "Whachama-Dingy".
 
Back
Top