Please understand that all wooden kits will need work and adjustments to make parts fit. Use files, chisels, sandpapers, rotary tools and even dental tools to work your parts into shape. Also consider miniature hand planes to adjust thicknesses of planks. Part of building!I don't know the reason for using different material, but I seem to be in an opposit situation, the keel ends are thicker than the bulkhead notches. I have jus made some quick measuring, but there seems to be a difference of 0,1-0,2mm. I put the whole wooden kit in my heating room, to see if it changes after a couple of days.
-

Win a Free Custom Engraved Brass Coin!!!
As a way to introduce our brass coins to the community, we will raffle off a free coin during the month of August. Follow link ABOVE for instructions for entering.
-

PRE-ORDER SHIPS IN SCALE TODAY!
The beloved Ships in Scale Magazine is back and charting a new course for 2026!
Discover new skills, new techniques, and new inspirations in every issue.
NOTE THAT OUR FIRST ISSUE WILL BE JAN/FEB 2026
You are using an out of date browser. It may not display this or other websites correctly.
You should upgrade or use an alternative browser.
You should upgrade or use an alternative browser.
NORSKE LOVE - Billing Boats 1:75 scale
- Thread starter Dean62
- Start date
- Watchers 74
-
- Tags
- billing boats norske lowe
I think I would rather open up notches (remove material) than add shims (add material). But adjustments are always necessary. I had to adjust the notches on the deck sheets. Which is why I always plank after the decks are glued in place.I don't know the reason for using different material, but I seem to be in an opposit situation, the keel ends are thicker than the bulkhead notches. I have jus made some quick measuring, but there seems to be a difference of 0,1-0,2mm. I put the whole wooden kit in my heating room, to see if it changes after a couple of days.
Yes, I understand that, wood is a "living material" and it will change due to humidty and temperature. This is my first model with laser cut parts and I can see a difference in width of the bulkhead notches from 4,5 to 5,2mm. I think I would have expected less. The other ones I built I had to cut evertything my self, so in that case it was autmatically adjusted while cutting. But as Dean said, it's better to open the notches to correct width, than to add shims to them.Please understand that all wooden kits will need work and adjustments to make parts fit. Use files, chisels, sandpapers, rotary tools and even dental tools to work your parts into shape. Also consider miniature hand planes to adjust thicknesses of planks. Part of building!
Last edited:
- Joined
- Sep 3, 2021
- Messages
- 5,190
- Points
- 738

Another small issue is the thickness of the adhesives we use, in case we have a stack-up of bonded parts.Yes, I understand that, wood is a "living material" and it will change due to humidty and temperature. This is my first model with laser cut parts and I can see a difference in width of the bulkhead notches from 4,5 to 5,2mm. I think I would have expected less. The other ones I built I had to cut evertything my self, so in that case it was autmatically adjusted while cutting. But as Dean said, it's better to open the notches to correct width, thand to add shims to them.
My experience is that you'll easily have to take into account 0,1mm to 0,3mm for every single bondlayer. (I had to open up quite a few (every single) notches to match the bonded frames.
YES YOU SHOULD DO THAT.- there is a lot of minor details which can be done.-I've just passed 71 so I still have a few years to go. Still working full time though, and most of the time down in Poland, so it might take some time to finish this ship, but I'm optimistic, and hopefully I can bring some of the smaller detailes wirh me to finish on a trip.
Hi Dean
I see in one of your early pictures that you also had a gap between some frames and the outer edge of the deck. How did you solve this problem, did you sand the deck to shape, or did you fill up on the frame before planking the hull? I have the same problem and I need to deal with it when I'm back home next week again and before I glue the deck to the frames.
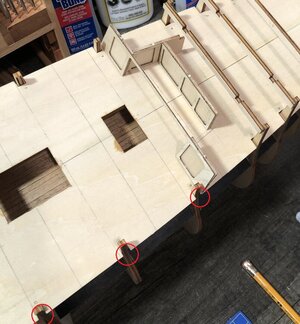
I see in one of your early pictures that you also had a gap between some frames and the outer edge of the deck. How did you solve this problem, did you sand the deck to shape, or did you fill up on the frame before planking the hull? I have the same problem and I need to deal with it when I'm back home next week again and before I glue the deck to the frames.

Last edited:
Hi, thanks for your message about Norske Love. Just for your info, my first one was built about 1992-1993 (a notHi Dean
I see in one of your early pictures that you also had a gap between some frames and the outer edge of the deck. How did you solve this problem, did you sand the deck to shape, or did you fill up on the frame before planking the hull? I have the same problem and I need to deal with it when I'm back home next week again and before I glue the deck to the frames.
View attachment 411164
Laser-Cut model). The second one was built in 1989 Th. (now Lasercut ). So which of the two are talking about? Anyway, it was more than 40 years ago.
to solve this problem- after having built the whole hull, I dry inserted the upper deck to see if it fit nicely -which is generally not the case -, so I made a new deck - using the one from the kit as a masterpiece, but not making the cut from the bulkhead. the inserted on top of the one from the kit and the made new cuts for the bulkheads, with the correct measure. the outside was sanded in place for the planking. I do not know your model, but in many cases, it is better to cut and move, the glue in another place. In my model, there was no real gunport on the inside of the ship but were glued to the hull on the outside of the hull. I have not used this method for a long but made my own frames with a 4x4 or 2x2 list to be glued inside
I learned to make to half deck outside this ship, set gast with a dobbel side Tape. on the middle line of each half let a 2,1 mm free - for later to insert the middle plank on the ship.
please apologise, if my message is not clear, but between 50 and 40 years ago, and have many reasons- health osv. not build the last 10 years. On the other hand, I have made a file about model building (about 40 GB ) I have started to make "HOW TO BUILD A MODEL SHIP FROM A Z
notes THE SECOND IMAGE IS A HELP TO MAKE THE CURVE ON THE DECK. It is not completely vertical.
KIND regard and merry x.mael Capi
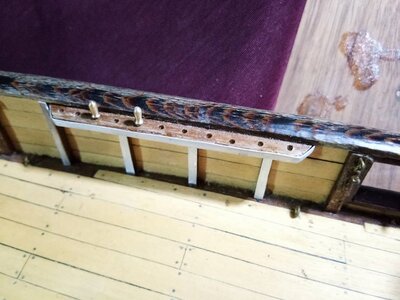
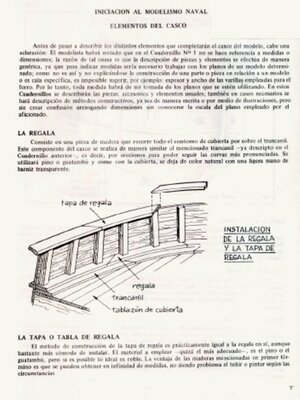
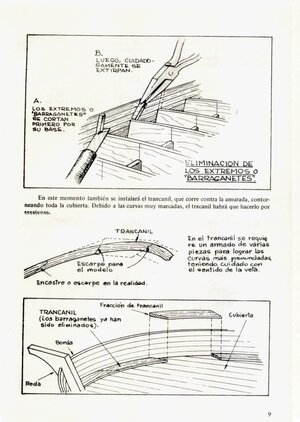
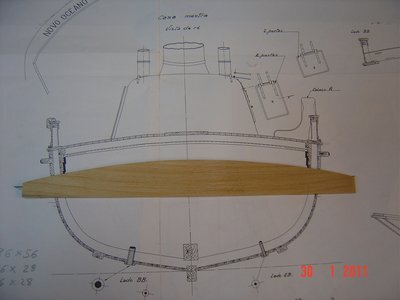
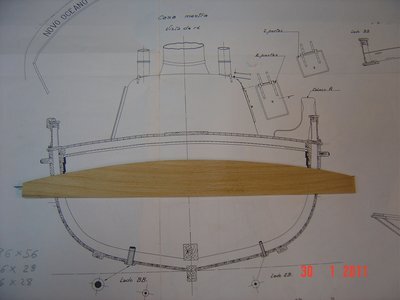
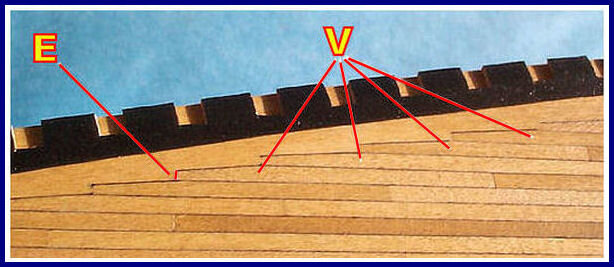
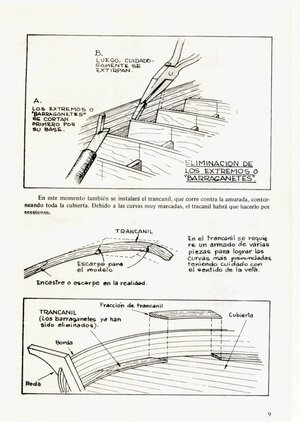
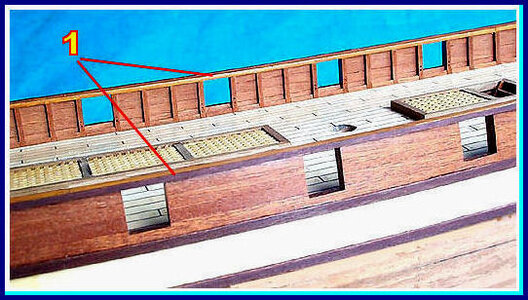
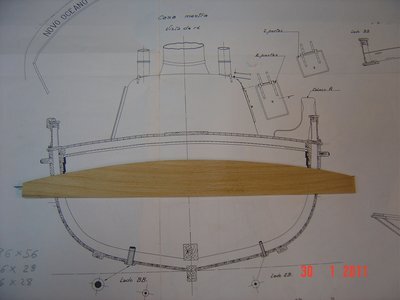
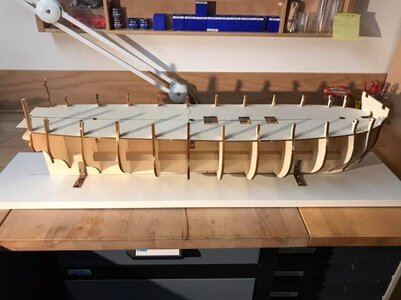
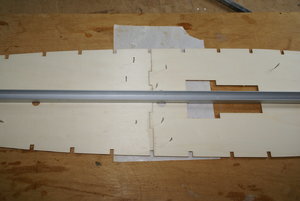
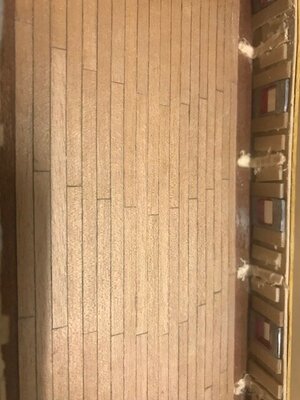
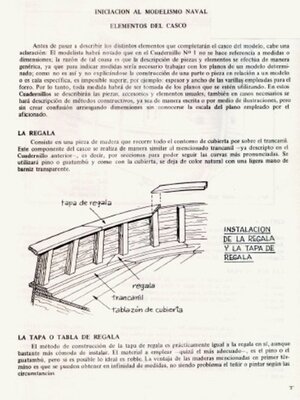
Hi, thanks for your message about Norske Love. Just for your info, my first one was built about 1992-1993 (a not
Laser-Cut model). The second one was built in 1989 Th. (now Lasercut ). So which of the two are talking about? Anyway, it was more than 40 years ago.
to solve this problem- after having built the whole hull, I dry inserted the upper deck to see if it fit nicely -which is generally not the case -, so I made a new deck - using the one from the kit as a masterpiece, but not making the cut from the bulkhead. the inserted on top of the one from the kit and the made new cuts for the bulkheads, with the correct measure. the outside was sanded in place for the planking. I do not know your model, but in many cases, it is better to cut and move, the glue in another place. In my model, there was no real gunport on the inside of the ship but were glued to the hull on the outside of the hull. I have not used this method for a long but made my own frames with a 4x4 or 2x2 list to be glued inside
I learned to make to half deck outside this ship, set gast with a dobbel side Tape. on the middle line of each half let a 2,1 mm free - for later to insert the middle plank on the ship.
please apologise, if my message is not clear, but between 50 and 40 years ago, and have many reasons- health osv. not build the last 10 years. On the other hand, I have made a file about model building (about 40 GB ) I have started to make "HOW TO BUILD A MODEL SHIP FROM A Z
notes THE SECOND IMAGE IS A HELP TO MAKE THE CURVE ON THE DECK. It is not completely vertical.
KIND regard and merry x.mael Capi
View attachment 411820
View attachment 411821
View attachment 411822
View attachment 411823
View attachment 411824
View attachment 411825
View attachment 411826
View attachment 411828
View attachment 411829
View attachment 411830
View attachment 411831
View attachment 411832
View attachment 411833
Just for your info, I have travelled about 15 years all over Europe, and Poland was in 3 4 places. (b after Spain and Portugal (I have visited about half of the Polish Brewery and Distiller mainly, but juice and berries plants too. still have some friends there
Dla Twojej informacji, podróżowałem po całej Europie około 15 lat, a Polska była w 3 4 miejscach. (b po Hiszpanii i Portugalii (odwiedziłem głównie około połowy Polskich Browarów i Gorzelni, ale także wytwórnie soków i jagód. Wciąż mam tam kilku przyjaciół)
Dla Twojej informacji, podróżowałem po całej Europie około 15 lat, a Polska była w 3 4 miejscach. (b po Hiszpanii i Portugalii (odwiedziłem głównie około połowy Polskich Browarów i Gorzelni, ale także wytwórnie soków i jagód. Wciąż mam tam kilku przyjaciół)
Hi El Capo
My post was actually meant for Dean62, and I started with "Hi Dean". It's his model in the picture I attached and I copied it from his thread. This refers to a model with laser cut parts, and my qustion was actually what to trust the most, the form of the main deck or the shape of the bulkheads (frames). My guess is that the laser cut deck is slightly oversized and need to be sanded off at the outer edge, just wanted to get a confirmation on that. I'm live in the south of Sweden, but working in Poland from time to time, going back home tomorrow.
// Krister
Last edited:
I appreciate you are busy at this time Dean but I just want to take this opportunity to express my admiration for your work ethic and my gratitude for the time you have spent laying this all out for us. I am new to ship modelling, coming from the air side. At 73 my skills are declining and I've read NEVER to start with a model such as this. Well, this is the kit I have and I don't have time to learn on a few lesser models. I searched, in vain, through many you tube videos to get some guidance. They were mostly unsatisfactory. When I happened upon this site, I realized I had struck gold. I have no expectation of such results as yours but I have a target to aim for. Your many great photos and explanations give me so much more to work with. I may never complete this task but that is not important. I will enjoy the journey - thanks to you.
with great respect,
John
with great respect,
John
Hello,Hi El Capo
My post was actually meant for Dean62, and I started with "Hi Dean". It's his model in the picture I attached and I copied it from his thread. This refers to a model with laser cut parts, and my qustion was actually what to trust the most, the form of the main deck or the shape of the bulkheads (frames). My guess is that the laser cut deck is slightly oversized and need to be sanded off at the outer edge, just wanted to get a confirmation on that. I'm live in the south of Sweden, but working in Poland from time to time, going back home tomorrow.
// Krister
I am sorry I have not been online to see your question. Yes the deck is oversized and the bulkheads all have to be faired and the sides of the deck too. I will find a picture of the fairing…
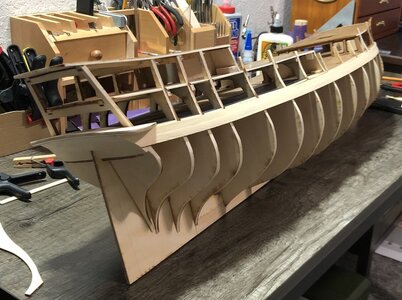
Then after planking the upper hull…
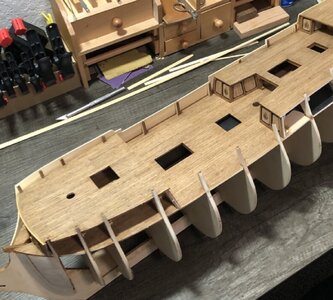
Notice the thin wall of the outer planking only at this point. (Above)
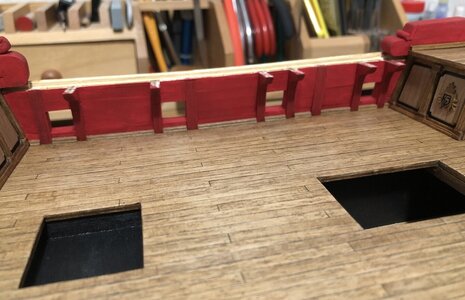
Above the inner wall has been added …
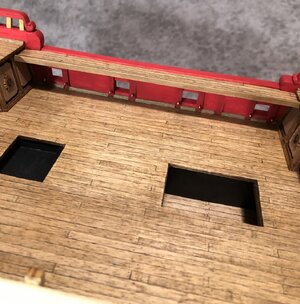
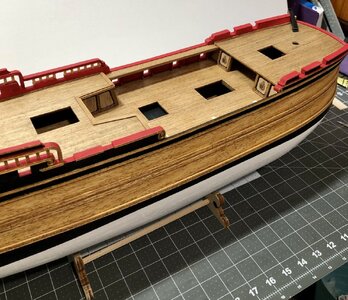
Anyway, I hope this helps show the fairing, planking and inner wall additions
Last edited:
Thank you very much, I appreciate the compliment! My intent was to share my journey, not so much show how to build it, because I made it my own version per my personal taste. But it’s good to hear it is helping others.I appreciate you are busy at this time Dean but I just want to take this opportunity to express my admiration for your work ethic and my gratitude for the time you have spent laying this all out for us. I am new to ship modelling, coming from the air side. At 73 my skills are declining and I've read NEVER to start with a model such as this. Well, this is the kit I have and I don't have time to learn on a few lesser models. I searched, in vain, through many you tube videos to get some guidance. They were mostly unsatisfactory. When I happened upon this site, I realized I had struck gold. I have no expectation of such results as yours but I have a target to aim for. Your many great photos and explanations give me so much more to work with. I may never complete this task but that is not important. I will enjoy the journey - thanks to you.
with great respect,
John
I hope to find time to get back to it soon!
Best Regards,
Dean
I appreciate you are busy at this time Dean but I just want to take this opportunity to express my admiration for your work ethic and my gratitude for the time you have spent laying this all out for us. I am new to ship modelling, coming from the air side. At 73 my skills are declining and I've read NEVER to start with a model such as this. Well, this is the kit I have and I don't have time to learn on a few lesser models. I searched, in vain, through many you tube videos to get some guidance. They were mostly unsatisfactory. When I happened upon this site, I realized I had struck gold. I have no expectation of such results as yours but I have a target to aim for. Your many great photos and explanations give me so much more to work with. I may never complete this task but that is not important. I will enjoy the journey - thanks to you.
with great respect,
John
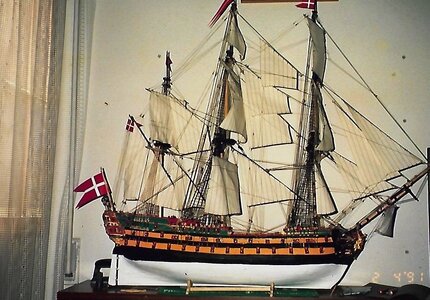
HEY kRISTER. If it is Norske Love you want or are trying to build, I have a hugh amount of materials on that ship. The first build was in 1971-1973 ( not as mentioned further up 1992-1993: This was my 2 Nd and laser cut. The 1Th ONE NOT. You had to cut out each piece with a Hacksaw (paa Dansk LØVSAV). Many of the images further up are from me. If you have questions and help just contact me. If you want to see a master model, look for Prinz Frerich -sistership tp Norske LØVE built by Calibot Germany -Karl Malze. This Ship is today in a Museum (SAMSØ). the first image- is from 1993 the laser-cut version. the second 40 years after
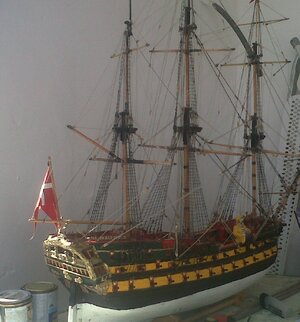
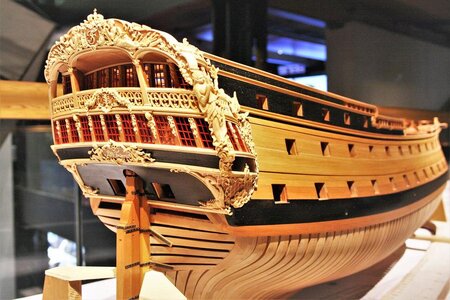
Hi Dean.Hello,
I am sorry I have not been online to see your question. Yes the deck is oversized and the bulkheads all have to be faired and the sides of the deck too. I will find a picture of the fairing…
View attachment 418771
Then after planking the upper hull…
View attachment 418772
Notice the thin wall of the outer planking only at this point. (Above)
View attachment 418773
Above the inner wall has been added …
View attachment 418774View attachment 418775
Anyway, I hope this helps show the fairing, planking and inner wall additions
No worries, I think I have that figured ou already, seems like you're right about the deck being oversized. I'm half way through fairing the bulkheads and the decks, now going to test with a dry plank to see that it fits smoothly everywhere. But, when looking at the instructions there seems to be a discrepancy between for example fig.3 and fig.6 when it comes to planking the hull. I have marked a couple of planks with red, and I think they are located at roughly the same place in both figures. What is your thought about this? The old kit that I built some 30-40yrs ago looked very different at the stern
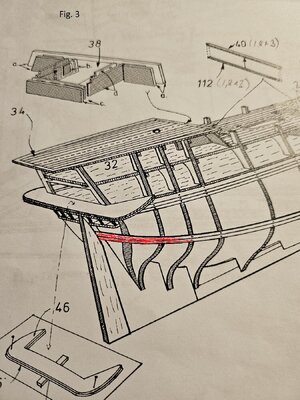
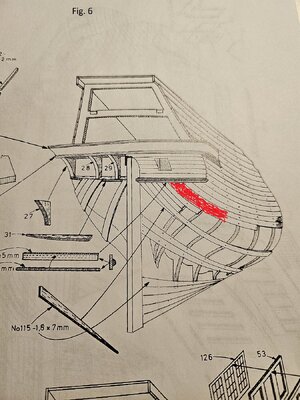
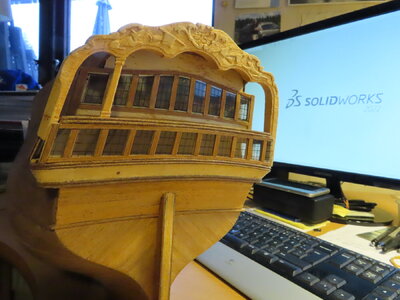
Figure 6 is the correct way...if you go back in my log you can see how I did it...Hi Dean.
No worries, I think I have that figured ou already, seems like you're right about the deck being oversized. I'm half way through fairing the bulkheads and the decks, now going to test with a dry plank to see that it fits smoothly everywhere. But, when looking at the instructions there seems to be a discrepancy between for example fig.3 and fig.6 when it comes to planking the hull. I have marked a couple of planks with red, and I think they are located at roughly the same place in both figures. What is your thought about this? The old kit that I built some 30-40yrs ago looked very different at the stern
View attachment 418960
View attachment 418961
View attachment 418962
Yes Dean, I believe you're right, I'll try to go that wayFigure 6 is the correct way...if you go back in my log you can see how I did it...
Here are a few pictures of mine during planking…Yes Dean, I believe you're right, I'll try to go that way

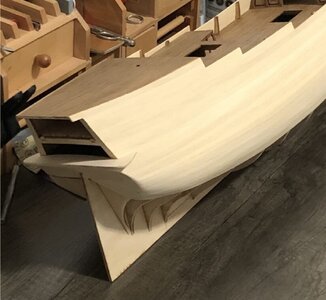
Some commented I should have come in steeper, but I favored a more gradual transition. As long as both sides are the same, I think the actual angle is not very important. Just make it look pleasing to the eye.
Yes, I will try to do something like that. I will also try to make a build log of my ship. Even though I'm close to start planking I have photos all the way from start
CORRECTHi Dean.
No worries, I think I have that figured ou already, seems like you're right about the deck being oversized. I'm half way through fairing the bulkheads and the decks, now going to test with a dry plank to see that it fits smoothly everywhere. But, when looking at the instructions there seems to be a discrepancy between for example fig.3 and fig.6 when it comes to planking the hull. I have marked a couple of planks with red, and I think they are located at roughly the same place in both figures. What is your thought about this? The old kit that I built some 30-40yrs ago looked very different at the stern
View attachment 418960
View attachment 418961
View attachment 418962


