
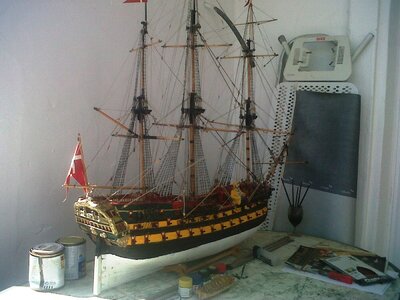
MY FAVOURED SHIP. BUILD 3 AND RESTORES 2Welcome to my build log! Let's start with the basics:
Norske Love – Billing Boats
Scale 1:75 = 101 cm (39.76 in) long x 90 cm (35.43 in) tall x 20 cm (7.87 in) wide
HISTORY:
The Norske Love (Norwegian Lion) was designed by Frederik Michael Krabbe, a naval officer and leading ship designer, and built in 1765 by the Nyholm shipyard, close to Copenhagen. The ship was originally named after the Norwegian Lion and the Danish-Norwegian Imperial Coat of Arms. All ornaments, made by the sculptor C. Moellerup, were reminders of Norway. On the transom, there is a fisherman and farmer, symbolizing the most important trades of Norway, agriculture and fishing.
Norske Love was the second built from a series of three, the two others being Printz Friderich and Dronning Caroline Mathilde, later renamed Oresund in 1772.
She was a 3 mast warship, length 48.93 m, breadth 9.70 m, draught 5.07 m, displacement 1,076 tons. There was a normal crew of 667 men and an armament of 70 cannons. She mounted 26 cannons (24 pounders) on the lower deck, 26 cannons (18 pounders) on the mid deck and 18 cannons (8 pounders) on the upper deck. The Norske Love was used as a guard ship in Oresund and other Danish waters.
In 1789 it was equipped as a guard ship to protect Russian ships in the Danish waters. In 1795, after having been stripped into a block ship, she was used to give shelter for homeless families after the fire in Copenhagen that same year. In 1798 she was deleted from the naval register.
In addition, according to the history of the Royal Danish Navy, there were other ships named the Norske Love, prior to the one the model represents. The list is as follows:
Norske Love (1634-1653), Norske Love (1654-1665), Norske Love (1666-1679), Norske Love (1680-1715), Norske Love (1735-1764), Norske Love (1765-1798)
The Danish-Norwegian warships were, until 1780, tared with a very dark brown color, after which they were painted black with light-yellow battery lines – the so called “Nelson Look” The decks were light tar-colored and the gun carriages were red.

-

SUBSCRIBE TO SHIPS IN SCALE TODAY!
The beloved Ships in Scale Magazine is back and charting a new course for 2026!
Discover new skills, new techniques, and new inspirations in every issue.
NOTE THAT OUR NEXT ISSUE WILL BE MARCH/APRIL 2026 -

Win a Free Custom Engraved Brass Coin!!!
As a way to introduce our brass coins to the community, we will raffle off a free coin during the month of August. Follow link ABOVE for instructions for entering.
You are using an out of date browser. It may not display this or other websites correctly.
You should upgrade or use an alternative browser.
You should upgrade or use an alternative browser.
NORSKE LOVE - Billing Boats 1:75 scale
- Thread starter Dean62
- Start date
- Watchers 74
-
- Tags
- billing boats norske lowe
Hi Dean. Your time invested in chamfering the bulkheads now pays for itself! The planks run smoothly from front to back. A very solid base.I started the first two planks. It’s too early to tell what I have yet, but it looks promising so far.
View attachment 276704View attachment 276716View attachment 276717View attachment 276718
Regards, Peter


Thanks Johan, I said I was taking a short break on the ship. Break is over!And this is where the difference is made between the near professional builders and the good willing modelers like myself.
What a nice, clean job!
PS I thought you mentioned there would be no work done on the Lowe until after new year, or am I mistaken?

Thank you Peter!Hi Dean. Your time invested in chamfering the bulkheads now pays for itself! The planks run smoothly from front to back. A very solid base.
Regards, Peter
- Joined
- Sep 3, 2021
- Messages
- 5,209
- Points
- 738

And your Admiral, daughters and granddaughter let you get away with that? Prior to Christmas? You sure are on their good side.Thanks Johan, I said I was taking a short break on the ship. Break is over!
But it's good to see your updates again ánd that the break did not impair the quality of your work!
")
Yes, I have to figure out the best way to do it. I will mark all the bulkheads first, to determine tapers needed and where I need stealers on the stern.I see what you mean. It also looks like you will have to pre-shape some planks (yellow plank edge)
View attachment 276747
But for now I will just plank upwards to the decks. Finish both sides. Then I will be dealing with all the planks from the wales down.
Well…my granddaughter and my to do list, has kept me busy. I only have an hour or two in the evenings to get anything done. So it’s a one board a day type progress!And your Admiral, daughters and granddaughter let you get away with that? Prior to Christmas? You sure are on their good side.
But it's good to see your updates again ánd that the break did not impair the quality of your work!
- Joined
- Sep 3, 2021
- Messages
- 5,209
- Points
- 738
Understood, but progress is progress and definitely a step closer to completing your journey.Well…my granddaughter and my to do list, has kept me busy. I only have an hour or two in the evenings to get anything done. So it’s a one board a day type progress!
- Joined
- Sep 3, 2021
- Messages
- 5,209
- Points
- 738
I am quite interested in how you will be dealing with stealers and tapers. I've been trying to imagine how to best approach it, but I find myself rather overwhelmed, see herewith also Heinrich's build of the Witte Swaen.Yes, I have to figure out the best way to do it. I will mark all the bulkheads first, to determine tapers needed and where I need stealers on the stern.
But for now I will just plank upwards to the decks. Finish both sides. Then I will be dealing with all the planks from the wales down.
My concerns are that most kits supply 5- or 6mm wide planks, but at stealer locations builders sometimes use wider than the standard supplied width. Tapers or wedges sometimes also appear to be wider than the supplied planks. The wider than standard width is also apparent on replica builds, though my knowledge in that regard is limited.
I will try to document some of that when I get to the lower hull. I prefer to use marks on the hull frames. If you start mid ship where your largest frames are, and measure the length from your lowest board (usually below the deck or at lowest wales) to the keel, you can divide that length by the width of your planks. That is the number of planks needed. You will now move towards bow and stern and mark each frame, but you will divide each frame length by the predetermined number of planks. This will show you the taper needed from frame to frame along the ship from bow to stern. If the taper gets to less than half the width of a board, usually at the bow, then you have to do a drop plank. At the stern, that area tends to be bigger than the available planks can cover (similar to a fish tail), requiring additional planks called stealers to help fill in the area. Where you put those stealers is usually determined by how the boards want to lay normally.I am quite interested in how you will be dealing with stealers and tapers. I've been trying to imagine how to best approach it, but I find myself rather overwhelmed, see herewith also Heinrich's build of the Witte Swaen.
My concerns are that most kits supply 5- or 6mm wide planks, but at stealer locations builders sometimes use wider than the standard supplied width. Tapers or wedges sometimes also appear to be wider than the supplied planks. The wider than standard width is also apparent on replica builds, though my knowledge in that regard is limited.
Hope all that makes sense!
In addition to tapering, you may need to bevel one edge of the plank so there is no gap on external and internal radius’s.
The taper should be towards the keel and the bevel towards the top or deck. Never on the same side.
Last edited:
- Joined
- Sep 3, 2021
- Messages
- 5,209
- Points
- 738
This sure makes sense, thanks! Basically you determine the shape of each and every plank, prior to making any cut? So you know exactly where you'll have the stealers and how and where you have to drop a plank?I will try to document some of that when I get to the lower hull. I prefer to use marks on the hull frames. If you start mid ship where your largest frames are, and measure the length from your lowest board (usually below the deck or at lowest wales) to the keel, you can divide that length by the width of your planks. That is the number of planks needed. You will now move towards bow and stern and mark each frame, but you will divide each frame length by the predetermined number of planks. This will show you the taper needed from frame to frame along the ship from bow to stern. If the taper gets to less than half the width of a board, usually at the bow, then you have to do a drop plank. At the stern, that area tends to be bigger than the available planks can cover (similar to a fish tail), requiring additional planks called stealers to help fill in the area. Hope that makes sense!
Again it's the matter of proper preparation, which determines the quality and appearance of one's pkankjob.
Correct! You can put in the work, and treat each board as a mini project, or you can fly blind and just throw boards on the hull. The later will result in accumulation of error and bends that will cause gaps and the need for filler. Also at the bow you end up with scalloped boards and when sanded leave low areas, that require filler!This sure makes sense, thanks! Basically you determine the shape of each and every plank, prior to making any cut? So you know exactly where you'll have the stealers and how and where you have to drop a plank?
Again it's the matter of proper preparation, which determines the quality and appearance of one's pkankjob.
You see these type errors a lot, but if you are doing a single plank ship and want it to be able to be sanded smooth with no filler, you really have to put in the extra effort.

I will try to document some of that when I get to the lower hull. I prefer to use marks on the hull frames. If you start mid ship where your largest frames are, and measure the length from your lowest board (usually below the deck or at lowest wales) to the keel, you can divide that length by the width of your planks. That is the number of planks needed. You will now move towards bow and stern and mark each frame, but you will divide each frame length by the predetermined number of planks. This will show you the taper needed from frame to frame along the ship from bow to stern. If the taper gets to less than half the width of a board, usually at the bow, then you have to do a drop plank. At the stern, that area tends to be bigger than the available planks can cover (similar to a fish tail), requiring additional planks called stealers to help fill in the area. Where you put those stealers is usually determined by how the boards want to lay normally.
Hope all that makes sense!
In addition to tapering, you may need to bevel one edge of the plank so there is no gap on external and internal radius’s.
The taper should be towards the keel and the bevel towards the top or deck. Never on the same side.Your
Your procedure is what I thought most builders followed and I agree with in the methodology. But then being rather new to the hobby I know that there are more than one ways to skin a cat. Your dedication to precise filing will make those strakes tight and properly seated. RichCorrect! You can put in the work, and treat each board as a mini project, or you can fly blind and just throw boards on the hull. The later will result in accumulation of error and bends that will cause gaps and the need for filler. Also at the bow you end up with scalloped boards and when sanded leave low areas, that require filler!
You see these type errors a lot, but if you are doing a single plank ship and want it to be able to be sanded smooth with no filler, you really have to put in the extra effort.
The next board required a notch to go around the base of the quarter galleries. The problem with this, is getting a tight fit without any gaps. See below…
In hindsight, it would have been best if I had made a notch in the front of the sharp corners the thickness of a plank, and then I could have slid the plank under it enough to get past the sharp corner. But it’s too late for that.
So I had to get creative and make a plank that had a notch, and add a taper with a file at the angle of the corner of the upper piece, then add a cut for the lower piece that had to be chamfered at 45 degrees internally to match it.
See below…

With that piece, I could then make a snug fit with no gaps. Whew…
See below…

Next plank!
Merry Christmas and Happy New Year to all!
In hindsight, it would have been best if I had made a notch in the front of the sharp corners the thickness of a plank, and then I could have slid the plank under it enough to get past the sharp corner. But it’s too late for that.
So I had to get creative and make a plank that had a notch, and add a taper with a file at the angle of the corner of the upper piece, then add a cut for the lower piece that had to be chamfered at 45 degrees internally to match it.
See below…
With that piece, I could then make a snug fit with no gaps. Whew…
See below…
Next plank!
Merry Christmas and Happy New Year to all!
Last edited:
Dean you are not just a painter but a sculptor as well!!! RichThe next board required a notch to go around the base of the quarter galleries. The problem with this, is getting a tight fit without any gaps. See below…View attachment 277178
In hindsight, it would have been best if I had made a notch in the front of the sharp corners the thickness of a plank, and then I could have slid the plank under it enough to get past the sharp corner. But it’s too late for that.
So I had to get creative and make a plank that had a notch, and add a taper with a file at the angle of the corner of the upper piece, then add a cut for the lower piece that had to be chamfered at 45 degrees internally to match it.
See below…
View attachment 277179
With that piece, I could then make a snug fit with no gaps. Whew…
See below…
View attachment 277183
Next plank!
Merry Christmas and Happy New Year to all!
- Joined
- Jan 9, 2020
- Messages
- 10,707
- Points
- 938
Nice work on that notch.  It's so funny - one can plan all you like, but you will still come across a situation from time to time, where you wish you had that wonderful hindsight BEFORE the time. I also had a few of those moments so far and I suppose there will be plenty more.
It's so funny - one can plan all you like, but you will still come across a situation from time to time, where you wish you had that wonderful hindsight BEFORE the time. I also had a few of those moments so far and I suppose there will be plenty more.Hi Dean. Good description of your process and methodology. Your planking is meeting the Lion’s expectations - brilliant for sure- he is going to start roaring. Reading yours and Heinrich’s planking process I wonder how on earth I managed to get my Victory hull ok. Sort of cut shaped and planked- a bit of beginner luck. Thanks for sharing your build
- Joined
- Sep 3, 2021
- Messages
- 5,209
- Points
- 738
Same to you and to the ones you hold dear!Merry Christmas and Happy New Year to all!
A nice lesson in 'planking around a corner', Dean. The circumstances determine the approach. With a creative solution.The next board required a notch to go around the base of the quarter galleries. The problem with this, is getting a tight fit without any gaps. See below…View attachment 277178
In hindsight, it would have been best if I had made a notch in the front of the sharp corners the thickness of a plank, and then I could have slid the plank under it enough to get past the sharp corner. But it’s too late for that.
So I had to get creative and make a plank that had a notch, and add a taper with a file at the angle of the corner of the upper piece, then add a cut for the lower piece that had to be chamfered at 45 degrees internally to match it.
See below…
View attachment 277179
With that piece, I could then make a snug fit with no gaps. Whew…
See below…
View attachment 277183
Next plank!
Merry Christmas and Happy New Year to all!
Regards, Peter