Gracias! Feliz Navidad para ti y tu familia!Gran trabajo el que estás haciendo Dean, Feliz Navidad.
-

Win a Free Custom Engraved Brass Coin!!!
As a way to introduce our brass coins to the community, we will raffle off a free coin during the month of August. Follow link ABOVE for instructions for entering.
-

PRE-ORDER SHIPS IN SCALE TODAY!
The beloved Ships in Scale Magazine is back and charting a new course for 2026!
Discover new skills, new techniques, and new inspirations in every issue.
NOTE THAT OUR FIRST ISSUE WILL BE JAN/FEB 2026
You are using an out of date browser. It may not display this or other websites correctly.
You should upgrade or use an alternative browser.
You should upgrade or use an alternative browser.
NORSKE LOVE - Billing Boats 1:75 scale
- Thread starter Dean62
- Start date
- Watchers 74
-
- Tags
- billing boats norske lowe
- Joined
- Sep 3, 2021
- Messages
- 5,198
- Points
- 738

I think, meanig no disrespect to others, that this is one of the best planking jobs I've ever seen.Today I finished the port side upper hull planking. I did some initial sanding with 150 grit sandpaper, there are still a few areas that need a little more sanding. So far I’m happy with what I have. Soon I will start marking the lower frames to determine the flow of the planks.
A few pics of current progress…
View attachment 277680View attachment 277681View attachment 277683

- Joined
- Sep 3, 2021
- Messages
- 5,198
- Points
- 738

Second that!To me, who does not celebrate this holiday, the best gift of Christmas is the company of friends like you. Merry Christmas and Happy New Year in advance!
View attachment 277788
Thank you Johan!I think, meanig no disrespect to others, that this is one of the best planking jobs I've ever seen.
Merry Christmas to you and your family!
Merry Christmas to everyone and their families!
Have a great holiday weekend! See you next week!
Have a great holiday weekend! See you next week!
Also for you and you beloved: Merry Christmas and the best wishes for the new year.Merry Christmas to everyone and their families!
Have a great holiday weekend! See you next week!
PS:
Nice planking with beautifull lines and balance.
Regards, Peter
- Joined
- Sep 3, 2021
- Messages
- 5,198
- Points
- 738

Hey Dean,Thank you Johan!
Merry Christmas to you and your family!
Thanks for the season wishes.
Of course merry Christmas and a prosperous New Year for you and your family as well!
Johan
Last edited:
I took about 3 days off to take care of things around the house and spend time with the grandkids!
Then I marked the frames and divided them into 4 belts. Then I look at the taper required in each belt to keep the bends from getting too extreme.
I actually put tape on the frames and marked the edge for the belts. Then checked with boards to see if the curves were natural.
Here is a view of some of the marked frames…
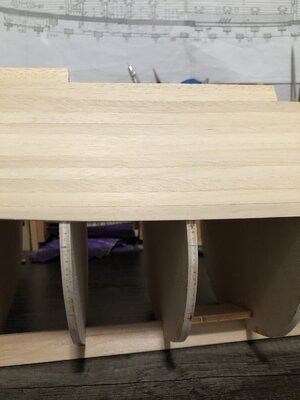
The heavy lines are where the belts are.
Anyway, satisfied with that I started tapering and beveling planks and adding them to the first belt. It is SLOW work!
I’m about 4 boards into the first belt.
At the stern, I practiced the bends on a few scrap pieces. It is nearly a 90 degree bend with a 2mm thick plank! I ended up having to soak them about 10 minutes in hot water and then towel dry and use my soldering iron shaft to add enough heat as I slowly bend them. Only way I could keep from splitting them!
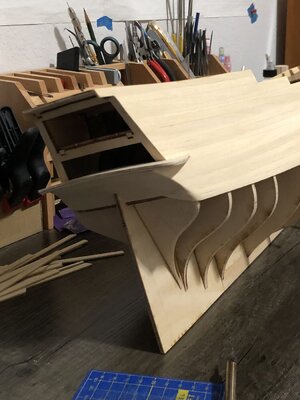
So I’m getting the hang of that!
Here is a few overall pics…
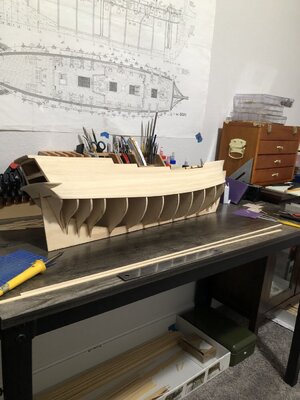
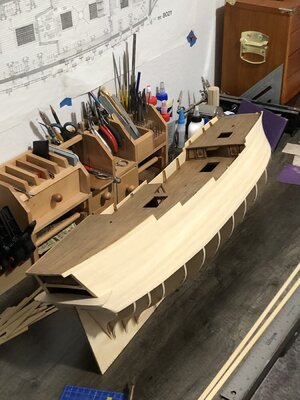
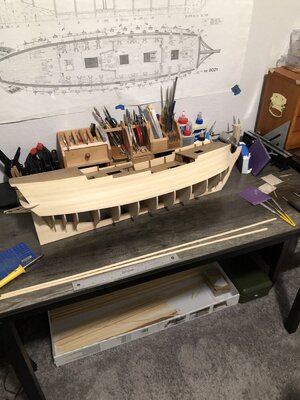
See you when I have more progress to show!
Ps - belts are 6 planks each, for a total of 24 boards per side, not including the garboard plank!
Then I marked the frames and divided them into 4 belts. Then I look at the taper required in each belt to keep the bends from getting too extreme.
I actually put tape on the frames and marked the edge for the belts. Then checked with boards to see if the curves were natural.
Here is a view of some of the marked frames…

The heavy lines are where the belts are.
Anyway, satisfied with that I started tapering and beveling planks and adding them to the first belt. It is SLOW work!
I’m about 4 boards into the first belt.
At the stern, I practiced the bends on a few scrap pieces. It is nearly a 90 degree bend with a 2mm thick plank! I ended up having to soak them about 10 minutes in hot water and then towel dry and use my soldering iron shaft to add enough heat as I slowly bend them. Only way I could keep from splitting them!

So I’m getting the hang of that!
Here is a few overall pics…


See you when I have more progress to show!
Ps - belts are 6 planks each, for a total of 24 boards per side, not including the garboard plank!
Last edited:
- Joined
- Jan 9, 2020
- Messages
- 10,566
- Points
- 938

Yes my friend, it is slow work. However, you are taking your time and ensuring that the planks run accurately and that is important. I would strongly advise you to get a plank bender. The curved head just make for a consistency in your bends that I think would otherwise be difficult to achieve. And by moving the plank deeper or shallower underneath the encapsulating ring, you can change the gradients very easily from shallow to sharper. And as you can see, 90-degree plus bends are no issue.
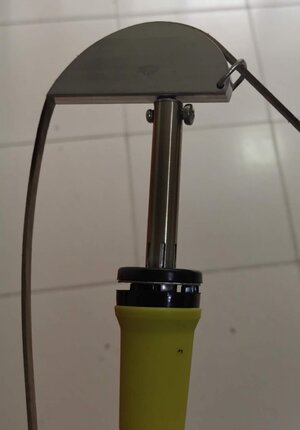
In all my time I have used this plank bender, I have not broken a single plank while bending it. (it obviously goes without saying that the planks needs to be soaked in water first and that the head of the plank bender needs to be properly heated first.)

In all my time I have used this plank bender, I have not broken a single plank while bending it. (it obviously goes without saying that the planks needs to be soaked in water first and that the head of the plank bender needs to be properly heated first.)
Impressive is a weak word to describe the amazement of you achieving ~90 degree bends without fracturing the wood. You really boiled the fibers to a point that Swedes would call "Lagom" which to the Italians describing perfect pasta may be Al Dente! To the Tooth, Just Right, Outstanding work under your skilled hands my friend!!!!I took about 3 days off to take care of things around the house and spend time with the grandkids!
Then I marked the frames and divided them into 4 belts. Then I look at the taper required in each belt to keep the bends from getting too extreme.
I actually put tape on the frames and marked the edge for the belts. Then checked with boards to see if the curves were natural.
Here is a view of some of the marked frames…
View attachment 278837
The heavy lines are where the belts are.
Anyway, satisfied with that I started tapering and beveling frames and adding to the first belt. It is SLOW work!
I’m about 4 boards into the first belt.
At the stern, I practiced the bends on a few scrap pieces. It is nearly a 90 degree bend with a 2mm thick plank! I ended up having to soak them about 10 minutes in hot water and then towel dry and use my soldering iron shaft to add enough heat as I slowly bend them. Only way I could keep from splitting them!
View attachment 278838
So I’m getting the hang of that!
Here is a few overall pics…
View attachment 278839View attachment 278840View attachment 278841
See you when I have more progress to show!
Ps - belts are 6 planks each, for a total of 24 boards per side, not including the garboard plank!

I agree that I eventually need a plank bender like that. But these bends I did while the board was on the ship, that way I can actually bend it around the frame to get the exact bend I need. Especially since the bend is at an angle, not parallel to the board! Then I remove it and add glue and place permanently.Yes my friend, it is slow work. However, you are taking your time and ensuring that the planks run accurately and that is important. I would strongly advise you to get a plank bender. The curved head just make for a consistency in your bends that I think would otherwise be difficult to achieve. And by moving the plank deeper or shallower underneath the encapsulating ring, you can change the gradients very easily from shallow to sharper. And as you can see, 90-degree plus bends are no issue.
View attachment 278844
In all my time I have used this plank bender, I have not broken a single plank while bending it. (it obviously goes without saying that the planks needs to be soaked in water first and that the head of the plank bender needs to be properly heated first.)
Last edited:
My own question is to what the radius is for the squared corner. 90 Degrees is easy with large radii but when that becomes too small, I don't understand how this bender with the "large radius" would work . . . just wondering????Yes my friend, it is slow work. However, you are taking your time and ensuring that the planks run accurately and that is important. I would strongly advise you to get a plank bender. The curved head just make for a consistency in your bends that I think would otherwise be difficult to achieve. And by moving the plank deeper or shallower underneath the encapsulating ring, you can change the gradients very easily from shallow to sharper. And as you can see, 90-degree plus bends are no issue.
View attachment 278844
In all my time I have used this plank bender, I have not broken a single plank while bending it. (it obviously goes without saying that the planks needs to be soaked in water first and that the head of the plank bender needs to be properly heated first.)
Rich
Thank you Rich! I was getting worried after a few failed attempts!Impressive is a weak word to describe the amazement of you achieving ~90 degree bends without fracturing the wood. You really boiled the fibers to a point that Swedes would call "Lagom" which to the Italians describing perfect pasta may be Al Dente! To the Tooth, Just Right, Outstanding work under your skilled hands my friend!!!!
Agreed Rich! This type bender will not help with the bends I am doing! First, it is a very small radius around the frame, second the bend is upwards at an angle that is not parallel to the board! So I am heating the wet board as I bend it slowly around the frame and upwards at the same time! Has to be done with the board in place, you can’t guess, it has to be exact!My own question is to what the radius is for the squared corner. 90 Degrees is easy with large radii but when that becomes too small, I don't understand how this bender with the "large radius" would work . . . just wondering????
Rich
- Joined
- Sep 3, 2021
- Messages
- 5,198
- Points
- 738

Hear, hear!Impressive is a weak word to describe the amazement of you achieving ~90 degree bends without fracturing the wood. You really boiled the fibers to a point that Swedes would call "Lagom" which to the Italians describing perfect pasta may be Al Dente! To the Tooth, Just Right, Outstanding work under your skilled hands my friend!!!!
That is some nerve-racking bend, Dean. But it looks smooth around that corner.I took about 3 days off to take care of things around the house and spend time with the grandkids!
Then I marked the frames and divided them into 4 belts. Then I look at the taper required in each belt to keep the bends from getting too extreme.
I actually put tape on the frames and marked the edge for the belts. Then checked with boards to see if the curves were natural.
Here is a view of some of the marked frames…
View attachment 278837
The heavy lines are where the belts are.
Anyway, satisfied with that I started tapering and beveling planks and adding them to the first belt. It is SLOW work!
I’m about 4 boards into the first belt.
At the stern, I practiced the bends on a few scrap pieces. It is nearly a 90 degree bend with a 2mm thick plank! I ended up having to soak them about 10 minutes in hot water and then towel dry and use my soldering iron shaft to add enough heat as I slowly bend them. Only way I could keep from splitting them!
View attachment 278838
So I’m getting the hang of that!
Here is a few overall pics…
View attachment 278839View attachment 278840View attachment 278841
See you when I have more progress to show!
Ps - belts are 6 planks each, for a total of 24 boards per side, not including the garboard plank!
PS:
By the bender, Heinrich showed, there comes 2 assesoires. For small angles. The pointed one is very helpful to put it behind a plank.
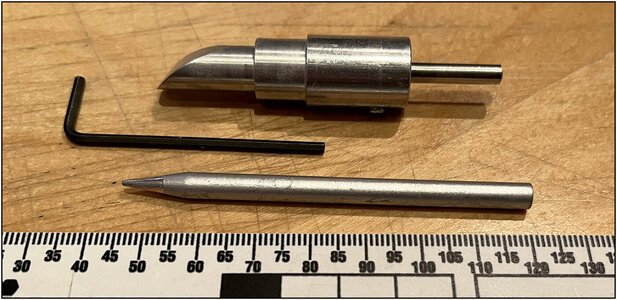
Regards, Peter
Very impressive bend Dean, I would have lost a bet on that even being possible. Did you let the plank dry completely before gluing it down?
I put the plank in position after tapering, beveling and soaking in water. Then I heat it while it is wet and bend it while applying the heat. Once I get the bend in the plank, I mark the final length and angle, then cut the end. Then I put glue on the edge of the previous plank and CA on the frames, then glue down the plank immediately while still damp. I let it dry after being glued.Very impressive bend Dean, I would have lost a bet on that even being possible. Did you let the plank dry completely before gluing it down?
So the short answer is no, I always glue the boards down while damp, this helps with the lateral bends as well.


