Ok, I was wondering about shrinkage while drying but it does not seem to be a problem especially since you glue the edges as well. Just curious, thanks.I put the plank in position after tapering, beveling and soaking in water. Then I heat it while it is wet and bend it while applying the heat. Once I get the bend in the plank, I mark the final length and angle, then cut the end. Then I put glue on the edge of the previous plank and CA on the frames, then glue down the plank immediately while still damp. I let it dry after being glued.
So the short answer is no, I always glue the boards down while damp, this helps with the lateral bends as well.
-

Win a Free Custom Engraved Brass Coin!!!
As a way to introduce our brass coins to the community, we will raffle off a free coin during the month of August. Follow link ABOVE for instructions for entering.
-

PRE-ORDER SHIPS IN SCALE TODAY!
The beloved Ships in Scale Magazine is back and charting a new course for 2026!
Discover new skills, new techniques, and new inspirations in every issue.
NOTE THAT OUR FIRST ISSUE WILL BE JAN/FEB 2026
You are using an out of date browser. It may not display this or other websites correctly.
You should upgrade or use an alternative browser.
You should upgrade or use an alternative browser.
NORSKE LOVE - Billing Boats 1:75 scale
- Thread starter Dean62
- Start date
- Watchers 74
-
- Tags
- billing boats norske lowe
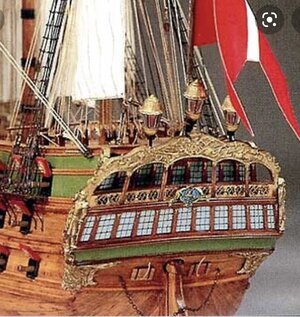
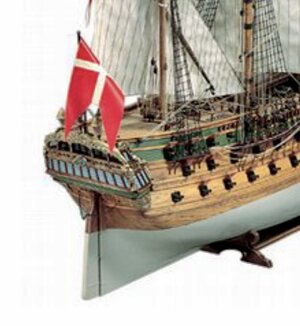
Hey, Mia Amigo, Is this is round or square stern?At the stern, I practiced the bends on a few scrap pieces. It is nearly a 90 degree bend with a 2mm thick plank! I ended up having to soak them about 10 minutes in hot water and then towel dry and use my soldering iron shaft to add enough heat as I slowly bend them. Only way I could keep from splitting them!
Shrinkage is usually not an issue. But there are a few factors, ie. type wood, moisture level changes and drying time. Because I towel dry prior to gluing, I have removed a lot of the water or moisture, but the board is still damp. However I never dry with heat, I let it dry naturally. The shrinkage at worse case would be around 5 percent, but as you mentioned the glue helps. The wood glue dries before the wood does. I am sure this helps keep the board from changing as much. For example, my planks are 7mm wide, and at worse case it would see a total of .35mm or .013” total shrinkage. Which is .175mm or .0065” per side, which is negligible.Ok, I was wondering about shrinkage while drying but it does not seem to be a problem especially since you glue the edges as well. Just curious, thanks.
Thus far I have never had an issue with shrinkage causing gaps.
Last edited:
I just had a quick look through your log and recognised a lot 
I made this ship roughly 40 years ago - in 1980 - 1981. Many things have improved since then, but the building instructions are still clearly Billing Boats.
You're doing a very nice and very neat job!
I made this ship roughly 40 years ago - in 1980 - 1981. Many things have improved since then, but the building instructions are still clearly Billing Boats.
You're doing a very nice and very neat job!
Thank you! It seems they had plastic pulleys and deadeyes, and at one point switched to wood. This newer kit is back to plastic…sigh! So I will be ordering wood pulleys and deadeyes once I put together a list.I just had a quick look through your log and recognised a lot
I made this ship roughly 40 years ago - in 1980 - 1981. Many things have improved since then, but the building instructions are still clearly Billing Boats.
You're doing a very nice and very neat job!
Also the decks used to have printed boards and the wall locations. This newer kit has blank false decks. But they provided deck planks. That’s a positive change, however the location of the walls would have been helpful!
In addition the figurehead was plastic at one point, but they now provided a metal one. I am using a wood figurehead. Also the sails material used to be printed with the sail outlines. They are now blank as well. Although I don’t care for the provided sail material.
In conclusion, some changes good, some bad. But I’m trying to make the best of the kit and lack of instructions!
Thanks for looking and for the compliments!
I learned my skills on Billing Boat kits - and that was not bad. You almost immediately started to scratch things. But the instructions where r**ish. And even now they say on their website for the experienced builder kits: ...And you'll be on your own with a lot of the details in the models.
Ok - that gives room for a nice invidual model. But if you want to paint it purple that's also ok...
Ok - that gives room for a nice invidual model. But if you want to paint it purple that's also ok...
Agreed! The kit does make you figure out the details, and do some scratch building. Which I suppose is because they expect you to be able to figure it out with the plans provided, and a few isometric views, because you are supposed to be an expert!I learned my skills on Billing Boat kits - and that was not bad. You almost immediately started to scratch things. But the instructions where r**ish. And even now they say on their website for the experienced builder kits: ...And you'll be on your own with a lot of the details in the models.
Ok - that gives room for a nice invidual model. But if you want to paint it purple that's also ok...
- Joined
- Sep 3, 2021
- Messages
- 5,198
- Points
- 738

You mean the lack thereof, I presume?Many things have improved since then, but the building instructions are still clearly Billing Boats.
Thinking, questioning, about these bends I came to seriously question if the same planks on the actual ship were bent or how they were fashioned. Assuming a thickness of 2 - 3 inches and the width of the board I do not see or understand how the same bends could or were made. One option coming to mind from natural tree limbs and the extending roots from a trunk could have provided for much of the curve when "hand sawn" in the proper orientation to the grain and plank width. That was done for frames on the old schooners and other components requiring strength to not fracture cross grain.Agreed Rich! This type bender will not help with the bends I am doing! First, it is a very small radius around the frame, second the bend is upwards at an angle that is not parallel to the board! So I am heating the wet board as I bend it slowly around the frame and upwards at the same time! Has to be done with the board in place, you can’t guess, it has to be exact!
What are your thoughts about these full sized planks on NL at the time of construction? Rich
I would assume they steamed the planks, then they can be bent without breaking.Thinking, questioning, about these bends I came to seriously question if the same planks on the actual ship were bent or how they were fashioned. Assuming a thickness of 2 - 3 inches and the width of the board I do not see or understand how the same bends could or were made. One option coming to mind from natural tree limbs and the extending roots from a trunk could have provided for much of the curve when "hand sawn" in the proper orientation to the grain and plank width. That was done for frames on the old schooners and other components requiring strength to not fracture cross grain.
What are your thoughts about these full sized planks on NL at the time of construction? Rich
Agreed but at that thickness and size it would take a long time as well as having built a very strong jig to secure the short end and bend the length around the tight radius to secure the plank in place. That is only the single plane which with the compound upwards bend complicates the entire procedure. Must have been a lot of strong workmen to achieve the task.I would assume they steamed the planks, then they can be bent without breaking.
Even with steaming to soften the fibers there would be a lot of compression packing of the fibers inside which may have been more of a problem than the elongation of the outer fibers which I would see as being torn apart and separating in the side to side structure. Are there any actual photos of the original NL showing these planks at the stern in the same manner that you are bending them? Very interesting to envision at full size. Rich
If Bilings Boats are considered very difficult then I shall be relived at the prospect of future builds being somewhat more builder friendly. Now if I can just come close to your level of joinery Dean I shall be extremely satisfied with the results. I still have much practice in front of me.
- Joined
- Oct 11, 2021
- Messages
- 740
- Points
- 403

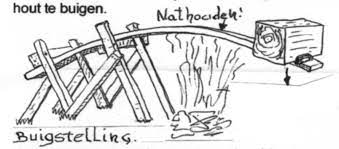
A method that was commonly used in The Netherlands at the time was:I would assume they steamed the planks, then they can be bent without breaking.

The upper part of the plank kept wet and the bottom was heated above an open fire. With a weight at the end, the plank got it's desired curve due to gravity.
- Joined
- Sep 3, 2021
- Messages
- 5,198
- Points
- 738

Didn't they have something similar on the Batavia yard?A method that was commonly used in The Netherlands at the time was:
View attachment 279297
The upper part of the plank kept wet and the bottom was heated above an open fire. With a weight at the end, the plank got it's desired curve due to gravity.
- Joined
- Oct 11, 2021
- Messages
- 740
- Points
- 403

Yes they have, I've made some photo's where they used it on some of the planks of the 7-provincien.Didn't they have something similar on the Batavia yard?
Sorry, for the offtopic Dean...back to your build!
No worries…plank bending and methods, apply to models as well. However we have to use scaled methods of doing it, such as soaking in water, steaming, or heating with a plank bender. In my case I use the shaft of a soldering iron to apply heat to a damp plank, which essentially steams it!Yes they have, I've made some photo's where they used it on some of the planks of the 7-provincien.
Sorry, for the offtopic Dean...back to your build!
One very important thing you should keep in mind: the way we build our models with straight planks over the full length of the hull was in fact not how it was done in real life.
When a tree was sawn to planks the building master choose the planks which where most in line with the hull of the ship. And these were not straight over the full length. Very often the part of the plank which should come at the bow already had a bend downwards, and was further shaped into the correct curve.
Then it was formed as shown in the post here above, with moist an an open fire. In this way you had a plank which fitted the hull quite easy.
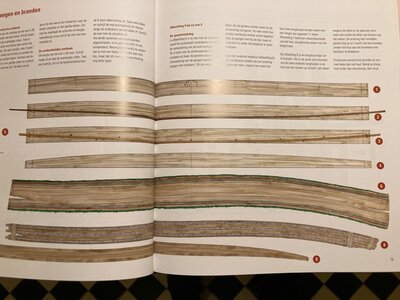
The Batavia was built by Willem Vos and his crew in the period of 1985 - 1995, and in 2015 he wrote a book on how to built an East Indiaman. This book is as far as I know only in Dutch - and you have to be very well into shipbuilding in the 17th and 18th century to fully understand what he means. But I have taken one photo out of this book where you can see the form of the timber and the planks cut out of it (#6 in this photo).

Then back to our model building. The usual kit comes with straight planks and we have to struggle to bend them in two directions, over the wrong side and often twisted as well.... This is not the easiest thing to do - especially not when it is a Dutch ship with a blunt bow and flat bottom. Many of you follow Heinrich and his ship of Willem Barentsz. The hull of this ship is a bit challenging, but in the end also very satisfactory when done.
The new model we (= Kolderstok) are constructing - a Dutch Fluit - has pre-formed and pre-cut hull planks, and even with these it still is not an easy ship to build.
Hans
When a tree was sawn to planks the building master choose the planks which where most in line with the hull of the ship. And these were not straight over the full length. Very often the part of the plank which should come at the bow already had a bend downwards, and was further shaped into the correct curve.
Then it was formed as shown in the post here above, with moist an an open fire. In this way you had a plank which fitted the hull quite easy.
The Batavia was built by Willem Vos and his crew in the period of 1985 - 1995, and in 2015 he wrote a book on how to built an East Indiaman. This book is as far as I know only in Dutch - and you have to be very well into shipbuilding in the 17th and 18th century to fully understand what he means. But I have taken one photo out of this book where you can see the form of the timber and the planks cut out of it (#6 in this photo).

Then back to our model building. The usual kit comes with straight planks and we have to struggle to bend them in two directions, over the wrong side and often twisted as well.... This is not the easiest thing to do - especially not when it is a Dutch ship with a blunt bow and flat bottom. Many of you follow Heinrich and his ship of Willem Barentsz. The hull of this ship is a bit challenging, but in the end also very satisfactory when done.
The new model we (= Kolderstok) are constructing - a Dutch Fluit - has pre-formed and pre-cut hull planks, and even with these it still is not an easy ship to build.
Hans
I’m actually interested in that ship, I like the hull shape!One very important thing you should keep in mind: the way we build our models with straight planks over the full length of the hull was in fact not how it was done in real life.
When a tree was sawn to planks the building master choose the planks which where most in line with the hull of the ship. And these were not straight over the full length. Very often the part of the plank which should come at the bow already had a bend downwards, and was further shaped into the correct curve.
Then it was formed as shown in the post here above, with moist an an open fire. In this way you had a plank which fitted the hull quite easy.
The Batavia was built by Willem Vos and his crew in the period of 1985 - 1995, and in 2015 he wrote a book on how to built an East Indiaman. This book is as far as I know only in Dutch - and you have to be very well into shipbuilding in the 17th and 18th century to fully understand what he means. But I have taken one photo out of this book where you can see the form of the timber and the planks cut out of it (#6 in this photo).
View attachment 279347
Then back to our model building. The usual kit comes with straight planks and we have to struggle to bend them in two directions, over the wrong side and often twisted as well.... This is not the easiest thing to do - especially not when it is a Dutch ship with a blunt bow and flat bottom. Many of you follow Heinrich and his ship of Willem Barentsz. The hull of this ship is a bit challenging, but in the end also very satisfactory when done.
The new model we (= Kolderstok) are constructing - a Dutch Fluit - has pre-formed and pre-cut hull planks, and even with these it still is not an easy ship to build.
Hans
I will post a build log within short time, but I am actually a bit short in time....I’m actually interested in that ship, I like the hull shape!


