- Joined
- Sep 10, 2024
- Messages
- 1,022
- Points
- 393

As spunky as you are, you have at least another 30 to go!Sorry I thought I was talking to Pavel and yes I am on a deadline I'm 90 years old.
 |
As a way to introduce our brass coins to the community, we will raffle off a free coin during the month of August. Follow link ABOVE for instructions for entering. |
 |
 |
The beloved Ships in Scale Magazine is back and charting a new course for 2026! Discover new skills, new techniques, and new inspirations in every issue. NOTE THAT OUR FIRST ISSUE WILL BE JAN/FEB 2026 |
 |

As spunky as you are, you have at least another 30 to go!Sorry I thought I was talking to Pavel and yes I am on a deadline I'm 90 years old.

Absolutely!I hope you mean years !!!!

That's an interesting question. You can view any model at any scale from any distance you want. If you're asking, "How much detail should I put in?", well, as much as you want, I suppose. That's all entirely up to the builder and what they are satisfied with.At what distance should you view a model ship i.e. Oseberg at 1/25 scale. ??
This is a true story Jan.They see a completed model and I see the mistakes.

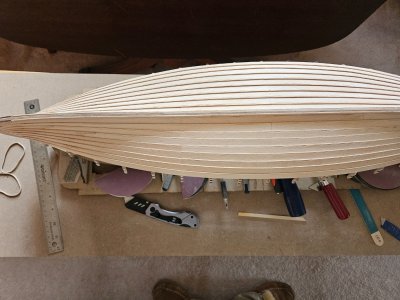
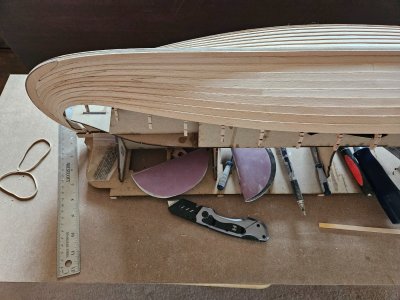
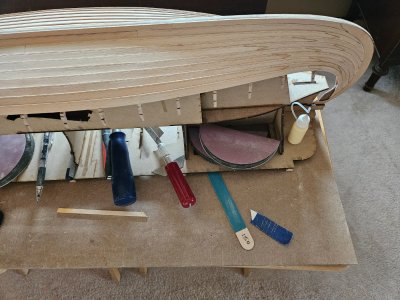
I am finding that after the 6th plank if you use some bending techniques it helps with the assembly.


For all the Oseberg modellers I want to recommend two links. Both are from the Oseberg Museum / Oslo university. The first is a 360 photo whet you can navigate around and also take length measurements, while the second has high res photos of all the minute details of the ship.

Your double bead detail really stands out, especially with 9 strakes installed. Nice job, looks great!Planking (cont'd)
It's been a while since I've had time to add to my log. The weather is warming and the chores are growing. Sigh.
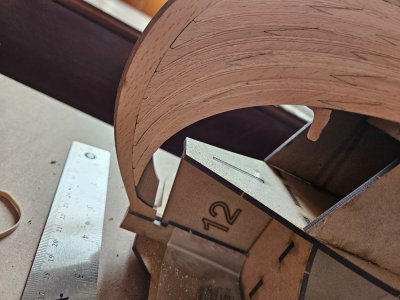
I've completed the planking up to strake 9.
View attachment 507217
View attachment 507218
View attachment 507219
The further up you go, the trickier it gets, but with patience, it can be done.
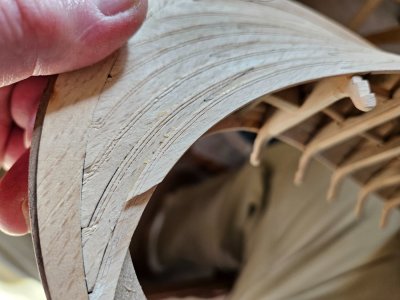
That may work. I have a plank bending iron, but I didn't use it - perhaps I should have. The problem is that as you progress, the curves at the stem become much tighter. Despite the fact that the planks are made of multiple pieces, unless you make the curved portions of 4 or 5 pieces, you will inevitably have areas of short grain, where the grain runs across the strake rather than along it. I ran into that when one of my #9 strakes broke under a clamp.
View attachment 507220
Fortunately, the glue was still somewhat rubbery and I was able to separate the strake from #8 enough to glue them back together. A little sanding - and good as new.
View attachment 507221
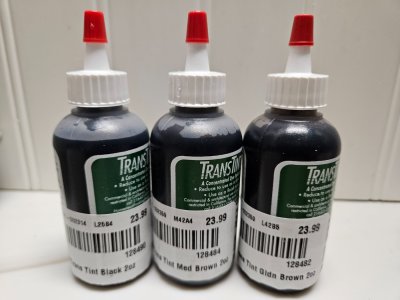
This is the point in Pavel's videos where he pauses in the planking to spray some color onto the frames and bitis. I probably should have ordered Pavel's "Painting Kit", but then, hindsight is 20/20. Since it's not available to order in the USA, I didn't want to wait another month or longer (especially given the current political situation), so I asked Pavel, in his thread, whether his colors were dyes or pigmented stains. Despite the fact that he was online at the time, replying to posts immediately before and after mine, he chose not to respond. So, I decided to take a leap of faith and headed to Woodcraft last weekend to pick up some dyes. I decided to try three colors, Black, Medium Brown and Golden Brown.
View attachment 507222
I would have picked up more, but you can see the price. These will go a long way and can be mixed for different shades. If they work out well, I may pick up some yellow for the shields as that was the color of some of the shields found in the Gockstadt burial. Other colors that have been found are red and gray.
I just received a 24" spray booth, so now it's time to open up the compressor I got for Christmas, hook up my new airbrush and start experimenting. I'll keep everyone updated with my results.

I've worked with MDF for years. The furniture manufacturer I work for goes through over 1000 sq. ft. per day. I suppose it would be ok for something you were going to paint rather than finish naturally. Sanding can be troublesome as well, because once you break through the outer hard skin, the inner core is very soft and you can't ever get it perfectly smooth no matter how fine your sandpaper is. It would take a lot of sealer/filler to get a decent surface.I wonder how mdf would work for planks that have tight bends and twists??

Thank you Steve.Your double bead detail really stands out, especially with 9 strakes installed. Nice job, looks great!
Good morning Russ. This is very good work. The clinker planking kits together so well as does the joins on the planks. I don’t know if it is just the pics but the wood looks very porous so I am keen to see how the airbrushed dye goes. Looks stunning so far. Cheers GrantPlanking (cont'd)
It's been a while since I've had time to add to my log. The weather is warming and the chores are growing. Sigh.
I've completed the planking up to strake 9.
View attachment 507217
View attachment 507218
View attachment 507219
The further up you go, the trickier it gets, but with patience, it can be done.
That may work. I have a plank bending iron, but I didn't use it - perhaps I should have. The problem is that as you progress, the curves at the stem become much tighter. Despite the fact that the planks are made of multiple pieces, unless you make the curved portions of 4 or 5 pieces, you will inevitably have areas of short grain, where the grain runs across the strake rather than along it. I ran into that when one of my #9 strakes broke under a clamp.
View attachment 507220
Fortunately, the glue was still somewhat rubbery and I was able to separate the strake from #8 enough to glue them back together. A little sanding - and good as new.
View attachment 507221
This is the point in Pavel's videos where he pauses in the planking to spray some color onto the frames and bitis. I probably should have ordered Pavel's "Painting Kit", but then, hindsight is 20/20. Since it's not available to order in the USA, I didn't want to wait another month or longer (especially given the current political situation), so I asked Pavel, in his thread, whether his colors were dyes or pigmented stains. Despite the fact that he was online at the time, replying to posts immediately before and after mine, he chose not to respond. So, I decided to take a leap of faith and headed to Woodcraft last weekend to pick up some dyes. I decided to try three colors, Black, Medium Brown and Golden Brown.
View attachment 507222
I would have picked up more, but you can see the price. These will go a long way and can be mixed for different shades. If they work out well, I may pick up some yellow for the shields as that was the color of some of the shields found in the Gockstadt burial. Other colors that have been found are red and gray.
I just received a 24" spray booth, so now it's time to open up the compressor I got for Christmas, hook up my new airbrush and start experimenting. I'll keep everyone updated with my results.

Hi Grant,Good morning Russ. This is very good work. The clinker planking kits together so well as does the joins on the planks. I don’t know if it is just the pics but the wood looks very porous so I am keen to see how the airbrushed dye goes. Looks stunning so far. Cheers Grant

That's why it is used so extensively in furniture. Having no grain makes it quite stable. Our plant goes through a lot of it, both as a core for veneer or laminate and alone for painted pieces. The soft core of MDF is porous and will absorb moisture quite readily, swelling the panel. Any exposed core is always sealed and sanded with two coats of epoxy prior to painting.I think the only good thing about MDF, if there is any, is no grain.
