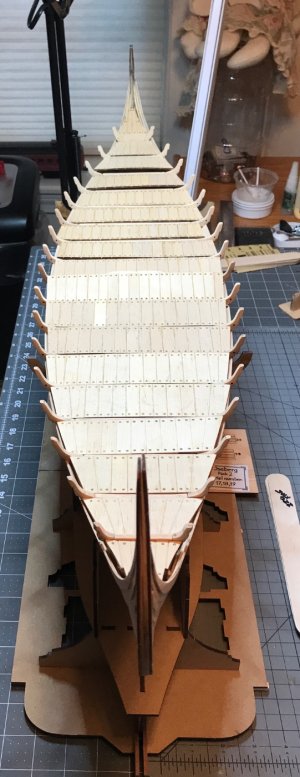
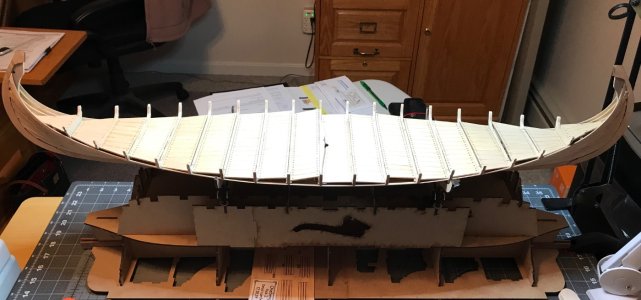
Hi, I used 220 and 320 grit sand paper and a lot patience.Jan. How did you get these parts so clean from the laser burn?
-

Win a Free Custom Engraved Brass Coin!!!
As a way to introduce our brass coins to the community, we will raffle off a free coin during the month of August. Follow link ABOVE for instructions for entering.
-

PRE-ORDER SHIPS IN SCALE TODAY!
The beloved Ships in Scale Magazine is back and charting a new course for 2026!
Discover new skills, new techniques, and new inspirations in every issue.
NOTE THAT OUR FIRST ISSUE WILL BE JAN/FEB 2026
You are using an out of date browser. It may not display this or other websites correctly.
You should upgrade or use an alternative browser.
You should upgrade or use an alternative browser.
Pavel Nikitin Oseberg #3 kit #61
- Thread starter Pathfinder65
- Start date
- Watchers 32
Thank for following my build. You've probably noticed that I don't work very fast, but then again there are many pieces that require preparation time before being added to the hull.Hi Jan. I'm following your build and do consider it to be very impressive work you're doing. I'm perhaps learning from you. I ordered the kit 1 month ago and still await delivery. I saw your note about staining the hull in oak. I also ordered the stains from Pavel as I did not know the colour to use. Where I live, its difficult to find model material and ever good wood dyes. I am concered that when I begin the build there may remain PTV spots that don't take the stain. I've condideted staining before the application of strakes. Best of luck there Jan.
The finished model will be displayed on mantel in front of a wall that is a very light color. Pavel's staining method of "used and weathered wood" would be much too dark.
I hope you get your kit soon.
Jan
Thank you Jan for the feedback. I'm excited to get back into the hobby I used to enjoy many years ago. The time involved in working for a living and the lack of a workship area prevented its continuation. Now I'm retired with a much more practical home, permits many changes. I await the kit wirh great enthusiasm and benefit from rading notes such as yours. I don't think you are taking a long time. You progress to me is great. I estimate for myself, far more time. But it's a hobby and the joy for me is in the build. I order the stains from Pavel but at this point, shall wait to see his results of colouration in his future videos. Keep upthe good work Jan.
Ashley
Ashley
Hello Ashley, I'm looking forward to seeing you start a build log. I think you will find that the kit will keep you busy for a quite some time. You will need to stock up on sandpaper, there is a lot of char that needs to be removed. I've used up many sheets of 220 grit.
Jan
Jan
- Joined
- Sep 10, 2024
- Messages
- 1,025
- Points
- 393

Hello Ashley, I'm looking forward to seeing you start a build log. I think you will find that the kit will keep you busy for a quite some time. You will need to stock up on sandpaper, there is a lot of char that needs to be removed. I've used up many sheets of 220 grit.
Jan
Agreed. I use large craft sticks to make my own "emery boards" by gluing sandpaper to them.
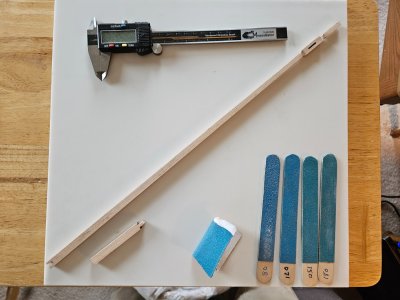
I have some large "Tongue Suppressors" that I've covered with 220 and 320 grit. Pavel seems to have some nifty double sided sanding boards.Agreed. I use large craft sticks to make my own "emery boards" by gluing sandpaper to them.
Jan
I've been making my own sanding sticks as well, they work great. I also use single edge razor blades to scrape off some of the char marks on the faces of the strakes, it works well getting most of the big stuff off before I finish sanding them.I have some large "Tongue Suppressors" that I've covered with 220 and 320 grit. Pavel seems to have some nifty double sided sanding boards.
Jan
Steve
The start of the decks.
The build plans,
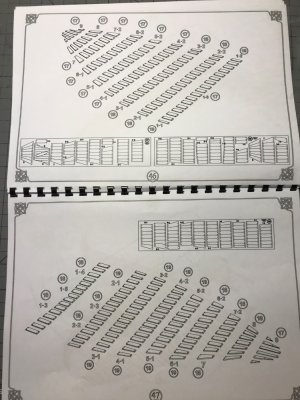
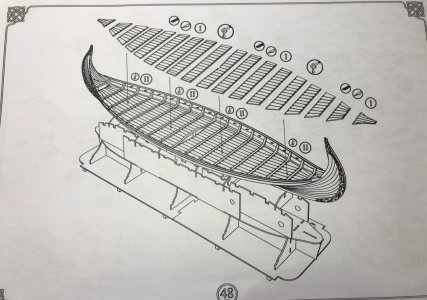
Plus this video "Video #11 decking. There are steps that Pavel completes that aren't in the kits build plan.
But before I started separating the pieces from the flats, I flipped the flat over and numbered the pieces on the back.
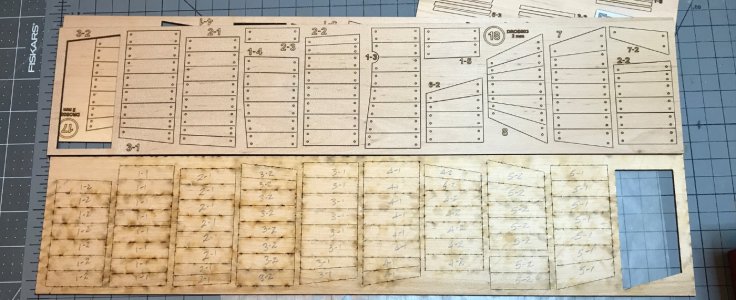
I didn't want take a chance of mixing any of the pieces.
The assembly process. Remove the char.
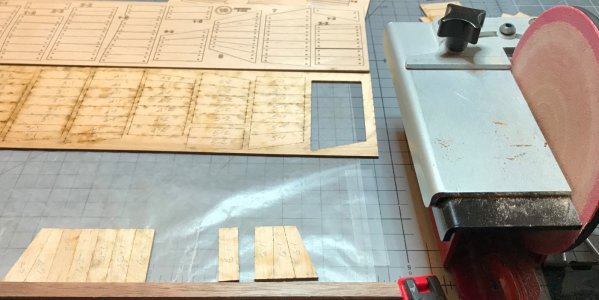
Then butt the pieces up against a straight edge and glue them in sets.
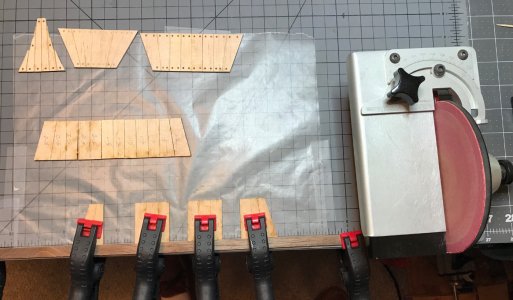
The final glue up.

The finished deck.
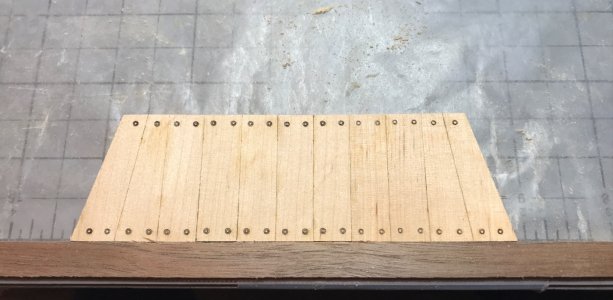
Sorry for the glare from the wax paper, but it's a great backing since PVA won't stick to it.
Jan
The build plans,


Plus this video "Video #11 decking. There are steps that Pavel completes that aren't in the kits build plan.
But before I started separating the pieces from the flats, I flipped the flat over and numbered the pieces on the back.

I didn't want take a chance of mixing any of the pieces.
The assembly process. Remove the char.

Then butt the pieces up against a straight edge and glue them in sets.

The final glue up.

The finished deck.

Sorry for the glare from the wax paper, but it's a great backing since PVA won't stick to it.
Jan
Wow Jan you've gotten a lot done, it really looks great! I'm looking forward to starting on the deck but at the rate I'm going that might not be for several months. LOLThe start of the decks.
The build plans,
View attachment 517628
View attachment 517629
Plus this video "Video #11 decking. There are steps that Pavel completes that aren't in the kits build plan.
But before I started separating the pieces from the flats, I flipped the flat over and numbered the pieces on the back.
View attachment 517630
I didn't want take a chance of mixing any of the pieces.
The assembly process. Remove the char.
View attachment 517631
Then butt the pieces up against a straight edge and glue them in sets.
View attachment 517632
The final glue up.
View attachment 517645
The finished deck.
View attachment 517646
Sorry for the glare from the wax paper, but it's a great backing since PVA won't stick to it.
Jan
Steve
Slow but sure is also good.Wow Jan you've gotten a lot done, it really looks great! I'm looking forward to starting on the deck but at the rate I'm going that might not be for several months. LOL
Steve
Jan
A nice and solid start of the deck parts, Jan. A lot of work but the outcome looks good.The start of the decks.
The build plans,
View attachment 517628
View attachment 517629
Plus this video "Video #11 decking. There are steps that Pavel completes that aren't in the kits build plan.
But before I started separating the pieces from the flats, I flipped the flat over and numbered the pieces on the back.
View attachment 517630
I didn't want take a chance of mixing any of the pieces.
The assembly process. Remove the char.
View attachment 517631
Then butt the pieces up against a straight edge and glue them in sets.
View attachment 517632
The final glue up.
View attachment 517645
The finished deck.
View attachment 517646
Sorry for the glare from the wax paper, but it's a great backing since PVA won't stick to it.
Jan
Regards, Peter
Thanik you, there are definitely a few parts. I've found that after gluing the bigger sections that I need to put some weight on them as the glue sets to keep them from warping.A nice and solid start of the deck parts, Jan. A lot of work but the outcome looks good.
Jan
Hi Jan, that's funny.This photo looks like the ship came to a sudden stop.
You're doing an awesome job, it really looks great!
Steve
That's brilliant progress Jan. It's starting to look much more like the completed model. I enquired when my kit may be dispatched. It's been 5 or 6 weeks since my order. I was informed it would posted out this next Monday. So maybe another 2 weeks from the Ukraine.
That is exiting news.I think you will like working on the kit.That's brilliant progress Jan. It's starting to look much more like the completed model. I enquired when my kit may be dispatched. It's been 5 or 6 weeks since my order. I was informed it would posted out this next Monday. So maybe another 2 weeks from the Ukraine.
Jan
- Joined
- Sep 10, 2024
- Messages
- 1,025
- Points
- 393

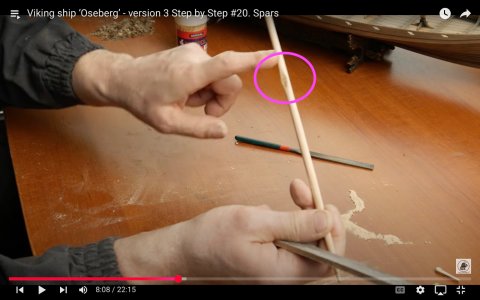
Mast and Spar Pavel Oseberg video #20.
@RussF
What is the "dimple " in the spar that Pavel is working on??
View attachment 519492
I see no reference for that in the build instructions or any of the plans. I've finished the mast and started on the spar when I decided to another look at this video and ????
Jan
That, my friend, is a good question. I suspect it is Pavel's artistic license. We already know that the top half of the Oseberg's mast had disintegrated, so we don't know if there was a square section with a sheave or not. I honestly can't remember off hand if any of the yard was left or not. The reconstruction, however, was made with a cylindrical mast with one flat side as I have documented before and a slot for a rope. I don't know if there is a sheave or not, it doesn't appear so from the drawings in Dr. Bischoff's paper. The yard was reconstructed purely cylindrical. I'm afraid you would have to post the question directly to Pavel to get his take on it.
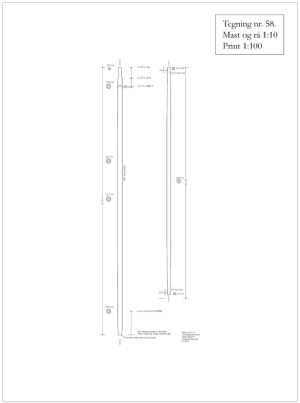
@RussF, thanks for the input, I had to watch Pavel' video several times to see that little bump in the middle of the yard. Interesting about the mast construction, I've finished it to be completly cylindrical following the plans, but I see from your post that the mast diameter varies 1.5cm from top to bottom. I hadn't worked my way through the Dr, Bishcoff's paper far enough to see the yard drawing.
Jan
Jan
Last edited:


