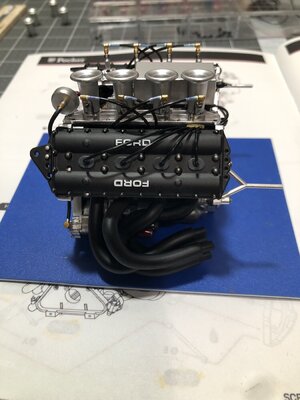
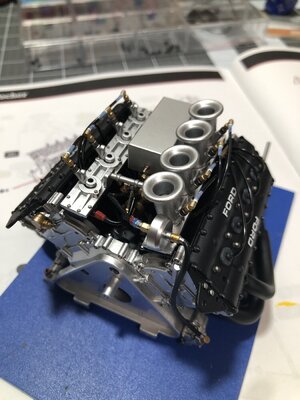
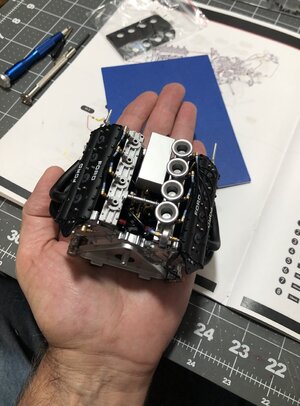
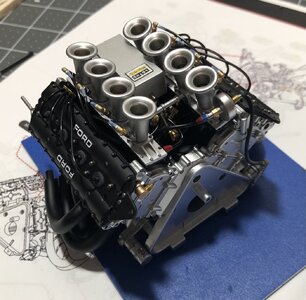
Pocher 1:8 scale Lotus 72 [COMPLETED BUILD]

That is an awesome new kit. Also, one of my fav. F1s of all time. Love your painting details - rear discs look awesome - will follow along as well !

Parenthetically, my Admiral is Brazilian, and she has a close Brazilian friend, of many years, who moved close to us after leaving Rio.

She coincidentally happened to also be a close friend of Emerson Fittipaldi, and he was on a trip to Los Angeles, probably 30+ years ago?? - after he retired and developed auto aftermarket auto wheels.

Our friend invited us to dinner at his hotel when Emerson was going to be in town…What a memorable night that was indeed!! – I did joke with him about the OJ drink after he won the Indi 500 – it was a good laugh… I was working at the time so glad that I was on layover at home.

Cheers,
Thank you! I love detail painting.
That must have been an awesome experience! He seems like a nice guy. ;)
He was promoting a sports car he was involved in designing...shown at Lotus.
1685120681201.png
 
I decided to make some wire looms…much frustration, but success in the end. I had to put them in a vice, too small to hold!
IMG_1337.jpeg

Then it was time to put on the plug wires on the first side…
IMG_1345.jpegIMG_1344.jpegIMG_1343.jpeg
Very happy with the end result, including the wire loom. Now for the other side and the coil wire!

Ps - tip for anyone who builds this kit. The wires, or in this case tiny rubber tubing, is very sticky and dust and everything you can imagine sticks to them. In addition, it would be near impossible to feed them where they need to go because they would not slide. So I cut them to length, then washed them with soap and water to get rid of the residue I assume is from the manufacturing process. It worked enough to help with assembly and hopefully dust sticking to them! ;)

Thanks for looking in!
 
Last edited:
Finally… I finished the plug wires and coil wire. I also made a sticker for the ignition box. That was artistic license. ;)
All of the velocity stacks are installed as well. Looking like a motor now!
View attachment 376427View attachment 376428View attachment 376429View attachment 376430
Good morning Dean. Gentlemen start your engines…:D. Played some catch up Dean and I’m impressed with the detail and accuracy of the kit. (Now you have your replacement part). Must be super fun to put this together.
Next step…the distributor and injector housing assembly. There will be an ignition box sitting on top of this that will cover most of it, but we still have to treat it like it will be seen! ;)
View attachment 376278
The parts are all black plastic…
View attachment 376279
I painted it and added the hoses…
View attachment 376280
View attachment 376281
Then it was glued to the motor… and the tubing was run and cut to length…
View attachment 376282
Using this image as reference…
View attachment 376283
As you can see, the tubing is actually a clear blue color and there is a black tubing for insulation over that. But the ends are clear and have a white piece that usually has the cylinder number on it.
So I tried to simulate that the best I could with paint…
View attachment 376287
View attachment 376284View attachment 376285View attachment 376286

And a peek at it with the velocity stacks… ;)

View attachment 376287
Tomorrow evening will be time for the spark plug wires! Fun stuff! ;)
These details are incredible.
Cheers Grant
 
Good morning Dean. Gentlemen start your engines…:D. Played some catch up Dean and I’m impressed with the detail and accuracy of the kit. (Now you have your replacement part). Must be super fun to put this together.

These details are incredible.
Cheers Grant
Thank you Grant! Yes, the part is on the way! I decided to keep moving forward on the engine build prior to joining it with the transmission and rear end. I just have to be more careful when I do! ;)
I am enjoying the build with the details and research involved. The fact it is one of my favorite F1 cars really motivates me to do my best.
 
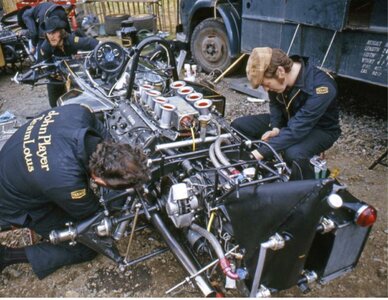
Here are more photos for reference…I have an entire folder of pics that I am using. ;)
IMG_1324.jpegIMG_1323.jpegIMG_1325.jpeg
There was definitely variance from car to car. And in the interest of improvement, they were always changing and testing things. But it’s good to know how the car could have looked throughout the race season. The kit was built to represent the car Emerson Fittipaldi raced at Brands Hatch and won. They even went through the mechanics notes on his car. The tires did not have the white lettering on that day, thus left off the kit tires. I may still paint the letters white because I think it looks better.
In conclusion, if you build the kit, you can build it to be an exact representation of that race day, or you can do as I have chosen and build it as it may have appeared during that racing season. Either way it will still be accurate and look very nice. ;)
 
Here are more photos for reference…I have an entire folder of pics that I am using. ;)
View attachment 376511View attachment 376512View attachment 376513
There was definitely variance from car to car. And in the interest of improvement, they were always changing and testing things. But it’s good to know how the car could have looked throughout the race season. The kit was built to represent the car Emerson Fittipaldi raced at Brands Hatch and won. They even went through the mechanics notes on his car. The tires did not have the white lettering on that day, thus left off the kit tires. I may still paint the letters white because I think it looks better.
In conclusion, if you build the kit, you can build it to be an exact representation of that race day, or you can do as I have chosen and build it as it may have appeared during that racing season. Either way it will still be accurate and look very nice. ;)
Interesting, the last photo looks like they are working on a million-dollar car in a junk yard somewhere.
 
Interesting, the last photo looks like they are working on a million-dollar car in a junk yard somewhere.
Probably track side somewhere that didn’t have pit provisions or it was closed?
I am sure they had to work in less than desirable conditions and locations depending on where they were. Also on qualifying day, there was a lot of testing and adjustments in preparation for race day. Interesting times! ;)
 
Back
Top