- Joined
- Apr 20, 2020
- Messages
- 305
- Points
- 278

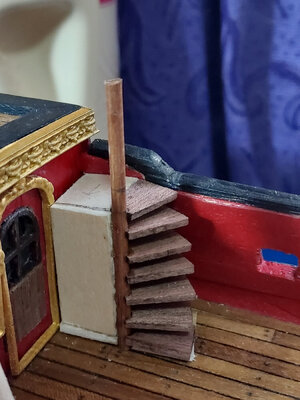
Next on my plate were the spiral staircases. The instructions made it seem like it should be a simple task, but, the novice that I am, I had to think through how to approach it.
First I had to calculate how many steps to put in. In our country, we have a superstition about the number of steps on the stairs. You have to count from the first step and do oro(gold), plata(silver), mata(death), oro, plata mata and so on. The last step cannot coincide with mata since it's bad luck. I put in 7 steps, so it ends in oro.
I had to DIY some pieces because I couldn't find them in the kit. The half moon piece serves as a base and the rectangular shape is the wall for the door.

The staircase requires a dowel to anchor the steps. I temporarily taped it against a flat vertical surface to keep it steady.

I took a couple of deck planking strips and glued it against the steps to serve as risers. This also served to help me with the vertical spacing of the steps.

I guesstimated how much rotation angle I needed so that when I reached the top, the final step is facing at the proper angle to the landing. I used white glue to give me a bit of leeway to adjust the steps. Once I established the proper angles, I dabbed some CA gel glue on the inside in order to strengthen them.


Put in the rectangular pieces and applied paint and poly.


Next, I worked on the gratings. These are very delicate pieces that need to be handled carefully. I was very impressed at the precision of the cutting at the factory. They were clean and fit together perfectly. Nice job YuanQing.


Put a border around the grates and painted them red. The grates themselves were painted black and then overlaid with my favorite burnished bronze powder.


Then it was on to attaching the wales. After soaking the wood for a half hour, I dry fitted the wales and clamped and taped them in place. I then hit them with a hair dryer until they were dry and kept their shape.
I used CA gel glue towards the bow where the stress points are and white Elmer's glue for the remainder of the length.


First I had to calculate how many steps to put in. In our country, we have a superstition about the number of steps on the stairs. You have to count from the first step and do oro(gold), plata(silver), mata(death), oro, plata mata and so on. The last step cannot coincide with mata since it's bad luck. I put in 7 steps, so it ends in oro.
I had to DIY some pieces because I couldn't find them in the kit. The half moon piece serves as a base and the rectangular shape is the wall for the door.
The staircase requires a dowel to anchor the steps. I temporarily taped it against a flat vertical surface to keep it steady.
I took a couple of deck planking strips and glued it against the steps to serve as risers. This also served to help me with the vertical spacing of the steps.
I guesstimated how much rotation angle I needed so that when I reached the top, the final step is facing at the proper angle to the landing. I used white glue to give me a bit of leeway to adjust the steps. Once I established the proper angles, I dabbed some CA gel glue on the inside in order to strengthen them.
Put in the rectangular pieces and applied paint and poly.
Next, I worked on the gratings. These are very delicate pieces that need to be handled carefully. I was very impressed at the precision of the cutting at the factory. They were clean and fit together perfectly. Nice job YuanQing.
Put a border around the grates and painted them red. The grates themselves were painted black and then overlaid with my favorite burnished bronze powder.
Then it was on to attaching the wales. After soaking the wood for a half hour, I dry fitted the wales and clamped and taped them in place. I then hit them with a hair dryer until they were dry and kept their shape.
I used CA gel glue towards the bow where the stress points are and white Elmer's glue for the remainder of the length.