Royal Caroline 1:50 YuanQing/ZHL [COMPLETED BUILD]

Painting over tape with spray paint usually requires that you cut along the edge of the tape with an xacto prior to removing the tape, to prevent chipping. Especially since you have a thick layer of paint.
You can clean the edge up by using some thin white graphic tape.
Thanks @Dean62...I now see how cutting along the edge before removing the tape, would really have helped, because I noticed some paint layers chipped off as I removed the tape.
 
the best tape for waterline ( or elsewhere ) is electrical tape. not the cheap stuff at the dollar store but the good stuff at about $3.00 a roll. the seal is watertight and you will get a perfect line. much better than masking or painters tape. Heinrich is correct in that the tung oil should have been applied after all painted areas are complete. otherwise, she is looking great. keep up with the build log.
Thanks @shipahoy...will give the electrical tape a try next time...also, applying tung oil after the paint makes a lot of sense now.
 
Thanks for the comments @Heinrich ...lots of lessons learned....will try the steel wool on a small section and see how it will turn out...I was also thinking, maybe apply a very light beige wash? Will let you know how it turns out....Thanks again and please keep safe. This Delta variant is really scary.

I made a mix of about 10 parts white, two parts yellow and one part brown to get a similar look for a build. I gave a nice off-white color that was not quite as "bright white". The idea of a beige wash sounds promising.
 
Next up for me was some work on the bow. First, the golden resin castings. To be frank, I was quite a bit disappointed at the quality of these castings for their utter lack of detail. They came out as indistinguishable globs, as you will see in later photos.

I test fitted the bottom resin pieces and determined that there was not enough surface contact area to get a good glue grip.
The resin piece basically extends out to the front part of the bow and touches it only at the pointed tip, as shown in the first photo below. To create more contact surface , I fashioned a small wedge and glued it to the end of the resin piece. I am hoping the wedge will not be too noticeable.
PSX_20210819_213257.jpg
PSX_20210819_213309.jpgPSX_20210821_210159.jpg

The bow railings were quite a challenge as they had to be fabricated from scratch using wood strips. The wood got some good soaking and then bent carefully. They then were dried to set using a blow dryer. There was a lot of guesstimates and trial and error to get just the right bend. The adjustments were done in small increments.

PSX_20210811_210516.jpgPSX_20210811_210543.jpgPSX_20210821_210058.jpg

They were test fitted repeatedly until the proper shapes were obtained.
PSX_20210811_210636.jpgPSX_20210811_210621.jpg
Here are the finished pieces.

PSX_20210821_210257.jpgPSX_20210821_210311.jpg

Remember when I mentioned earlier that I wasn't too happy with the lack of detail in the resin pieces? Here's what I am referring to.
PSX_20210821_210331.jpgPSX_20210821_210354.jpg

Next up was the channels and the deadeyes.
The channels provided in the kit were walnut which looked very nice, especially after a few coats of tung oil. Small triangle shaped braces were also provided. However, I thought that, even with the braces, the pieces were not going to be strong enough when glued, especially considering that the channels were only 2mm thick. Besides, I wanted to put in pins to strengthen the hold, and 2mm just wasn't thick enough to drill a pin hole.

So, I improvised and put in a piece of wooden strip on the underside of the channel. This solved my problems with lack of gluing surface as well as having room to put in the pins.
PSX_20210819_213137.jpgPSX_20210819_213438.jpgPSX_20210819_213451.jpgPSX_20210819_213505.jpgPSX_20210819_213516.jpg

The deadeyes were to be attached to the channels using the wire holders below. I was supposed to set the deadeye in place, then twist the wire to lock the deadeye. However, after a few attempts, I gave up on this idea because I kept breaking the wire. But not after I lost 5 of them this way.
PSX_20210821_210413.jpg

I decided that I didn't need to twist the wire. The natural shape of the holder pushing against the hole will be plenty strong to hold it in place, and with some CA glue gel to keep it safe.
PSX_20210819_213531.jpg

The deadeyes that came with the kit are light colored (not sure what kind of wood), and of good quality. Originally, I was going to paint them black as well as the wire holder. But I changed my mind and decided to retain their original color. A few coats of tung oil gave them a beautiful look.
PSX_20210821_210109.jpg

The channels were glued on to the hull. I lightly sanded the tung-treated area of the hull where the glue will attach. Stiff wire was used to pin the channels in order to give added strength.

The deadeyes were mounted on the channels, anticipating the angle of the rope coming down from the masts, so as to follow the path of the rope. The wire holders were nailed to the hull.

PSX_20210821_210447.jpgPSX_20210821_210525.jpgPSX_20210821_210620.jpg

That's it for now. I pray everyone stays safe.
Thanks for your support.
 

Attachments

  • PSX_20210819_213243.jpg
    PSX_20210819_213243.jpg
    341.5 KB · Views: 3
Reggie about the quality of the resin castings. I fully agree with you that it could have been better - I feel exactly the same way about some of the castings on my Batavia/Haarlem. But in the end we only have two choices - have them scratch-built or go with what we have. The amazing thing is that anyone looking at the ship in its entirety, will not even notice those very same things that stick out like eyesores to us. Not to fret my friend - she looks great!
 
Hi Reggie

Why did you call your kit "a humble version" on the below link ?

Post in thread 'Royal Caroline 1749, 1/48' https://shipsofscale.com/sosforums/threads/royal-caroline-1749-1-48.6985/post-188464

Your are doing a great built and teaching modelers how you did it with your detailed explanations/pictures

Cheers
Daniel
Thanks for the kind words Daniel @Dematosdg. I probably shouldn't be too harsh on ZHL/YuanQing. After all, I am really enjoying the build and learning tons of stuff in the process. Despite its few shortcomings, the ZHL is still a good kit, and I feel good that it will turn out to be a beautiful ship. However, sometimes I can't help but be like the man who looks longingly at the shiny car in his neighbor's garage.
 
Reggie about the quality of the resin castings. I fully agree with you that it could have been better - I feel exactly the same way about some of the castings on my Batavia/Haarlem. But in the end we only have two choices - have them scratch-built or go with what we have. The amazing thing is that anyone looking at the ship in its entirety, will not even notice those very same things that stick out like eyesores to us. Not to fret my friend - she looks great!
Thanks @Heinrich. I hope you are staying safe my friend. This Delta surge is for real, and what's worrisome is an increasing number of children are now being infected. I guess we have to be grateful for the nature of our hobby, which allows us to stay indoors. Regarding the ZHL kit, I really shouldn't be complaining too much because I am truly having a blast building this ship.
 
I am very glad that you are enjoying building her Reggie. We are indeed trying our best to stay safe my friend. Ever since the teaching centres have closed, I only teach online and come into contact with no one - except the Admiral, of course.

As to your comment to Daniel: Yes we may be longing for the shining new car of the neighbor, but I can promise you two things:

1. He may have a shining car in the garage, but he doesn't have a Royal Caroline on his workbench.
2. His shiny car is probably not giving him the enjoyment and pleasure that you are getting from Ms. Caroline. :)
 
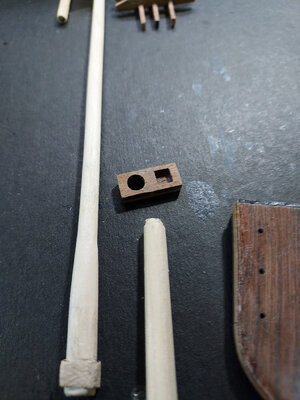
I thought I'd tackle something easy for a change and work on some finishing touches for the little boat. Installed the wood placeholders for the oars and the steering stick. Then did the oars.
PSX_20210830_201746.jpgPSX_20210830_201729.jpgPSX_20210830_201702.jpg

Next up was the lanterns. I have been working on these on and off, for the last few months. It was taking me a while, because to be frank, I wasn't sure how best to approach the task.

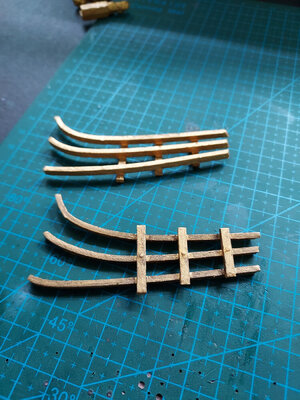
The kit provides somewhat disappointing pieces for the lanterns. To start with, the main piece is a shiny, gold, cardboard/paper. Yes, that's right....cardboard paper.
PSX_20210704_202436.jpg
There was no way that the flimsy main piece for the body was going to work. It would have disintegrated at the slightest bump. So, in addition to gluing a piece of translucent plastic to simulate glass, I also glued a piece of stiff wire on the edges of the piece. This added quite a bit of strength to the piece. By the way, I always had trouble with glue smears on my translucent plastic in the past, because I used CA glue, which clouded the plastic. This time, I tried contact cement, and it worked quite a bit better.
PSX_20210704_202309.jpg
PSX_20210704_202400.jpg

Notice how the wire extends beyond the edge..this is to help lock the piece in place once it is shaped into a cylindrical form.
PSX_20210704_202424.jpg

I think, without the added reinforcements, this piece would have been impossible to assemble. I look at the finished lantern with a gratified smile on my face.
PSX_20210704_202459.jpg

Now, it's time to mount the lanterns. Remember that I mentioned in a prior post that I made things a bit more complicated for myself by deciding to add LED lights to the lanterns?

So far, I have the LED wiring just hanging down through the stern.
PSX_20210801_201655.jpg

I drilled small holes for the brass wire bracing to be glued to. Test fitted the lanterns. Had a bit if trouble here, because the brass wires were manually shaped and it was difficult to get a perfect uniform angle to them.
PSX_20210830_201848.jpgPSX_20210830_201925.jpg

The additional bracing was soldered on to the main support (I still haven't quite learned how to solder cleanly). By the way, it's worth mentioning, none of this was included in the instructions...had to wing myself through the whole process.
PSX_20210830_201937.jpg

Stuck the lanterns using my old reliable CA glue gel. I noticed the lanterns weren't quite perfectly aligned. But I was afraid to mess with them for fear I will do more damage than good.
PSX_20210830_202026.jpg

The LEDs were snuck through the bottom part of the assembly. This was a bit of a crude solution, as I couldn't quite figure out how to neatly hide the wiring. Need some help here, friends. So far I have the wiring just annoyingly hanging out there. How can I fix it so they more or less appear neat? Thanks for any suggestions.
PSX_20210830_202045.jpg

Now it’s time for reckoning. Light them up.
PSX_20210830_202058.jpg
PSX_20210830_202117.jpg

One last thing to do. Need to trim the brass wire.

PSX_20210830_202152.jpg

Didnt like the way that looked so I made a small plug using a dowel and drilled through the middle.

PSX_20210830_202217.jpgPSX_20210830_202226.jpg

That was quite a good exercise in improvising. I was glad to see that the cardboard-based lanterns turned out quite sturdy in the end.

That's it for now. Thanks for your support.
 
Wow...I can't believe it's been six weeks since my last post. I was actually quite diligent and tried to spend at least 2 to 3 hours per day working on the ship. Somehow the hours seem to fly so fast and I don't have a lot to show for it.

Started working on the masts. I was really happy with the materials provided by YuanQing. The masts were cut to size and, more importantly, come already pre tapered. I remember how I struggled to manually taper the masts for my previous Black Pearl kit.

The bowsprit didn't have a mast cap included in the parts list, so I had to DIY one.
PSX_20211012_193534.jpgPSX_20211012_193601.jpg
PSX_20211012_193546.jpg

I used a dark oak water based stain on the mast and finished it with with a couple of coats of tung oil. Added black wooldings. At this time I am just dry fitting the bowsprit. Will permanently mount it (as well as the masts) much later in the build. I am planning to bring the unassembled ship to my daughter in LA in my check-in luggage later this year. I think the hull, without any of the protruding masts and bow elements will just barely fit in my luggage. Will then just finish the ship when I am stateside.

Here's the bowsprit.
PSX_20211012_195003.jpg

Next are the masts. Assembling the mast top was fairly straightforward but took more time than I expected. After gluing wood strips on the surface, I took some planking strips and glued them along the edges to form a border. I initially finished the tops using tung oil and leaving the natural color of the wood. Later on as you will see, I decided to paint them black.
PSX_20211012_193402.jpgPSX_20211012_193505.jpg

I noticed that the mast tops did not have the holes on the front for the crows feet. I guess the kit didn't contemplate putting these in, because there was nowhere in the instructions for them. I drilled the holes myself, but I didn't do a great job with the spacing.

PSX_20211012_193805.jpgPSX_20211012_193820.jpg

Here are the parts for assembling the 3 masts.

The mizzen mast.
PSX_20211012_194136.jpg

The main mast.
PSX_20211012_194159.jpg

The fore mast
PSX_20211012_194219.jpg

I put together the trestle and cross trees.
PSX_20211012_193742.jpg

Certain portions of the masts had to be squared off. I marked an X at the end of the dowel to guide me as I filed it into shape.
PSX_20211012_193921.jpgPSX_20211012_193934.jpg
PSX_20211012_194058.jpgPSX_20211012_194039.jpg
PSX_20211012_194110.jpg

The upper part of the main mast also had to be squared off and the very tip is shaped to fit in the square hole on the mast cap. (Sorry the camera doesn't quite show this clearly).
PSX_20211012_194252.jpg

The pieces were likewise stained dark oak and finished with tung oil.
PSX_20211012_194348.jpg

The masts were assembled.
PSX_20211012_194615.jpg

Initially, I put on simulated metal rings by flattening some soldering wire and painting black.
PSX_20211012_194638.jpgPSX_20211012_194648.jpg

But later on, I decided to undo this and replace them with black electric tape. The reason for this is because when I attached the wooden bolstering strips to the mast, the metal rings were too thick resulting in the bolstering strips to bulge. Here's final result after gluing the electric tape then the wooden strip bound by black wooldings.
PSX_20211013_205514.jpgPSX_20211013_205532.jpg

More to follow.
 

Attachments

  • PSX_20211012_194330.jpg
    PSX_20211012_194330.jpg
    256.9 KB · Views: 2
Continuing with the work on the masts. Next up was attaching the deadeyes on the mast tops. These will receive the shrouds for the top mast.

Oh, but before that, I had to DIY the railings since the kit didn't provide for them.
PSX_20211012_194709.jpg

Then on to the deadeyes. Unlike the Black Pearl where the deadeyes were mounted using wire rings that extended down thru the holes, the RC didn't have those. Instead, rope was run around the deadeyes and seized.

First I dabbed a bit of glue on the deadeye, then wrapped the rope around it. I seized the rope and applied a bit of glue to seal.
PSX_20211012_194834.jpg
PSX_20211012_194823.jpg
PSX_20211012_194900.jpgPSX_20211012_194937.jpgPSX_20211012_194748.jpg

Then mounted on the mast top by applying some CA gel glue.
PSX_20211012_194732.jpgPSX_20211012_195030.jpgPSX_20211012_195127.jpg

That's it for now. Will show you my work on the shrouds in my next post. Thanks for stopping by.
 
Wow...I can't believe it's been six weeks since my last post. I was actually quite diligent and tried to spend at least 2 to 3 hours per day working on the ship. Somehow the hours seem to fly so fast and I don't have a lot to show for it.

Started working on the masts. I was really happy with the materials provided by YuanQing. The masts were cut to size and, more importantly, come already pre tapered. I remember how I struggled to manually taper the masts for my previous Black Pearl kit.

The bowsprit didn't have a mast cap included in the parts list, so I had to DIY one.
View attachment 262677View attachment 262679
View attachment 262678

I used a dark oak water based stain on the mast and finished it with with a couple of coats of tung oil. Added black wooldings. At this time I am just dry fitting the bowsprit. Will permanently mount it (as well as the masts) much later in the build. I am planning to bring the unassembled ship to my daughter in LA in my check-in luggage later this year. I think the hull, without any of the protruding masts and bow elements will just barely fit in my luggage. Will then just finish the ship when I am stateside.

Here's the bowsprit.
View attachment 262681

Next are the masts. Assembling the mast top was fairly straightforward but took more time than I expected. After gluing wood strips on the surface, I took some planking strips and glued them along the edges to form a border. I initially finished the tops using tung oil and leaving the natural color of the wood. Later on as you will see, I decided to paint them black.
View attachment 262683View attachment 262684

I noticed that the mast tops did not have the holes on the front for the crows feet. I guess the kit didn't contemplate putting these in, because there was nowhere in the instructions for them. I drilled the holes myself, but I didn't do a great job with the spacing.

View attachment 262685View attachment 262686

Here are the parts for assembling the 3 masts.

The mizzen mast.
View attachment 262687

The main mast.
View attachment 262688

The fore mast
View attachment 262690

I put together the trestle and cross trees.
View attachment 262691

Certain portions of the masts had to be squared off. I marked an X at the end of the dowel to guide me as I filed it into shape.
View attachment 262692View attachment 262693
View attachment 262694View attachment 262695
View attachment 262696

The upper part of the main mast also had to be squared off and the very tip is shaped to fit in the square hole on the mast cap. (Sorry the camera doesn't quite show this clearly).
View attachment 262697

The pieces were likewise stained dark oak and finished with tung oil.
View attachment 262700

The masts were assembled.
View attachment 262703

Initially, I put on simulated metal rings by flattening some soldering wire and painting black.
View attachment 262705View attachment 262704

But later on, I decided to undo this and replace them with black electric tape. The reason for this is because when I attached the wooden bolstering strips to the mast, the metal rings were too thick resulting in the bolstering strips to bulge. Here's final result after gluing the electric tape then the wooden strip bound by black wooldings.
View attachment 262701View attachment 262702

More to follow.
I used black card stock on some of my masts. You’re doing a great job, Reggie! I love it that you’re going to see your daughter. My admiral is visiting mine in Omaha. Wish I could be there. Guess I’ll just have to work on her Soleil instead of being there with her. You staying in the states for long?
 
Continuing with the work on the masts. Next up was attaching the deadeyes on the mast tops. These will receive the shrouds for the top mast.

Oh, but before that, I had to DIY the railings since the kit didn't provide for them.
View attachment 262722

Then on to the deadeyes. Unlike the Black Pearl where the deadeyes were mounted using wire rings that extended down thru the holes, the RC didn't have those. Instead, rope was run around the deadeyes and seized.

First I dabbed a bit of glue on the deadeye, then wrapped the rope around it. I seized the rope and applied a bit of glue to seal.
View attachment 262725
View attachment 262726
View attachment 262727View attachment 262728View attachment 262724

Then mounted on the mast top by applying some CA gel glue.
View attachment 262723View attachment 262729View attachment 262731

That's it for now. Will show you my work on the shrouds in my next post. Thanks for stopping by.
I did the same for my upper deadeyes and futtocks on the Connie. The glue didn’t hold as well as I had hoped and when tightening the lanyards, the string pulled up and the deadeyes weren’t even. If I had it to do over, I’d find a way to better fasten the deadeyes down, maybe from the bottom of the crows nest.
 
I used black card stock on some of my masts. You’re doing a great job, Reggie! I love it that you’re going to see your daughter. My admiral is visiting mine in Omaha. Wish I could be there. Guess I’ll just have to work on her Soleil instead of being there with her. You staying in the states for long?
Thanks Vic....If all goes well, I plan to be in the West Coast for 6 to 8 weeks. I already have tons of stuff on my shopping list for things that are not available here.
 
I did the same for my upper deadeyes and futtocks on the Connie. The glue didn’t hold as well as I had hoped and when tightening the lanyards, the string pulled up and the deadeyes weren’t even. If I had it to do over, I’d find a way to better fasten the deadeyes down, maybe from the bottom of the crows nest.
Very good suggestion Vic. Will try to put something underneath the mast tops to serve as stopper for the rope. Thanks and be safe.
 
Back
Top