Great progress, Dave! Keep going!
-

Win a Free Custom Engraved Brass Coin!!!
As a way to introduce our brass coins to the community, we will raffle off a free coin during the month of August. Follow link ABOVE for instructions for entering.
-

PRE-ORDER SHIPS IN SCALE TODAY!
The beloved Ships in Scale Magazine is back and charting a new course for 2026!
Discover new skills, new techniques, and new inspirations in every issue.
NOTE THAT OUR FIRST ISSUE WILL BE JAN/FEB 2026
You are using an out of date browser. It may not display this or other websites correctly.
You should upgrade or use an alternative browser.
You should upgrade or use an alternative browser.
Royal James sloop
- Thread starter Dave Stevens (Lumberyard)
- Start date
- Watchers 24
-
- Tags
- royal james sloop
- Joined
- Dec 1, 2016
- Messages
- 6,383
- Points
- 728

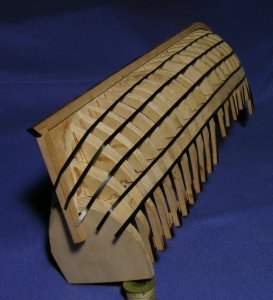
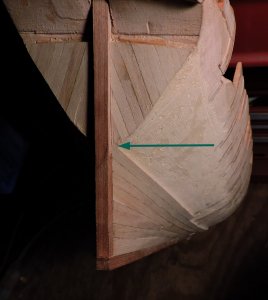
one way to get that sweep of the bottom planks is to use wide planks cut to shape. This is difficult to do with kit models because the kit does not supply different widths of planks for the hull. Here is an example of using wide planks cut to fit the hull. The blue arrow is pointing to the hump created by the planks following the shape of the hull, which I will deal with in a moment, also you may think boy those are wide planks and in real ship building that could never have been done.
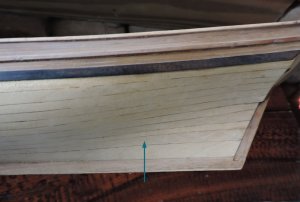
look at a real hull wide planks were used


look at a real hull wide planks were used

- Joined
- Dec 1, 2016
- Messages
- 6,383
- Points
- 728

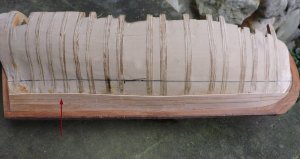
that hump in the run of the planking is the culprit of any a bad planking job and it was the reason I started over. Looking back at the last post and the blue arrow the hump is there but by cutting and shaping the bottom planks that hump is dealt with in the correct way.
even with the new garboard that pest of a hump is there right from the start caused by the plank following the shape of the hull. The number one concern of planking is to follow the hull shape first.

- Joined
- Dec 1, 2016
- Messages
- 6,383
- Points
- 728

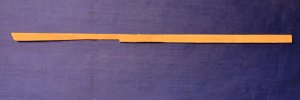
hull planks just might come in all kinds of odd shapes and there is a reason for that
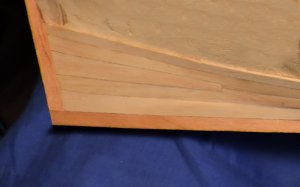
to deal with the sweep or "run" of the planks either wide planks are used OR stealers
what I did was to place a plank and bend it to follow the natural run then slip a pieces of blue card stock behind the planks. Now I created a pattern for my stealer which will allow the run to follow the hull. Notice where the top plank and the bottom plank meet. there is a gap there, if I were to make a stealer to fill that gap it will end as a narrow point, not good because there would be no way to spike it to the deadwood.
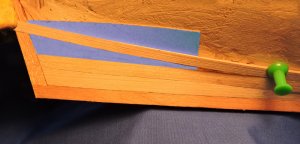
here is how a stealer is fit into the run of the bottom planks and its end notches into the lower and upper planks creating enough width so it can be spiked to the deadwood.
Great thread Dave as always. Don
- Joined
- Dec 1, 2016
- Messages
- 6,383
- Points
- 728

ok now I am back to where I left off after correcting my mess up
on to the second belt of planking but before I continue with my planking 2.0 I did swap the wood. In the first attempt I was using pearwood and it does bend really nice and I was going to give the hull a natural finish, pearwood turns a beautiful gold color. But with planking 2.0 I am using Poplar another nice bending wood, now I will finish the hull with weathering and Poplar takes paint and stain very well.
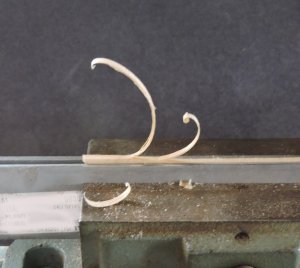
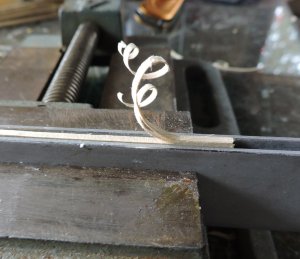
There are trade offs pearwood and boxwood look nice when finished but they are hard woods and difficult to cut with a knife, boxwood is somewhat brittle and tends to break when trying to bend it. Poplar bends without having to soak it, I am bending it dry. The thickness I am using is .080 a FAT 1/16 or about 2mm thick.
What I like about the Poplar is it can be finished naural and is a pale tan color but its big advantage is how it cuts and believe me there will be a lot of shaving and tapering and cutting planks. No need to make the job harder for yourself by using wood that is difficult to work with.
just look at that curl


- Joined
- Dec 1, 2016
- Messages
- 6,383
- Points
- 728

the glue I am using is super glue with a quick set of 5 to 10 seconds now there is no need for clamps a tiny dab of glue and I can move on to the next plank, this makes things move along at a steady pace. So much better than using a wood glue that you have to clamp down and wait for the glue to set.
Dave you are correct in the use of poplar, I used it on my ceiling planking of the Philadelphia Gun Boat, it does bend easily as does the beech, w bending both woods I run it through HOT WATER for about 3 minutes, and then clamp it in place after it dries it holds its shape wonderfully, thanks for introducing me to these woods. Don
- Joined
- Dec 1, 2016
- Messages
- 6,383
- Points
- 728

Poplar has little to no figure it is a uniform pale tan color which looks good, it does not detract for the craftmanship of the model. when you look back on the photos light colored wood tends to make the joinery stand out so you have to be pretty good at fitting pieces together.
Beech has a figure that looks like scale Oak well that could be because Beech is in the Oak family so yup there is a family resemblance there.
This model went from a natural finished model to a weathered looking model. I will use Cherry for the wales and use steel wool and vinegar to give the wales an old weathered looking paint job that looks like it had been neglected. This is a pirate ship and I don't think care of the vessel was a top priority like a naval ship.
- Joined
- Dec 1, 2016
- Messages
- 6,383
- Points
- 728

When the bottom planks are on the hull the next step is to set the location of the wale. I bent a plank and marked the lower edge. By setting the location of the wales I can now estimate the width and taper of the planks going from the bottom plank belt to turning the bilge and up to the sides of the hull..
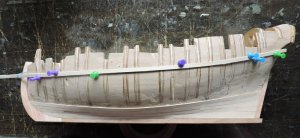
these bottom planks are not simple tapered planks each one is cut to fit the shape of the hull so wide planks are needed to shape these planks.


these bottom planks are not simple tapered planks each one is cut to fit the shape of the hull so wide planks are needed to shape these planks.

- Joined
- Dec 1, 2016
- Messages
- 6,383
- Points
- 728

Before I continue with the next belt of planking I need to set the point of the lower stern planks.
cutting a few planks I glued them together and printed a pattern from the plans
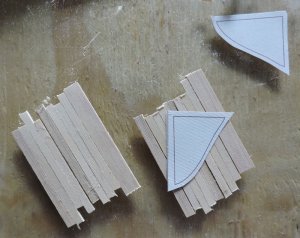
rather than try to place the planks on the hull and get both side as a perfect mirror I cut both sides out at once.
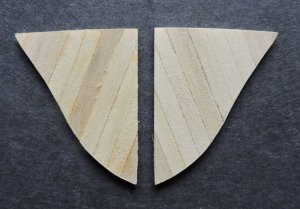
Now I glued bothe pieces to the stern lining them up along the top edge.
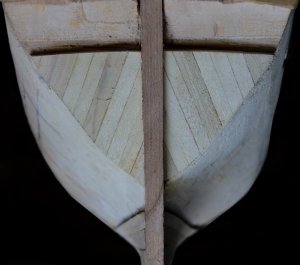
Now I have the space between the last bottom plank and the bottom of the stern planking. I can judge the tapper of the next couple runs of planking so they are the same on both sides of the hull.
cutting a few planks I glued them together and printed a pattern from the plans

rather than try to place the planks on the hull and get both side as a perfect mirror I cut both sides out at once.

Now I glued bothe pieces to the stern lining them up along the top edge.
Now I have the space between the last bottom plank and the bottom of the stern planking. I can judge the tapper of the next couple runs of planking so they are the same on both sides of the hull.

- Joined
- Dec 1, 2016
- Messages
- 6,383
- Points
- 728

- Joined
- Dec 1, 2016
- Messages
- 6,383
- Points
- 728

As you can see the bottom planking has quite a curve to it, that is because the planks follow the shape of the hull in order for them to lay flat and not spring edge wise. The goal now is to taper the next planks to lessen the curve and bring it closer to the curve of the sheer.
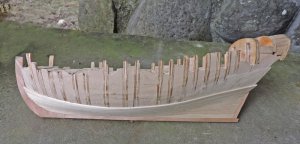
Planking the hull has reached that critical point where many planking jobs go wrong The problem is tapering the planks did reduce the curve in the plank run but not enough. As you can clearly see there is much more space to fill at midship than at the stem. In order to fill the midship section the planks would tapper to almost a point at the stem. A proper planking job is to increase the width of the plank at midship and keep the tapper at the ends the same.
This is not possible with planking from a kit because just about all kits supply only one width of planking so a stylized form of planking is used in kits and the run of the planks fall short of the stem and end along the bottom of the wales. sometimes drop planks or stealers can be used but if the supplied planks are to narrow stealers will not work.
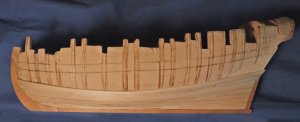
one easy fix to the same width kit planking is to add a stealer. But if the provided plank width is not wide enough several stealers will have to be used.
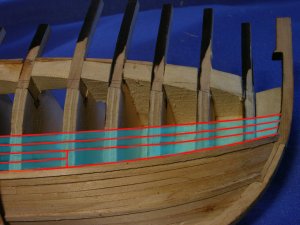

Planking the hull has reached that critical point where many planking jobs go wrong The problem is tapering the planks did reduce the curve in the plank run but not enough. As you can clearly see there is much more space to fill at midship than at the stem. In order to fill the midship section the planks would tapper to almost a point at the stem. A proper planking job is to increase the width of the plank at midship and keep the tapper at the ends the same.
This is not possible with planking from a kit because just about all kits supply only one width of planking so a stylized form of planking is used in kits and the run of the planks fall short of the stem and end along the bottom of the wales. sometimes drop planks or stealers can be used but if the supplied planks are to narrow stealers will not work.

one easy fix to the same width kit planking is to add a stealer. But if the provided plank width is not wide enough several stealers will have to be used.

Last edited:
- Joined
- Dec 1, 2016
- Messages
- 6,383
- Points
- 728

Taking a look at the final planking the run went from a curve of the bottom planking to matching the sheer all runs of planking go from stem to stern and no narrow tapering at the stem.
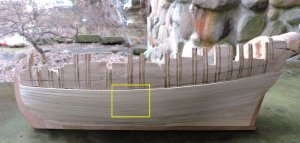
How that is done is by taking a close look at the area in the yellow box. Notice the plank in the run at the turn of the bilge and compare them to the upper planks. As you can see the upper runs of planking are wider. Once the hull has been sanded and finished your eye is drawn to the run of the planking and the curve it takes as the planking conforms to the shape of the hull.
What has been done is rather than cut the planks to almost a point or run them short of the stem the space midship is taken up with wider planks.
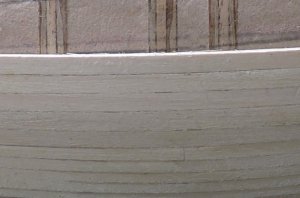
When planking a hull the planks at the turn of the bilge are always narrower than the bottom and side planking. Narrow planks are used so each run conforms to the curve of the hull.


How that is done is by taking a close look at the area in the yellow box. Notice the plank in the run at the turn of the bilge and compare them to the upper planks. As you can see the upper runs of planking are wider. Once the hull has been sanded and finished your eye is drawn to the run of the planking and the curve it takes as the planking conforms to the shape of the hull.
What has been done is rather than cut the planks to almost a point or run them short of the stem the space midship is taken up with wider planks.

When planking a hull the planks at the turn of the bilge are always narrower than the bottom and side planking. Narrow planks are used so each run conforms to the curve of the hull.

Last edited:
- Joined
- Dec 1, 2016
- Messages
- 6,383
- Points
- 728

to answer the question asked many time over by model ship builders where do you start the planking. the answer is always from the garboard up to the shutter plank. You can start from the top down but that makes the job quite difficult because it is hard to judge the shape of the planks as your working your way down.
the "shutter plank" is the plank that joins the curve of the sheer to the sheer of the hull planking and it is placed right under the wales or sheer molding if there isn't wales on the ship.
The term Shutter plank, so I am told comes from the yard foreman. As the planking crew planks up the hull the foreman is keeping a close eye on the run of the planking. A good planking job would not have stealers or drop planks above the waterline. This shows the foreman missed his mark. Stealers are considered a fix for a mistake in laying out the planking for a hull. So once the final inspection of the planking is done by the yard foreman he yells out "good planking job boys so shut'er up"
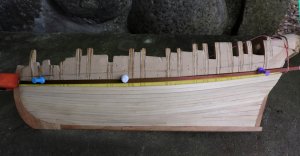
in model building personally what I do is temporally set the wale in place, the yellow area is the shape of the final shutter plank. I make a pattern of the shape and cut the plank. Once the shutter plank is placed in then I can set the wale on the top of the shutter plank. This insures a nice fit. If you put the wales on first you will have to fiddle with getting a tight fit and no gaps between the shutter plank and the top of the last plank and bottom of the wales.

Last edited:
- Joined
- Dec 1, 2016
- Messages
- 6,383
- Points
- 728

now I am happy with the second attempt of planking the hull and glad I ripped off all the first planking job and started over. In the past I let a mistake go and years latter it sits there mocking me. Nobody else may know or see an error but I do. for me it is not about just getting the job done it is about learning something.
ok next step is to build the stern
ok next step is to build the stern
As always fantastic thread, KEEP IT GOING ask Ev to read her email. THANKS Don
Question Dave, if you were to spile the planks can you start at the bottom of the wale and go down once you determine the No. of planks in a belt,( linings out the hull). Don
Hi Dave can you check my build on the MATTHEW, had some questions to start waiting for answers so I can start putting things together, has Ev checked her emai yet. please have her check if you guys are not to busy. THANKS Don
- Joined
- Dec 1, 2016
- Messages
- 6,383
- Points
- 728

Question Dave, if you were to spile the planks can you start at the bottom of the wale and go down once you determine the No. of planks in a belt,( linings out the hull). Don
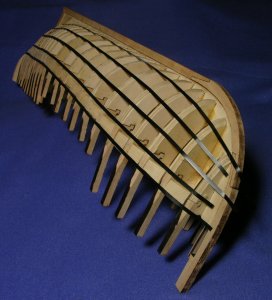
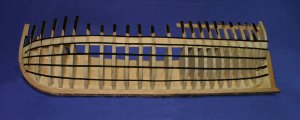
yes if you break the hull into belts by lining it off, theoretically you can start with any belt. Looking at this hull of the Matthew I first lined it off breaking the hull into belts. Now I can figure out how many planks it takes to fill any one of the belts. The problem is the lines are narrow strips of tape and a wide plank may or may not lay flat and follow the hull shape. so the black line is a "general" position of where the plank should be. As a hull is planked from the garboard up you are using you eye to judge the run of the planking and making small adjustments as you work your way up to match the sheer.
