-

Win a Free Custom Engraved Brass Coin!!!
As a way to introduce our brass coins to the community, we will raffle off a free coin during the month of August. Follow link ABOVE for instructions for entering.
-

PRE-ORDER SHIPS IN SCALE TODAY!
The beloved Ships in Scale Magazine is back and charting a new course for 2026!
Discover new skills, new techniques, and new inspirations in every issue.
NOTE THAT OUR FIRST ISSUE WILL BE JAN/FEB 2026
You are using an out of date browser. It may not display this or other websites correctly.
You should upgrade or use an alternative browser.
You should upgrade or use an alternative browser.
San Felipe 1690 from ZHL
- Thread starter Scott Shilling
- Start date
- Watchers 43
-
- Tags
- san felipe zhl
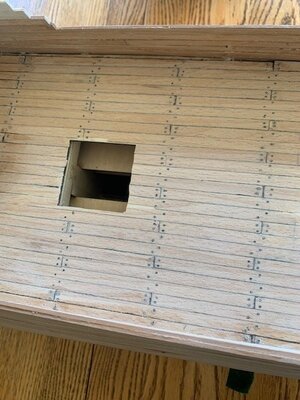
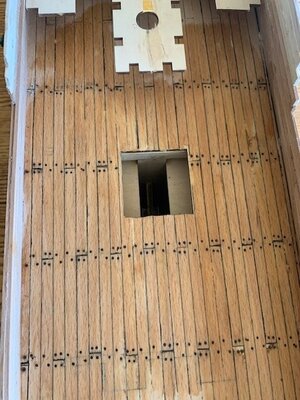
Ha ha ha ha waaaa lol omg ha ha ha....... Tree nailing results
NOPE!!!!
This is an example of an abject failure.
I'll cover this up with the decking wood that the kit provided. I'll lick my wounds, analyze my mistakes, and move forward.
Next time, I'll use less dark stain (per El Capi suggestion), use a smaller diameter drill bit, and build some sort of jig.
Pretty funny.....
Sheesh....


I hate to pile on... but 'yup' that's got to be a nope...
If I could suggest (learned this myself personally) - trials OFF the ship is the way to go...
If I could suggest (learned this myself personally) - trials OFF the ship is the way to go...
Good morning Scot. Yep, this hobby should be called “redo “. I always find this the best learning curve aspect of building these ships - those multitudes of redos.Ha ha ha ha waaaa lol omg ha ha ha....... Tree nailing results
NOPE!!!!
This is an example of an abject failure.
I'll cover this up with the decking wood that the kit provided. I'll lick my wounds, analyze my mistakes, and move forward.
Next time, I'll use less dark stain (per El Capi suggestion), use a smaller diameter drill bit, and build some sort of jig.
Pretty funny.....
Sheesh....
View attachment 408642View attachment 408643
I attempted treenails for the first time on my Xebec as well and this is a craft. I look at Uwek, (@Uwek ), ( Tobias @Tobias ), Paul @dockattner ) and many others and just go - “No way” how do they get this little b@&#*$s so right. My advice (from a noob
Hi Scott,
Interesting mistake since I had planned to use tree nailing on my planned project for the San Felipe. Consider it some kind of blessing in disguise, while you have the challenge of fixing it, I have been forewarned to do some proper testing and follow your progress closely, as to not make the same mistake.
Thank you for sharing on I'm sure you'll get it right next time around.
Cheers, Dirk
I should have the new decking for this section completed by tomorrow. I still have plenty of tree nailing to do on the rub rails of this project. Believe me I will thoroughly test before doing this again. Got to.
Good fun stuff.
Scott
Good fun stuff.
Scott
Scott, I'm jumping onboard a little late - just found your build! I'm very interested in ordering ZHLs Bonhomme Richard. I'm following for sure. The best logs also show their mistakes, it's how we all learn.
And hopefully, I'll catch you at the club meetings in Denver - I'm retiring so my Saturdays are going to open up!
And hopefully, I'll catch you at the club meetings in Denver - I'm retiring so my Saturdays are going to open up!
When I was nailing the deck of Santisima I made a jig out of two of the planks I used for planking the deck glued on top of each other. Draw a line across to simulate the meeting of the planks and drilled 4 holes as precisely as I could.
Then I placed the jig on the deck with the line matched up with the line on the plank and drilled through the holes. Nearly everyone came out precisely like the others.
Couldn't manage it free hand to save my life lol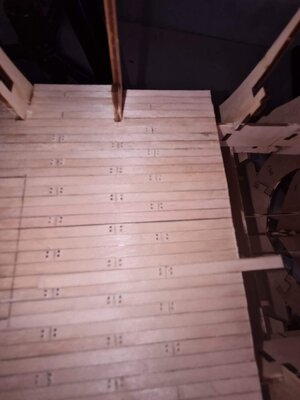
Then I placed the jig on the deck with the line matched up with the line on the plank and drilled through the holes. Nearly everyone came out precisely like the others.
Couldn't manage it free hand to save my life lol

- Joined
- Dec 27, 2019
- Messages
- 1
- Points
- 1
Buenos dias¿Tengo las instrucciones en inglés si las desea?
Yo solo tengo las instrucciones en chino.
¿Cómo podriamos hacer para tenerlas yo?. ¿Dónde puedo conseguirlas?
METROi e-mail: jgarcia_benaiges@infonegocio.com
Hola, sí tengo las instrucciones en inglés. si me envías tu dirección de correo electrónico puedo enviarte tgemBuenos dias
Yo solo tengo las instrucciones en chino.
¿Cómo podriamos hacer para tenerlas yo?. ¿Dónde puedo conseguirlas?
METROi e-mail: jgarcia_benaiges@infonegocio.com
Hello everyone. Time for an update. This weekend was dedicated to replacing the decking with the stuff that was provided in the kit.
And Yep - going forward I'll be using a jig.
Still have a ways to go on decking but it's going just fine. I may or may not do the pencil nails. I think I'll trial a few to one, see what it looks like and two, how long it takes. The provided decking is paper thin, so much so that I just use scissors to cut it up. Over the next couple of days, I'll have it wrapped up and sanded.
This model requires an inner set of planking. I used the cherry to do this, and it really stiffened things up. At this point, per the frustrating instructions I need to use a saw and cut the planking into a particular stepped down pattern. There are no provided dimensions for this. The kit does come with a 1 to 1 set of diagrams, but these are stuffed with so much that you cannot just measure and cut. Not sure where the steps start and stop. See below. Here is what I plan on doing, each section has a part that fits onto that section. Most of them anyway. I'll dig those parts out of the kit and use them as measurement tools. Once done I'll chart the measurements onto some graph paper and post it. That will save everyone some time when building one of these.
I have looked and looked at other posts and don't see any of the measurements for this.
One last thing, I used the template for the cannon ports and cut one of them out just to see if it lined up ok. It did, phew!!
Couple of pics below.
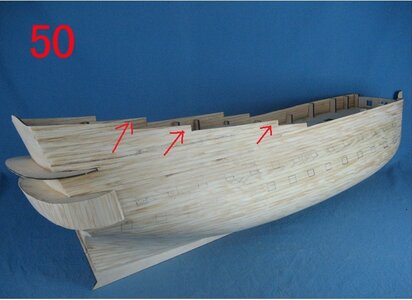
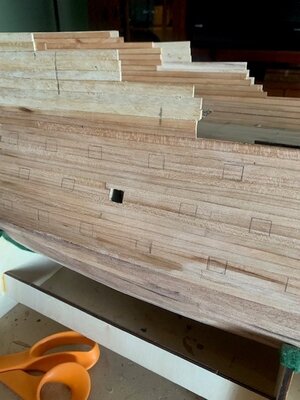
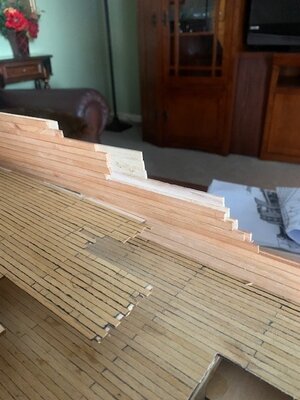
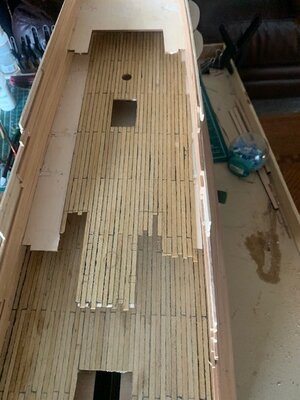
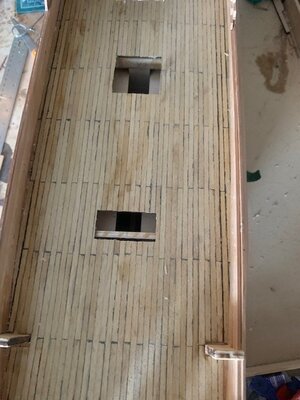


Good morning Scott. That deck will sand up beautifully. Re your treenails - this is a small scale build and there are plenty (nothing you don’t knowHello everyone. Time for an update. This weekend was dedicated to replacing the decking with the stuff that was provided in the kit.
And Yep - going forward I'll be using a jig.
Still have a ways to go on decking but it's going just fine. I may or may not do the pencil nails. I think I'll trial a few to one, see what it looks like and two, how long it takes. The provided decking is paper thin, so much so that I just use scissors to cut it up. Over the next couple of days, I'll have it wrapped up and sanded.
This model requires an inner set of planking. I used the cherry to do this, and it really stiffened things up. At this point, per the frustrating instructions I need to use a saw and cut the planking into a particular stepped down pattern. There are no provided dimensions for this. The kit does come with a 1 to 1 set of diagrams, but these are stuffed with so much that you cannot just measure and cut. Not sure where the steps start and stop. See below. Here is what I plan on doing, each section has a part that fits onto that section. Most of them anyway. I'll dig those parts out of the kit and use them as measurement tools. Once done I'll chart the measurements onto some graph paper and post it. That will save everyone some time when building one of these.
I have looked and looked at other posts and don't see any of the measurements for this.
One last thing, I used the template for the cannon ports and cut one of them out just to see if it lined up ok. It did, phew!!
Couple of pics below.
View attachment 410064
View attachment 410065View attachment 410066View attachment 410067View attachment 410068
 ) I would go as small and as light as possible. They could over power your deck. Pencil is an option however it can also darken a lot when you poly or oil your deck if you are too aggressive. As Paul mentioned previously I would also do a sequence of test nailing. Cheers Grant
I agree- comes up way better and more evenMight I suggest you not sand the deck, but scrape it with a razor scraper instead. That way, the excess stains you want removed will be scraped away without creating any unevenness through removal of softer parts of the plank or creating waves in the deck.

Once I get the rest of the decking laid out I'll give the scraping technic a try.
Feel the deck with your fingertips after scraping. You'll be amazed.Once I get the rest of the decking laid out I'll give the scraping technic a try.
Hello everyone - weekend update. Couple posts here.
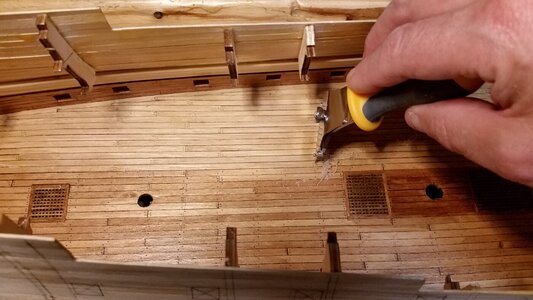
I gave Kurt's scraping technique a try. Works pretty darn good!!! The lower deck I had already sanded so I used the technique on the rest of the decks. This is going to be my standard process going forward. I am still trying to decide if I want to put the pencil nails or not.
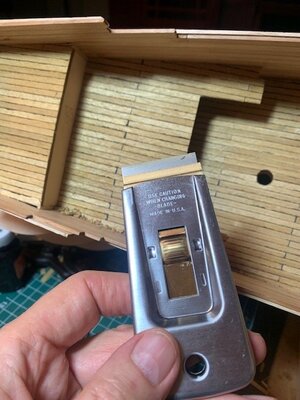
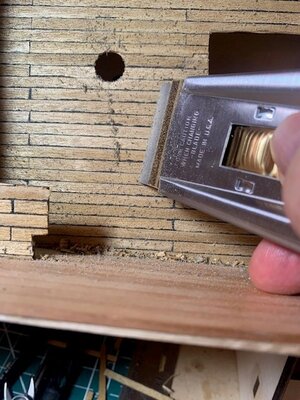
I gave Kurt's scraping technique a try. Works pretty darn good!!! The lower deck I had already sanded so I used the technique on the rest of the decks. This is going to be my standard process going forward. I am still trying to decide if I want to put the pencil nails or not.


The next task for the weekend was to take care of the area just below the officers' quarters. This is going to be painted black so all I am worried about is to make sure there are no plank marks / lines. Needs to be smooth. Sheesh - seems easy enough but not really. Coming around the corner with curves that do not match is tricky. I had to heavily bevel the plank edges and cut triangles out of the planks as well. I then did a rough sanding and it worked out well.
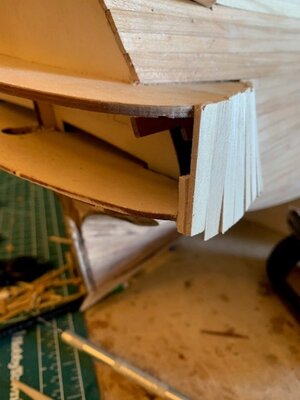
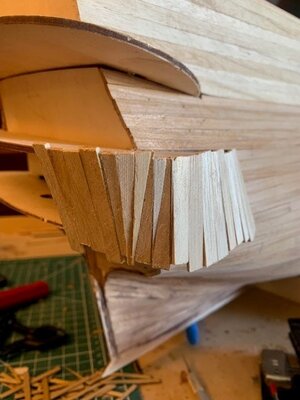
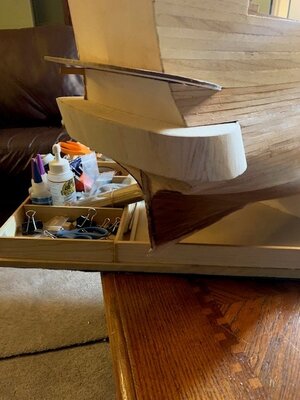
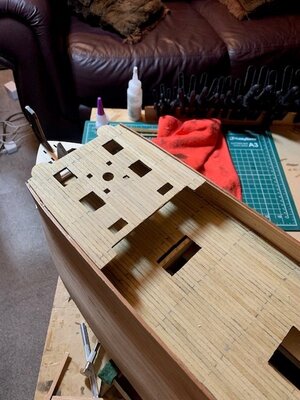
The last item for this post of a pic of the forward deck. After placing and scraping the decking It glued on just fine.
Just keep going.
Scott


The last item for this post of a pic of the forward deck. After placing and scraping the decking It glued on just fine.
Just keep going.
Scott
Hello everyone.
I made a lot of progress over the weekend. I'll get a big post out tomorrow. But I had an event.
If you are a sailor you've heard this saying before. "There are those who have hit the bottom and those that are lying about it". Well. While working on the cannon holes I had a Dremel blowout. My Dremel has two speed settings. Crazy super-fast and thermonuclear fast. I had it set on nuclear fast. Boom!! in a fraction of a second it blew a hole in the side of the boat. LOL Got some repair to do.
More tomorrow. Mostly I finalize the sides of the boat and I have measurements for those who are also building one of these.
Oh man. Gotta slow down that Dremel....
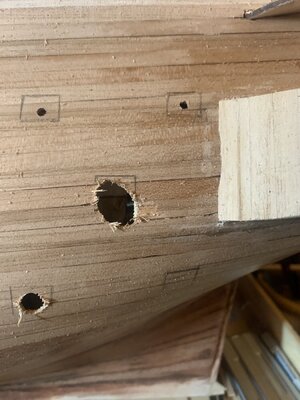
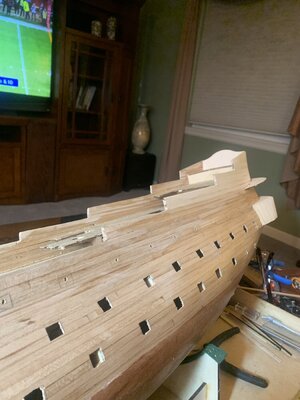


The steps you are doing now are exciting and nerve wracking. One slip and you have to rebuild one side of a gun port with glued in slivers. It's no big deal if you're cutting the first layer of planking and have one more layer to add, but if it's a single planked hull, YIKES! Be careful!Hello everyone.
I made a lot of progress over the weekend. I'll get a big post out tomorrow. But I had an event.
If you are a sailor you've heard this saying before. "There are those who have hit the bottom and those that are lying about it". Well. While working on the cannon holes I had a Dremel blowout. My Dremel has two speed settings. Crazy super-fast and thermonuclear fast. I had it set on nuclear fast. Boom!! in a fraction of a second it blew a hole in the side of the boat. LOL Got some repair to do.
More tomorrow. Mostly I finalize the sides of the boat and I have measurements for those who are also building one of these.
Oh man. Gotta slow down that Dremel....
View attachment 413204View attachment 413205


