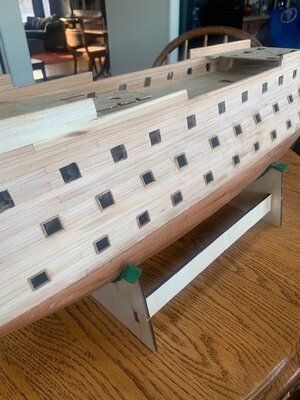
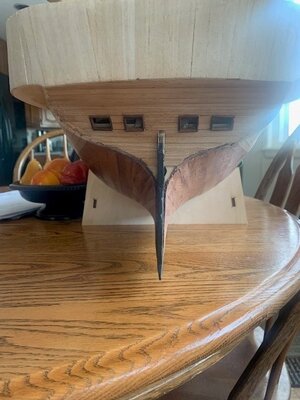
San Felipe 1690 from ZHL

Hello folks - Merry Christmas. Sorry for the delay in posting but I am slogging away at my least favorite model ship building activity. Digging out the cannon ports. It takes me a long time and I am not good at it. I did manage to get them all done, and I am currently working on the frames.

Last night while working on one of the frames I slid the model closer and when doing so my utility knife slid of the workstation. It got me!!! Not a slice but a little hole that must have hit an artery because it started bleeding like crazy. It's not bad, just a tiny hole that turned out to be pretty comical. I took this picture before I realized that I was about to make a mess.

I have seen serious cuts on this board that required many stitches and long healing times. Scott one (because of the hole I created with the Dremel) and Boat one. Now we are even so it's safe to continue.

Scott
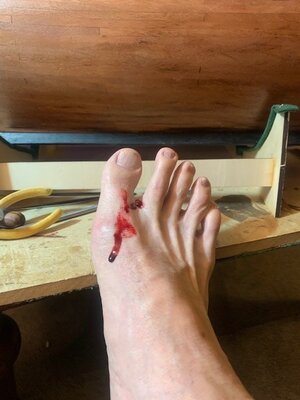
12-24-2023 Foot damage.jpg
 
OK that's it!!! I got me a serious ^*&^#% gripe. Here is the situation. Be aware all ZHL San Felipe builders. Alert Alert.

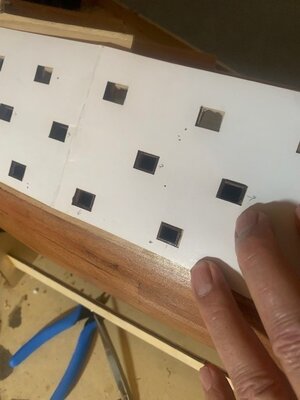
I double checked the alignment of the cannon port template and found it a bit lacking when it came to lining up with the bits of wood to mount the cannons on. Easy enough, I adjusted the backstops accordingly and proceeded to complete the planking.

Now it's time to actually6 use the template. I dutifully grabbed up my template and marked the cannon ports and presto they were in the correct spots. Great.

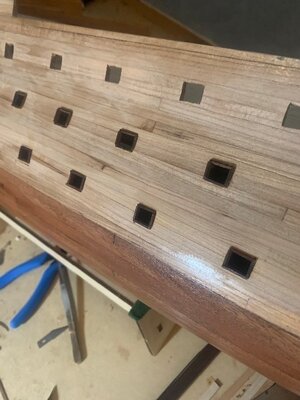
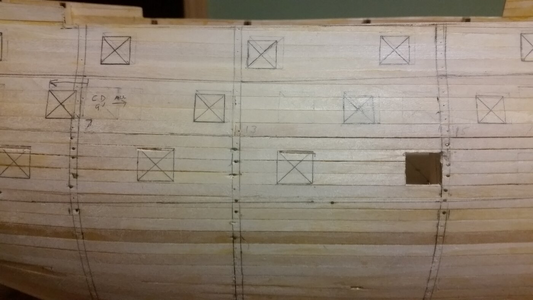
Next was to slog through my most dreaded part of modeling. Cutting out the cannon port holes. Blood and all I got it done then started the process of framing them. Frankly quite pleased with myself and this is looking pretty good Keep reading below

12-26-2023 Cannon Holes match template.jpg12-29-2023 Cannon port frames.jpg

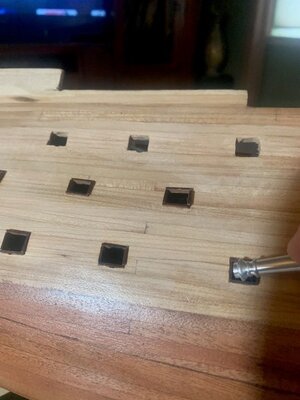
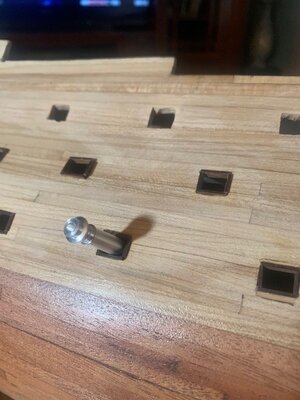
So... My wife asks me how the cannons will work and I explained that they are fake cannons. "I'll show you".

That's when the shit hit the fan. The cannons are tooooooooooo big!!! What &*&^%#*^)#_)(*& is this???

12-29-2023 Cannot too big.jpg12-26-2023 Cannon Way tooooo big.jpg


I framed 2 rows of 6. Gotta be redone. I am going tear out the framing, then recut all of the holes about 2mm on each side and 2mm on the bottom and top. Maybe 1.5mm. Either way i will test, 1mm at a time to see what it looks like then increment until I can get a compromise. A hole that is big enough to support the cannon yet not too big as to mess up the ratio of hole to hull size.

It never occurred to me to check this. Oh well. Learning by doing.

This is going to put me back several weeks.

All part of the game I guess.

Scott
 
OK that's it!!! I got me a serious ^*&^#% gripe. Here is the situation. Be aware all ZHL San Felipe builders. Alert Alert.

I double checked the alignment of the cannon port template and found it a bit lacking when it came to lining up with the bits of wood to mount the cannons on. Easy enough, I adjusted the backstops accordingly and proceeded to complete the planking.

Now it's time to actually6 use the template. I dutifully grabbed up my template and marked the cannon ports and presto they were in the correct spots. Great.

Next was to slog through my most dreaded part of modeling. Cutting out the cannon port holes. Blood and all I got it done then started the process of framing them. Frankly quite pleased with myself and this is looking pretty good Keep reading below

View attachment 416584View attachment 416585

So... My wife asks me how the cannons will work and I explained that they are fake cannons. "I'll show you".

That's when the shit hit the fan. The cannons are tooooooooooo big!!! What &*&^%#*^)#_)(*& is this???

View attachment 416608View attachment 416609


I framed 2 rows of 6. Gotta be redone. I am going tear out the framing, then recut all of the holes about 2mm on each side and 2mm on the bottom and top. Maybe 1.5mm. Either way i will test, 1mm at a time to see what it looks like then increment until I can get a compromise. A hole that is big enough to support the cannon yet not too big as to mess up the ratio of hole to hull size.

It never occurred to me to check this. Oh well. Learning by doing.

This is going to put me back several weeks.

All part of the game I guess.

Scott
As I in a message here on SOS said: "You will never learn if you do not make mistakes."
EL CAPI
The easiest way to cut gunports is making -with a dremel -holes around the frame-a 1mm inside -and then with an x-knives fine cut it
 
OK that's it!!! I got me a serious ^*&^#% gripe. Here is the situation. Be aware all ZHL San Felipe builders. Alert Alert.

I double checked the alignment of the cannon port template and found it a bit lacking when it came to lining up with the bits of wood to mount the cannons on. Easy enough, I adjusted the backstops accordingly and proceeded to complete the planking.

Now it's time to actually6 use the template. I dutifully grabbed up my template and marked the cannon ports and presto they were in the correct spots. Great.

Next was to slog through my most dreaded part of modeling. Cutting out the cannon port holes. Blood and all I got it done then started the process of framing them. Frankly quite pleased with myself and this is looking pretty good Keep reading below

View attachment 416584View attachment 416585

So... My wife asks me how the cannons will work and I explained that they are fake cannons. "I'll show you".

That's when the shit hit the fan. The cannons are tooooooooooo big!!! What &*&^%#*^)#_)(*& is this???

View attachment 416608View attachment 416609


I framed 2 rows of 6. Gotta be redone. I am going tear out the framing, then recut all of the holes about 2mm on each side and 2mm on the bottom and top. Maybe 1.5mm. Either way i will test, 1mm at a time to see what it looks like then increment until I can get a compromise. A hole that is big enough to support the cannon yet not too big as to mess up the ratio of hole to hull size.

It never occurred to me to check this. Oh well. Learning by doing.

This is going to put me back several weeks.

All part of the game I guess.

Scott
Hey there! looks like the template could have already included the frame of each gun port, altough they would appear far too small even that way. Accordingly to Wikipedia , contemporary english man of war main gun deck's gunport was 120 cm wide each, that means 2,4 cm in 1:50 scale. Cheers.
 
As I in a message here on SOS said: "You will never learn if you do not make mistakes."
EL CAPI
The easiest way to cut gunports is making -with a dremel -holes around the frame-a 1mm inside -and then with an x-knives fine cut it
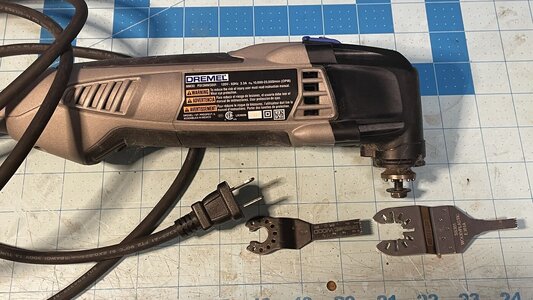
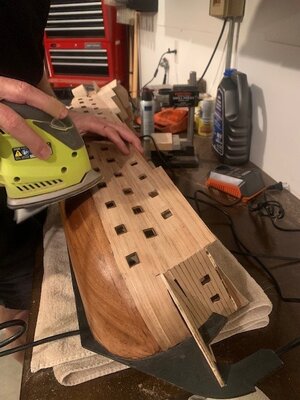
Here is another easy way, El Capi. You can use a Dremel oscillating cutter to make plunge cuts straight into the hull, if you have careful hands and place the hull in a steady place. The blade on the right is a replacement that was ground to a width which precisely cut the slots at a perfect width to make clean gun port holes with squared corners in one step. This makes the work much faster, especially if you have to cut a lot of gun ports. If a slot is cut too wide, it will be covered over with finish planking and gun port frames anyway.

You can see the plunge-cut slots and one of the fully gun gun ports.
1703682674000.png

This tool is very useful in many ways for cutting even though it is rather heavy. For cutting away frames when bashing the internals in a hull, it is invaluable.
IMG_2336.jpg
 
Last edited:
Here is another easy way, El Capi. You can use a Dremel oscillating cutting to make plunge cuts straight into the hull, if you have careful hands and place the hull in a steady place. The blade on the right is a replacement that was ground to a width which precisely cut the slots at a perfect width to make clean gun port holes with squared corners in one step. This makes the work much faster, especially if you have to cut a lot of gun ports. If a slot is cut too wide, it will be covered over with finish planking and gun port frames anyway.

You can see the plunge-cut slots and one of the fully gun gun ports.
View attachment 416718

This tool is very useful in many ways for cutting even though it is rather heavy. For cutting away frames when bashing the internals in a hull, it is invaluable.
View attachment 416719
 
I do not disagree with you. Each one of the experienced builders has their methods. I only described one to help one who had problems with cutting the ports. In my times of build -now more than 8 years ago - I made first all the gun frames and glued them.
then from inside the gunports, I inserted a nail in each corner to mark the ports,- this said to, that I always BUILD UP THE COMPLETE HULL, BEFORE ADDING ANYTHING ELSE.

I like very much your constructive comments, which sadly are not always the case

ps. My wife is now recovering from a minor-we hope - brain operation, so I have to as much at home.
HAPPY NEW YEAR TO YOU AND ALL OTHERS HERE. IN MY CASE IT SEEMS THAT 2024 CAN ONLY BE BETTER. OUR GOLDING WEDDING WAS CANCELED, MY 80 YEAR BIRTHDAY CANCELLED AS WELL X-MAS TOO


JUL, JULESTAS OG JULE HILSENER (22).jpg

JUL, JULESTAS OG JULE HILSENER (23).jpg
 
Indeed. I used my Dremel to gouge out the center part of the cannon port then used my knife to fine tune. Also, if you are going to use a Dremel for this make sure you have a solid grip on the devise. I learned this the hard way when the darn thing blew a monster hole in the side of the boat. See page 6 of this thread for a picture.

I did a couple of trials on making the holes bigger. It's not going to be overly time consuming.
DREMEL HAS a type of knife "curved". you then make A CENTER HOLE AND USE THIS KNIFE TURNING AROUND- CARVING,
 
I do not disagree with you. Each one of the experienced builders has their methods. I only described one to help one who had problems with cutting the ports. In my times of build -now more than 8 years ago - I made first all the gun frames and glued them.
then from inside the gunports, I inserted a nail in each corner to mark the ports,- this said to, that I always BUILD UP THE COMPLETE HULL, BEFORE ADDING ANYTHING ELSE.


I like very much your constructive comments, which sadly are not always the case

ps. My wife is now recovering from a minor-we hope - brain operation, so I have to as much at home.
HAPPY NEW YEAR TO YOU AND ALL OTHERS HERE. IN MY CASE IT SEEMS THAT 2024 CAN ONLY BE BETTER. OUR GOLDING WEDDING WAS CANCELED, MY 80 YEAR BIRTHDAY CANCELLED AS WELL X-MAS TOO


View attachment 416720

View attachment 416721
Best wishes to your wife for a speedy recovery.
 
I started San Felipe today. First thing I found is the keel is bent. Got to fix that before I move forward . Hopefully after that I can do half as good a job as you are doing
 
Last edited:
I started San Felipe today. First thing I found is the keel is bent like a banana. Got to fix that before I move forward . Hopefully after that I can do half as good a job as you are doing
Build yourself a strong multi-position keel clamp from wood. The keel won't be stabilized in a straight position until all the decks and planking are installed. A bent keel is a real curse if it isn't tamed. In fact, if it is badly bent, it's much better off being replaced from scratch.
 
Build yourself a strong multi-position keel clamp from wood. The keel won't be stabilized in a straight position until all the decks and planking are installed. A bent keel is a real curse if it isn't tamed. In fact, if it is badly bent, it's much better off being replaced from scratch.
Someone suggested I soak the keel in water , put it on a flat surface with a heavy weight on it
Till it dries. But I'm leaning towards trying the method you have suggested.
 
Last edited:
In more or less all of my models is minimum one drop of my blood soaked in the wood
Good, that you usualy do not need to foot for working on the model ;)
 
Hello all,

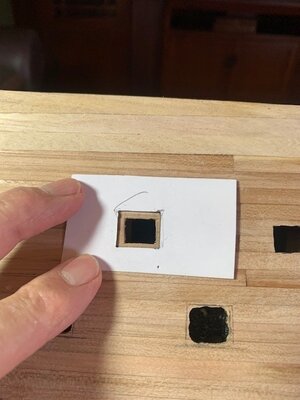
I finished redoing the cannon ports. I hated it! My least favorite task but now it behind me. Cut two big holes in one of my fingers. Reworking these needed to be done, but put me way behind my timeline. I kept finding excuses to do something else.

So - it's back to making progress and dealing with other issues and wobbly instructions.

Here are a couple of pictures. My next task is to put putty or wood filler on the back section and get it painted.

Greg - I'll jump over to your build to have a look at your center board.

01-15-2024 Finished the resizing of cannon ports..jpg01-15-2024 Resizing the cannon port holes.jpg01-20-2024 New Cannon Ports.jpg01-20-2024 Stern Cannon Ports.jpg
 
Back
Top