-

Win a Free Custom Engraved Brass Coin!!!
As a way to introduce our brass coins to the community, we will raffle off a free coin during the month of August. Follow link ABOVE for instructions for entering.
-

PRE-ORDER SHIPS IN SCALE TODAY!
The beloved Ships in Scale Magazine is back and charting a new course for 2026!
Discover new skills, new techniques, and new inspirations in every issue.
NOTE THAT OUR FIRST ISSUE WILL BE JAN/FEB 2026
You are using an out of date browser. It may not display this or other websites correctly.
You should upgrade or use an alternative browser.
You should upgrade or use an alternative browser.
- Joined
- Jun 28, 2020
- Messages
- 544
- Points
- 353

That's great!Yeah, it's made in the style of the 17th century!
And beautiful!
- Joined
- Jun 28, 2020
- Messages
- 544
- Points
- 353

------------------------------------------------------------------------------------------------------------------------------------
It has been a while since I have posted an overall view of the Silent Mary.

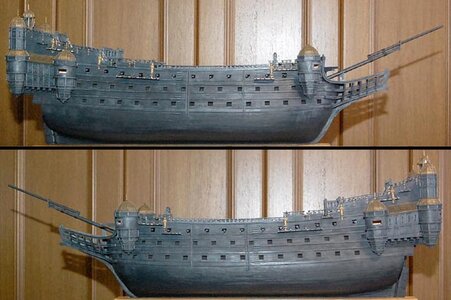
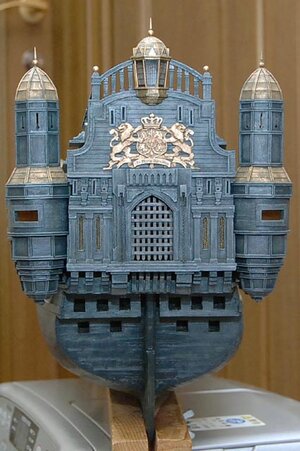
I wonder if it is better than before because of the details that were worked out.
The bilge pump is not found on the Silent Mary in the movie. I did not see any bilge pumps on the Black Pearl or the Flying Dutchman either.
I am sure that the actors did not put the bilge pump on the deck because it was too much of a nuisance for them to perform on the deck. ...... (my imagination)
By the way, I didn't see any pinnacles either.
By the way, the Black Pearl was a replica of the pinnacle.
------------------------------------------------------------------------------------------------------------------------------------
■Crafting a Chain■
First, a sample is made.
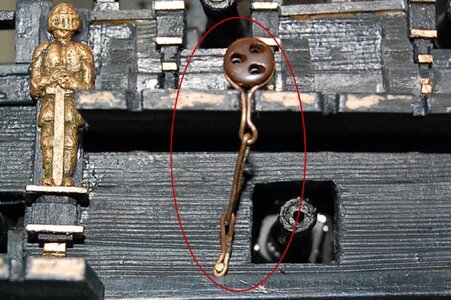
This is a chain for the channel part of the foremast and the deadeye. I made this as a sample. It took me 3 times to make the length right...
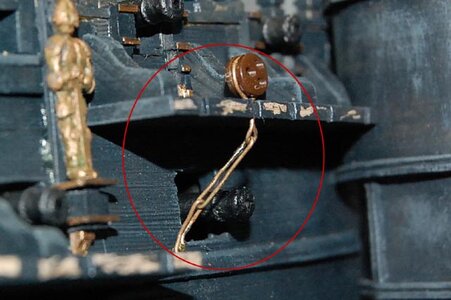
Here is an image from an angle. It looks good.
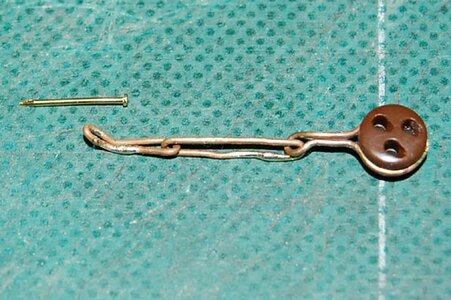
The deadeye chain for the foremast channel has been removed from the hull.
We will make 10 of these for port and starboard.
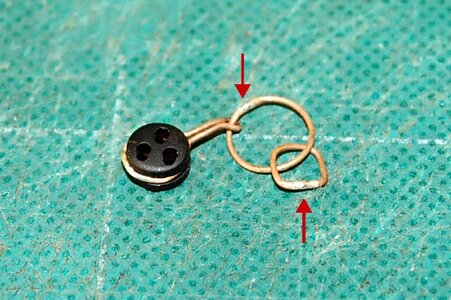
Braze the rings of each chain according to the sample above.
The red arrows indicate the brazing points.
Brazing a 0.5mm thick brass wire is quite tough.
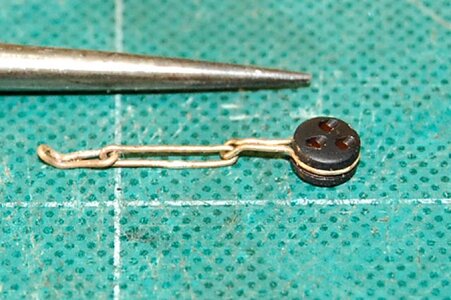
Shape the brazed ring into a chain with a pair of pliers.
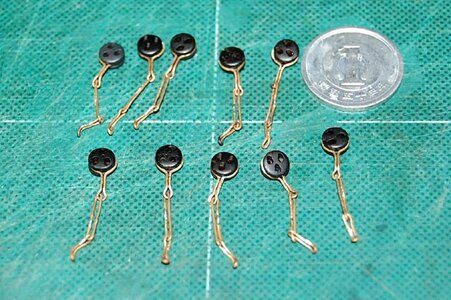
It took me a long time to make 10 pieces. I need 8 more for the foremast with different chain lengths.
It has been a while since I have posted an overall view of the Silent Mary.


I wonder if it is better than before because of the details that were worked out.
The bilge pump is not found on the Silent Mary in the movie. I did not see any bilge pumps on the Black Pearl or the Flying Dutchman either.
I am sure that the actors did not put the bilge pump on the deck because it was too much of a nuisance for them to perform on the deck. ...... (my imagination)
By the way, I didn't see any pinnacles either.
By the way, the Black Pearl was a replica of the pinnacle.
------------------------------------------------------------------------------------------------------------------------------------
■Crafting a Chain■
First, a sample is made.

This is a chain for the channel part of the foremast and the deadeye. I made this as a sample. It took me 3 times to make the length right...

Here is an image from an angle. It looks good.

The deadeye chain for the foremast channel has been removed from the hull.
We will make 10 of these for port and starboard.

Braze the rings of each chain according to the sample above.
The red arrows indicate the brazing points.
Brazing a 0.5mm thick brass wire is quite tough.

Shape the brazed ring into a chain with a pair of pliers.

It took me a long time to make 10 pieces. I need 8 more for the foremast with different chain lengths.
- Joined
- Jun 28, 2020
- Messages
- 544
- Points
- 353

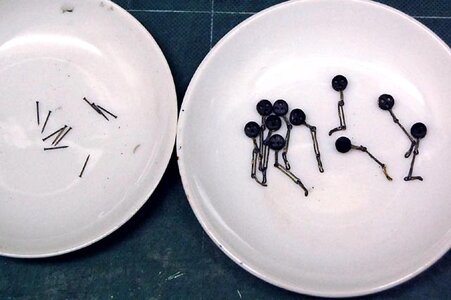
Ten chains and brass nails made were dyed black.
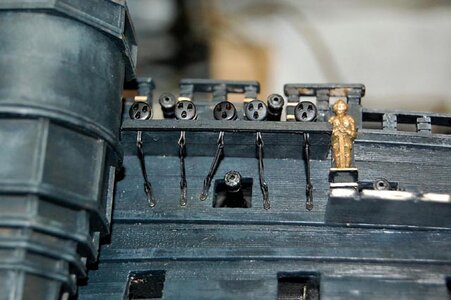
I've been itching to set it on the hull. This is the channel section on the port side.
The gunnery section is at an angle.
It would look something like this.
This image is from looking up from below, but when displayed, the deadeye chain is hidden behind the channel board.
The general public would not be able to see the effort that went into making the chain.
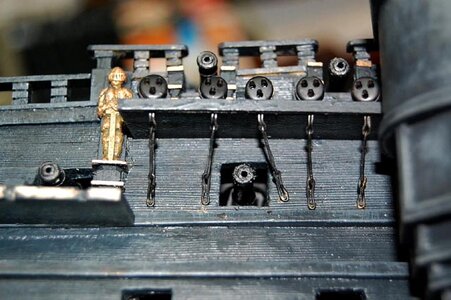
This is the channel section on the starboard side.
This one also has the gunnery section at an angle.
Very good solved - looking very good
- Joined
- Jun 28, 2020
- Messages
- 544
- Points
- 353

Hello, Uwek.Very good solved - looking very good
Thank you very much. So far, so good.
Sooner or later, there may be a point where the cannon hits a dead eye.
- Joined
- Jun 28, 2020
- Messages
- 544
- Points
- 353

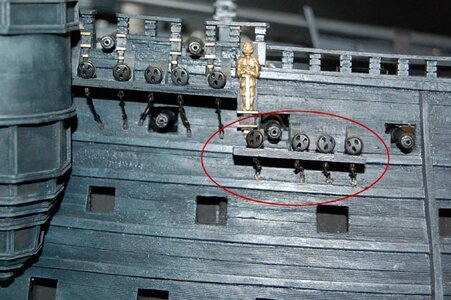
The remaining channel portion of the port side foremast, the red line portion of the chain, was made and set.
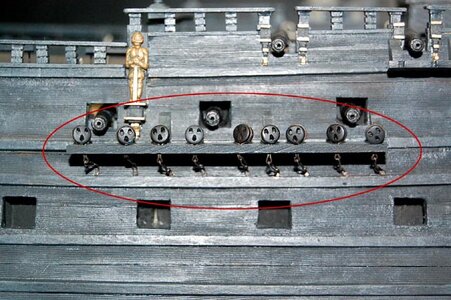
The channel portion of the port side mainmast and the red line portion of the chain were made and set.
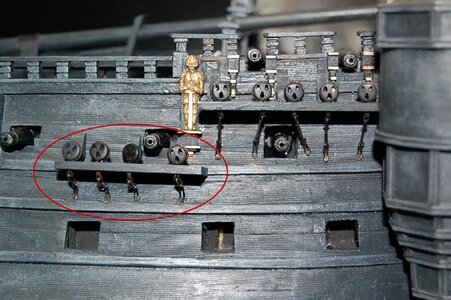
This is the remaining channel portion of the starboard foremast, the red line portion of the chain is made and set.
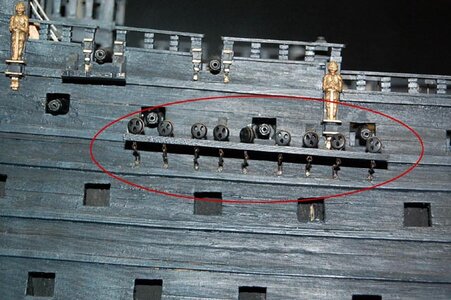
Make and set the channel section of the starboard side main mast and the red line portion of the chain.
--------------------------------------------------------------------------------------------------------------------
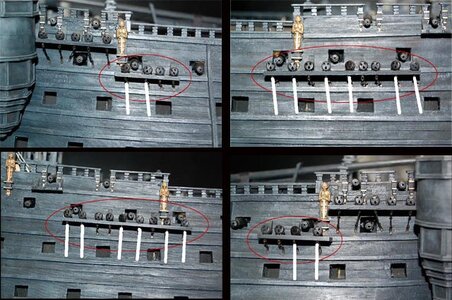
I don't like the chain that was installed last time.
This is not self-sufficient.
Fix the chain to the length of the white line at the point where the white line was placed.
-----------------------------------------------------------------------------------------------------------------------
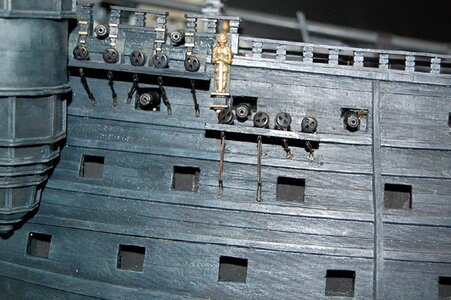
The channel section of the foremast on the port side and the chain were repaired.
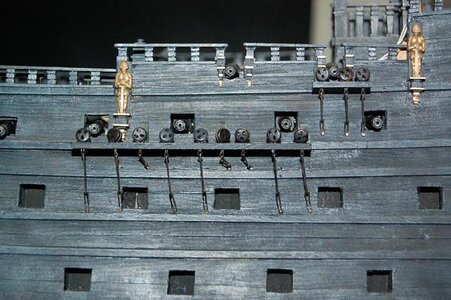
The channel section of the main mast on the port side was also re-chained.
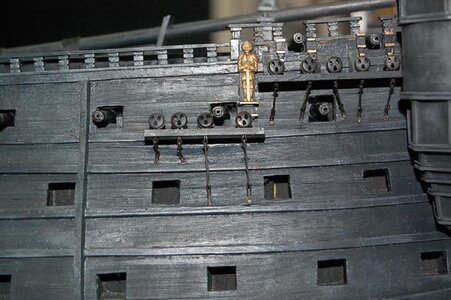
The channel section of the foremast on the starboard side, the chain was repaired.
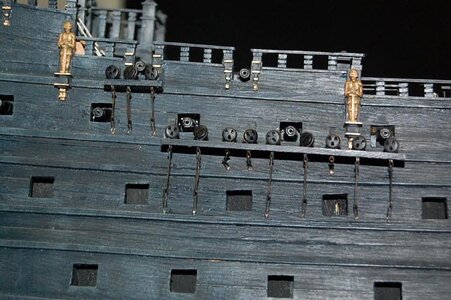
I also fixed the chain on the channel part of the main mast on the starboard side.
Now all that is left is the chain for the channel portion of the mizzen mast.
- Joined
- Jun 28, 2020
- Messages
- 544
- Points
- 353

Hello Rokket.Looks great. And big!
Thanks for taking a look at the thread.
Now it's time for the channel part of the mizzenmast.
Silver brazing 0.5mm brass wire is tricky.
- Joined
- Oct 17, 2020
- Messages
- 1,691
- Points
- 488

Hi Mellpapa, Congratulations you are making a work of art.FrankView attachment 427717
The remaining channel portion of the port side foremast, the red line portion of the chain, was made and set.
View attachment 427718
The channel portion of the port side mainmast and the red line portion of the chain were made and set.
View attachment 427719
This is the remaining channel portion of the starboard foremast, the red line portion of the chain is made and set.
View attachment 427720
Make and set the channel section of the starboard side main mast and the red line portion of the chain.
--------------------------------------------------------------------------------------------------------------------
View attachment 427721
I don't like the chain that was installed last time.
This is not self-sufficient.
Fix the chain to the length of the white line at the point where the white line was placed.
-----------------------------------------------------------------------------------------------------------------------
View attachment 427722
The channel section of the foremast on the port side and the chain were repaired.
View attachment 427723
The channel section of the main mast on the port side was also re-chained.
View attachment 427724
The channel section of the foremast on the starboard side, the chain was repaired.
View attachment 427725
I also fixed the chain on the channel part of the main mast on the starboard side.
Now all that is left is the chain for the channel portion of the mizzen mast.
- Joined
- Jun 28, 2020
- Messages
- 544
- Points
- 353

Hello, Frank48Hi Mellpapa, Congratulations you are making a work of art.Frank
Thanks for taking a look at the thread.
It is still a work in progress.
It is far from finished.
- Joined
- Jun 28, 2020
- Messages
- 544
- Points
- 353

Hi RokketShe sure is beautiful.
I can imagine brazing the brass would be tricky. I've always wanted to try silver soldering, but it see,s..scary and difficult!
Silver brazing is really difficult.
It's very difficult, because you have to glue the cuts and breaks in the brass wire.
You only apply the flux to the areas you want to glue together, but you end up applying it to the excess areas.
If you do this, the silver solder doesn't stick to the part you want it to stick to, and it gets lumpy in another part.
Soldering is easier, but the adhesion is weak.
Silver soldering has stronger adhesion.
Even if the adhesion point is pulled as hard as possible, it will not come off.
- Joined
- Jun 28, 2020
- Messages
- 544
- Points
- 353

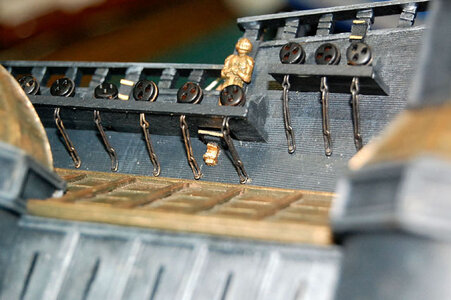
The chain for the mizzen mast channel on the port side was ready and attached to the hull.
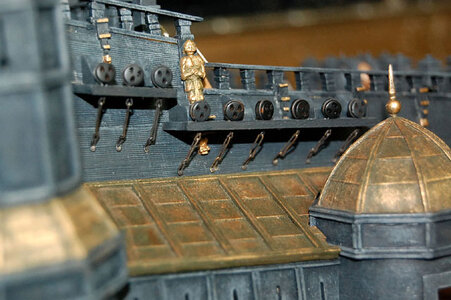
This is the chain for the channel on the starboard side mizzen mast.
Silver brazing a chain is not my favorite task, so I was depressed about making the chain.
I made many mistakes and it took a long time, and when I got used to silver brazing, I finished the work.
But when it was finished, it looked good.
I am self-satisfied.
- Joined
- Jun 28, 2020
- Messages
- 544
- Points
- 353

■ Preparation for bow figure making ■
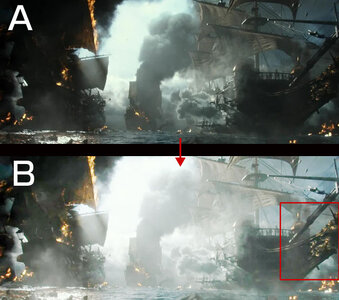
Image B shows the density of Image A reduced.
Note the red framed area in image B! The color of the figure appears to be the same as the roof of the bow turret.
Judging from this, there are two possible types.
One, it was painted gold. The second was gilded.
Now which one shall we choose... it is a bit difficult to get the gold leaf, so we will go with the gold paint.
Whether I should paint it the same as the paint on the turret roof, or paint it like the emblem on the stern, I will decide after the figure is done.

I see that the bow statues are designed in various ways in the concept illustration.
The one chosen from these is C.
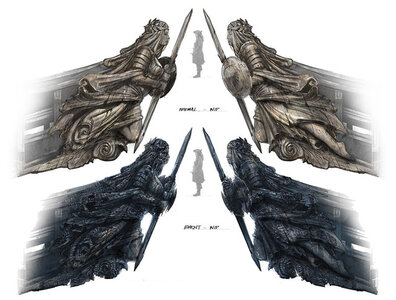
The bow statue is quite large.
They are compared to the size of the figures.
The top is the bow statue a before it became a ghost ship, and the bottom is the bow statue of a ghost ship.
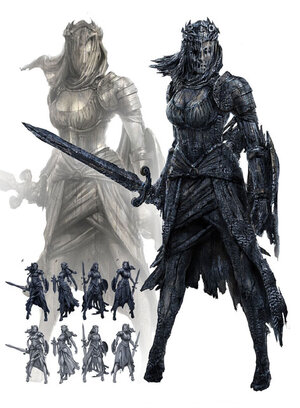
This is a standing statue of the bow of the ghost ship and before it became a ghost ship.
It is helpful to see the detail of the bow statue before it became a ghost ship.
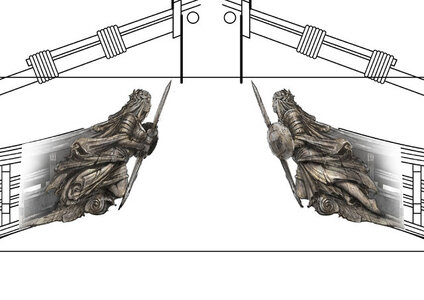
Illustrations of the left and right sides of the bow figure were pasted to match the drawings of the Silent Mary.
It is very helpful to have this kind of material when creating a bow figure!
-------------------------------------------------------------------------------------------------------------------------
■Production of the Bow Statue ■
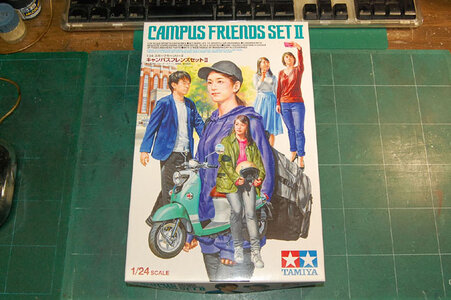
In making the bow statue, I was looking for a figure to use as a base and found one.
I will use as a base the female figure wearing a blue skirt that comes in TAMIYA's 1/24 Campus Friends Set 2.
I went to a model shop and bought it.
Any 1/24 female figure from any manufacturer would be fine.
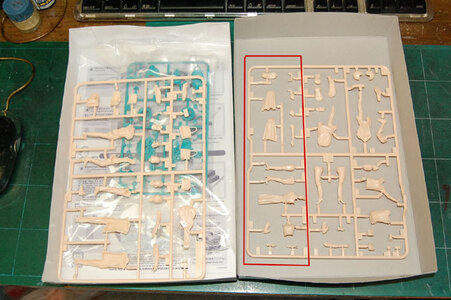
Open the box and observe the runner.
Use the woman with the blue skirt in the red frame section.
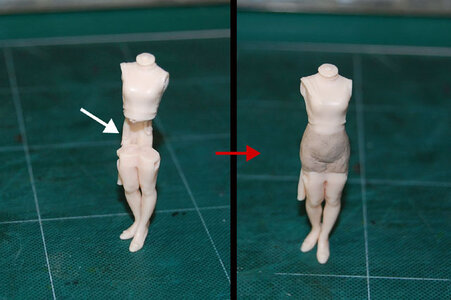
When assembled, the belly part is missing.
If it were a normal assembly, the skirt parts would be glued together, but since it is used as a base, epoxy putty for woodworking is applied to the belly part.
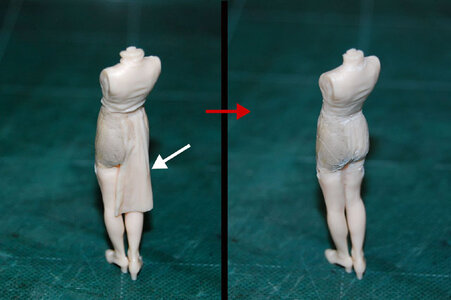
Shave off the back skirt area to finish the butt.
Leave it for a while because the epoxy putty is still raw and dry.
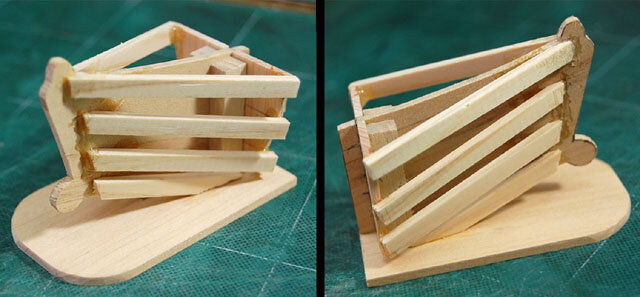
While the figures were left unattended, I made a bow stand to set the figures on.
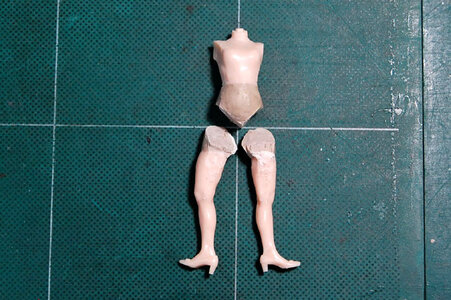
The figure's epoxy putty hardened and both legs were cut off.
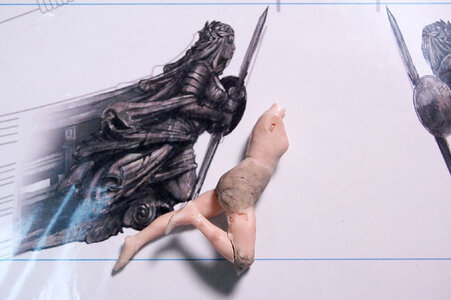
The right leg is machined and glued to match the sample bow.
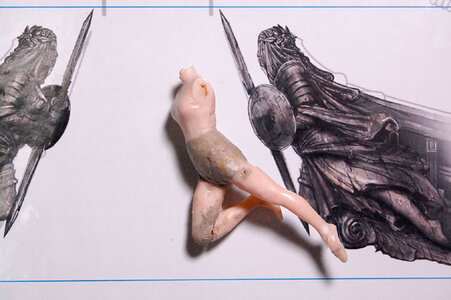
The left leg is also processed and glued in the same way.
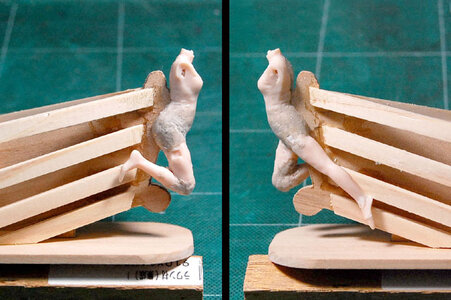
I set it on the bow stand I had made.
I will add arms and head to this and build it up, but that's all for today.
I am 100% satisfied with myself because I managed to complete the base of the bow statue.

Image B shows the density of Image A reduced.
Note the red framed area in image B! The color of the figure appears to be the same as the roof of the bow turret.
Judging from this, there are two possible types.
One, it was painted gold. The second was gilded.
Now which one shall we choose... it is a bit difficult to get the gold leaf, so we will go with the gold paint.
Whether I should paint it the same as the paint on the turret roof, or paint it like the emblem on the stern, I will decide after the figure is done.

I see that the bow statues are designed in various ways in the concept illustration.
The one chosen from these is C.

The bow statue is quite large.
They are compared to the size of the figures.
The top is the bow statue a before it became a ghost ship, and the bottom is the bow statue of a ghost ship.

This is a standing statue of the bow of the ghost ship and before it became a ghost ship.
It is helpful to see the detail of the bow statue before it became a ghost ship.

Illustrations of the left and right sides of the bow figure were pasted to match the drawings of the Silent Mary.
It is very helpful to have this kind of material when creating a bow figure!
-------------------------------------------------------------------------------------------------------------------------
■Production of the Bow Statue ■

In making the bow statue, I was looking for a figure to use as a base and found one.
I will use as a base the female figure wearing a blue skirt that comes in TAMIYA's 1/24 Campus Friends Set 2.
I went to a model shop and bought it.
Any 1/24 female figure from any manufacturer would be fine.

Open the box and observe the runner.
Use the woman with the blue skirt in the red frame section.

When assembled, the belly part is missing.
If it were a normal assembly, the skirt parts would be glued together, but since it is used as a base, epoxy putty for woodworking is applied to the belly part.

Shave off the back skirt area to finish the butt.
Leave it for a while because the epoxy putty is still raw and dry.

While the figures were left unattended, I made a bow stand to set the figures on.

The figure's epoxy putty hardened and both legs were cut off.

The right leg is machined and glued to match the sample bow.

The left leg is also processed and glued in the same way.

I set it on the bow stand I had made.
I will add arms and head to this and build it up, but that's all for today.
I am 100% satisfied with myself because I managed to complete the base of the bow statue.
Last edited:
- Joined
- Jun 28, 2020
- Messages
- 544
- Points
- 353

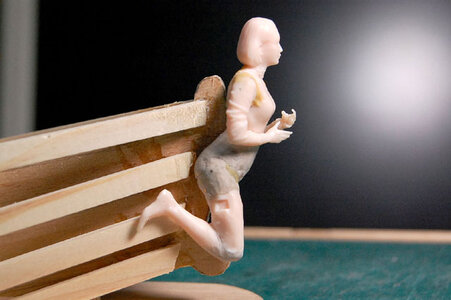
Adjust the gluing surface of the neck and glue the head.
This is the right side.
The elbow and wrist of the right arm are taken apart, adjusted to match the concept illustration, and glued.
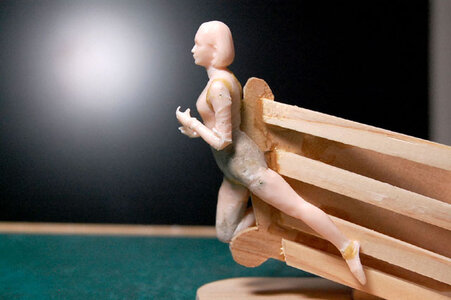
This is the left side.
The left arm is also glued after the elbow and wrist are disassembled and adjusted to match the concept illustration.
The glue is Tamiya cement, so it takes time for the glue to harden.
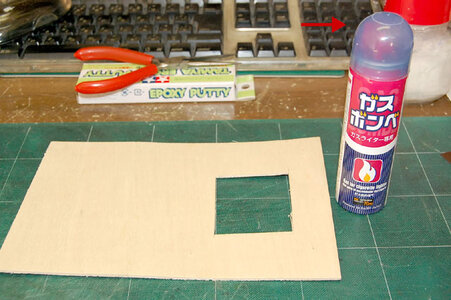
While waiting for the glue to harden, I decide to make a circular shield.
Note the red arrow!
The curved surface of the cap part of a gas cylinder of a gas lighter sold at a 100 yen store is just right.
Using this part, I heat press the plastic plate.
First, make a square hole in a thin plywood board.
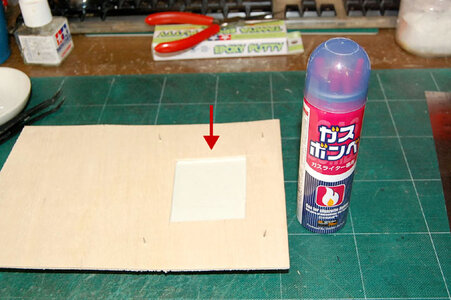
Set a 1mm-thick plastic board from the back side of a plywood board with square holes and fasten it with thumbtacks.
Heat this up on the gas table in the kitchen, and when the plastic board becomes soft, press it onto the cap of the gas cylinder.
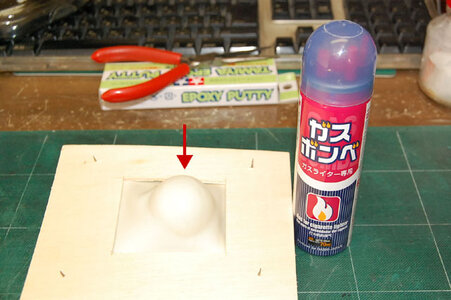
Note the red arrow part.
This is the result of heat pressing.
It succeeded in one time.
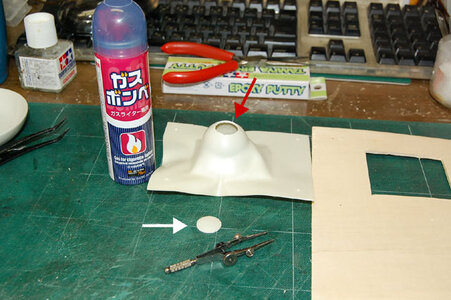
The heat-pressed plastic plate was cut out with a spring divider.
The red arrow is the cut-out remnant and the white arrow is the cut-out part, which will become the circular shield.
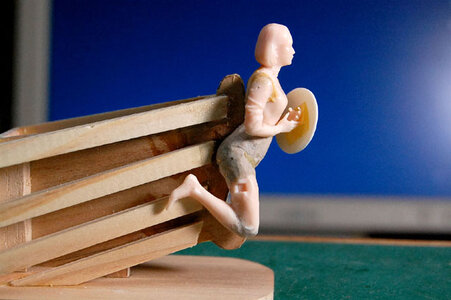
The glue hasn't completely set, but I temporarily attached the circular shield with masking tape.
This is the right side. It looks good.
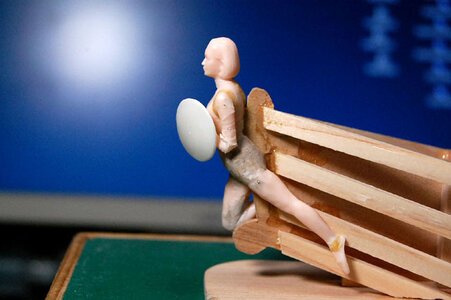
This is the left side, just the right size.
The curved surface is nice.
The part where the head and arms were glued together is still freshly glued, so I left it as is.
It will be safe to leave it overnight.
So I'll make the sword.
--------------------------------------------------------------------------------------------------------------------------------------------
-Sword Crafting-
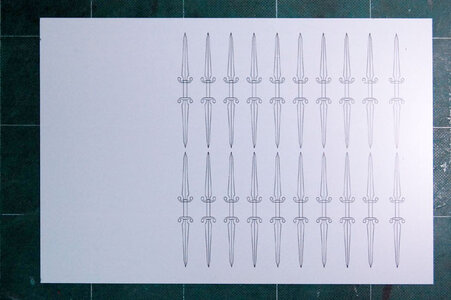
I drew a sword using Illustrator and printed it on a 0.3mm plastic plate.
Alps MD printers are thermal transfer printers, so they can print on 0.3mm plastic plates.
It is a very convenient printer.
I always print more because I don't want to make a mistake.
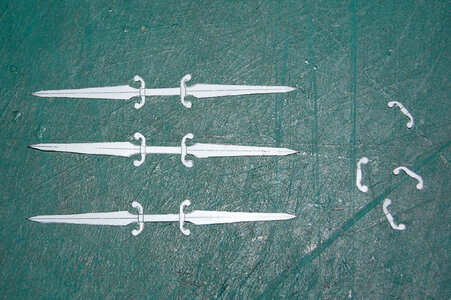
Cut out 3 swords, cut out 4 guard pieces, and laminate the 3 swords.
Lace up the guard part as well.
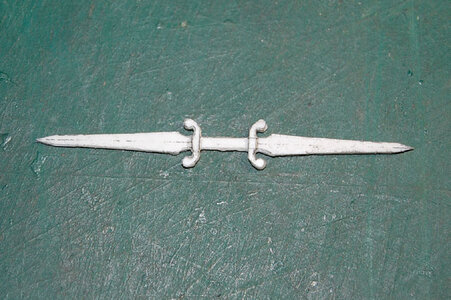
Since it is glued with Tamiya cement, it takes time to harden.
After it hardens completely, it is scraped and shaped.
----------------------------------------------------------------------------------------------------------------------------------
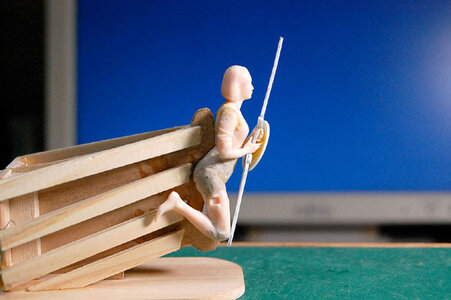
Let the bow statue hold the sword.
This image is from the right.
It looks good.
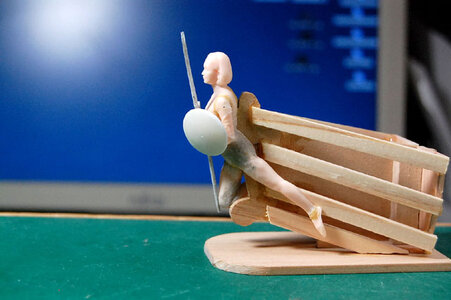
This image is from the left.
This one looks good too.
Let it dry overnight as is.
The next craft is to make the clothes and armor with epoxy putty, but that's all for today.
- Joined
- Jun 28, 2020
- Messages
- 544
- Points
- 353

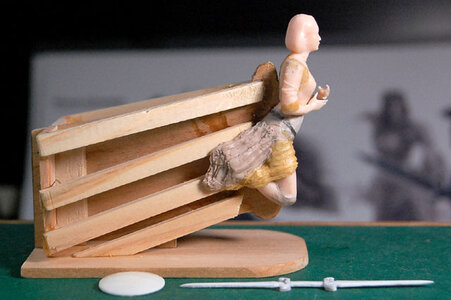
I putty up the skirt part using epoxy putty for woodworking and Tamiya epoxy putty (fast curing type).
I put the putty in the approximate shape.
After it hardens, I cut it into shape.
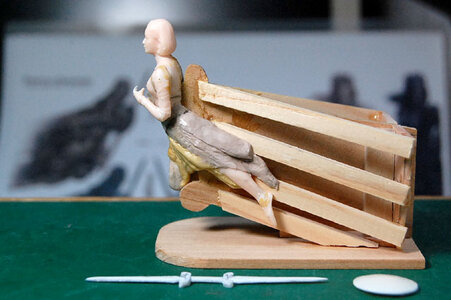
This side is also puttying the skirt part using two types of epoxy putty.
After the putty hardens, the shape of the skirt is cut out.
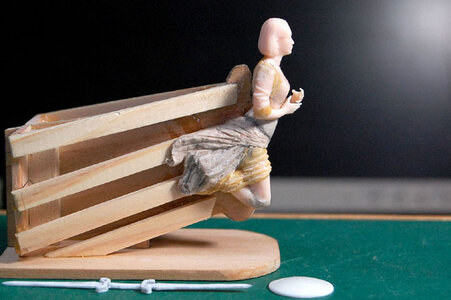
The previous putty heaping was scraped down to get most of the shape, and the second time epoxy putty for woodworking was placed.
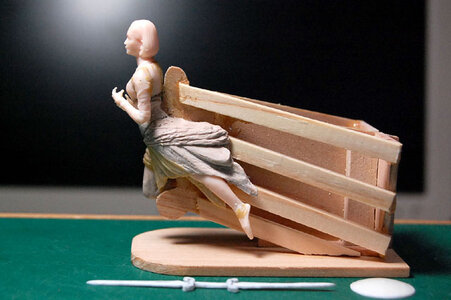
On the left side, the previous putty was scraped off and the shape was almost complete, then the second epoxy putty for woodworking was applied.
After the putty hardens, it is scraped in.
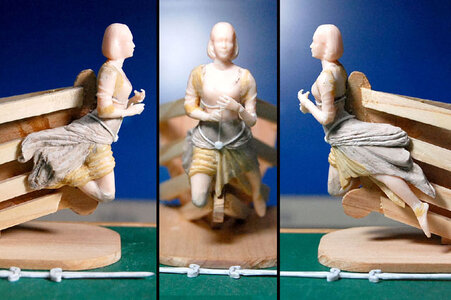
The belly part seems to be wearing a corset-like armor, so I glued the stretched runner to the edge of the corset armor.
- Joined
- Jun 28, 2020
- Messages
- 544
- Points
- 353

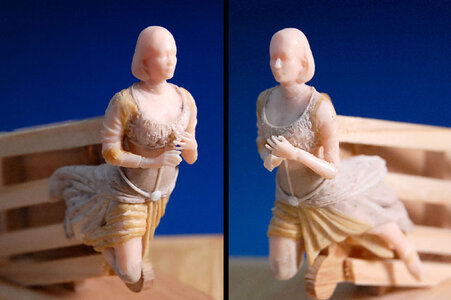
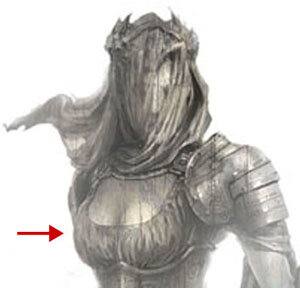
On the corset armor, I stretched a thin layer of wood epoxy putty over the wrinkles in the chest garment, affixed it, wet the tip of a toothpick with water, and poked it to express the wrinkles.
The putty was too thin and would peel off if left as is, so I applied instant adhesive to harden it.
I also shaved the cleavage a little.
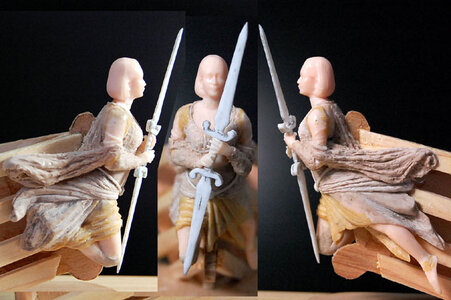
Since arm guards are attached, wood epoxy putty was heaped on both arms.
I also heaped a cape-like thing on her back and a robe that flutters back from both arms.
Since I couldn't do anything until the putty hardened, I took a picture of him holding a sword.
Once the putty hardens, I carve out the shape and paper it.
Melpapa,
If you want to try gold leaf, I have several sheets I would be willing to share. It is not real gold, but it looks and behaves just like gold leaf. If you message me your address I will send some sheets through Japan Post. I also have the adhesive, but I don't think I can send that through the mail. You might be able to use something like rubber cement instead--I think they are very similar.
If you want to try gold leaf, I have several sheets I would be willing to share. It is not real gold, but it looks and behaves just like gold leaf. If you message me your address I will send some sheets through Japan Post. I also have the adhesive, but I don't think I can send that through the mail. You might be able to use something like rubber cement instead--I think they are very similar.


