-

Win a Free Custom Engraved Brass Coin!!!
As a way to introduce our brass coins to the community, we will raffle off a free coin during the month of August. Follow link ABOVE for instructions for entering.
-

PRE-ORDER SHIPS IN SCALE TODAY!
The beloved Ships in Scale Magazine is back and charting a new course for 2026!
Discover new skills, new techniques, and new inspirations in every issue.
NOTE THAT OUR FIRST ISSUE WILL BE JAN/FEB 2026
You are using an out of date browser. It may not display this or other websites correctly.
You should upgrade or use an alternative browser.
You should upgrade or use an alternative browser.
…..very coolIt's pretty cool.
DittoThis is just incredible work. Even in a fantasy world, those double cannons in the turrets are inspiring and awesome to say the least!
- Joined
- Jun 28, 2020
- Messages
- 544
- Points
- 353

Mr. Heinrich,This is just incredible work. Even in a fantasy world, those double cannons in the turrets are inspiring and awesome to say the least!
Thank you for your words of encouragement.
I am looking at Heinrich's HMS PANDORA.
I am looking forward to seeing how you handle the fusion of resin and wood.
- Joined
- Jun 28, 2020
- Messages
- 544
- Points
- 353

Mr.GrantTyler,…..very cool
Thank you very much.
Enjoy how things are going to turn out.
Thanks for all the "Likes".

- Joined
- Jun 28, 2020
- Messages
- 544
- Points
- 353

-  fabrication -
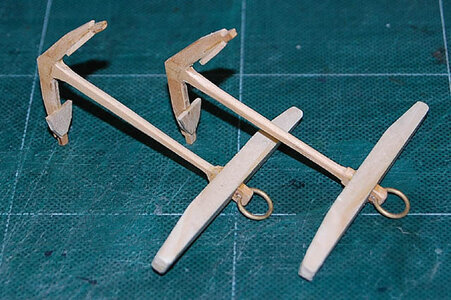
The shank, crown, and palm of the anchor were all made of cypress wood. The ring is 1mm thick brass wire, and the stock is also made of cypress wood.
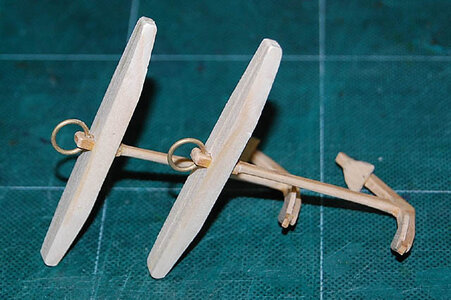
I took pictures from different angles, so I will post the images.
The hoop (iron band) attached to the stock will be made of copper plate.
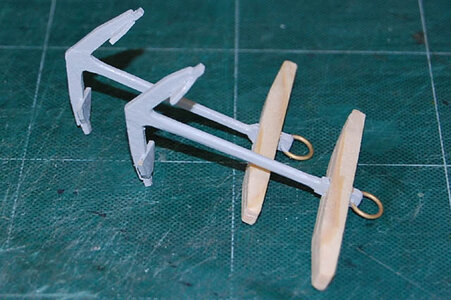
Preparation for painting.
I applied a brush of Tamiya's surfacer to the shank, crown, and palm areas to break up the grain.
-----------------------------------------------------------------------------------------------------------------------------------------------------
- Paint the anchor -
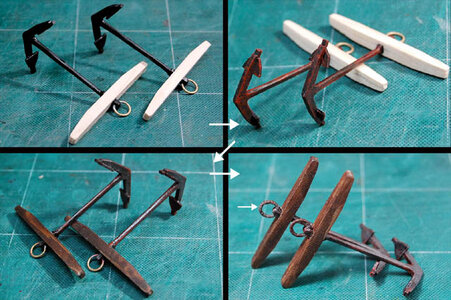
Paint the surfacer coated area with Tamiya acrylic color Flat Black.
After the flat black was dry, I mixed PEARM.RED, PERM.SCARLT and COBALT BLUE of Turner Acrylic Gouache to make rust color and painted it with a rough dry brush.
After it dried, a 4B pencil was rubbed on.
The stock was coated with OILSTIN (walnut).
The first rope (thin thread) was wrapped around the brass ring part.
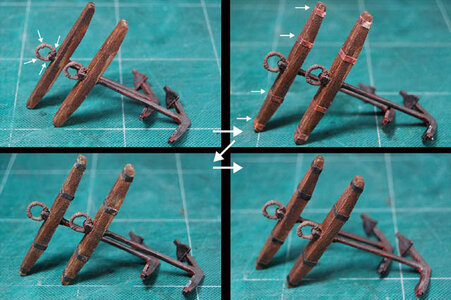
White arrow part of brass ring section, second rope (thin thread) wrapped around four places, thinly coated with lacquer-based dark earth.
The white arrow part of the stock section, I made a hoop out of copper plate.
I silver brazed the hoop instead of soldering it because of the force applied when fitting it.
The hoop made of copper plate was dyed black, and the uneven areas were coated with a thin layer of lacquer type matte black.
The wooden stock was coated with Tamiya's PANEL LIN ACCENT COLOR (BROWN).
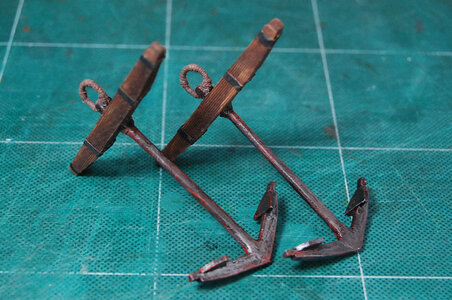
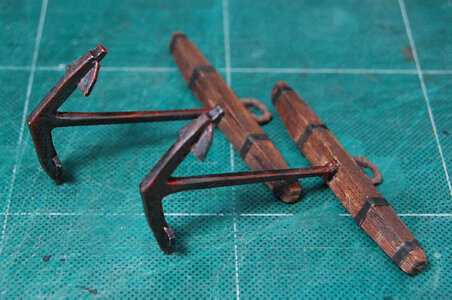
I made an anchor made of cypress wood and painted it to look like that.
It looks like an anchor to me, so I am self-satisfied.

 fabrication -
The shank, crown, and palm of the anchor were all made of cypress wood. The ring is 1mm thick brass wire, and the stock is also made of cypress wood.

I took pictures from different angles, so I will post the images.
The hoop (iron band) attached to the stock will be made of copper plate.

Preparation for painting.
I applied a brush of Tamiya's surfacer to the shank, crown, and palm areas to break up the grain.
-----------------------------------------------------------------------------------------------------------------------------------------------------
- Paint the anchor -

Paint the surfacer coated area with Tamiya acrylic color Flat Black.
After the flat black was dry, I mixed PEARM.RED, PERM.SCARLT and COBALT BLUE of Turner Acrylic Gouache to make rust color and painted it with a rough dry brush.
After it dried, a 4B pencil was rubbed on.
The stock was coated with OILSTIN (walnut).
The first rope (thin thread) was wrapped around the brass ring part.

White arrow part of brass ring section, second rope (thin thread) wrapped around four places, thinly coated with lacquer-based dark earth.
The white arrow part of the stock section, I made a hoop out of copper plate.
I silver brazed the hoop instead of soldering it because of the force applied when fitting it.
The hoop made of copper plate was dyed black, and the uneven areas were coated with a thin layer of lacquer type matte black.
The wooden stock was coated with Tamiya's PANEL LIN ACCENT COLOR (BROWN).


I made an anchor made of cypress wood and painted it to look like that.
It looks like an anchor to me, so I am self-satisfied.

Last edited:
- Joined
- Jan 9, 2020
- Messages
- 10,566
- Points
- 938

You can be very well satisfied, my friend - those look superb!-fabrication -
View attachment 435232
The shank, crown, and palm of the anchor were all made of cypress wood. The ring is 1mm thick brass wire, and the stock is also made of cypress wood.
View attachment 435233
I took pictures from different angles, so I will post the images.
The hoop (iron band) attached to the stock will be made of copper plate.
View attachment 435234
Preparation for painting.
I applied a brush of Tamiya's surfacer to the shank, crown, and palm areas to break up the grain.
-----------------------------------------------------------------------------------------------------------------------------------------------------
- Paint the anchor -
View attachment 435235
Paint the surfacer coated area with Tamiya acrylic color "Flat Black". After the flat black was dry, I mixed PEARM.RED, PERM.SCARLT and COBALT BLUE of Turner acrylic gouache to make rust color, and painted it with a rough dry brush. The stock was coated with OILSTIN (walnut).
The first rope (thin thread) was wrapped around the brass ring part.
View attachment 435236
White arrow part of brass ring section, second rope (thin thread) wrapped around four places, thinly coated with lacquer-based dark earth.
The white arrow part of the stock section, I made a hoop out of copper plate. I silver brazed the hoop instead of soldering it because of the force applied when fitting it.
The hoop made of copper plate was dyed black, and the parts that were unevenly dyed black were coated with a thin layer of lacquer type matte black.
The wooden stock was coated with Tamiya's PANEL LIN ACCENT COLOR (BROWN).
View attachment 435240
View attachment 435241
I made an anchor made of cypress wood and painted it to look like that.
It looks like an anchor to me, so I am self-satisfied.
- Joined
- Jun 28, 2020
- Messages
- 544
- Points
- 353

Mr. Heinrich.You can be very well satisfied, my friend - those look superb!
Thank you for your encouragement.
The anchor I made is dirty with rust showing, but you wouldn't believe it was made out of wood.

But if I drop it in the ocean, it will float.
Lost items are easy to find.

You have fantastic fabricating skills. And the paint job is top notch-fabrication -
View attachment 435232
The shank, crown, and palm of the anchor were all made of cypress wood. The ring is 1mm thick brass wire, and the stock is also made of cypress wood.
View attachment 435233
I took pictures from different angles, so I will post the images.
The hoop (iron band) attached to the stock will be made of copper plate.
View attachment 435234
Preparation for painting.
I applied a brush of Tamiya's surfacer to the shank, crown, and palm areas to break up the grain.
-----------------------------------------------------------------------------------------------------------------------------------------------------
- Paint the anchor -
View attachment 435235
Paint the surfacer coated area with Tamiya acrylic color Flat Black.
After the flat black was dry, I mixed PEARM.RED, PERM.SCARLT and COBALT BLUE of Turner Acrylic Gouache to make rust color and painted it with a rough dry brush.
After it dried, a 4B pencil was rubbed on.
The stock was coated with OILSTIN (walnut).
The first rope (thin thread) was wrapped around the brass ring part.
View attachment 435236
White arrow part of brass ring section, second rope (thin thread) wrapped around four places, thinly coated with lacquer-based dark earth.
The white arrow part of the stock section, I made a hoop out of copper plate.
I silver brazed the hoop instead of soldering it because of the force applied when fitting it.
The hoop made of copper plate was dyed black, and the uneven areas were coated with a thin layer of lacquer type matte black.
The wooden stock was coated with Tamiya's PANEL LIN ACCENT COLOR (BROWN).
View attachment 435240
View attachment 435241
I made an anchor made of cypress wood and painted it to look like that.
It looks like an anchor to me, so I am self-satisfied.
- Joined
- Jun 28, 2020
- Messages
- 544
- Points
- 353

Hello swampdweller126.You have fantastic fabricating skills. And the paint job is top notch
Thank you very much.
When I was young, I used to build only plastic models of tanks and military vehicles.
Instead of building them beautifully, I built only dirty and shabby tanks that were used on the battlefield.
After I turned 50, I switched to full-scratch sailboat models, but the paint job is a dirty paint job that I studied in my own way.
I am not good at painting neatly, so it is always a dirty paint job.
If I can satisfy myself, that's good enough for me.
Whether this dirty paint looks realistic or dirty is up to the viewer.
I wish I could do a clean paint job.

- Joined
- Jun 28, 2020
- Messages
- 544
- Points
- 353

- Cat block production -
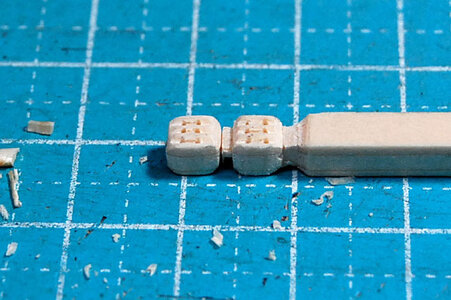
Drill a hole in a 4mm square cypress wood and cut it with a design knife to form the shape of a pulley.
If it looks somewhat like a pulley, it is OK.
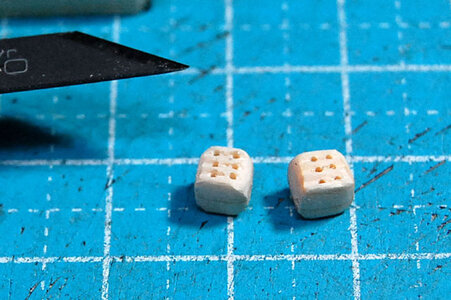
Two pulleys can be made by detaching them.
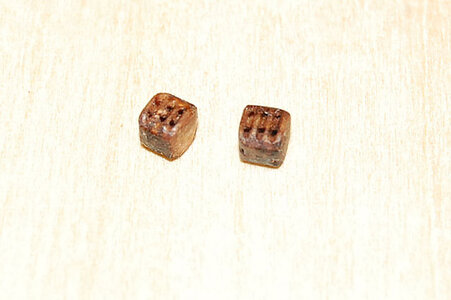
Apply oil stain and allow to dry.
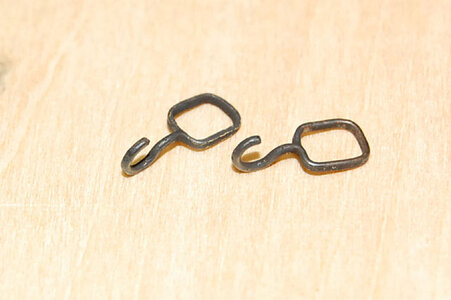
A brass wire 0.8mm in diameter is annealed, bent into the shape of a hook, and the bottom part is tapped to form a plate and bent into a square shape to fit the pulley made earlier.
The joints are glued together with silver soldering to complete the cat block hook fittings.
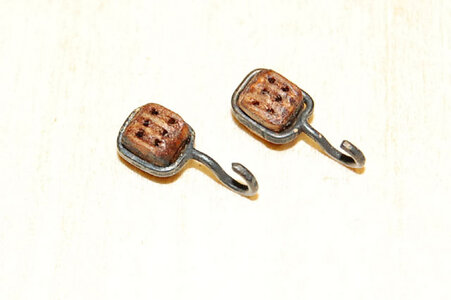
The catblock is now ready to be combined with the pulley we made earlier.
Since it is small, it is impossible to apply detailed detailing to it, and it looks somewhat like a cat block, so I am OK with that.
The white arrow in the image below ...... shows where it will be attached.
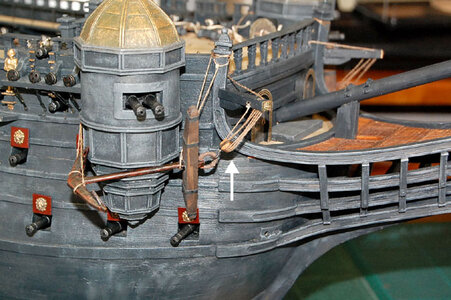
It's at the white arrow part, but it's small, so I'll put a further enlarged image below.
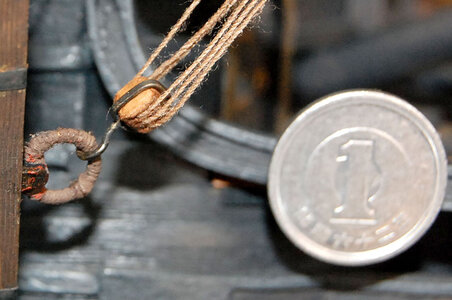
I put a penny on the cat block to show the size of the cat block.
The pulley rope has a lot of fluff.
Let's do something about it later.
The size of the pulley is about 5mm.
I haven't attached a thick anchor rope yet.

Drill a hole in a 4mm square cypress wood and cut it with a design knife to form the shape of a pulley.
If it looks somewhat like a pulley, it is OK.

Two pulleys can be made by detaching them.

Apply oil stain and allow to dry.

A brass wire 0.8mm in diameter is annealed, bent into the shape of a hook, and the bottom part is tapped to form a plate and bent into a square shape to fit the pulley made earlier.
The joints are glued together with silver soldering to complete the cat block hook fittings.

The catblock is now ready to be combined with the pulley we made earlier.
Since it is small, it is impossible to apply detailed detailing to it, and it looks somewhat like a cat block, so I am OK with that.
The white arrow in the image below ...... shows where it will be attached.

It's at the white arrow part, but it's small, so I'll put a further enlarged image below.

I put a penny on the cat block to show the size of the cat block.
The pulley rope has a lot of fluff.
Let's do something about it later.
The size of the pulley is about 5mm.
I haven't attached a thick anchor rope yet.
- Joined
- Jun 28, 2020
- Messages
- 544
- Points
- 353

- Making Fife Rails -
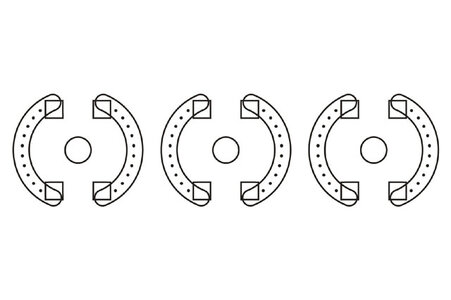
First of all, I need to make parts.
At first, I drew a drawing of a fife rail and printed it out on copy paper with a printer.
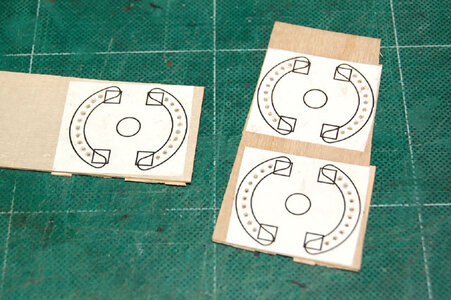
The drawing is attached to 0.6 mm aviation veneer.
A 0.5mm-thick cypress wood is attached to the back of the aerial veneer.
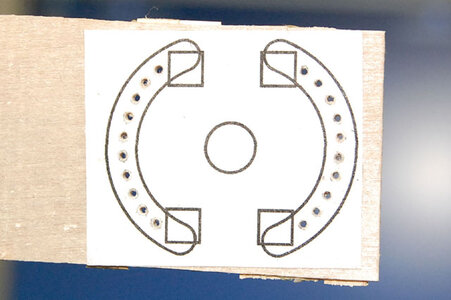
Before cutting out, the first step is to drill holes.
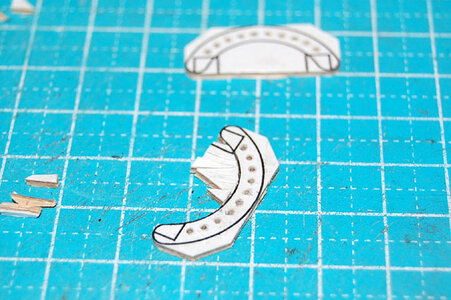
Next, cut from the inside.
Next, cut the outside.
It's the same with plastic board crafts.
First you drill the holes, then cut from the inside, then the outside ......
The processing order is the same for both wood and plastic boards.
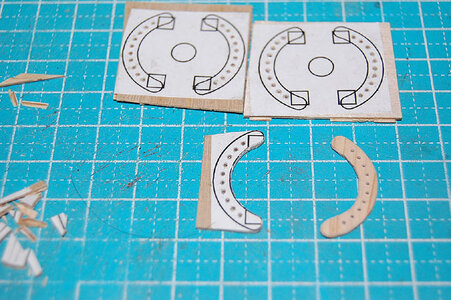
The first one was cut cleanly, so the second one is in the middle of the cut.
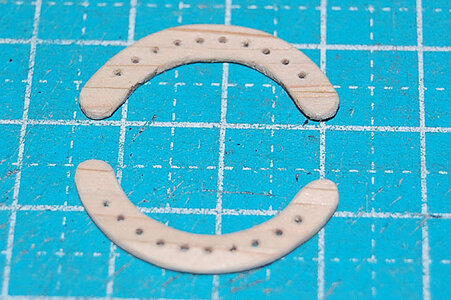
The second piece is ready.
I'll cut four more.
It takes quite a long time, doesn't it?
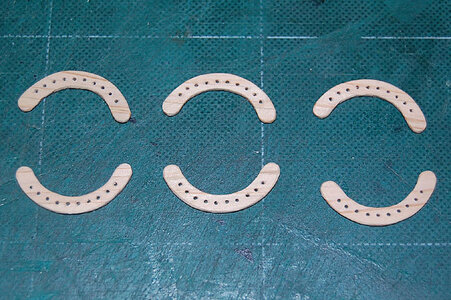
Finally, I made six of them.
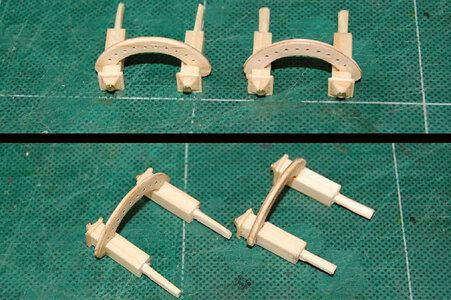
I made a fife rail for the foremast.
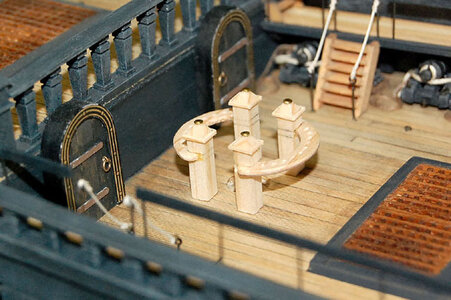
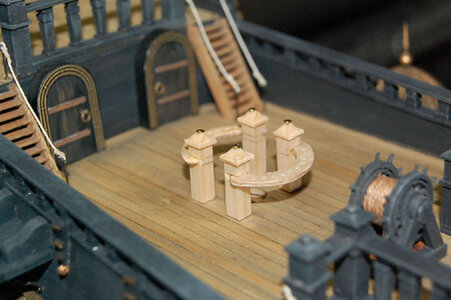
It took me a bit of time to decorate the upper part of the columns.
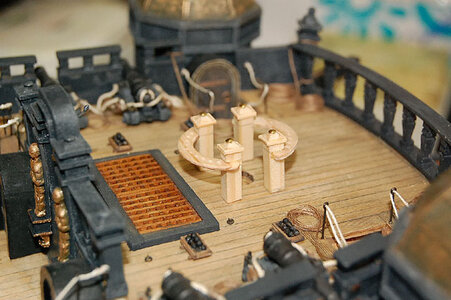
Temporarily assembled on the bow section.
This image is viewed from behind at an angle.
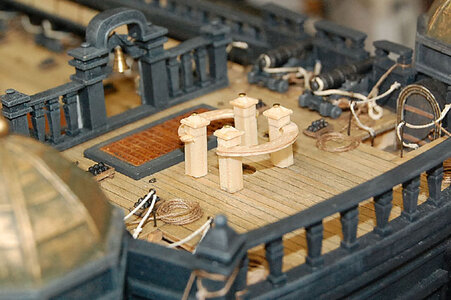
This image is viewed from the diagonal front.
This is good.
After this, German gray was applied.
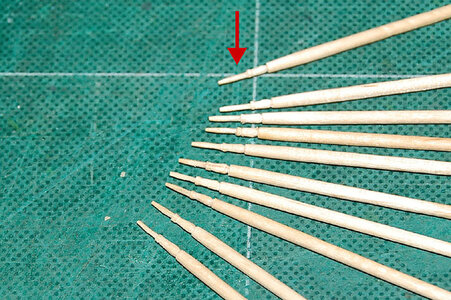
I shaved the tips of toothpicks into the shape of belaying pins.
It took about 40 minutes to sharpen 10 pieces.
After that, I shaved 10 more.
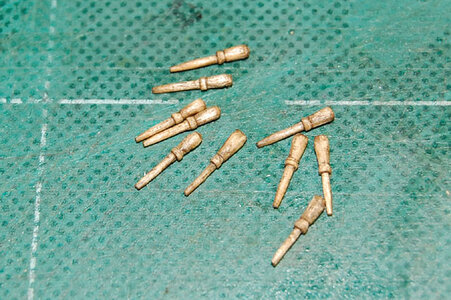
It was cut apart, coated with wood oil, and set on a fife rail.
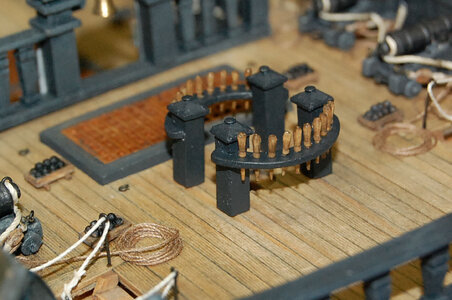
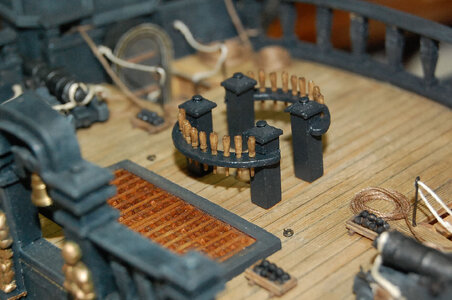
After setting the belay pin on the fife rail, it is set on the bow foremast section.
It took us a whole day to make this fife rail.
Next, the main mast fife rail was made.

First of all, I need to make parts.
At first, I drew a drawing of a fife rail and printed it out on copy paper with a printer.

The drawing is attached to 0.6 mm aviation veneer.
A 0.5mm-thick cypress wood is attached to the back of the aerial veneer.

Before cutting out, the first step is to drill holes.

Next, cut from the inside.
Next, cut the outside.
It's the same with plastic board crafts.
First you drill the holes, then cut from the inside, then the outside ......
The processing order is the same for both wood and plastic boards.

The first one was cut cleanly, so the second one is in the middle of the cut.

The second piece is ready.
I'll cut four more.
It takes quite a long time, doesn't it?

Finally, I made six of them.

I made a fife rail for the foremast.
It took me a bit of time to decorate the upper part of the columns.

Temporarily assembled on the bow section.
This image is viewed from behind at an angle.

This image is viewed from the diagonal front.
This is good.
After this, German gray was applied.

I shaved the tips of toothpicks into the shape of belaying pins.
It took about 40 minutes to sharpen 10 pieces.
After that, I shaved 10 more.

It was cut apart, coated with wood oil, and set on a fife rail.


After setting the belay pin on the fife rail, it is set on the bow foremast section.
It took us a whole day to make this fife rail.
Next, the main mast fife rail was made.
Good evening. Brilliant and thanks for showing the process. The belay pins made from toothpicks are incredible. Cheers Grant- Making Fife Rails -
View attachment 436819
First of all, I need to make parts.
At first, I drew a drawing of a fife rail and printed it out on copy paper with a printer.
View attachment 436820
The drawing is attached to 0.6 mm aviation veneer.
A 0.5mm-thick cypress wood is attached to the back of the aerial veneer.
View attachment 436821
Before cutting out, the first step is to drill holes.
View attachment 436822
Next, cut from the inside.
Next, cut the outside.
It's the same with plastic board crafts.
First you drill the holes, then cut from the inside, then the outside ......
The processing order is the same for both wood and plastic boards.
View attachment 436823
The first one was cut cleanly, so the second one is in the middle of the cut.
View attachment 436824
The second piece is ready.
I'll cut four more.
It takes quite a long time, doesn't it?
View attachment 436825
Finally, I made six of them.
View attachment 436826
I made a fife rail for the foremast.
It took me a bit of time to decorate the upper part of the columns.
View attachment 436827
Temporarily assembled on the bow section.
This image is viewed from behind at an angle.
View attachment 436828
This image is viewed from the diagonal front.
This is good.
After this, German gray was applied.
View attachment 436829
I shaved the tips of toothpicks into the shape of belaying pins.
It took about 40 minutes to sharpen 10 pieces.
After that, I shaved 10 more.
View attachment 436830
It was cut apart, coated with wood oil, and set on a fife rail.
View attachment 436831
View attachment 436832
After setting the belay pin on the fife rail, it is set on the bow foremast section.
It took us a whole day to make this fife rail.
Next, the main mast fife rail was made.
- Joined
- Jun 28, 2020
- Messages
- 544
- Points
- 353

Hello GrantTyler.Good evening. Brilliant and thanks for showing the process. The belay pins made from toothpicks are incredible. Cheers Grant
Thanks for all the likes.
I have a belaying pin made from a toothpick that is very overscaled.
But I think once a lot of rope is set, the overscale won't matter.
- Joined
- Jun 28, 2020
- Messages
- 544
- Points
- 353

Hello, Mr. Heinrich.For me those rails would probably have taken a week (each)!Wonderful work, my friend!
Today I am making a fife rail for the main mast and mizzen mast.
It takes a long time to make two sets at the same time.
Especially the belay pins...it takes too much time.
I wish I had another me.


- Joined
- Jun 28, 2020
- Messages
- 544
- Points
- 353

- Joined
- Jun 28, 2020
- Messages
- 544
- Points
- 353

'I would like to know how you use a design knife to sharpen toothpicks to make belaying pins. Also, wouldn't it be faster to let the router nip the toothpick and sharpen it?'
I got an email from ......
'How do you sharpen it ......' I sharpen it normally with a design knife.
The following explains the order in which the pieces are sharpened.
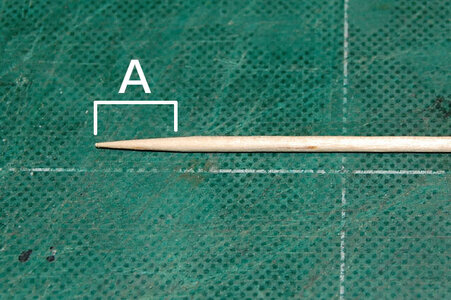
Use the A part of the toothpick to make a belaying pin.
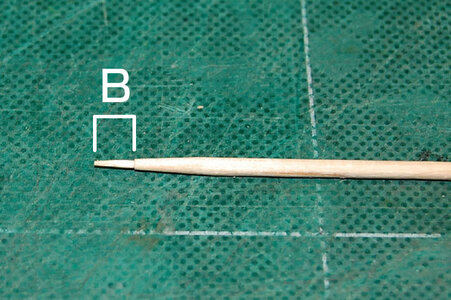
Cut part B with a design knife to fit the hole in the fife rail.
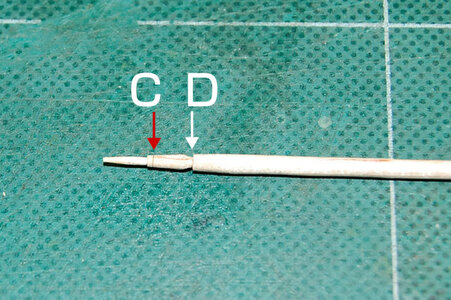
Shallowly insert the blade of a design knife into part C and shave part D as shown in the image.
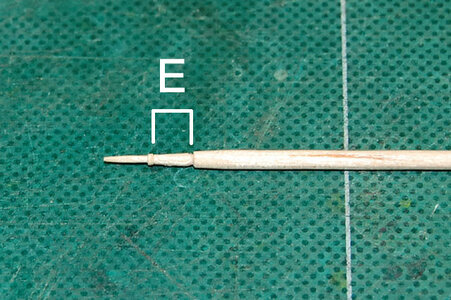
The E part becomes the handle of the belaying pin, so the belaying pin is completed by shaving it with a design knife as shown in the image and lightly sandpapering the whole piece.
Leave it as it is without separating it, apply woodworking oil to it and leave it to dry before separating.
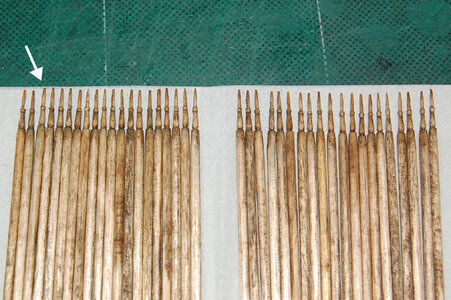
Wood oil has been applied and is drying.
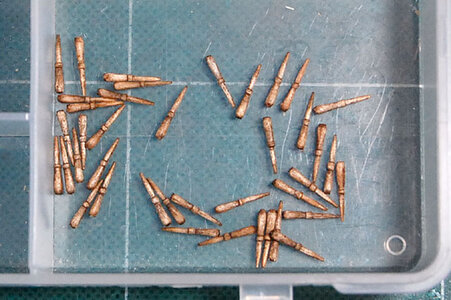
When dry, separate the belaying pins with a design knife and store them in a glove case so that they are not lost.
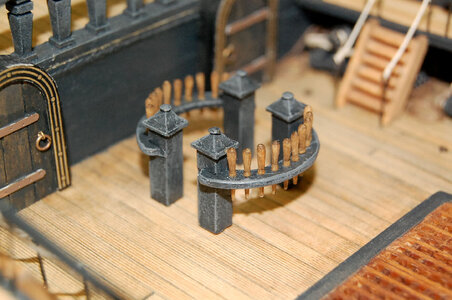
The main mast fife rail is ready.
The belay pins are uneven, but I don't think it will bother me once the ropes are set.
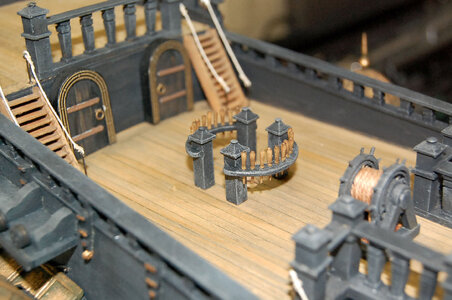
This is the fife Rail on the mizzen mast.
The belay pins are uneven here too, but I don't think you'll mind if you set the rope.
---------------------------------------------------------------------------------------------------------------------------
Now,
"Wouldn't it be faster to just let the router dip a toothpick in it and sharpen it?"
Please try this question yourself.
In my case, I am used to sharpening with a design knife, so I make it this way.
Everyone has their own way of making them, so I think you should find the way that suits you best.
As long as the final product looks somewhat like a belaying pin, that's all that matters.
I'm not forcing you to make it my way or anything, so please don't get the wrong idea.
I got an email from ......
'How do you sharpen it ......' I sharpen it normally with a design knife.
The following explains the order in which the pieces are sharpened.

Use the A part of the toothpick to make a belaying pin.

Cut part B with a design knife to fit the hole in the fife rail.

Shallowly insert the blade of a design knife into part C and shave part D as shown in the image.

The E part becomes the handle of the belaying pin, so the belaying pin is completed by shaving it with a design knife as shown in the image and lightly sandpapering the whole piece.
Leave it as it is without separating it, apply woodworking oil to it and leave it to dry before separating.

Wood oil has been applied and is drying.

When dry, separate the belaying pins with a design knife and store them in a glove case so that they are not lost.

The main mast fife rail is ready.
The belay pins are uneven, but I don't think it will bother me once the ropes are set.

This is the fife Rail on the mizzen mast.
The belay pins are uneven here too, but I don't think you'll mind if you set the rope.
---------------------------------------------------------------------------------------------------------------------------
Now,
"Wouldn't it be faster to just let the router dip a toothpick in it and sharpen it?"
Please try this question yourself.
In my case, I am used to sharpening with a design knife, so I make it this way.
Everyone has their own way of making them, so I think you should find the way that suits you best.
As long as the final product looks somewhat like a belaying pin, that's all that matters.
I'm not forcing you to make it my way or anything, so please don't get the wrong idea.
Last edited:
A clever method for making these pins - with very good results
Many thanks for sharing
Many thanks for sharing
- Joined
- Jun 28, 2020
- Messages
- 544
- Points
- 353

Hello Mr. Uwek.A clever method for making these pins - with very good results
Many thanks for sharing
There are many ways to make belaying pins.
For example, you could have a mini router nip the brass wire and sharpen it with an iron file...
I am used to sharpening toothpicks with a design knife, so this is the best.
It's a bit overscaled, but I don't think I'll mind once I get the rope set.
The Silent Mary is not that precise.

