Soleil Royal- Re-engineering Artesania Latina's New Kit by NMBROOK

Thanks Everyone,feel like all eyes on meSpeechlessGood job I had a productive dayROTF

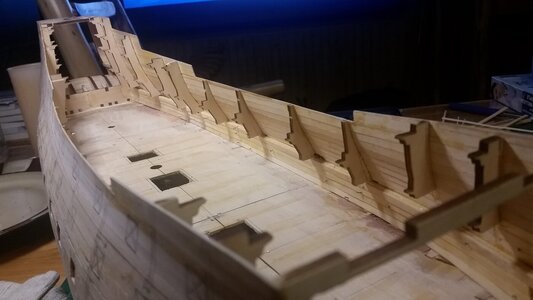
Well my plans are to trim 2mm off the edges of all bulkheads for the stringer that supports the lower gun deck.The idea being is that a layer of 2mm planking will be applied taking the surface level with the lower section of bulkheads.This will NOT be glued to the bulkheads. The idea being is that the upper section of bulkheads will be removed giving me an open hull which will have three layers of planking topsides for strength. I thought I had better explain now then all subsequent updates will make more sense.

Kind Regards

Nigel
It's the same approach we took on our models of the Sovereign, removing the bulkhead support structure and replacing it with bulwark stiffening layers of planking as you work upwards. Call it "ship model deconstructionism". I just call it destructionism! ROTF In this method, the location of the gun ports is what you measure from to determine the height of the deck support structure, starting with the stringer that supports each deck at the bulwarks.
279 Two Layers Bamboo Added to Buulwarks.jpg
 
Hi Kurt

Yes it is and now it isn'tROTFSame principle but slightly different in that the additional inner layer is fitted before planking as are the deck support stringers.I suppose you could say, this time I am working from the inside outwards.Gunport height will be set from the deck where as in Sovereign, we did it the other way round.

Both ways work, this time I am trying to make removing the internal structure as easy as possible.The only bit I an going to have to quite a bit of Dremel work is the stern above the counter, the area will be too thin underneath where the deck meets the lower balcony if I reprofile the precut parts first.

Kind Regards

Nigel
That's a novel approach! I'm eager to see if it is any easier than the other method. Be sure to check out my method of removing bulkheads using an oscillating saw. The tool was indispensable.
 
That is a handy tool and from memory Proxxon also make a similar one. I don't think either were on the market when I "hollowed out" Sovereign which must be getting on for 10 years ago:rolleyes:

Kind Regards

Nigel
 
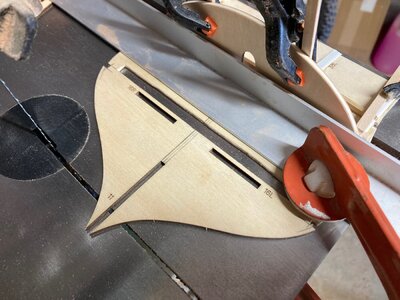
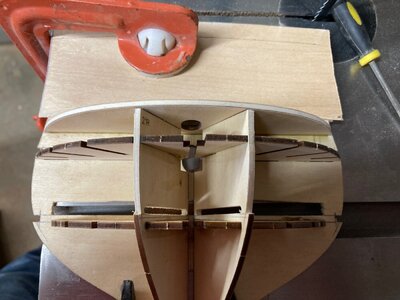
Still sticking with the bow area for now,I began work on the forward kit bulkhead.This was a little warped so my bandsaw table provided a convenient flat surface to clamp the piece to will I worked on it.

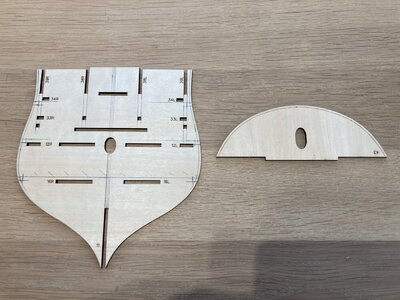
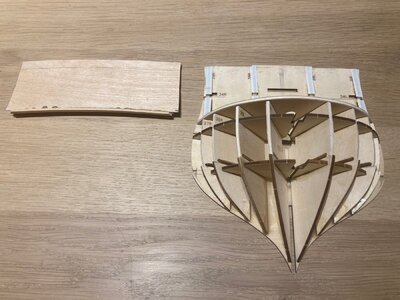
The first picture shows two of the kit parts marked up for modification. This includes trimming 2mm off each side topsides to allow for the additional planking layer and the notches for the stringers. Only the bottom stringers will be glued to the bulkheads the other will simply be trapped in place and only glued to the planking

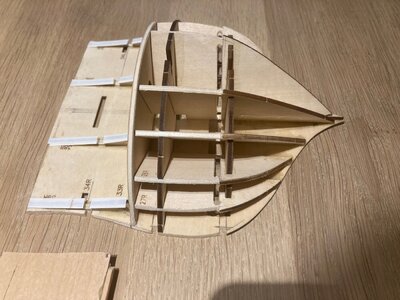
The second picture shows the lower part of the bulkhead. The bottom of the "letterbox" cutout is the underside of the lower gundeck, all the kit skeleton upward of this will be removed after planking giving the open interior.

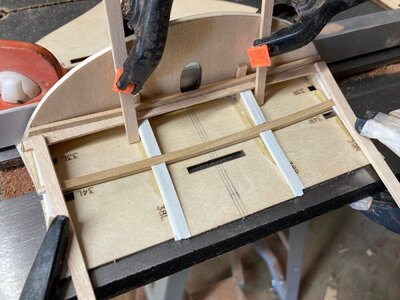
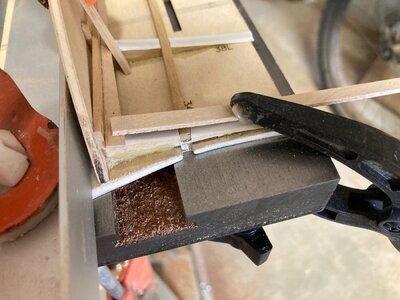
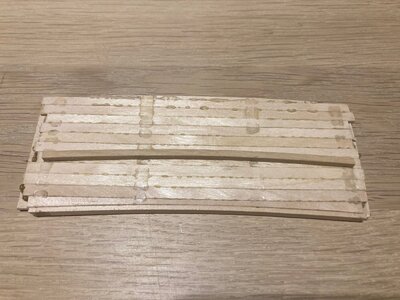
The third and forth picture show the start of planking the front bulkhead above the prow. Note the spacers to give the base of this bulkhead camber. The kit decks are all flat, the only deck that will be flat on my model is the lower gundeck and that is so the kit supplied decoration for the stern chasers will work.
The boxwood stringer is the deck support and not glued to the formers.The white is vinyl AK interactive masking tape to prevent the planks sticking to the formers.The planking and deck support stringer will be glued together.

Note the kit Beakhead deck is there to carry the bow formers (not fitted yet) and will be removed and replaced with a deck of the correct curvature when the hull is together.

Kind Regards

Nigel


IMG_0261.jpgIMG_0263.jpgIMG_0262.jpgIMG_0264.jpg
 
The engineering puzzles you (and my little buddy Kurt) are working through on these builds (along with the knowledge/understanding of ship construction being evidenced) has highlighted for me that I am playing around in the land of giants in this hobby. What I DON'T KNOW is so expansive that it makes me wonder if what I think I DO KNOW is even right.

My deepest respect and admiration to all you giants out there.
 
Hello Nigel.
I came across your build here from reading SOS "Weekly Digest". After reviewing you have captured my interest and I too think I will find much great instruction in the art of redesign. In my limited experience with this hobby, I have determined the need for building outside the box is practically a requirement.
 
Given that it seems you will be dispensing with most, if not all of the interlocking kit stringers (between bulkheads), will you be filling in with balsa, between bulkheads, up to the lower gun deck?
 
Given that it seems you will be dispensing with most, if not all of the interlocking kit stringers (between bulkheads), will you be filling in with balsa, between bulkheads, up to the lower gun deck?

Marc that is an excellent question and the answer to which I have not decided. I will see what the structure is like once together. If I do it will be with softwood as I find balsa a pain as it sands too easily and you can get dips or flat spots between bulkheads unless you use fine sandpaper. Not only that, but it doesn't hold pins so you loose the ability to pin anywhere you want as you do with softwood.

Kind Regards

Nigel
 
The engineering puzzles you (and my little buddy Kurt) are working through on these builds (along with the knowledge/understanding of ship construction being evidenced) has highlighted for me that I am playing around in the land of giants in this hobby. What I DON'T KNOW is so expansive that it makes me wonder if what I think I DO KNOW is even right.

My deepest respect and admiration to all you giants out there.
This is not rocket science, Paul. You can do this on your next ship. Just some good pre-planning with minor modification of the bulkheads. We are playing with sticks here and forming shapes, nothing more. Nigel and I simply came up with ways to plank the inside, and removing the bulkheads. With the method Nigel is using on the Soleil Royal, instead of adding planks on the inside surface of the first layer of planking like I did, he is trimming the bulkhead edges 2mm to make room for the inner most planking layer, the bulwarks themselves. This inside planking now forms the shape of the hull, with what would have been our first layer is placed over it, and the third, finishing layer placed over that. This totals three layers.

With that much wood holding the shape of the hull, warping and flattening of curvature is minimized. Planking the inside surface of a hull versus the outside is more difficult. Nigel has planned ahead and trimmed the edges of the bulwarks so that after all three layers of planking are done, he can destroy and remove the bulkheads and the hull will hold its shape, then he'll add deck support structures like I did and build the insides from the bottom upwards.

Longitudinal members (stringers) that support the edges of the decks where they meet the hull are also pre-planned by cutting notches in the bulkheads. In this way, even waterboards and margin strakes can be shape to their correct shape and installed on the bulkheads at the correct height and sheer curves.

Before you even lay the first plank, you know where everything will be. It's a improvement over my method of planking the inside of the hull and trying to get the deck heights correct by measuring off the gun ports. The is far simpler, and only with a little bit more planning at the beginning.

Paul, you are on your first ship and I am only on my second. Please try to save some new tricks like interior decks for your second ship. There are SO many things I am improving on since finishing La Couronne. If you actually managed to do everything right to perfection on your first build, you'd never want to build another one.
 
Last edited:
Just one final update before I am back at work for the week.

I finished planking the bulkhead sanded it then chose to use 1/8th Birch ply for the second layer.Reasoning is because I will be cutting a fair few holes in this piece in a few steps time.The finish layer will be boxwood veneer planks, no paint on this bit.

I have started to glue in the formers for the bow.I am cutting slots with the mill to allow easy removal of the upper portion later.The base of the slots again line up with the deck underside so the lower section will support the lower deck.

Just as a side note, anyone building this kit, there is a little sideways slop in the prow deck slots.I hadn't spotted this and the bowsprit hole is slightly off centre.This does not matter on my model as the deck will be removed but anyone building out of the box, take care with this

Kind Regards

Nigel

IMG_0269.jpg
 
A small update on progress.The remaining kit bow formers are fitted, all have been slotted to allow later removal of the upper section and also relieved 2mm for the extra layer of planking.
The bulkhead has been removed, came off really easily due to the tape.This is going to be fully detailed prior to refitting.

Kind Regards

Nigel

IMG_0275.jpgIMG_0276.jpgIMG_0277.jpg
 
A little bit of an update...

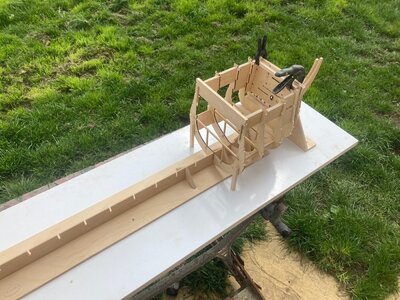
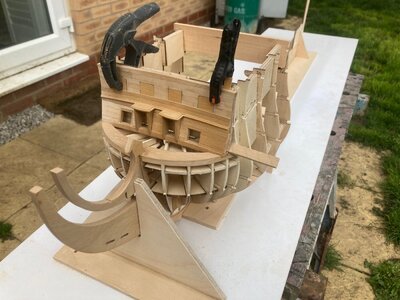
The ply skin on the bulkhead did not work out.I awoke the following morning to find it flat:mad: So I had to sand multiple layers of the ply off leaving one layer in place.This brought the shape back, so I added another layer of planking.

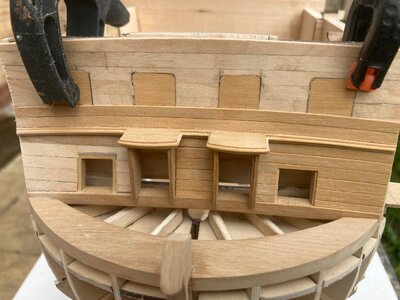
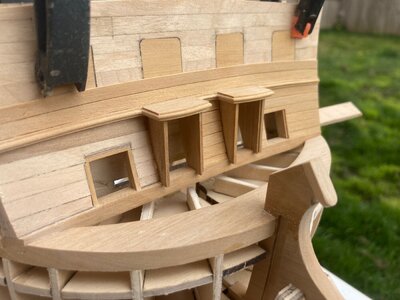
The photos show the skeleton so far and work is continuing on the beakhead bulkhead off the model.It is just clamped in place for the pics.You will notice the deck is now gone and the bulkhead has the support beam fitted to it's base.This sits in the breast beam I have added which will be glued to the planking.Easier to fit this now rather than latter plus it provides necessary support for the rather flexible stem.This beam would be in three sections on the original but given you would need a borescope and a mirror to see this on the finished model it is fashioned out of a single piece of boxwood.

The bulkhead deviates from Mr Saunier's interpretation and is more in keeping IMHO with the period.The planking is spilled from 0.6mm Boxwood veneer.The 4 Boxwood inserts are for where the circular gunports will be cut.

PS Apologise for the state of the lawn, first cut after winter and it looks like I have done it with a knife and forkROTFROTF

Kind Regards

Nigel

IMG_0278.jpgIMG_0279.jpgIMG_0280.jpgIMG_0281.jpg
 
Last edited:
Back
Top