-

Win a Free Custom Engraved Brass Coin!!!
As a way to introduce our brass coins to the community, we will raffle off a free coin during the month of August. Follow link ABOVE for instructions for entering.
-

PRE-ORDER SHIPS IN SCALE TODAY!
The beloved Ships in Scale Magazine is back and charting a new course for 2026!
Discover new skills, new techniques, and new inspirations in every issue.
NOTE THAT OUR FIRST ISSUE WILL BE JAN/FEB 2026
You are using an out of date browser. It may not display this or other websites correctly.
You should upgrade or use an alternative browser.
You should upgrade or use an alternative browser.
Sovereign of The Seas 1637 - Heavily modified Mantua kit
- Thread starter modelshipwright
- Start date
- Watchers 35
Well, the move and the months of renovations in our new home is finally over. The shipyard officially re-opened yesterday and I was able to relax and contemplate the work ahead on the Sovereign. When setting up the shop, it quickly became apparent that I had forgot where certain things were packed and it took awhile to find items to get them sorted and away. So many boxes............
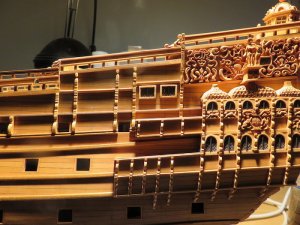
As I got down to work, I found that my multitool drill was not working as the power cord was frayed and broken where it entered the end on the unit. The first work in the yard was to take it apart and re-solder the cord. With that complete I started work on the port side where work to divide the hull into sections to house carvings is needed.

More to follow......
Bill
As I got down to work, I found that my multitool drill was not working as the power cord was frayed and broken where it entered the end on the unit. The first work in the yard was to take it apart and re-solder the cord. With that complete I started work on the port side where work to divide the hull into sections to house carvings is needed.

More to follow......
Bill
Last edited:
Great to hear that you are back in business. Really looking forward to more amazing work from you.
Thanks Wolfgang. I did forget to mention that despite wrapping The sovereign in bubble wrap and protecting her during the move by transporting her in my car, I did manage to knock off a rail and a few other bits and bobs which had to be glued back on. She is now back together.
Regards,
Bill
Last edited:
G'day Billit quickly became apparent that I had forgot where certain things were packed and it took awhile to find items to get them sorted and away. So many boxes............
Welcome back mematie.
It has been 13 months since we moved into our new home, and I'm still finding tools etc that I 'put away in a safe spot' and forgot about them.
I'm glad that the old girl wasn't too damage in your move, my HMS Endeavour was almost written off by our removalist when the ran over it by their truck.
Gee I was so angry.
Happymodeling
Greg
AMAZING work Neat clean and exact. Carvings and moldings are magnificent This is a masterpiece
Very good to have you back here in SOS and that you are back in your workshop.
We are all looking forward to see your work
We are all looking forward to see your work

Thanks to everyone for the welcome back and nice comments. Happy Thanksgiving to everyone in the US.
Bill
Bill
Very nice build and attention to details. I will watch with undisguised interest 
Thanks to everyone for the welcome back and nice comments. Happy Thanksgiving to everyone in the US.
Bill
Bill,
You folks have yours in October Were just catching up. Though you have it better -Your day is intended for yearly harvest celebrations is it not?
Bill,
You folks have yours in October Were just catching up. Though you have it better -Your day is intended for yearly harvest celebrations is it not?
Yup, it is meant to be a harvest festival and I suppose our climate is a little ahead of yours when it comes to that so we celebrate in early October.
Bill
Last edited:
- Joined
- Dec 3, 2018
- Messages
- 2,451
- Points
- 538

Yup, it is meant to be a harvest festival and I soppose our climate is a little ahead of yours when it comes to that so we celebrate in early October.
Bill
Pretty nise carving you are doing, keep on the good stuf.

- Joined
- Nov 26, 2018
- Messages
- 546
- Points
- 343

Hi Bill,Well, the move and the months of renovations in our new home is finally over. The shipyard officially re-opened yesterday and I was able to relax and contemplate the work ahead on the Sovereign. When setting up the shop, it quickly became apparent that I had forgot where certain things were packed and it took awhile to find items to get them sorted and away. So many boxes............
As I got down to work, I found that my multitool drill was not working as the power cord was frayed and broken where it entered the end on the unit. The first work in the yard was to take it apart and re-solder the cord. With that complete I started work on the port side where work to divide the hull into sections to house carvings is needed.
View attachment 64189
More to follow......
Bill
Your talent at carving is magnificent. Your work sure does humble me. I could never do that kind of work. I do not have the talent.
@Vpirozzi Never underestimate your capabilities: It sometimes seems that intense desire creates not only its own opportunities but its own talents. Eric HofferI could never do that kind of work. I do not have the talent.
Bill, I agree w everything that has been said and more. I think to myself I have a long way to go before I can even come close to your craftsmanship. Even if I don’t, it is still an inspiration.
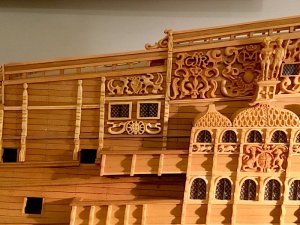
The following photo shows two new carvings and also structural divisions to divide off the area for the individual carvings. The first carving below the two rectangular windows shows the sun radiating from the centre with ribbons on the top sides. The second carving is above the windows and has a harp in the middle with a crown on the top.

More to follow.........
Regards,
Bill

More to follow.........
Regards,
Bill
Last edited:
Recently I have been fabricating deck gratings and found it very frustrating to align the fixture on my Byrnes saw table. The fixture consisted of a piece of aircraft plywood with a strip of boxwood the width of the slots I wanted to cut spaced an equal distance from the blade. The fixture is clamped to the saw table. To cut the slot you slide the piece of wood along the guide indexing the piece on each of the new slots. You repeat the process at 90 degrees to create the grid. The issue is that if the fixture is not absolutely square with the saw blade, the slots start to fan out. :-(
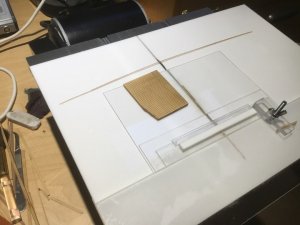
A good friend and modeller helped me by fabricating a sliding table jig that is always square to the blade as it is aligned in the table slot. A small fixture similar to the one described above is clamped to the sliding table and the wood is positioned on the fixture. Each cut is achieved by pushing the sliding table across the blade. Each slot is absolutely square as the photos below will attest.


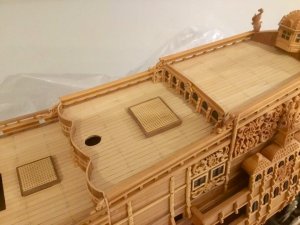
This has really helped to make the grates I was expecting.
More to follow,
Bill
A good friend and modeller helped me by fabricating a sliding table jig that is always square to the blade as it is aligned in the table slot. A small fixture similar to the one described above is clamped to the sliding table and the wood is positioned on the fixture. Each cut is achieved by pushing the sliding table across the blade. Each slot is absolutely square as the photos below will attest.


This has really helped to make the grates I was expecting.
More to follow,
Bill
Last edited:
Hi Bill, Is there a way you can show close-up photos for sliding table jig? If it not difficult to build I would at least try...as I have typical trouble with alignment.
Great job, Bill, as always. I lack (and envy) the consistency of your build. I also made the gratings on my SoS on the circular saw, but with the conventional method - creating the comb-like pieces and then assembling them into each other. I just have to find the blade of tge proper thickness for it.
Janos
Janos
Last edited:


