-

Win a Free Custom Engraved Brass Coin!!!
As a way to introduce our brass coins to the community, we will raffle off a free coin during the month of August. Follow link ABOVE for instructions for entering.
-

PRE-ORDER SHIPS IN SCALE TODAY!
The beloved Ships in Scale Magazine is back and charting a new course for 2026!
Discover new skills, new techniques, and new inspirations in every issue.
NOTE THAT OUR FIRST ISSUE WILL BE JAN/FEB 2026
You are using an out of date browser. It may not display this or other websites correctly.
You should upgrade or use an alternative browser.
You should upgrade or use an alternative browser.
Syren 1803 1:64 Model Shipways
- Thread starter RogerD
- Start date
- Watchers 61
-
- Tags
- model shipways syren
Yes, I am too, thanks for providing me the link a few posts back. Now I have the tape in hand I am happy with the more realistic look of the plates and nails. It will make a huge difference.I am glad you went this route Roger. About the weathering - I wouldn't but that's just me!
With regard to weathering I’ll most definitely not be changing the finished look of the model itself. For the plates I’ll do more research on a variety of other coppered builds. Plenty of time to decide given the snail like progress of my construction
Thanks again for your valued input.
Do you ever get those times when you complete part of your build and then think it just isn’t good enough? I had completed the cap rails on my model and then added some 1/16” x 1/32” shaped trim work. It was glued on with PVA, thank goodness. That was yesterday.
Today is “Isopropyl Sunday” .
.
Today is “Isopropyl Sunday”
 .
.Found your log on Syren and will follow.  I just finished the standing rigging and am now starting the yard construction and rigging. Been working of this since Christmas 2020 when my daughter gave the kit to me.
As to the copper plates I made a jig for the 3 patterns and using a small press was able to quickly make the plates.
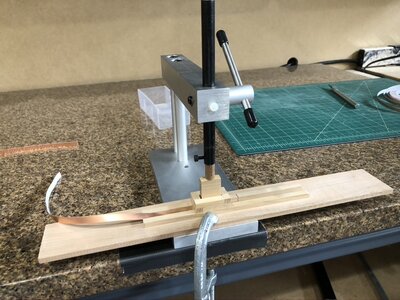
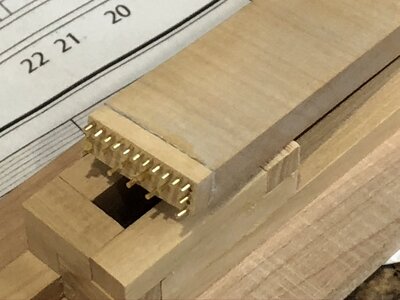
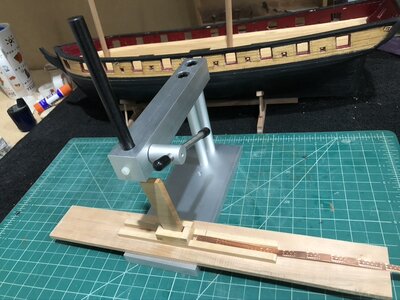
As to the copper plates I made a jig for the 3 patterns and using a small press was able to quickly make the plates.


Found your log on Syren and will follow.I just finished the standing rigging and am now starting the yard construction and rigging. Been working of this since Christmas 2020 when my daughter gave the kit to me.
As to the copper plates I made a jig for the 3 patterns and using a small press was able to quickly make the plates.
View attachment 311277View attachment 311279View attachment 311280
Welcome to my log Trilogy, I am honoured that you will join me.
The Syren is a beautiful ship and I find more challenging than it looks. It would be great if you posted some photos of your build. The wonderful thing about this SOS site is you can start your build log at any point. The help and support from everyone here is what makes modelling so much fun. There is an incredible amount of expertise here with some exceptional, and well respected, builders.
I tried the jig Chuck shows in the manual but found my attempts at scale nail impressions way out of scale. A few posts back I had some great advice and settled for pre-stamped scaled plates from ZHL, a China supplier. I have yet to start coppering but know it will be a long process. That press you show looks useful for a multitude of things though.
As you rummage through this site there are other Syren builds worth looking at. I have learned from each and every one of them.
I am looking forward to exchanging ideas, problems and solutions with you as we both progress.
- Joined
- Oct 9, 2020
- Messages
- 2,245
- Points
- 488

all the time. Even when I am finished I still wonder if it's good enough to display.Do you ever get those times when you complete part of your build and then think it just isn’t good enough? I had completed the cap rails on my model and then added some 1/16” x 1/32” shaped trim work. It was glued on with PVA, thank goodness. That was yesterday.
Today is “Isopropyl Sunday”.
I know what you mean. I find as I progress, learn and research the work I did even a few weeks or months ago could have been way better. As experience grows it means my progress slows. The problem then is how many redo’s make sense? Maybe finish the present project as is and move on to the next using everything learned so far. As I try to increase my knowledge from centuries ago, trying to be accurate, I spend more time reading than building. I have to admit though, this hobby for me is as much about the model as it is about the knowledge of the Age of Sail.all the time. Even when I am finished I still wonder if it's good enough to display.
I'm with you here Roger. To re-do or not is a never-ending question. Plus, I just spent the past several days researching sails with nothing actually done on the ship. We have all entered an alternate universe...
Hi Paul, my big weakness is my love of books. Especially when they relate to a hobby such as this. I too research as much as possible, use the knowledge gained and try to apply it. Then obtain another book/paper, from another expert, and find different opinions about the particular subject in question. I think though it surely comes down to a personal choice and decision on how to move forward.
Mind you the isopropyl is within reach .
.
Mind you the isopropyl is within reach
And the ethanol (and I don't even drink - well, rarely)!
I'm still working on the Syren and up to almost completing the standing rigging. How many redos? I've stopped looking at what I done and now I am moving forward. Writing this I realized that I hadn't done the sister blocks yet so Id better do them now.
Regards
Will
Regards
Will
No doubt- I spent most of my time cutting off rigging I did not do correctly yesterday- I shared your Isopropyl SundayDo you ever get those times when you complete part of your build and then think it just isn’t good enough? I had completed the cap rails on my model and then added some 1/16” x 1/32” shaped trim work. It was glued on with PVA, thank goodness. That was yesterday.
Today is “Isopropyl Sunday”.
Roger I'll jump in on the copper aging dilemma. I did not protect mine and after 21 months the finish has dulled to a pleasant patina and no green tint.
Here's a picture taken just now showing the after section of the port side. Hope the picture helps.
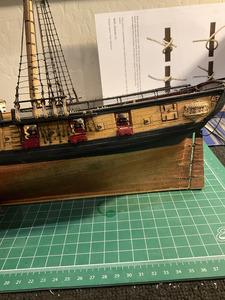
And reading you log I've decided to start a Syren log of my build from today forward.
Here's a picture taken just now showing the after section of the port side. Hope the picture helps.

And reading you log I've decided to start a Syren log of my build from today forward.
Roger I'll jump in on the copper aging dilemma. I did not protect mine and after 21 months the finish has dulled to a pleasant patina and no green tint.
Here's a picture taken just now showing the after section of the port side. Hope the picture helps.
View attachment 312491
And reading you log I've decided to start a Syren log of my build from today forward.
Thanks Will, your information about the copper plates is good to know. Your Syren looks great, you are a long way ahead of me.
I just finished my third re-do of the cap rails and trim. I managed to get the aft rail on in one piece. The yard painters are preparing their black paint pots for work today
I will certainly search out your log of the Syren and I’ll grab a seat.
No doubt- I spent most of my time cutting off rigging I did not do correctly yesterday- I shared your Isopropyl Sunday
The thing about the re-do’s is I learn and improve slightly each time. Though at this rate I’ll have three Syren’s on the bench
 .
.A little while ago I decided to jump ahead a little and complete the opening for the rudder. The hole (helm port) has to be large enough to allow the rudder to swing freely. It looked straight forward enough until I realized how critical it was to align the hole inboard with the angle created by the stern post. You have to drill from inboard and outboard, increase the hole gradually from both sides and hope they meet. This is one of those one shot mini-projects. Yikes!
The trick is to get that outboard hole drilled close in to the stern post using a very fine bit. Then gradually opening it with larger bits, needle files and a really sharp exacto blade. To get a marker on the inboard counter I drilled very carefully upwards through the hole from below. The tiny hole in the counter then gave me a rough guide as I enlarged the counter hole downwards. A small but important detail that I think turned out ok and it is large enough for the rudder to turn.
As I looked at the opening I thought about the amount of sea water that would be forced upwards when the ship was working in heavy seas. It just didn’t make sense to me that it was not covered in some way while still allowing the rudder to work. Modern day vessels have a watertight arrangement in the steering flat where the integrity of the hull is penetrated. I was convinced there must have been at least a rudimentary stuffing box type of arrangement on those sailing ships.
It turns out that the crew used greased cloth (apron) and other types of materials packed around the rudder “head” to limit water ingress. On the Victory, for example, a rudder coat of tarred canvas was used. In 1779 and beyond a new design allowed for a smaller hole that reduced the water intake but the canvas apron was still used. A little detail I might add to my model later on.
The trick is to get that outboard hole drilled close in to the stern post using a very fine bit. Then gradually opening it with larger bits, needle files and a really sharp exacto blade. To get a marker on the inboard counter I drilled very carefully upwards through the hole from below. The tiny hole in the counter then gave me a rough guide as I enlarged the counter hole downwards. A small but important detail that I think turned out ok and it is large enough for the rudder to turn.

As I looked at the opening I thought about the amount of sea water that would be forced upwards when the ship was working in heavy seas. It just didn’t make sense to me that it was not covered in some way while still allowing the rudder to work. Modern day vessels have a watertight arrangement in the steering flat where the integrity of the hull is penetrated. I was convinced there must have been at least a rudimentary stuffing box type of arrangement on those sailing ships.
It turns out that the crew used greased cloth (apron) and other types of materials packed around the rudder “head” to limit water ingress. On the Victory, for example, a rudder coat of tarred canvas was used. In 1779 and beyond a new design allowed for a smaller hole that reduced the water intake but the canvas apron was still used. A little detail I might add to my model later on.
Thanks for your wonderful compliment Heinrich. I can only hope to deserve such praise as the build progresses.
Your unwavering support, help and advice makes me want to improve each time I approach the workbench.
Your unwavering support, help and advice makes me want to improve each time I approach the workbench.
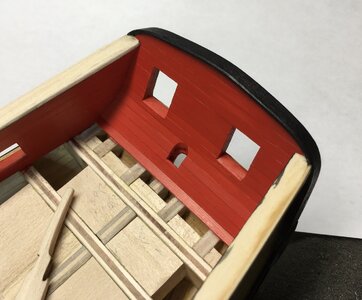
Roger the red really makes your woodwork jump out. The whole thing comes together with the black cap rails. Can’t wait to see. Great job what else can be saidA little while ago I decided to jump ahead a little and complete the opening for the rudder. The hole (helm port) has to be large enough to allow the rudder to swing freely. It looked straight forward enough until I realized how critical it was to align the hole inboard with the angle created by the stern post. You have to drill from inboard and outboard, increase the hole gradually from both sides and hope they meet. This is one of those one shot mini-projects. Yikes!
The trick is to get that outboard hole drilled close in to the stern post using a very fine bit. Then gradually opening it with larger bits, needle files and a really sharp exacto blade. To get a marker on the inboard counter I drilled very carefully upwards through the hole from below. The tiny hole in the counter then gave me a rough guide as I enlarged the counter hole downwards. A small but important detail that I think turned out ok and it is large enough for the rudder to turn.
View attachment 312623
As I looked at the opening I thought about the amount of sea water that would be forced upwards when the ship was working in heavy seas. It just didn’t make sense to me that it was not covered in some way while still allowing the rudder to work. Modern day vessels have a watertight arrangement in the steering flat where the integrity of the hull is penetrated. I was convinced there must have been at least a rudimentary stuffing box type of arrangement on those sailing ships.
It turns out that the crew used greased cloth (apron) and other types of materials packed around the rudder “head” to limit water ingress. On the Victory, for example, a rudder coat of tarred canvas was used. In 1779 and beyond a new design allowed for a smaller hole that reduced the water intake but the canvas apron was still used. A little detail I might add to my model later on.


