Syren 1803 1:64 Model Shipways

6E22314B-DBF3-4F33-9F6F-56223DE87ED5.jpeg

The painted bulwarks certainly change the look of the model. Now I’m looking ahead to coppering the hull. Firstly, a stamping jig had to be made as described in the kit supplied manual.

80E09EFD-2176-4B80-BA8A-4A9904BBCD5C.jpeg

Once the jig is made the stamping process is simple. Hit it with a hammer
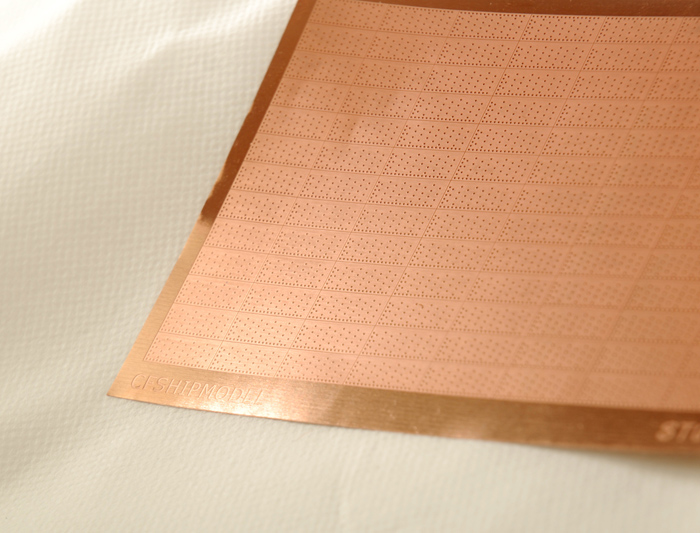
 ;). Ok, tap it, but consistently, to get a repeatable embossed nail pattern. Experimenting is taking lots of time and lots of tape.

The size of nails for copper sheathing is given by Goodwin at 5/16” and Mondfeld at 3/8” to 1 1/4”. That equates to a range of 0.005” to 0.02” at 1/64 scale. The smaller size makes me think it’s not worth trying to replicate but possibly the 0.02” is.

My first attempt at making the stamp involved a piece of pine with tiny nails. I clipped of the nail heads but had a hard time getting all the protrusions dead flat and to the same height. When striking the stamp to emboss the tape I found the nail stubs sunk randomly but slightly into the soft pine. That changed the evenness of the pattern depth but the nails were too big anyway so that got tossed. Then I tried some oak with nails. Same issues so that got tossed. Next was more research.

I had some rigid 0.025” steel wire in a parts box so time to experiment, again.

F94FC825-A7C9-46D1-A522-CEEF9ADC480C.jpeg

This time I laid two pieces of 1/16” yellow cedar together and hand drilled holes with a 0.025” bit. I took my wire and using a Dremel ground the end flat. Using a perfectly flat kitchen tile on the bench I placed the ground flat end of the wire into the double layered cedar. (My wife will possibly notice the new rectangular hole in the tiled kitchen wall but it’s for a good cause :D ).

Using snips I cut the wire as close to the top piece of cedar as possible. Filed that end flat and removed the by now 1/8” long piece of wire. Repeated that many times, lost pieces, crawled around the floor, said bad words and made more. Those 1/8” lengths of wire were then glued into an exact sized 1/16” thick piece of cedar. This is the head of the stamp.

Anticipating a repeat problem of my new wire “nails” sinking into the base of the wood stamp I needed another solution. I thought a very thin metal plate between the bottom of the nails and the stamp base would keep the new nails consistent. By the time they are hit multiple times I expected they might shift.

Where to find really thin metal plate? Cast your minds back to the 80’s and 90’s and you will no doubt remember the 3.5” floppy computer discs. If you take one apart the sliding piece of metal (see photo below) becomes a source of very thin mini metal plates.

063888B6-C4FB-4312-AE2F-556EEFB29EEA.jpeg

I cut, then sandwiched, a metal plate between the stamp nail head and main body. Superglue worked. Time to experiment, again.

The tape embossing works but it takes trial and error to get consistency. Hit it too hard and the tape crinkles, too soft and the embossing is erratic. I think this will work for me but it’s going to be a long process. I have yet to get the copper tape off the paper backing cleanly but that’s for later.

I wonder if the vacation photos on the now destroyed 3.5” floppy disc will be missed? The kitchen tile will be ROTF.
 
Last edited:
I hope you accept to show my way of making the nails into the copper plates - and my jig, which was "developed" years ago during the work on my HMS Triton section model

IMG_24461.jpg IMG_24481.jpg

the copper sheet is layed on top of a hard rubber bed - with this the nail heads are pressed slightly into the rubber - you will get better results
I used strong plywood - I think better than the softwood

IMG_24491.jpg

Important not to use a hammer, because you get often not symetric preasure - I am using the vise

IMG_24501.jpg

Ok - no mass production ....... only plate by plate

IMG_24511.jpg

and this was the result on the first model I made with the coppering template

IMG_24631.jpg IMG_24651.jpg

IMG_24641.jpg
 
I agree with Paul - classic posting! And, Roger, it is great to see you back at the Syren - she is a gorgeous ship!
 
I hope you accept to show my way of making the nails into the copper plates - and my jig, which was "developed" years ago during the work on my HMS Triton section model

View attachment 302690

Hello Uwe, that is a very clever technique you have shown. You did a beautiful job on the Triton.

I will try to make a similar jig as yours but at 1/64 scale my plates are 1/4” x 11/16”. I notice you do the plates one at a time. I need to plate both sides of the hull so there will be many hundreds to emboss with the copper tape. One advantage your way is, even with the small tape, I could cut the plates accurately with clean edges before stamping them. It’s worth a try and I really appreciate your advice and help.
 
Seems to me a "roller embosser" needs to be designed and made so you could just crank rolls of copper tape through and not have to do one at a time.
 
Hi Roger. You can buy copper plating on a roll - already punched - from China. I will find the link.
 
Here you go. And by the way, @Uwek , was very impressed with this. This particular copper plating is from Shicheng Model Company.

2020_05_24_16_26_IMG_5815.JPG

IMG_5816.JPG

1590594662385.png

This comes from the build log of @Lidong superb HMS Diana. If you are interested, I will try to assist. I just do not know how Covid will affect anything from China now.

IMG_5828.JPG
 
Thanks for the images and link Heinrich. I like the look of the completed hull, it’s really impressive and might be the ideal solution. It will save a lot of time too. I’ll take a look tomorrow and let you know.
 
Thanks for the images and link Heinrich. I like the look of the completed hull, it’s really impressive and might be the ideal solution. It will save a lot of time too. I’ll take a look tomorrow and let you know.
Good morning Roger- decision time;). Heinrich plates look really great, simpler and hours saved or make the awesome dimple making “machine”....Which ever way you go I know an awesome coppered hull will be created. Cheers Grant
 
Here you go. And by the way, @Uwek , was very impressed with this. This particular copper plating is from Shicheng Model Company.

View attachment 302772

View attachment 302773

View attachment 302775

This comes from the build log of @Lidong superb HMS Diana. If you are interested, I will try to assist. I just do not know how Covid will affect anything from China now.

View attachment 302774

I looked at Lidong’s @Lidong Diana thread and he also provides the link to Shicheng Models but I cannot access a page in English. So I turned to ZHL and they have what appears to be the same product at the size I need, which is 18mm x 6mm for 1/64.

I also looked at the CAF site, suggested by Uwe @Uwek, but the plate sheets seem to be at 1/48 scale. The CAF site mentions they will size to the required scale if a nail pattern is provided.

On Lidong’s thread Uwe mentions the accuracy of the nail pattern Lidong used so I am leaning towards the tape suggested by Heinrich. (If you know how I can get an English page link for the Shicheng site that would be very helpful Heinrich.)

Then as Grant wisely writes there’s the option of making Uwe’s jig. The only way I can see that working at 1/64 scale is to make one and see if it works. The problem might be the use of a vise so I’ll have to think about some sort of “pressure” device. Using Uwe’s invention I tried simulating a “rubber” base for a tape impression yesterday using an eraser. It might work if I adapt accordingly and make a former.

Thinking it all through, yet again, I feel the tape might be the solution. A small part of me feels I should make the plates and complete the model as designed. We buy replacement cannon, ropes, blocks etc. as replacements in our kits so buying pre-embossed tape is surely acceptable too :)

I am grateful to you all for the wonderful continued advice.
 
Last edited:
Good morning Roger- decision time;). Heinrich plates look really great, simpler and hours saved or make the awesome dimple making “machine”....Which ever way you go I know an awesome coppered hull will be created. Cheers Grant
Thanks Grant, the decision is getting closer. I just have to decide on which decision I decided on :D.
 
Back
Top