-

Win a Free Custom Engraved Brass Coin!!!
As a way to introduce our brass coins to the community, we will raffle off a free coin during the month of August. Follow link ABOVE for instructions for entering.
-

PRE-ORDER SHIPS IN SCALE TODAY!
The beloved Ships in Scale Magazine is back and charting a new course for 2026!
Discover new skills, new techniques, and new inspirations in every issue.
NOTE THAT OUR FIRST ISSUE WILL BE JAN/FEB 2026
You are using an out of date browser. It may not display this or other websites correctly.
You should upgrade or use an alternative browser.
You should upgrade or use an alternative browser.
Syren 1803 1:64 Model Shipways
- Thread starter RogerD
- Start date
- Watchers 61
-
- Tags
- model shipways syren
Roger the tape that ZHL has is in all likelihood Shicheng's product. You can ask Max, because ZHL is a Shicheng stockist. However, I doubt whether there will be an English link.
Thanks for that Heinrich, your help and advice is always well appreciated.
Engineering idea: For the dimple making tool, use brass pins normally used for pinning hull planking. The heads of the pins can make the dimples in the copper tape. If you want to go into business making millions of copper plates, make the tool not a rectangular stamp, but a disc the width of a copper plate. Mark the pin locations on the edge of the disc, center drill and insert the pins leaving the pinheads protruding, and create a rolling tool to make a steady strip of plates. The pattern of the pinheads on the disc must be arranged so it is a repeatable pattern in order to save copper material.I agree Kurt, Uwe’s design and jig is really well thought out and obviously very functional. I mentioned in a couple of posts scaling it down for copper tape might be an issue for me. It needs an engineering mind like yours.
Engineering idea: For the dimple making tool, use brass pins normally used for pinning hull planking. The heads of the pins can make the dimples in the copper tape. If you want to go into business making millions of copper plates, make the tool not a rectangular stamp, but a disc the width of a copper plate. Mark the pin locations on the edge of the disc, center drill and insert the pins leaving the pinheads protruding, and create a rolling tool to make a steady strip of plates. The pattern of the pinheads on the disc must be arranged so it is a repeatable pattern in order to save copper material.
Hi Kurt, back a few posts I mentioned I tried hard wire diameter 0.025” equating to a max copper plate nail head size, late 18th century, of probably 1 1/4”, though probably quite a large size back then. The trick for me was to get evenly cut “heads” to emboss the copper tape, evenly, without penetrating it. The tape is very, very thin. While pressing with the nail jig I can almost get a repeatable pattern as long as the pressure is even and therein lies the problem. There will be a few hundred plates embossed for the port side, then another fabricated jig for the hundreds on the stb’d side. This afternoon I tried to use my workshop drill press, as a press, and may be on to something using an adaptation of Uwe’s invention and Passaro’s jig. Though a shop drill press, as you well know, does not have the finesse needed for modelling.
I think your engineered idea for a rolling disc is great. I certainly don’t have those skills but maybe you or someone out there can produce one. I’d certainly buy it
Thanks for your valuable input.
Hi great job your doing with this kit. I've recently finished the copper plates on my HMS Unicorn, this was the first time I've tried this. I found the best way to make the nails heads was in a drill press with a medium hard rubber block.
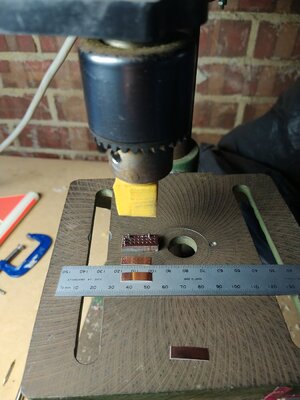
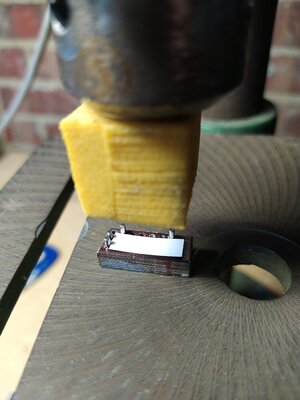

I purchased two rolls of copper tape from Amazon for around A$10 this was more than enough. I had no problem with peeling off the backing tape and the whole process took about two weeks.
Next time I do this job I will spend more time on the nail pattern and make it look more realistic. Hope this is of some help to you, there's more photos on my build log.
Tony
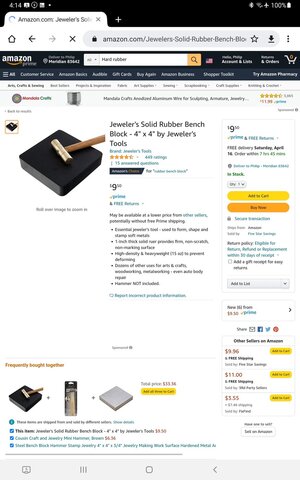
A hard, black rubber block would be the best "anvil" to press the copper tape using the pin head jig. Luckily for me, I don't have to worry about copper sheathing... not used in my century of interest!Hi Kurt, back a few posts I mentioned I tried hard wire diameter 0.025” equating to a max copper plate nail head size, late 18th century, of probably 1 1/4”, though probably quite a large size back then. The trick for me was to get evenly cut “heads” to emboss the copper tape, evenly, without penetrating it. The tape is very, very thin. While pressing with the nail jig I can almost get a repeatable pattern as long as the pressure is even and therein lies the problem. There will be a few hundred plates embossed for the port side, then another fabricated jig for the hundreds on the stb’d side. This afternoon I tried to use my workshop drill press, as a press, and may be on to something using an adaptation of Uwe’s invention and Passaro’s jig. Though a shop drill press, as you well know, does not have the finesse needed for modelling.
I think your engineered idea for a rolling disc is great. I certainly don’t have those skills but maybe you or someone out there can produce one. I’d certainly buy it.
Thanks for your valuable input.
Hi great job your doing with this kit. I've recently finished the copper plates on my HMS Unicorn, this was the first time I've tried this. I found the best way to make the nails heads was in a drill press with a medium hard rubber block.
View attachment 302886
View attachment 302888
View attachment 302887
I purchased two rolls of copper tape from Amazon for around A$10 this was more than enough. I had no problem with peeling off the backing tape and the whole process took about two weeks.
Next time I do this job I will spend more time on the nail pattern and make it look more realistic. Hope this is of some help to you, there's more photos on my build log.
Tony
Hi Tony, thanks for your comments. I just checked out your log and excellent Unicorn build. The copper work looks really good. I’m going to spend a couple of days and experiment with the various suggestions, yours included. I like the idea of the rubber block mounted in the drill press, it’s giving me some interesting alternatives. Thanks.
Thanks Kurt, the rubber block suggested by you and Tony looks good. I just have to find some suitable hard rubber. My wife’s winter boots have thick soles but I’m in enough trouble alreadyA hard, black rubber block would be the best "anvil" to press the copper tape using the pin head jig. Luckily for me, I don't have to worry about copper sheathing... not used in my century of interest!But that copper sheathed hull looks awesome.
 .
.You have have any old car tires?Thanks Kurt, the rubber block suggested by you and Tony looks good. I just have to find some suitable hard rubber. My wife’s winter boots have thick soles but I’m in enough trouble already.
You have have any old car tires?
The car is getting a little old but no old tires
This afternoon I tried a slight variation of the original jig made according to the Syren manual. Thinking about the clever suggestions of Uwe, Kurt and Tony, using a rubber pad, I tried a piece of 1/16” thick styrene cut to 1/4” width. Instead of using the “well” of the jig I placed a length of styrene in the leading channel. This is to allow a little “give” as the nail heads press into the copper tape. I then glued a piece of styrene on the head of the stamp in lieu of a hard rubber pad. This seems to help spread the load as the drill press is brought down onto the stamp.
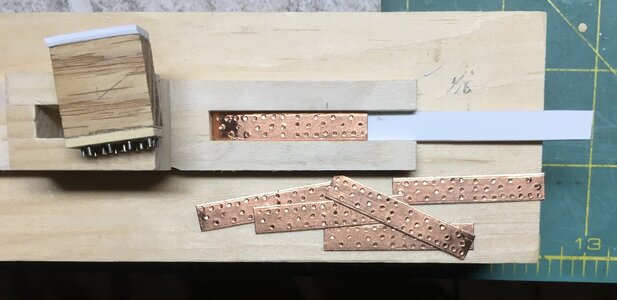
Prior to stamping the copper tape I cut lengths to exactly 1 3/8” (2x11/16”). Placed one end in the channel on top of the styrene. Pressed the stamp down, reversed the tape and repeated for the other end. The process is no slower than using the well of the jig.
The result is shown below. By reversing the copper tape I end up with a center showing two vertical lines of three nails. This will be a guide for cutting the plates into two 11/16” lengths. The pattern shown is from the Syren manual. Not technically correct I know but the overall effect once the hull is coppered should be ok.
If I am still at this in August I’m buying copper tape suggested by Heinrich .
.
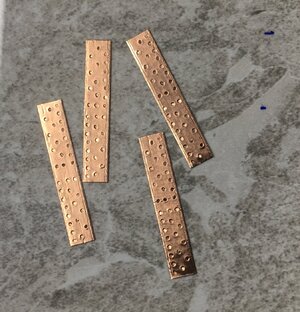

Prior to stamping the copper tape I cut lengths to exactly 1 3/8” (2x11/16”). Placed one end in the channel on top of the styrene. Pressed the stamp down, reversed the tape and repeated for the other end. The process is no slower than using the well of the jig.
The result is shown below. By reversing the copper tape I end up with a center showing two vertical lines of three nails. This will be a guide for cutting the plates into two 11/16” lengths. The pattern shown is from the Syren manual. Not technically correct I know but the overall effect once the hull is coppered should be ok.
If I am still at this in August I’m buying copper tape suggested by Heinrich

- Joined
- Jan 9, 2020
- Messages
- 10,566
- Points
- 938

Hi Roger. To me this seems like an awful amount of work for something that does not offer a better look than what the tape does. To me the coppering of a hull is akin to painting/decorating it. Just as we do not make our own paint/stain/polyurethane varnish etc.. (I am not talking about mixing paints to achieve a certain color), why should we spend such an inordinate amount of time that could have been spent much better elsewhere? My two cents.
The nail head size could be smaller. They seem out of scale and too large relative to the plates.This afternoon I tried a slight variation of the original jig made according to the Syren manual. Thinking about the clever suggestions of Uwe, Kurt and Tony, using a rubber pad, I tried a piece of 1/16” thick styrene cut to 1/4” width. Instead of using the “well” of the jig I placed a length of styrene in the leading channel. This is to allow a little “give” as the nail heads press into the copper tape. I then glued a piece of styrene on the head of the stamp in lieu of a hard rubber pad. This seems to help spread the load as the drill press is brought down onto the stamp.
View attachment 303156
Prior to stamping the copper tape I cut lengths to exactly 1 3/8” (2x11/16”). Placed one end in the channel on top of the styrene. Pressed the stamp down, reversed the tape and repeated for the other end. The process is no slower than using the well of the jig.
The result is shown below. By reversing the copper tape I end up with a center showing two vertical lines of three nails. This will be a guide for cutting the plates into two 11/16” lengths. The pattern shown is from the Syren manual. Not technically correct I know but the overall effect once the hull is coppered should be ok.
If I am still at this in August I’m buying copper tape suggested by Heinrich.
View attachment 303157
Hi Roger. To me this seems like an awful amount of work for something that does not offer a better look than what the tape does. To me the coppering of a hull is akin to painting/decorating it. Just as we do not make our own paint/stain/polyurethane varnish etc.. (I am not talking about mixing paints to achieve a certain color), why should we spend such an inordinate amount of time that could have been spent much better elsewhere? My two cents.
The nail head size could be smaller. They seem out of scale and too large relative to the plates.
Heinrich, you make a very good point and I tend to agree. I mentioned in an earlier post that we change out our cannon, rope, blocks and so on, why not the copper plates as well? When you make the point that “coppering of a hull is akin to painting/decorating it” it also aligns with my own thoughts about valuable time being spent elsewhere.
Kurt’s input about nailhead size being out of proportion to the plate size is valid too. Trying to get scaled down simulated nail imprints with a technically correct pattern is very hard, for me anyway.
The input from both of you this evening has reinforced how I will proceed with the plating. I think sometimes we need the valued opinions of others to help us decide on a course of action. I am grateful to everyone here who continue to offer such helpful insight, their own experience and advice.
I am going to get the scaled Shicheng copper tape through ZHL. The few days spent on this mini project were not wasted, it was and is a great learning experience to be carried forward for a future build.
As always my thanks to you all for dropping by, the comments, advice, help, likes and laughter.
Mini update:
I contacted Max of ZHL and ordered two rolls of copper tape at 1/75 scale. It’s the plate size at 18x6mm that I need even though the scale is out. Should be good for the Syren at 1/64.
Max responded to my email within an hour, impressive .
.
I contacted Max of ZHL and ordered two rolls of copper tape at 1/75 scale. It’s the plate size at 18x6mm that I need even though the scale is out. Should be good for the Syren at 1/64.
Max responded to my email within an hour, impressive
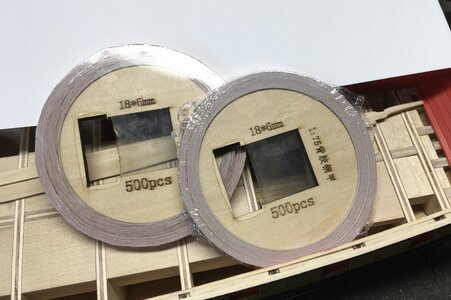
I was really pleased to receive two 500 piece rolls of 18mm x 6mm copper tape today from Max of ZHL in China. From initial ordering to receipt it took about a month. Not bad considering the difficulties in China at the present time.
When I order items online I am often concerned about the type of packaging used to protect the order from damage. Although this was a small order from ZHL the tapes were very well protected both inside and outside the small mailing box.
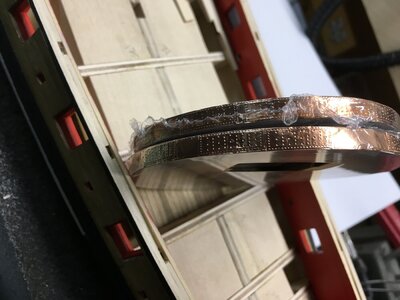
The copper tapes are wound around a wooden “reel” and protected with a clear plastic wrap. I have not opened the wrap yet but you can see the embossed nail detail in the photo. The scale shows at 1:75 but the plates, as you can see, are 18mm x 6mm equating, at 1:64, to 1152mm x 384mm full scale (just over 45” x 15”). That should work out well. The embossed nail pattern looks really good.
After reading many posts about coppering I know this will take a while once I get going. These past weeks I’ve had other distractions but work continues, albeit slowly, on hull preparations. I sprayed a Krylon clear finish satin on the lower hull to give the plates a smooth surface to adhere to. I intend finishing most of the larger hull items above the waterline before coppering. That way I can protect the copper plates as much as possible once they are on the hull.
So that’s it for now, thanks for all the support and advice as my build progresses. The continued interaction on this site is impressive.
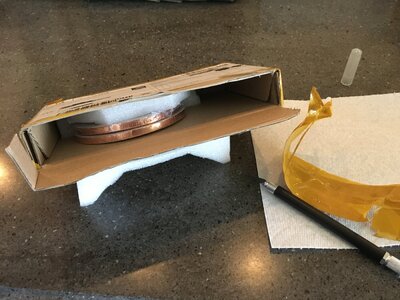


Will you be aging the copper?I was really pleased to receive two 500 piece rolls of 18mm x 6mm copper tape today from Max of ZHL in China. From initial ordering to receipt it took about a month. Not bad considering the difficulties in China at the present time.
When I order items online I am often concerned about the type of packaging used to protect the order from damage. Although this was a small order from ZHL the tapes were very well protected both inside and outside the small mailing box.
The copper tapes are wound around a wooden “reel” and protected with a clear plastic wrap. I have not opened the wrap yet but you can see the embossed nail detail in the photo. The scale shows at 1:75 but the plates, as you can see, are 18mm x 6mm equating, at 1:64, to 1152mm x 384mm full scale (just over 45” x 15”). That should work out well. The embossed nail pattern looks really good.
After reading many posts about coppering I know this will take a while once I get going. These past weeks I’ve had other distractions but work continues, albeit slowly, on hull preparations. I sprayed a Krylon clear finish satin on the lower hull to give the plates a smooth surface to adhere to. I intend finishing most of the larger hull items above the waterline before coppering. That way I can protect the copper plates as much as possible once they are on the hull.
So that’s it for now, thanks for all the support and advice as my build progresses. The continued interaction on this site is impressive.
View attachment 309102
View attachment 309103
View attachment 309104
Hello Vic, that is a really good question.Will you be aging the copper?
Amongst modellers there seem to be as many opinions about aging copper plates as there are about adding sails to their models (yes, Paul I read your possible Vasa sails or not “dilemma”
If I age the plates but not the rest of the Syren then there is a possible mismatch. If I leave the plates to weather then I understand they take on a patina anyway. If I spray them with a sealer of sorts they retain there newness and that will match the unweathered look of the rest of the model. To be honest at this stage I am not sure. Your question has made me think that allowing the plates to lose their shiny copperness and take on that green hue would be good visually. The vessel is then observed as a whole rather than with a distracting shiny bottom.
I have time to think about it but opinions are always welcome
Yeah, it was more of a question than an opinion. I was just curious as to what your intentions were and your rationale. Thanks for sharing. I’m looking forward to the finished product.Hello Vic, that is a really good question.
Amongst modellers there seem to be as many opinions about aging copper plates as there are about adding sails to their models (yes, Paul I read your possible Vasa sails or not “dilemma”).
If I age the plates but not the rest of the Syren then there is a possible mismatch. If I leave the plates to weather then I understand they take on a patina anyway. If I spray them with a sealer of sorts they retain there newness and that will match the unweathered look of the rest of the model. To be honest at this stage I am not sure. Your question has made me think that allowing the plates to lose their shiny copperness and take on that green hue would be good visually. The vessel is then observed as a whole rather than with a distracting shiny bottom.
I have time to think about it but opinions are always welcome.


