Syren 1803 1:64 Model Shipways

Hi Jack, those loose test planks were laid to give me an idea of where butts would fall. The manual shows one plank each side of the centre line. The first on the port side lands on bulkhead three (L on the plan). The first stbd one lands on bulkhead five (D on the plan). That butt shift throws off the deck butt pattern at the port and stbd sides but as Paul said it probably will not be noticed.

I laid the planks alternately port and stbd to see how they would look. If I do the actual planking that way I will probably alternate in much the same way to make sure my planks run straight and true.
I have attached an article that I have which shows different layouts of planks on the deck. Maybe you already have seen this or not?
 

Attachments

One other thing Roger, if you decide to test the faux butt on planks. The hardest part is repeating the straight butt line. I've had success with using a very fine blade in a coping saw, using a miter type jig. Draw my target line on the plank, insert into jig, 3 or 4 passes with the blade.
 
Hello Roger. The VASA was in essence Dutch, so as @dockattner Paul said she followed the Dutch pattern of no pattern. Here you will have to make the call my friend and if I were you, I would base it on personal preference. It doesn't even have to be symmetrical. On the Dutch ships as an example, neither the deck planking nor the hull planking was symmetrical.
 
One other thing Roger, if you decide to test the faux butt on planks. The hardest part is repeating the straight butt line. I've had success with using a very fine blade in a coping saw, using a miter type jig. Draw my target line on the plank, insert into jig, 3 or 4 passes with the blade.
Ok thanks I’ll try that Ken. Looks like I have some good options.
 
Hello Roger. The VASA was in essence Dutch, so as @dockattner Paul said she followed the Dutch pattern of no pattern. Here you will have to make the call my friend and if I were you, I would base it on personal preference. It doesn't even have to be symmetrical. On the Dutch ships as an example, neither the deck planking nor the hull planking was symmetrical.
Always good sensible advice from you Heinrich. I need to keep reminding myself that ship model making is as much an interpretive art form as it is an attempt to replicate some aspects of ship building. In my case as a learning experience, especially from a kit. I agree with your sentiment that preference is a personal decision and that is how I shall proceed.
My thanks to you, as always, for you valued input.
 
Hello Vic, I cannot answer your question but maybe Heinrich @Heinrich or Paul @dockattner can give you some feedback.
I can only answer for the Vasa...
Most of the oak boards came from Poland. The curved timbers for the stem, frames, etc. generally came from Sweden from either the king's forests or trees from private owners (the shapes had to be nearly perfect, so it was quite an undertaking finding the right trees). Remember, Vasa was a ship in the Swedish navy - it was only built by a Dutch shipwright (who died before the ship was launched) in the Dutch style.
 
Was lumber plentiful in Holland at the time?
No, not at all. Add to that, that the Dutch are notoriously stingy and do not waste any money and you had your answer. They only used what they had and if it did not fit, they made it fit! It was all a case of function to the Dutch - form came a big second.
 
I think I'd follow the method of planking across. Symmetry may happen but then it may not. Once you start 'populating' the decks with housing, ladders, cannons, machines etc, the planking becomes the background. Just my opinion....
 
I think I'd follow the method of planking across. Symmetry may happen but then it may not. Once you start 'populating' the decks with housing, ladders, cannons, machines etc, the planking becomes the background. Just my opinion....
You make some good and helpful points, thanks Phil.

After I read through all the very helpful posts today I went back to my mockup deck and tweaked a few of the planks, added more, adjusted their lengths here and there, took some photos for my own reference and then walked away for the night. What I see is coming together and my concern about symmetry got tossed overboard :). I intend trying out some of today’s alternatives tomorrow though.
 
I can't answer your question for the Syren other than to say if you are laying down a pattern just stick with that pattern - any side to side difference would then fade into the background (just my opinion not stating fact).

And to answer Kurt's question...

View attachment 321998

Complete chaos...
Good morning. Who would have thought. I have just learnt something. Thanks guys. I always imagined deck planking to be perfectly symmetrical some having different patterns etc. Cheers Grant
 
How serendipitous that I would run accross this thread the same day Model Shipways would be having a sale on this particular ship. It'll be on the shelf for a while, but you've gotta strike while the iron is hot, right? Just an FYI your skills with this model is what put me over the top. Ship is looking great and I look forward to seeing more as you progress.
 
How serendipitous that I would run accross this thread the same day Model Shipways would be having a sale on this particular ship. It'll be on the shelf for a while, but you've gotta strike while the iron is hot, right? Just an FYI your skills with this model is what put me over the top. Ship is looking great and I look forward to seeing more as you progress.

Hi Jamie @jamiebradley426 I believe you will really enjoy building the Syren. I am getting a lot of enjoyment from this kit. As I slowly progress I find myself spending as much time reading as I do building. Books, online references, papers and other Syren logs help enormously. Just as important for me as a novice is the helpful input, advice, welcome critiques and support from SOS members. As you are no doubt aware there are some very knowledgable, respected and superbly skillful builders on this site.

I am presently installing my pear decking after numerous iterations of planking arrangements. I grab time when I can but the deck is actually a long enjoyable process. It starts to pull the ship together visually.

Thanks for your very kind supportive comments. When you start your build if I can help in any way I certainly will keeping in mind my novice skillset :) .
 
3161B311-52A6-48E1-9ED0-308EEA4AB73C.jpeg

A small progress update

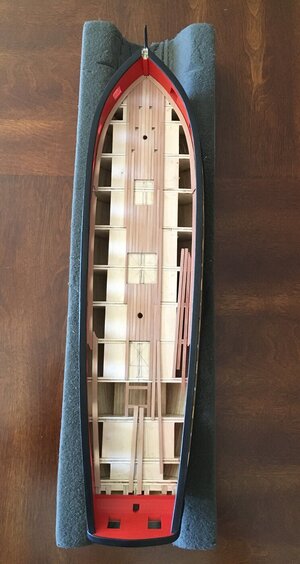
The pear deck planking is underway. I know cutting the pear with the margins glued down will be difficult. So the margin planks are staying loose until I have completed the joggling. Obviously nothing is sanded or scraped yet.

I previously cut planking strips 1/8” x 1/16” from stock billets in line with the kit sizes. I tried out various arrangements of planking but wanted to keep to the four-butt system the kit designer suggests. I also, as discussed previously, was interested in trying to maintain symmetry of the planks across the deck. The manual suggests keeping the average length of planks to cover four bulkheads.

I decided I wanted the plank ends to butt against the hatch framing (coamings) and larger structures where possible instead of placing those items on the decking after it is laid. Instead of fiddling with tiny pieces of planking I am going to place the smaller structures onto the planks but lay decking around the larger ones. In addition I tried to minimize the cut-outs of the planks around the future companionway, coamings and hatches. To do this I will have to adjust the width of the future structures but only minimally. I also increased the width of the two off-centre line planks by 1/32”. That gives me a clean line each side of the for’d and aft structures but not for the one amidships. So far so good, possibly, maybe, I hope so :D

Once the planks are laid the manual cautions to ensure there is enough space between the deck and the underside of the carronade sled supports. No problem, I had measured and planned for that some while back. However, as I laid the planks I realized a false deck would have helped enormously. To have done that would have decreased the deck to bottom carronade height, which meant thinner deck planks but they were already cut. So that was not going to happen but it will be planned for in a future build. Lesson learned.

Each plank is blackened using a 2B pencil but on one side only and the butt end. I made sure to blacken the whole side depth of the plank so when I sand and scrape them the dark “caulking” will still show. Mind you at this stage I don’t really see that effect, yet. I might be laying them too close but applying the deck finish on completion may show it a lot better. In the future I think I’ll use very thin temporary spacers as I lay the planks so the caulked gaps have a more consistent look.

Thanks for taking the time to read another of my somewhat wordy posts. The support I get from you all is much appreciated.
 
Dear Roger. I love your wordy posts as they indicate a thought process - I do the same. Your planning that has premeditated the actual deck planking is beyond compare - you seemed to have taken all possible permutations into account. I especially like the measures you have taken to minimize deck cut-outs around fixtures and the use of slightly wider planks in some areas to create and maintain a straight planking line. I cannot wait to see the final product!

On WB#2 I might just join you with the deck planking in Pear Wood.
 
Thank you Heinrich. For me it’s like a puzzle sometimes, working out what goes where and especially why but still staying within some semblance of realism - difficult with a kit though.

I reckon your terrific WB#2 will look great with a pear deck.
 
Last edited:
Back
Top