Syren 1803 1:64 Model Shipways

I can't remember the last time I thought that hard about something, Roger ROTF. Brilliant planning. This explains why everything on your ship approaches perfection!
Please don’t tell your patients that Paul ROTF.

I appreciate your generous compliment but know that to really see perfection, in a ship build, is to visit and re-visit your Vasa build.
 
View attachment 324431

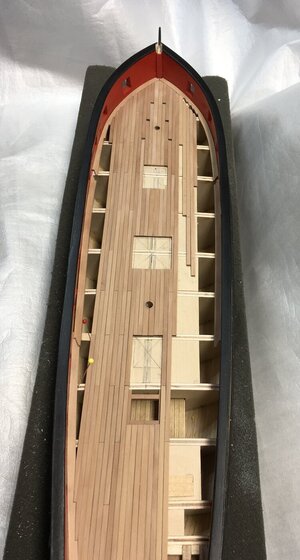
A small progress update

The pear deck planking is underway. I know cutting the pear with the margins glued down will be difficult. So the margin planks are staying loose until I have completed the joggling. Obviously nothing is sanded or scraped yet.

I previously cut planking strips 1/8” x 1/16” from stock billets in line with the kit sizes. I tried out various arrangements of planking but wanted to keep to the four-butt system the kit designer suggests. I also, as discussed previously, was interested in trying to maintain symmetry of the planks across the deck. The manual suggests keeping the average length of planks to cover four bulkheads.

I decided I wanted the plank ends to butt against the hatch framing (coamings) and larger structures where possible instead of placing those items on the decking after it is laid. Instead of fiddling with tiny pieces of planking I am going to place the smaller structures onto the planks but lay decking around the larger ones. In addition I tried to minimize the cut-outs of the planks around the future companionway, coamings and hatches. To do this I will have to adjust the width of the future structures but only minimally. I also increased the width of the two off-centre line planks by 1/32”. That gives me a clean line each side of the for’d and aft structures but not for the one amidships. So far so good, possibly, maybe, I hope so :D

Once the planks are laid the manual cautions to ensure there is enough space between the deck and the underside of the carronade sled supports. No problem, I had measured and planned for that some while back. However, as I laid the planks I realized a false deck would have helped enormously. To have done that would have decreased the deck to bottom carronade height, which meant thinner deck planks but they were already cut. So that was not going to happen but it will be planned for in a future build. Lesson learned.

Each plank is blackened using a 2B pencil but on one side only and the butt end. I made sure to blacken the whole side depth of the plank so when I sand and scrape them the dark “caulking” will still show. Mind you at this stage I don’t really see that effect, yet. I might be laying them too close but applying the deck finish on completion may show it a lot better. In the future I think I’ll use very thin temporary spacers as I lay the planks so the caulked gaps have a more consistent look.

Thanks for taking the time to read another of my somewhat wordy posts. The support I get from you all is much appreciated.
Good morning Roger- Beautiful!
 
Roger, just catching up on your build. As stated by so many others, wonderfully clean work and finish on your wood.

Just to confirm, you're using Alaskan Yellow Cedar and wipe on poly, correct? How are you prepping your wood? Did you sand or scrape your hull planks? Is there any tint agent in your wipe on poly? And finally, is the wipe on poly water-based or solvent-based?

After seeing the great results you've achieved on your wood, I'd like to do some testing of my own.

Thanks Roger!

Ken.
 
Dear Roger
you are doing wonderful work on ship, the deck is awesome and the red has a great look
 
Wow Roger really great work, the red has a great tone.
Hi Tobias, thanks for your support. I was attracted to the colours of the Syren when I read some reviews and logs. I kept to the same tone of red as the designer and think I have a close match. I am looking forward to getting all the deck fittings constructed and painted. A while to go yet :) .
 
Last edited:
Roger, just catching up on your build. As stated by so many others, wonderfully clean work and finish on your wood.

Just to confirm, you're using Alaskan Yellow Cedar and wipe on poly, correct? How are you prepping your wood? Did you sand or scrape your hull planks? Is there any tint agent in your wipe on poly? And finally, is the wipe on poly water-based or solvent-based?

After seeing the great results you've achieved on your wood, I'd like to do some testing of my own.

Thanks Roger!

Ken.
Hey Ken, thanks for your comments and looking in on my log, it’s slow progress but I thoroughly enjoy the build.

The deck planking is Swiss pear, which I am cutting from the edge of 1/8” sheets. At the moment what you see in the topside photo is the woods natural state. After I cut a multitude of 1/8” x 1/16” planks I then mixed them up so that I would not have a consistent plank to plank wood colour or grain. When the deck is complete I will scrape with miniature scrapers to level the planks out then maybe fine sand if necessary. I have not prepped the pear but my intention is to go with tung oil.

For the hull I used the kit supplied basswood but in hindsight I think AYC would have been a little easier but we learn as we go. The Syren hull is painted black above the waterline and will be copper plated below. I used a spray on sealer on the basswood, after hand sanding, to get a level surface for those tiny plates. The coppering will be done after I finish the deck.

The only Alaskan Yellow Cedar (AYC) I used is for the inner bulwarks. I wanted to try it instead of the kit supplied basswood. Some posts back I mentioned I used Vallejo primer and hand brushed multiple coats of a Vallejo red. I was tempted to use the AYC for the deck planking but I think the pear will have more of an “oompf“ factor (I have no idea where that word comes from :D ).
 
Last edited:
Dear Roger
you are doing wonderful work on ship, the deck is awesome and the red has a great look
Hello Shota, thank you so much for your comments. I expect the deck will take a little more time yet before I am satisfied with it. I am becoming quite adept at ripping off glued down deck planks and redoing them, maybe that’s why it’s a slow process for me. Once the deck coating/finish is applied I’m hoping it will compliment the red tones.
 
I love your personal choices of the woods your using. The pear deck speaks for itself! I'm impressed with the finish/sheen of the basswood, where used. I don't recall seeing basswood look, well, so well finished. Super work mate!
 
I think it’s time for an update even though it doesn’t look like much progress.

I am finding the deck, especially nibblng and joggling, very time consuming. The absence of a false deck has also made things significantly more difficult, especially where the plank butts fall. I mentioned in my post #278 that a false deck fitted at this stage would have altered critical heights for other parts of the construction. Another lesson learned for future models but that is how we gain experience. Also, I previously mentioned my deck pattern butt ends would loosely follow that of the model designer as shown in his manual. In other words every fourth bulkhead, not technically correct but I think it’s turning out ok.

As I lay the pear planks I am making sure the margin planks are removable. Trying to cut them in place just will not work for me. That meant cutting and dry fitting the plank ends and the margin very carefully trying to get a neat fit. Measure, cut, scribe, curse, redo, fit, cut, curse, sand, fit, curse, redo - well you get the idea :D.

Once I had completed the joggled planks to the point I no longer needed to remove the margin plank/s for cutting I started glueing things down. In the photo the port side is partly glued and underway. The stb’d side is next but for the photo I showed the planks and margin plank on that side loose and being prepared. Once I have completed the necessary joggling that side too will be glued. The gaps between deck planks will, hopefully, be made more consistent later.

I know recommendations are to alternate the laying of planking port and stb’d. However, I decided to mostly complete the port side then work on the stb’d side. My thinking is I can adjust plank widths to stb’d so my plank count is equal each side from the centerline and hopefully my butt pattern too. It remains to be seen but if I mess up it will be blamed in good sea going fashion on the apprentice :).

So back to the bench for me this afternoon. Thanks to those of you who follow my slow progress, your helpful input, likes and laughs are always well appreciated.

A80A67EB-BC50-4786-884B-131A3BBCE1D7.jpeg
 
Back
Top