Roger that looks great, worked perfectly.
Thanks Tobias, I learn from and try to follow wonderful model builders like yourself.
 |
As a way to introduce our brass coins to the community, we will raffle off a free coin during the month of August. Follow link ABOVE for instructions for entering. |
 |
 |
The beloved Ships in Scale Magazine is back and charting a new course for 2026! Discover new skills, new techniques, and new inspirations in every issue. NOTE THAT OUR FIRST ISSUE WILL BE JAN/FEB 2026 |
 |
Roger that looks great, worked perfectly.

Good morning Roger. Your joggle and nibble joints may have been time consuming however they came out perfectly- false deck or not. I can see why you had to make the but joints match the bulkhead with no false deck. I like the clean look of the deck and I hope you will not change the pear wood colour too much when finishing it? It is beautiful. Cheers GrantI think it’s time for an update even though it doesn’t look like much progress.
I am finding the deck, especially nibblng and joggling, very time consuming. The absence of a false deck has also made things significantly more difficult, especially where the plank butts fall. I mentioned in my post #278 that a false deck fitted at this stage would have altered critical heights for other parts of the construction. Another lesson learned for future models but that is how we gain experience. Also, I previously mentioned my deck pattern butt ends would loosely follow that of the model designer as shown in his manual. In other words every fourth bulkhead, not technically correct but I think it’s turning out ok.
As I lay the pear planks I am making sure the margin planks are removable. Trying to cut them in place just will not work for me. That meant cutting and dry fitting the plank ends and the margin very carefully trying to get a neat fit. Measure, cut, scribe, curse, redo, fit, cut, curse, sand, fit, curse, redo - well you get the idea.
Once I had completed the joggled planks to the point I no longer needed to remove the margin plank/s for cutting I started glueing things down. In the photo the port side is partly glued and underway. The stb’d side is next but for the photo I showed the planks and margin plank on that side loose and being prepared. Once I have completed the necessary joggling that side too will be glued. The gaps between deck planks will, hopefully, be made more consistent later.
I know recommendations are to alternate the laying of planking port and stb’d. However, I decided to mostly complete the port side then work on the stb’d side. My thinking is I can adjust plank widths to stb’d so my plank count is equal each side from the centerline and hopefully my butt pattern too. It remains to be seen but if I mess up it will be blamed in good sea going fashion on the apprentice.
So back to the bench for me this afternoon. Thanks to those of you who follow my slow progress, your helpful input, likes and laughs are always well appreciated.
View attachment 329184
Now how on earth did I miss this posting?
Roger, the deck planking is absolutely superb! It looks incredibly rich in color and warm in ambience while at the same time maintaining razor sharp seams between the planks. In combination with the red hue of the inner bulwarks it looks simply exquisite. This is going to be one heck of a beautiful Syren! Kudos, my friend!

It is a huge pleasure my friend!Heinrich, I honestly don’t know how you are able to follow, support, advise and comment on so many logs. Then on top of that you not only teach but also build those exquisite ship models.
I am actually enjoying laying the pear deck but looking forward to completing it. We have discussed the type of finish elsewhere but I think it may be advisable for me to do that before the next steps in the build. That way I can protect the decking to a certain extent.
Thank you again for giving me such a supportive boost as I progress.
Good morning Roger. Your joggle and nibble joints may have been time consuming however they came out perfectly- false deck or not. I can see why you had to make the but joints match the bulkhead with no false deck. I like the clean look of the deck and I hope you will not change the pear wood colour too much when finishing it? It is beautiful. Cheers Grant
 .
.

Just beautiful work here Roger. Congratulations on this milestone.

Good morning Roger. The deck came out brilliantly- with no false deck and many butt (the butt pattern at the bow is magic) and scarph joints this was no easy feat. Awesome worth. Cheers GrantView attachment 334043
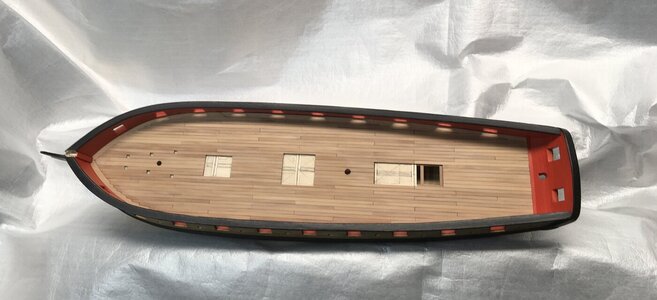
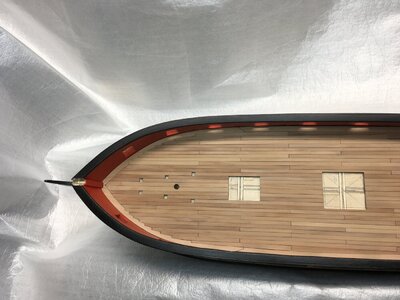
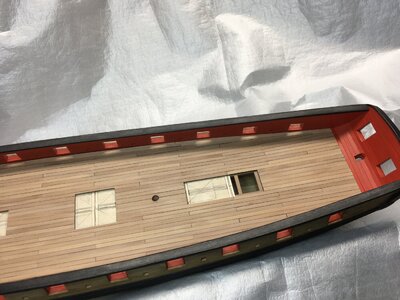
At last my deck is laid, which seemed to go on forever. I had to redo many of the pear planks in an attempt to get an even thickness across the deck, while still allowing for slight camber. It was not to be though because, as previously mentioned, not having a false deck introduced a lot more inconsistencies as work progressed. I always try to work through problems but sometimes have to accept limitations. Anyway, I reached a point where I had to be satisfied with my efforts otherwise I would end up redoing my previous redos of the redos that were redone.
As I worked across the deck I adjusted the width of some lines of planks on the stb’d side. The width adjustment was slight but it meant I could try to get that symmetrical butt pattern port and stb’d. It mostly worked out and I feel any visual discrepancies will eventually be covered by deck clutter, I hope.
View attachment 334044View attachment 334045
One problem I did encounter was not planning for where the margin scarph joints lay. As I completed the planking I realised that the last plank each side, next to the margins, would end with butts adjacent to those margin scarphs. A weak point no doubt so I adjusted the last plank each side to extend the butt joint beyond the scarph. That meant increasing the width of the plank to about 15” real scale to avoid pointy plank ends where joggling would not work. I had to then cut a lengthwise notch to allow it to fit across a plank width and most of the next one. Realistic? I’m not sure but I reckon it is practical, maybe. I added a marked up photo to try to show what I mean. What is it they say? - “a picture is worth a thousand words”. Well, mine anyway.
View attachment 334046
So next is deck scraping, fitting the waterway and then experimentation with a deck finish on scrap pear wood and possibly simulated plank fastenings. I have some ideas gleaned from knowledgable modellers so it will depend on how small I can make the simulated treenail “spots”, if at all.
Thanks for taking your valuable time to follow my posts, it’s much appreciated.
Thanks Heinrich, I’m pleased how the randomness of the plank colours worked out. Cutting plank lengths off the side of 1/8” thick pear sheets provided those colour variations while minimizing grain patterns. As for the nibbing - well I think I have found a new form of workshop therapyYour deck looks truly beautiful, Roger! The color of the planks matches superbly, and your nibbing adds another dimension to the visual aspect.
Thanks, I appreciate your input and support Shota. Now the deck is finished I am looking forward to planning the deck fixtures and fittings. However, there’s also the hull copper plating that is waiting - yikes, another form of model ship therapyDear Roger
Your deck looks beautiful, you are doing wonderful work here . Congratulations on this milestone

Such clean workmanship on the deck.
Good morning Roger. The deck came out brilliantly- with no false deck and many butt (the butt pattern at the bow is magic) and scarph joints this was no easy feat. Awesome worth. Cheers Grant
 . My biggest concern was messing up the nibbing/joggling on those pear margin pieces. I have learned what works and does not work for a future build so it’s all good experience.
Thanks Tobias, as I see the model taking shape I find I like the colour variations more and more. I wondered when I painted the red bulwarks if it was too bright. Now the deck is laid down the pear tones it down.Hi Roger really very clean work, the colour of the wood harmonises very well with the red.
 .
.