That has to be the most difficult method to make a boat, and it doesn't simulate the planks also. How do not sand through the hull? You're one brave builder! Check out Master Korabel's boat kits. The are plank on frame, and the parts are tiny, but they are easier to make than hollowing the hull out like a dugout canoe.
-

Win a Free Custom Engraved Brass Coin!!!
As a way to introduce our brass coins to the community, we will raffle off a free coin during the month of August. Follow link ABOVE for instructions for entering.
-

PRE-ORDER SHIPS IN SCALE TODAY!
The beloved Ships in Scale Magazine is back and charting a new course for 2026!
Discover new skills, new techniques, and new inspirations in every issue.
NOTE THAT OUR FIRST ISSUE WILL BE JAN/FEB 2026
You are using an out of date browser. It may not display this or other websites correctly.
You should upgrade or use an alternative browser.
You should upgrade or use an alternative browser.
Syren 1803 1:64 Model Shipways
- Thread starter RogerD
- Start date
- Watchers 61
-
- Tags
- model shipways syren
- Joined
- Jan 9, 2020
- Messages
- 10,566
- Points
- 938

It looks stunning Roger! I don't think there is any chance of this participating in a Viking ceremonial burial. The Pear wood looks wonderful. My next builds will be Pear in as well. For now, I have had enough of fighting with oak,
That has to be the most difficult method to make a boat, and it doesn't simulate the planks also. How do not sand through the hull? You're one brave builder! Check out Master Korabel's boat kits. The are plank on frame, and the parts are tiny, but they are easier to make than hollowing the hull out like a dugout canoe.
Hi Kurt, you are right on with how difficult this is turning out to be. The manual says to get that hull down to 1/32”. I have held off for the moment at 1/16” but that means the cap rail will be too wide. I sand slowly and carefully
 .
.The outside will be painted white but I know what you mean about the plank simulation. Master Korabel is an excellent suggestion, thanks.
Hi Heinrich, you are too kind. As I mentioned to Kurt I’ve used, and will have to use, some fine filler. I have already tried to see if a finish will be compatible for the pear and adjacent filled areas. Doesn’t look too good on samples so a deliberate paint colour may be the answer. By deliberate I mean not a simulated wood but more a period grey paint. Then offset that with finished pear floor boards, gratings, thwarts and cap rail.It looks stunning Roger! I don't think there is any chance of this participating in a Viking ceremonial burial. The Pear wood looks wonderful. My next builds will be Pear in as well. For now, I have had enough of fighting with oak,
One thing I do know, after following your oak WB, it’s going to be a treat to see what you will do with a pear build.
That's progressing nicely - but what a massive amount of work!
I have to agree Paul, I didn’t appreciate the work involved with this method. I’ll see how it looks in a few days and possibly rethink my approach. I’m keeping a close eye on your esping for methodology.That's progressing nicely - but what a massive amount of work!
Good morning Roger. No Viking funeral needed here . Are you going to simulate planking or paint as a smooth finish ? How you managed to get the sanding of the interior so brilliant is a reflection of your patience on skill. Cheers GrantNo doubt the longest period for me without an update but family matters have taken priority. Hopefully progress will pick up again soon.
I laid the hull aside for a while and leafed through the build manual for an achievable small item to build in the meantime. I chose the Syren longboat but as I’ve now read in other threads these little boats can be fiddly.
The lift method is used for the longboat and all the laser cut parts are provided for in the kit. I started out using the supplied sheet basswood but then wondered if I could manage with pear. Don’t ask me why.
I cut new pear lifts with a scroll saw using the plan patterns, glued them up and went at it with a range of Dremel cutters, burrs, files and sandpaper. Much more difficult than I had anticipated but I’ll keep at it to see what is personally achievable. At the moment it looks like a pregnant dugout canoe. If it doesn’t work out there will be a Viking funeral.
Thanks again for following my log. Work continues, but slowly.
View attachment 342617
View attachment 342616
Thanks for those very supportive words Grant. The lifts are 1/8” thick so when layered the joins show longitudinally. I am hoping the paint will not obscure those joins thus simulating planking. A bit “hit and miss” but I’ll not know till I hit the hull with thin white paint.Good morning Roger. No Viking funeral needed here . Are you going to simulate planking or paint as a smooth finish ? How you managed to get the sanding of the interior so brilliant is a reflection of your patience on skill. Cheers Grant
Last edited:
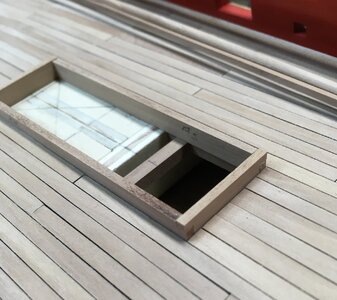
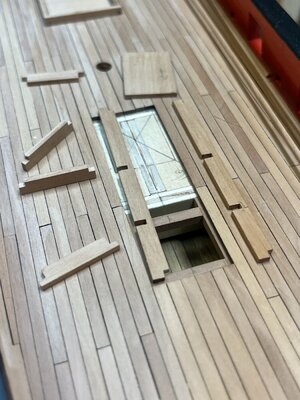
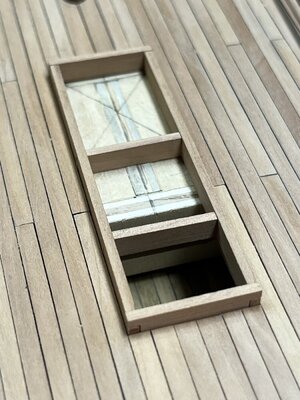
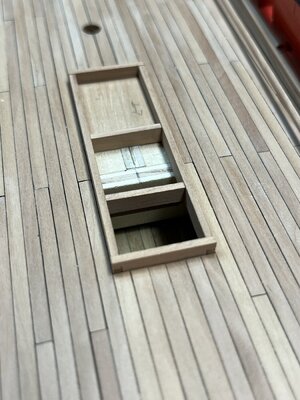
Over the past few days I thought I’d tackle a few of the deck hatches. Everything is presently dry fitted and not sanded but initial test fits are coming along. The photo sequence below shows progress so far.
When I planned and laid my deck I allowed for the future coamings and head-ledges, when constructed, to lay below the 1/16” thick pear planks. That meant a height above deck level of 1/8” (8” real scale) so I needed to cut 3/16” strips of wood. I also wanted to have the appearance of half-laps at the coaming corners. I believe tailed half-laps were used in actual ship construction but at 1/64 scale I settled for the easier solution.
These figures work in my favour because the kit supplied gratings are close to 1/8” in height. Rather than try to mess with strips to simulate grating ledge supports I cut full pieces of 1/16” scrap pear and placed them in position ready for the gratings. That should give me full support under the gratings for each hatch. I may paint them black to give the appearance of a hold beneath the gratings. It’ll be easier to paint them off ship before glueing. That way I’ll not be a klutz and spill paint all over the deck .
.
I also lapped the intermediate ledges for the aft hatch and companionway. I’m not sure if those laps were cut into the top or bottom of the fore and aft coamings. Since I cannot find a reference they are positioned underneath.
The camber of the deck is very slight. Once the hatches are glued up I might try to sand them in a gentle thwartships curve but I’ve seen them left “flat”.
When I planned and laid my deck I allowed for the future coamings and head-ledges, when constructed, to lay below the 1/16” thick pear planks. That meant a height above deck level of 1/8” (8” real scale) so I needed to cut 3/16” strips of wood. I also wanted to have the appearance of half-laps at the coaming corners. I believe tailed half-laps were used in actual ship construction but at 1/64 scale I settled for the easier solution.
These figures work in my favour because the kit supplied gratings are close to 1/8” in height. Rather than try to mess with strips to simulate grating ledge supports I cut full pieces of 1/16” scrap pear and placed them in position ready for the gratings. That should give me full support under the gratings for each hatch. I may paint them black to give the appearance of a hold beneath the gratings. It’ll be easier to paint them off ship before glueing. That way I’ll not be a klutz and spill paint all over the deck
I also lapped the intermediate ledges for the aft hatch and companionway. I’m not sure if those laps were cut into the top or bottom of the fore and aft coamings. Since I cannot find a reference they are positioned underneath.
The camber of the deck is very slight. Once the hatches are glued up I might try to sand them in a gentle thwartships curve but I’ve seen them left “flat”.


Nice attention to the details Roger.
Thanks Paul, by following great builds, like your Vasa, I’ve seen that the finer details are an important part of the model shipbuilding process. Very time consuming but quite enjoyable when things come together.
Maybe. But you trumped me here. I unwittingly cut miter joints and only later learned the corners needed to be lapped. Love your work!Thanks Paul, by following great builds, like your Vasa, I’ve seen that the finer details are an important part of the model shipbuilding process. Very time consuming but quite enjoyable when things come together.
Thanks Heinrich, I enjoy the small parts of the build. With those lap joints at 1/16” x 1/16” I go cross-eyed thoughLovely work Roger. Those lapped joints are exactly what the doctor ordered - both in terms of your execution and in terms of historical accuracy.
 .
.- Joined
- Jan 9, 2020
- Messages
- 10,566
- Points
- 938

Oh heck, yes - same here!Thanks Heinrich, I enjoy the small parts of the build. With those lap joints at 1/16” x 1/16” I go cross-eyed though.
Good morning Roger. Your detail work is fantastic. So many modellers (myself included) add detail however the detail within the details is lacking. Yours is there. Those lapped joints as an example. Love your work. Cheers GrantOver the past few days I thought I’d tackle a few of the deck hatches. Everything is presently dry fitted and not sanded but initial test fits are coming along. The photo sequence below shows progress so far.
When I planned and laid my deck I allowed for the future coamings and head-ledges, when constructed, to lay below the 1/16” thick pear planks. That meant a height above deck level of 1/8” (8” real scale) so I needed to cut 3/16” strips of wood. I also wanted to have the appearance of half-laps at the coaming corners. I believe tailed half-laps were used in actual ship construction but at 1/64 scale I settled for the easier solution.
These figures work in my favour because the kit supplied gratings are close to 1/8” in height. Rather than try to mess with strips to simulate grating ledge supports I cut full pieces of 1/16” scrap pear and placed them in position ready for the gratings. That should give me full support under the gratings for each hatch. I may paint them black to give the appearance of a hold beneath the gratings. It’ll be easier to paint them off ship before glueing. That way I’ll not be a klutz and spill paint all over the deck.
I also lapped the intermediate ledges for the aft hatch and companionway. I’m not sure if those laps were cut into the top or bottom of the fore and aft coamings. Since I cannot find a reference they are positioned underneath.
The camber of the deck is very slight. Once the hatches are glued up I might try to sand them in a gentle thwartships curve but I’ve seen them left “flat”.
View attachment 343732
View attachment 343733
View attachment 343734
View attachment 343735
Hi Grant, I really appreciate your supportive compliment. It’s certainly going to set me up for the day as I head down to my little workshop  .
.
Thank you my friend, my best wishes to you and your family also. May the holiday season be happy and joyful.Dear Roger, Merry Christmas and Happy Holidays for you and your family
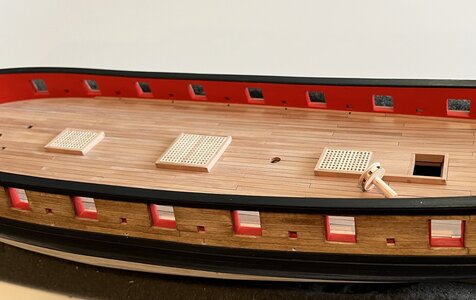
Some small progress that includes working on little details on and around the deck. I cut and fitted the supplied hatch grating pieces to three of the coamings, which took a while. I’m not sure I’m satisfied with the result but I will live with them until I get to the point of glueing each coaming in place.
The waterways are about 70% fitted each side. The shape of the waterway for a vessel of this era tended, as far as I can tell, towards a convex shape instead of triangular or concave. I decided to use pear to match the deck so cut strips 1/16” x 1/16” square. Then rounded off the edge by hand all the way along to give that convex shape. I fitted the waterways in lengths no longer than 25 scale feet. The resulting pieces were joined so the butts fall below gun-ports, which means they will be hidden by the swivel brackets when fitted later on. I’ll fit the for’d waterway pieces once I cut and shape the inner hawse hole doubler.
The scuppers became a mini challenge because of the convex waterway surface. The scuppers for this build would have been between 3” and 4”, there were five each side midships. I used the sequence of an awl then tiny mm drill bits to increase the scupper holes to a final diameter of 1.35mm (about 7/128” or 0.055”). Scaled up that gives me about a scupper diameter of 3 1/2”. I tried to get the scupper holes as close to the deck as possible to simulate efficient drainage. There’s obviously cleaning up to do later on plus maybe a touch of lead coloured paint to line the scuppers.
I’m now working on the capstan using the supplied basswood parts, which I will be painting on completion.
A very happy new year to everyone, thanks for your support, likes and input. I always welcome your advice and critical comments too

