Syren 1803 1:64 Model Shipways

Hi Roger. The deck planking and gratings, those minute scuppers; the quality of the inner bulwark planking and some of the neatest gunport linings I have ever seen, all add up to a great visual effect. No doubt the Syren is a beautiful model, but in your hands, it is becoming a special model.
 
Hi Roger. The deck planking and gratings, those minute scuppers; the quality of the inner bulwark planking and some of the neatest gunport linings I have ever seen, all add up to a great visual effect. No doubt the Syren is a beautiful model, but in your hands, it is becoming a special model.

Thank you for those more than generous words of support Heinrich. You have a remarkable way of encouraging a modeller to try harder, do better and self improve as a build progresses no matter the standard achieved. It is very much appreciated.
 
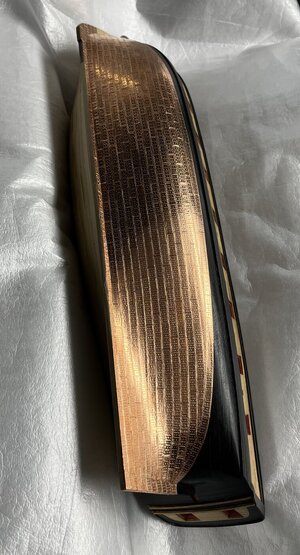
For the copper sheathing on the Syren I decided to try indented copper tape, which I purchased from ZHL (Shicheng), China some months ago. There was some discussion on various methods of making the scaled plates on this build thread back in April last year. I ordered two rolls of tape each having 500 plates. However, I know already that I need at least another roll. I estimate wastage at about 5%, not forgetting this is my first go at this.

I am presently working my way up the hull, from the keel aft to the bow. The design of the nail pattern on the plates does not seem to allow for the recommended overlap but I made an effort to do this anyway. I was a little confused to start with the way the plates were embossed on the copper. Gaps between plates vary, as do the edges but cutting carefully means I can allow for a small bare patch, adjacent to the end of a plate, where it can be held with tweezers. A little bit of manipulation, a final trim and with care the plate can be affixed without touching it. A wipe with a small lint free cloth helps secure the plate before some light burnishing. A little more burnishing is going to be necessary later.

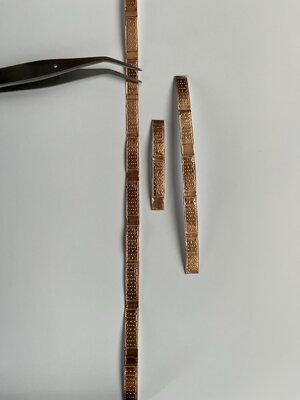
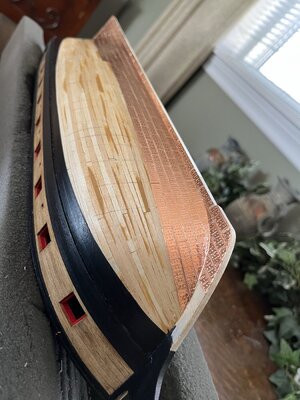
As I progress I am trying hard to align the plates using multiple pencilled lines on the hull. Some visual dexterity helps too. I’ve attached a photo to show the loose tape with varying separation distances and also one of the hull port side with progress so far. This is a long process as many of you know.

If I do a “Kattner Close-up” (@dockattner) :D with my phone camera I see areas I’m not happy with. However, from a distance it’s passable so this time a re-do is not a consideration.

As always your comments, input and critical observations are very welcome. Thanks for spending your valuable time reading this.

9443BE64-D326-42F3-B54D-C89FC3A3327B.jpeg

66D960D1-5A81-43CA-B28C-767493F81536.jpeg
 
For the copper sheathing on the Syren I decided to try indented copper tape, which I purchased from ZHL (Shicheng), China some months ago. There was some discussion on various methods of making the scaled plates on this build thread back in April last year. I ordered two rolls of tape each having 500 plates. However, I know already that I need at least another roll. I estimate wastage at about 5%, not forgetting this is my first go at this.

I am presently working my way up the hull, from the keel aft to the bow. The design of the nail pattern on the plates does not seem to allow for the recommended overlap but I made an effort to do this anyway. I was a little confused to start with the way the plates were embossed on the copper. Gaps between plates vary, as do the edges but cutting carefully means I can allow for a small bare patch, adjacent to the end of a plate, where it can be held with tweezers. A little bit of manipulation, a final trim and with care the plate can be affixed without touching it. A wipe with a small lint free cloth helps secure the plate before some light burnishing. A little more burnishing is going to be necessary later.

As I progress I am trying hard to align the plates using multiple pencilled lines on the hull. Some visual dexterity helps too. I’ve attached a photo to show the loose tape with varying separation distances and also one of the hull port side with progress so far. This is a long process as many of you know.

If I do a “Kattner Close-up” (@dockattner) :D with my phone camera I see areas I’m not happy with. However, from a distance it’s passable so this time a re-do is not a consideration.

As always your comments, input and critical observations are very welcome. Thanks for spending your valuable time reading this.

View attachment 353020

View attachment 353022
Are those self-adhesive tiles? Do they stick well or do you have to use glue? I've done a lot of stained glass with copper tape ' (un-dented) and often wonder if I could make a 'roller/denter jig to make my own tiles. Interesting. And nice work on your ship too!
 
Are those self-adhesive tiles? Do they stick well or do you have to use glue? I've done a lot of stained glass with copper tape ' (un-dented) and often wonder if I could make a 'roller/denter jig to make my own tiles. Interesting. And nice work on your ship too!
Hello Phil,

Yes they are self-adhesive. The copper tape is lightly fixed to a white backing paper. After I cut and trim a plate I hold one end with fine tweezers. I gently flick the other end in an upward motion with my finger. The tape releases from that end reasonably well. I then hold the now loosened white backing paper with my left hand. The copper tape is still gently secured at the tweezer end. Whilst holding the white paper I gently remove the tweezers, grip the loose copper plate with the same tweezers. Then I trim off the excess tape where the tweezers were, remove the white backing paper and place the plate on the hull. After initial burnishing the copper seems to hold really well.

Sorry Phil, a long answer to your question :D.

From the look of the tape it must have been produced by a machine of some sort. There are areas that do not line up well where the embossing is offset. That’s partly where my wastage is. I would imagine a roller/denter would work well with critical alignment of a jig. With your expertise I would think it’s very do-able.

Thanks for your comment.
Thank you!
 
Roger not only are you a very brave man with all the coppering that needs to be done, but you are also a meticulous craftsman. Those copper tiles look superb - clean and perfectly aligned. I am glad the tape works well for you - I am always cautious to recommend something, but I am very happy it is turning out so well. A slow process it is indeed - take your time and just carry on doing what you've been doing up until now. It is going to look spectacular.
 
Roger not only are you a very brave man with all the coppering that needs to be done, but you are also a meticulous craftsman. Those copper tiles look superb - clean and perfectly aligned. I am glad the tape works well for you - I am always cautious to recommend something, but I am very happy it is turning out so well. A slow process it is indeed - take your time and just carry on doing what you've been doing up until now. It is going to look spectacular.

Thanks Heinrich and especially for the suggestion and recommendation for the tape (back in Heinrich’s posts #172 and #173 for others who may be interested in going the ZHL route).

The tape is a time saver with regard to the actual simulated nail embossing process. Although the cutting, trimming, placement etc. probably takes as long as other copper plate techniques. I am particularly pleased with the scaled nail pattern that allows for variations to plate placement. The copper is very thin and, after some limited burnishing, tends to show the slightest underlying hull imperfections. I am hoping the patina that develops over time will hide some of the more apparent dings and dents.

I keep asking myself if I am building a ship just new off the blocks or a vessel slightly weather worn. Weather worn is the easy answer, which can cover a multitude of modelling sins ;).
 
I coppered HMS Snake (the log is on here somewhere). These were individual 'tiles', it took some time, but I enjoyed doing it. I need to get out more.
Hi Graham, thanks for looking in on my build, I agree it takes time. The tape I am using needs to be cut into individual plates, which are 18mm x 6mm. At an hour a day I hope to be finished by early February :D.
 
Are you leaving it as bright copper? In the end I decided to try and represent the verdigris on the Snake and colourwashed it with alternate washes of blue and green acrylic. It's a personal choice, I know.
 
Early days I think but the copper is, for me, way too shiny. I will leave it be as work continues on the model and see what happens. I intend protecting the plates though so that will also factor in to how and if a patina develops.
Thanks.
 
63B62D7D-042F-40D0-AC57-E8EA12656A62.jpeg

The port side coppering is mostly completed except for some fine tuning and then it’s onto the stbd side.

I estimate there are about 400 plates placed so far with more wastage than I expected. I definitely need another roll of 500 pieces from ZHL because there’s only about 2/3rds left from my second reel. Wastage is higher than I expected because of print/embossing errors from the manufacturer. I had to repeatedly adjust spacing to try to align the line plates vertically. Cutting a plate with a deliberate small blank area at the end meant I could line them up but not the best solution really. Where I cut for blank tape areas between plates I used a dental pick to poke tiny holes in the tape to simulate nail indents.

There is no gore line worked into this plating for this smaller ship. I researched as best I could and for this era found the plates were simply laid in a gradually rising line of upward curves. When they reached the upper section of the hull below the waterline I added a dressing belt. That is also in line with the manual. This vessel had no longitudinal wood batten at the top end of the line of plates.

So now onto the stbd side once I get more tape ordered from ZHL.
 
Back
Top