• LUCZORAMA SHIPWRECK SCAVENGER HUNT GIVEAWAY. 4 Weeks of Fun • 1 Legendary Prize ((OcCre’s Fram Ship)) • Global Crew Welcome!
    **VIEW THREAD HERE**

Syren 1803 1:64 Model Shipways

Back to the Workbench

I’ve been laid up for the past few weeks but hopefully back to the workbench more frequently now. So a Sunday afternoon update mainly to keep myself accountable to myself :).

I’ve just added a few of the deck fittings I made out of pear. They are now glued and/or pinned into position. The main fife rail was troublesome because I used brass wire in the base of each pear stanchion and then had to align the wires for each corresponding hole in the deck. A template I made assisted greatly though. The binnacle, also made from pear, is positioned but without the ships bell atop it, for the moment. Other parts now in place include the pump I previously fabricated from pear, brass rod, parts and some appropriate tubing. I might make some pump handles later on.

The pear gallows bitts, riding bitts, and fore bitts are also in place. I placed a multitude of blackened brass belaying pins temporarily in place throughout the ship. I know they are not technically correct but I wanted to see if I liked the effect overall. (The dowels in the mast positions are just place holders).

After reading this small update you probably now recognize my affinity with pear wood. One of those woods that holds up at tiny scale and is great to work with.

That’s it for now, thanks as always for following along.

View attachment 521794

View attachment 521796

View attachment 521795
looking wonderful!!
 
Back to the Workbench

I’ve been laid up for the past few weeks but hopefully back to the workbench more frequently now. So a Sunday afternoon update mainly to keep myself accountable to myself :).

I’ve just added a few of the deck fittings I made out of pear. They are now glued and/or pinned into position. The main fife rail was troublesome because I used brass wire in the base of each pear stanchion and then had to align the wires for each corresponding hole in the deck. A template I made assisted greatly though. The binnacle, also made from pear, is positioned but without the ships bell atop it, for the moment. Other parts now in place include the pump I previously fabricated from pear, brass rod, parts and some appropriate tubing. I might make some pump handles later on.

The pear gallows bitts, riding bitts, and fore bitts are also in place. I placed a multitude of blackened brass belaying pins temporarily in place throughout the ship. I know they are not technically correct but I wanted to see if I liked the effect overall. (The dowels in the mast positions are just place holders).

After reading this small update you probably now recognize my affinity with pear wood. One of those woods that holds up at tiny scale and is great to work with.

That’s it for now, thanks as always for following along.

View attachment 521794

View attachment 521796

View attachment 521795
Good afternoon Roger. “My oh my…..” Got it all spot on - rather splendidly. Since I am looking at red paint - which paint did you use? Cheers Grant
 
Good morning Grant, thanks for your compliment :).

I use Vallejo paints for the Syren build. Where possible I airbrush an acrylic-polyurethane Vallejo grey surface primer #74.600 then a Vallejo Model Air red #71.003, which quite closely matches the suggested red supplied by Model Expo/Shipways. If I airbrush I use multiple coats of the red thinned with Vallejo airbrush thinner #71.161 in a ratio of 1 part thinner to 10 red. If I think the paint from the bottle is getting a little thicker I’ll add two drops of thinner into the cup. I sometimes add a drop of Vallejo Airbrush Flow Improver #71.462

If I hand brush I use multi coats of the Model Air red despite Vallejo having one called Model Colour/Color. I find I can get more of a consistent layering but it takes quite a few coats. If I hand brush I usually apply the Model Air red without thinning.

By the way Vallejo has a white surface primer too but I find the grey primer way better when applying the layered coats of the red.
Thank you Roger.
 
Vallejo Color/Colour red

Vic and Grant:

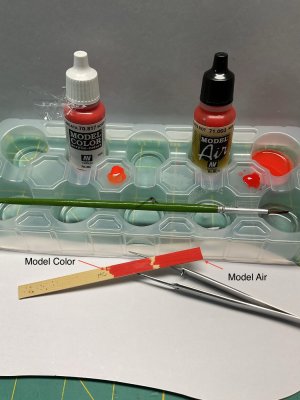
My notebook tells me I used Model Color scarlet #70.817 as the best match for the Model Air red #71.003

There is a very, very slight difference so I don’t combine the two colours on the same piece I’m painting. Interestingly enough the colours look different in the two bottles side by side but once laid they are very similar. To help I’ve just used both colours on a piece of scrap AYC side by side. Note: I did not use a primer for these samples. I just slapped two brushed coats on so you can see them. Don’t think it’s dry yet, :D.

See attached photo. Hope this is of some help.

IMG_5787.jpeg
 
Vallejo Color/Colour red

Vic and Grant:

My notebook tells me I used Model Color scarlet #70.817 as the best match for the Model Air red #71.003

There is a very, very slight difference so I don’t combine the two colours on the same piece I’m painting. Interestingly enough the colours look different in the two bottles side by side but once laid they are very similar. To help I’ve just used both colours on a piece of scrap AYC side by side. Note: I did not use a primer for these samples. I just slapped two brushed coats on so you can see them. Don’t think it’s dry yet, :D.

See attached photo. Hope this is of some help.

View attachment 522361
Thank you kindly Roger
 
Vallejo Color/Colour red

Vic and Grant:

My notebook tells me I used Model Color scarlet #70.817 as the best match for the Model Air red #71.003

There is a very, very slight difference so I don’t combine the two colours on the same piece I’m painting. Interestingly enough the colours look different in the two bottles side by side but once laid they are very similar. To help I’ve just used both colours on a piece of scrap AYC side by side. Note: I did not use a primer for these samples. I just slapped two brushed coats on so you can see them. Don’t think it’s dry yet, :D.

See attached photo. Hope this is of some help.

View attachment 522361
A very detailed and timely response! Thank you very much.
 
Galley vent stack

As my ability to stay at the workbench continues to be temporarily reduced I decided to work at a small achievable item. So I turned to the construction of the galley vent stack.

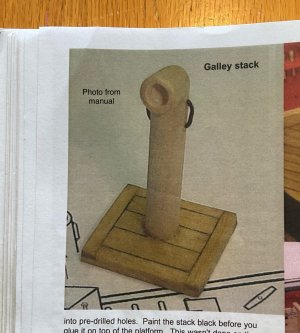
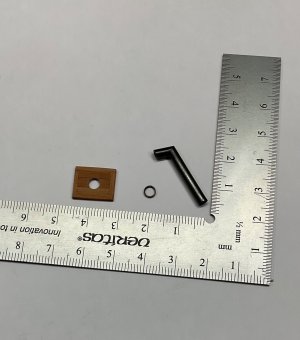
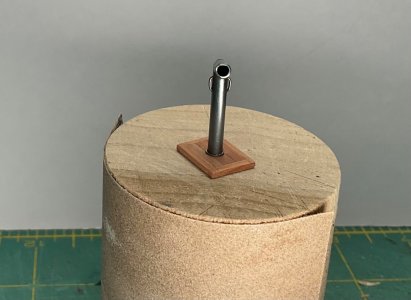
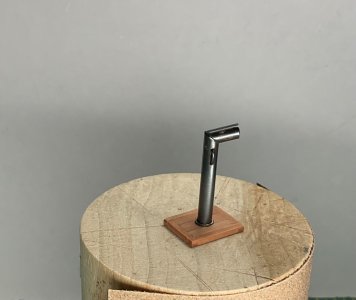
The manual advises using 1/8” dowel cut to length to make the stack, which sits on a raised platform. I didn’t like the look of it (see below) so decided to make one using brass tubing for the stack and brass wire for the handles. The handles shown on the plan indicate, to me, that it can be turned on and off the wind to prevent smoke being blown back into the cooking stove area. I was intrigued at how the stack was constructed in 1803 to prevent fire risk to adjoining wood structures. I also tried to find information about the sealing arrangement at the base of the stack. I had seen one solution being a steel or copper plate surrounding the stack and placed over the wooden platform. Another solution was a lining around the vent as it penetrated the platform. I elected to construct a tiny ring at the base to simulate that external lining.

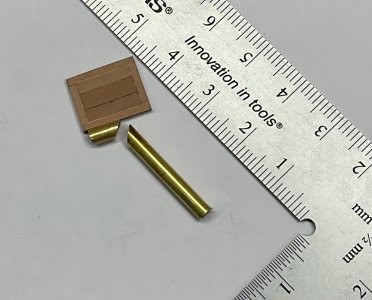
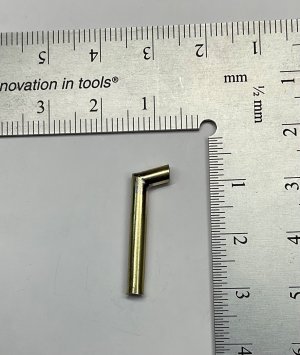
I constructed the stack from brass tubing cut at a suitable angle and then silver soldered. I drilled four tiny holes in the upper tubing for handles, which I made from brass wire. I cut a suitable size brass tubing “collar” for the lining at the base of the stack. After frustrating myself to no end I then blackened the whole thing and test fitted it as shown in the accompanying photos.

Just a single item but it’s progress no matter how small. Thanks for following along.

IMG_5824.jpeg

IMG_5796.jpeg

IMG_5797.jpeg

IMG_5818.jpeg

IMG_5822.jpeg

IMG_5823.jpeg
 
Just getting caught up on your build, Roger, WOW!

I have a question, if this is a model ship, where's the DUST?!?! Not one spec of dust? How is this possible?

I love your color scheme, realistically muted. But what is so very impressive is your eye for the correct scale, in all of the elements, especially your gun's riggings! Just super work, mate.

Thanks for your really nice post and comments Ken. I enjoy challenging myself working to scale and try to get the fixtures and fittings sized as best I can. It often means making and replacing a lot of the kit items, which I find myself doing more and more. The colour scheme is what attracted when I first saw the Syren but of course, for realism, I used some modellers licence here and there.

As for the dust I try to clean up as I work and very gently remove it as I progress. That dust is definitely not to scale though, ROTF.
 
Back
Top