-

Win a Free Custom Engraved Brass Coin!!!
As a way to introduce our brass coins to the community, we will raffle off a free coin during the month of August. Follow link ABOVE for instructions for entering.
-

PRE-ORDER SHIPS IN SCALE TODAY!
The beloved Ships in Scale Magazine is back and charting a new course for 2026!
Discover new skills, new techniques, and new inspirations in every issue.
NOTE THAT OUR FIRST ISSUE WILL BE JAN/FEB 2026
You are using an out of date browser. It may not display this or other websites correctly.
You should upgrade or use an alternative browser.
You should upgrade or use an alternative browser.
The Anatomy of the Bounty - AL-
- Thread starter Dematosdg
- Start date
- Watchers 32
-
- Tags
- artesania latina bounty
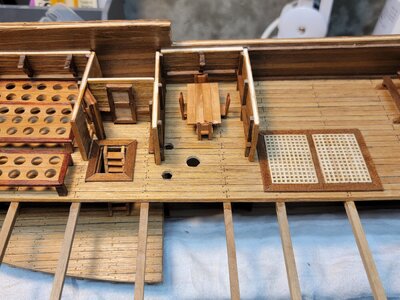
WOW - great looking pictures Daniel! So, the stove stood out in the open on the upper deck?
Thank you Heinrich !! And Yes, the stove chimney vent on the upper deck.
The deck is filling up quickly looks great with all the tables and chairs. Was the stove part of the kit it came out really well, is it made from castings?
Hello Daniel, I like the way you aim your build to all kinds of details. They are really great and add to your model a lot! 
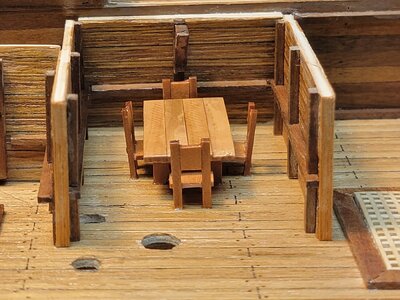
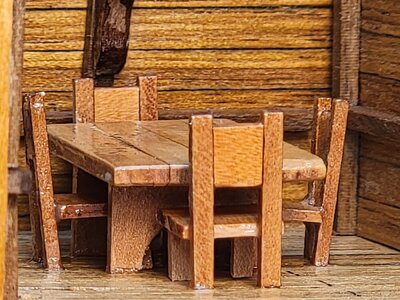
If you don't mind, the last image shows the table and chairs - they are too glossy. Most likely you took the photo while it was wet (still). Such a glassy surface would be big trouble in the sea.

If you don't mind, the last image shows the table and chairs - they are too glossy. Most likely you took the photo while it was wet (still). Such a glassy surface would be big trouble in the sea.
The deck is filling up quickly looks great with all the tables and chairs. Was the stove part of the kit it came out really well, is it made from castings?
Hi Tony
Yes, it was. The weathered aspect is real
Thank you for the compliments !!!
Daniel
Hello Daniel, I like the way you aim your build to all kinds of details. They are really great and add to your model a lot!
If you don't mind, the last image shows the table and chairs - they are too glossy. Most likely you took the photo while it was wet (still). Such a glassy surface would be big trouble in the sea.
Hi Jimsky
Thank you for stopping by. YES !!!! you are correct. Is very glossy and I HATE it. But I will confess you why it is like that independently that I hate it.
When I was doing the chairs, my trembling hands created more than I liked CA drops. I had options, (a) trash them (b) do an experiment.
I decided to do "b" before trashing them.
I saw a posting where CA was used "to paint the full hull". Then I decided to "paint with CA" the chairs. And they look fine. So I did the same to the table. All looks fine until I took the pictures. Yes, I saw them glossy, but in the pictures looks 100 times more.
After the pictures I painted them with shellac, as all the deck. But they are still glossy. I though using flat poly, but the one I have is water based. So I decided not to mix water base poly with shellac that is oil base.
So I decided to leave it as it is and post the pictures, independently that I thought someone will make your comment. Because I do not have LEDs, like others are doing on this type of builts and a deck goes over the table and the table is at the back, the only way to see the glossy is to point it directly with a flash light. If ever someone notice the table and chairs there.
Lesson learned from the experiment and for everyone that will read this posting. "Do not do what I did", unless you like the glossy aspect.
Cheers
Daniel
- Joined
- Jan 9, 2020
- Messages
- 10,566
- Points
- 938

I think in the greater scheme of things, the table and chairs will be fine. Like you said, it is at the back of the cabin and will still get a deck over it. We will just say that the cabin boy polished the table prior to you taking the picture! 
- Joined
- Apr 21, 2018
- Messages
- 881
- Points
- 353

With a little research I think you'll discover the entire 'pot' room was lined with lead. This was to aid drainage and collection of water used to keep the breadfruit saplings alive.
This indicates, to me at least, there must have been provision for fresh water somewhere.
As anyone who has grown any kind of plant indoors, plenty of light is required. As is the 'pot' room must have been a dark place, even with the gratings removed.
This indicates, to me at least, there must have been provision for fresh water somewhere.
As anyone who has grown any kind of plant indoors, plenty of light is required. As is the 'pot' room must have been a dark place, even with the gratings removed.
With a little research I think you'll discover the entire 'pot' room was lined with lead. This was to aid drainage and collection of water used to keep the breadfruit saplings alive.
This indicates, to me at least, there must have been provision for fresh water somewhere.
As anyone who has grown any kind of plant indoors, plenty of light is required. As is the 'pot' room must have been a dark place, even with the gratings removed.
You are correct. I had that same discussion with my wife and couldn't find an answer.
The below text comes from the Smithsonian article I posted on page 5 and I am posting here again. As we can read looks like only a few survived.
"...Two thousand one hundred twenty-six breadfruit plants were carried from Tahiti, in pots and tubs stored both on deck and in the below-deck nursery. The expedition's gardener described depredations inflicted by "exceedingly troublesome" flies, cold, "unwholesomeness of Sea Air," salt spray and rationed water; nonetheless, 678 survived to the West Indies, being delivered first to St. Vincent and finally to Jamaica. And it was in February 1793 that Capt. William Bligh, fulfilling at last his momentous commission, had overseen his first deposition of 66 breadfruit specimens from Tahiti, all "in the finest order," in Bath Botanical Gardens..."
Some of those are still living at Bath Botanical Gardens, based on the article.
It is a really interesting story.

Captain Bligh's Cursed Breadfruit
The biographer of William Bligh—he of the infamous mutiny on the Bounty—tracks him to Jamaica, still home to the versatile plant
With a little research I think you'll discover the entire 'pot' room was lined with lead. This was to aid drainage and collection of water used to keep the breadfruit saplings alive.
This indicates, to me at least, there must have been provision for fresh water somewhere.
As anyone who has grown any kind of plant indoors, plenty of light is required. As is the 'pot' room must have been a dark place, even with the gratings removed.
Moreover, May I kindly ask you if you can post the link to where the "pot room lead descriptions is done". I found interesting to have it in the log for modelers interested on Bounty.
I will try to find it by myself.
Thank you !!!! For stopping by and adding to the background history and discussion of this ship.
Best
Daniel
Last edited:
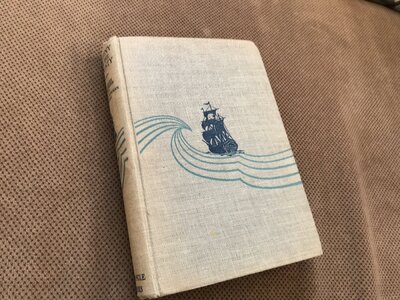
I have a 1943 copy of mutiny on the Bounty
Interesting, is it a novel? Or composition of historical documents?
I believe it’s a novel, it’s the famous story of mutiny, I orig was going to build a Bounty model, but a buddy picked the Bounty so I went with another. It’s for sale, cheap if you’d like to add it to your Bounty Booty. Lol
i paid $20 for it
i paid $20 for it
- Joined
- Apr 21, 2018
- Messages
- 881
- Points
- 353

Daniel, Happy New Year.
In answer to your question; I'm sure other sources mention the lead lining, however the most convenient to hand is the AOT book. Please see page 9, first paragraph.
See also page 12; 'a proper stove' was installed in the aft cabin to keep the breadfruit nice and warm! Figure that one out!
It is also made clear there was provision to store plants above deck, presumably in similar racks, though I've never seen a model which addresses these issues.
Another feature never illustrated is that the mid-ship rail was 'boarded', ie filled in, like a bulwark. In his diary Bligh mentions these boards were washed away in a storm.
That tome is not to hand, so I can't give chapter and verse, but be assured it is definitely mentioned in the diary. That would alter the ships appearance somewhat.
Over many years I've acquired and read just about all there is published about this often exaggerated moment in maritime history. Being a hoarder of books I can barely move from room to room, never mind attempting to find something I forget I have LOL.
I believe it’s a novel, it’s the famous story of mutiny, I orig was going to build a Bounty model, but a buddy picked the Bounty so I went with another. It’s for sale, cheap if you’d like to add it to your Bounty Booty. Lol
i paid $20 for it
Nice !! But I already have a bounty novel
Cheers
Daniel
Daniel, Happy New Year.
In answer to your question; I'm sure other sources mention the lead lining, however the most convenient to hand is the AOT book. Please see page 9, first paragraph.
See also page 12; 'a proper stove' was installed in the aft cabin to keep the breadfruit nice and warm! Figure that one out!
It is also made clear there was provision to store plants above deck, presumably in similar racks, though I've never seen a model which addresses these issues.
Another feature never illustrated is that the mid-ship rail was 'boarded', ie filled in, like a bulwark. In his diary Bligh mentions these boards were washed away in a storm.
That tome is not to hand, so I can't give chapter and verse, but be assured it is definitely mentioned in the diary. That would alter the ships appearance somewhat.
Over many years I've acquired and read just about all there is published about this often exaggerated moment in maritime history. Being a hoarder of books I can barely move from room to room, never mind attempting to find something I forget I have LOL.
Thank you very much !!!
I have the Anatomy of the bounty book. But, definitely I missread those paragraphs. Or read them without paying the correct attention. I will go and read it again ASAP.
Thank you again !!
Daniel
Hi , Yes , I am still working on the ship.
I started the upper deck. The most difficult task was to place the beams exactly in the same position of the previous deck beams. In the near future, I will need to place the false ribs against those beams. So they need to fit exactly one over the others. And , as you know, this ship does not have a classical full hull. All is in the "air", if that is a way of describing it. Future builders could probably design a building jig, like the ones used on some POF kits models, to have all perfectly centered and less issues.
Well , moving on and beams on place, i planked the deck. Then I found I have used all the gratings, provided with the kit, on my previous deck. Why ? , because following the AoB book, I placed grating on openings that the kit suggest to leave fully open. Crazy, very dangerous for the sailors. .
.
Bottom line, I had to do gratings. I have never, ever done that. First tried with Cherry wood. And was a failure. Wood too weak and some teeth broke. Plus the cuts weren't 100 % identical. That increased the pressure, that ended with broken teeth.
Next day used Maple and was more detaile oriented with the cuts. And Bingo !!! Success.
I used now Maple. I resawed it to ~6 mm. It wasn't perfect. Then, using the Byrnes thickness sander took it to a 4 mm perfect pice of wood. Then using the Byrnes table saw with the help of the micrometer on it I was able to do the gratings.
Let's see some pictures.
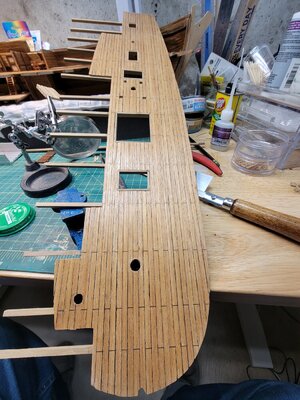
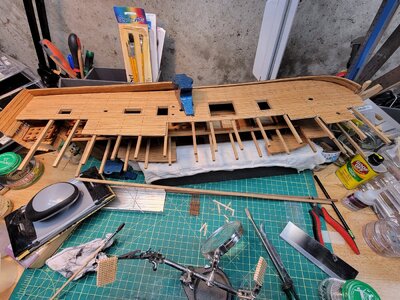
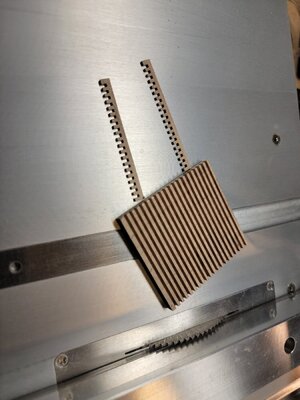
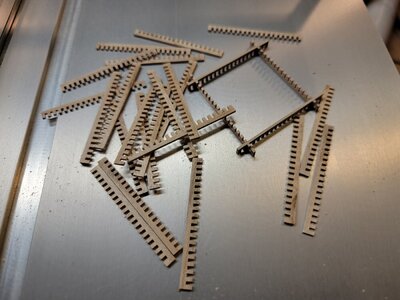
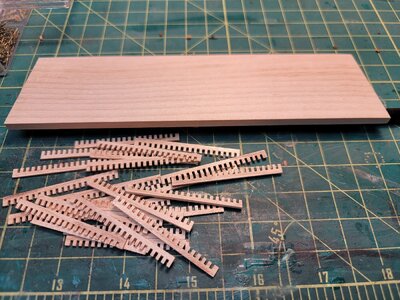
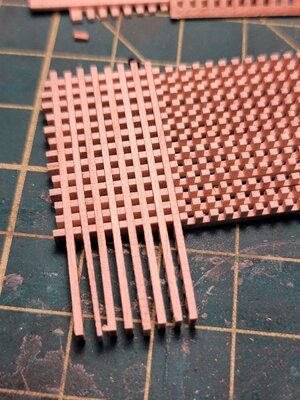
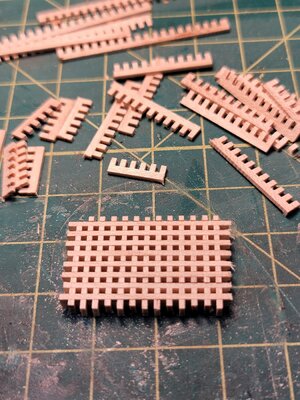
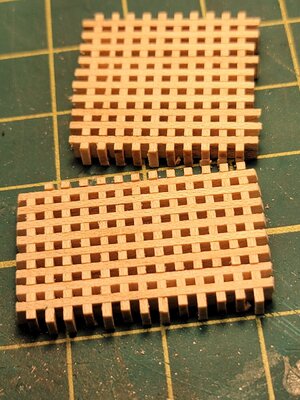
Gratings need to be taken yet to their final size.
Till the next update...
Cheers
Daniel
I started the upper deck. The most difficult task was to place the beams exactly in the same position of the previous deck beams. In the near future, I will need to place the false ribs against those beams. So they need to fit exactly one over the others. And , as you know, this ship does not have a classical full hull. All is in the "air", if that is a way of describing it. Future builders could probably design a building jig, like the ones used on some POF kits models, to have all perfectly centered and less issues.
Well , moving on and beams on place, i planked the deck. Then I found I have used all the gratings, provided with the kit, on my previous deck. Why ? , because following the AoB book, I placed grating on openings that the kit suggest to leave fully open. Crazy, very dangerous for the sailors.
Bottom line, I had to do gratings. I have never, ever done that. First tried with Cherry wood. And was a failure. Wood too weak and some teeth broke. Plus the cuts weren't 100 % identical. That increased the pressure, that ended with broken teeth.
Next day used Maple and was more detaile oriented with the cuts. And Bingo !!! Success.
I used now Maple. I resawed it to ~6 mm. It wasn't perfect. Then, using the Byrnes thickness sander took it to a 4 mm perfect pice of wood. Then using the Byrnes table saw with the help of the micrometer on it I was able to do the gratings.
Let's see some pictures.


Gratings need to be taken yet to their final size.
Till the next update...
Cheers
Daniel


