
I will mention just for general info. All wooden model versions of the Black Pearl I have reviewed (movie prop ship, Mellpapa, Model Ship Master, Old Modern Handicraft, ZHL, Hachette) feature the capstan around the mainmast. In some cases the handles have been removed so it is not as apparent.I have never seen a capstan around a mast I do not even think that would work.

-

SUBSCRIBE TO SHIPS IN SCALE TODAY!
The beloved Ships in Scale Magazine is back and charting a new course for 2026!
Discover new skills, new techniques, and new inspirations in every issue.
NOTE THAT OUR NEXT ISSUE WILL BE MARCH/APRIL 2026 -

Win a Free Custom Engraved Brass Coin!!!
As a way to introduce our brass coins to the community, we will raffle off a free coin during the month of August. Follow link ABOVE for instructions for entering.
You are using an out of date browser. It may not display this or other websites correctly.
You should upgrade or use an alternative browser.
You should upgrade or use an alternative browser.
The Black Pearl
- Thread starter Dave Stevens (Lumberyard)
- Start date
- Watchers 35

The capstan on all the Black Pearl kits, including those made from wood is that big thing at the base of the mainmast. I see it on your build Dave. I just discovered your most recent post about my comments. Also, if the capstan had a ring of ball bearings inside rubbing against the mast it might work.
Last edited:
- Joined
- Dec 1, 2016
- Messages
- 6,656
- Points
- 728

The capstan on all the Black Pearl kits, including those made from wood is that big thing at the base of the mainmast. I see it on your build Dave. I just discovered your most recent post about my comments. Also, if the capstan had a ring of ball bearings inside rubbing against the mast it might work.
actually this is not my build the model is being built by Mellpapa all i am doing is rebuilding his build here on SoS
yes a ring of ball bearings would work but back then i don't think so
- Joined
- Dec 1, 2016
- Messages
- 6,656
- Points
- 728
PART 35

Mast coat
I applied a cloth to the mast wedges of the fore mast and the mizzle mast, and melted the deck
tongue with a Tamiya acrylic color.
I made it a mast coat.

Thank you for letting me know about yn1948531 Master, Mast Wedge, and Mast Court of My Ship Club.

Does this look like a mast coat, the root of the fore mast?

This is the mast coat, the root of the Mizun Mast.
You have to clean up the mast coat before you start rigging the fore and mist masts.
Well, it looks like this.


White dwarfs came to see the progress of BP issue. (Laughs) This is a figure for a
1/72 to 1/75 architectural model. I thought I could understand the size of BP, so I searched
online and purchased it.
The fittings of the ship also match the size of the figure.


Finished the shroud and stay of each lower mast (foremain, miso).

Dead eye and lanyard of fore mast (light brown rope)
The heights of the dead eyes weren't the same...
Let's not worry too much.
Two dead eyes that are not put in anything are for the back stay to be stretched later.

This is the main mast dead eye and lanyard
I wonder if the height of the dead eyes has been adjusted.

Mizzen Mast Dead Eye and Lanyard

Fore-mast Futox steave (red arrow part)

Main mast Futox steave (red arrow part)

Mizzen Mast's Futox steave (red arrow part)
Futox steave is wood or iron rod, but 1/72 BP uses 0.8mm brass wire (black dyed).
Parts required for standing rigging of each top mast. I omitted it for the 1/60 BP issue.
Rigging will tire your eyes. Next is the shroud and stay of each top mast and top galant mast.
Standing rigging continues... (sweat)
Mast coat
I applied a cloth to the mast wedges of the fore mast and the mizzle mast, and melted the deck
tongue with a Tamiya acrylic color.
I made it a mast coat.
Thank you for letting me know about yn1948531 Master, Mast Wedge, and Mast Court of My Ship Club.
Does this look like a mast coat, the root of the fore mast?
This is the mast coat, the root of the Mizun Mast.
You have to clean up the mast coat before you start rigging the fore and mist masts.
Well, it looks like this.
White dwarfs came to see the progress of BP issue. (Laughs) This is a figure for a
1/72 to 1/75 architectural model. I thought I could understand the size of BP, so I searched
online and purchased it.
The fittings of the ship also match the size of the figure.
Finished the shroud and stay of each lower mast (foremain, miso).
Dead eye and lanyard of fore mast (light brown rope)
The heights of the dead eyes weren't the same...
Let's not worry too much.
Two dead eyes that are not put in anything are for the back stay to be stretched later.
This is the main mast dead eye and lanyard
I wonder if the height of the dead eyes has been adjusted.
Mizzen Mast Dead Eye and Lanyard
Fore-mast Futox steave (red arrow part)
Main mast Futox steave (red arrow part)
Mizzen Mast's Futox steave (red arrow part)
Futox steave is wood or iron rod, but 1/72 BP uses 0.8mm brass wire (black dyed).
Parts required for standing rigging of each top mast. I omitted it for the 1/60 BP issue.
Rigging will tire your eyes. Next is the shroud and stay of each top mast and top galant mast.
Standing rigging continues... (sweat)
- Joined
- Dec 1, 2016
- Messages
- 6,656
- Points
- 728
PART 36

It is a continuation of standing rigging.
We have set up stays and back stays for each mast that we can see in the movie.
There are other things like Flagstaff stay, Flagstaff backstay, and each shifting back stay,
but I could not confirm in the movie. To be clear, "I don't know the details in the movie. "is.
It has changed in each scene.

Foretop mast shroud and lanyard.

Here are the main top mast shrouds and lanyards.

If you put a dead eye on the shroud of the mist top mast by stretching the shroud and lanyard
of the main top mast, an accident will occur.


The red arrow part, I caught my lantern and broke it...
It was pretty shocking, but when I looked closely, I could only clean it from the adhesive. It was good~
Let's glue after finishing rigging and yard and sail.
Finished each shroud, stay, backstay, lanyard. My eyes are sore...


The main mast and the muzzle mast are up. This is the bow split and the foremost part.


The Mizzen Top Mast is up. The main top galant mast is up.

Foretop galant mast part up.

This is the bow split part, but it often changes depending on the movie scene.
There is a foretop galant stay at the tip of the bowsprit, and it doesn't exist.


I managed to do vertical line standing rigging. I will take a photo here as a commemorative photo.
I'll shoot at my favorite angle.
Rigging will tire your eyes. Next is the standing rigging of the horizontal line. next to? ? …That's right.
That's the troublesome "rat line".
It is a continuation of standing rigging.
We have set up stays and back stays for each mast that we can see in the movie.
There are other things like Flagstaff stay, Flagstaff backstay, and each shifting back stay,
but I could not confirm in the movie. To be clear, "I don't know the details in the movie. "is.
It has changed in each scene.
Foretop mast shroud and lanyard.
Here are the main top mast shrouds and lanyards.
If you put a dead eye on the shroud of the mist top mast by stretching the shroud and lanyard
of the main top mast, an accident will occur.
The red arrow part, I caught my lantern and broke it...
It was pretty shocking, but when I looked closely, I could only clean it from the adhesive. It was good~
Let's glue after finishing rigging and yard and sail.
Finished each shroud, stay, backstay, lanyard. My eyes are sore...
The main mast and the muzzle mast are up. This is the bow split and the foremost part.
The Mizzen Top Mast is up. The main top galant mast is up.
Foretop galant mast part up.
This is the bow split part, but it often changes depending on the movie scene.
There is a foretop galant stay at the tip of the bowsprit, and it doesn't exist.
I managed to do vertical line standing rigging. I will take a photo here as a commemorative photo.
I'll shoot at my favorite angle.
Rigging will tire your eyes. Next is the standing rigging of the horizontal line. next to? ? …That's right.
That's the troublesome "rat line".
- Joined
- Dec 1, 2016
- Messages
- 6,656
- Points
- 728
PART 37

Ready to stretch the rat line.
A gauge is set to set the rat line on the shroud of the main lower mast and lower mast.
The distance between parallel lines is about 4 mm.
The one that I bought at a 100-yen shop is the smallest wooden clothespin, the smallest one. I'm using it to clip.
The rat line extends parallel to the channel plate.

It looks like this when enlarged.

Then, I'll set the rat line like this. Since it is a rope that only needs to support one person,
a thin patchwork thread is sufficient.
It feels more like a little slack.
It looks awkward if you're too tight.
Right and left are going on at the same time.
This is the main lower mast shroud on the starboard side.

This is the main lower mast shroud on the port side.

The main lower mast/follower mast rat line is over and we are working on the mitten lower mast shroud.

This is the main lower mast shroud with the rat line finished.

This is the forward mast shroud with the rat line finished.

And it is the Mizzen Lower Mast Shroud with the rat line finished.
Next is the shroud rat line for each top mast.
This work depends on patience.

Set the parallel line gauge on the shroud of each top mast and stretch the rat line from below.
It's also simultaneous right and left here, but since it's done in 3 places at the same time, it doesn't end easily...

I managed to finish it. I finished the part of the rat line enclosed by the red line.
Next up is the shroud of the top galant mast of the main mast and the fore mast!


This is the rat line here. The captain stands in the fore top yard and holds the foretop galant mast lanyard...

Attach the gauge to the shroud of the top galant mast.

It is each up image. Draw a rat line for this... win!

So I finished the tension.
Whoops... I won!


This is a commemorative photo because I finished standing rigging.
Standing rigging is over. You don't want to do anything for the time being. But next is sails, yards and running rigging.
Hard work will continue. Oh, I have to make an anchor...
Ready to stretch the rat line.
A gauge is set to set the rat line on the shroud of the main lower mast and lower mast.
The distance between parallel lines is about 4 mm.
The one that I bought at a 100-yen shop is the smallest wooden clothespin, the smallest one. I'm using it to clip.
The rat line extends parallel to the channel plate.
It looks like this when enlarged.
Then, I'll set the rat line like this. Since it is a rope that only needs to support one person,
a thin patchwork thread is sufficient.
It feels more like a little slack.
It looks awkward if you're too tight.
Right and left are going on at the same time.
This is the main lower mast shroud on the starboard side.
This is the main lower mast shroud on the port side.
The main lower mast/follower mast rat line is over and we are working on the mitten lower mast shroud.
This is the main lower mast shroud with the rat line finished.
This is the forward mast shroud with the rat line finished.
And it is the Mizzen Lower Mast Shroud with the rat line finished.
Next is the shroud rat line for each top mast.
This work depends on patience.
Set the parallel line gauge on the shroud of each top mast and stretch the rat line from below.
It's also simultaneous right and left here, but since it's done in 3 places at the same time, it doesn't end easily...
I managed to finish it. I finished the part of the rat line enclosed by the red line.
Next up is the shroud of the top galant mast of the main mast and the fore mast!
This is the rat line here. The captain stands in the fore top yard and holds the foretop galant mast lanyard...
Attach the gauge to the shroud of the top galant mast.
It is each up image. Draw a rat line for this... win!
So I finished the tension.
Whoops... I won!
This is a commemorative photo because I finished standing rigging.
Standing rigging is over. You don't want to do anything for the time being. But next is sails, yards and running rigging.
Hard work will continue. Oh, I have to make an anchor...
- Joined
- Dec 1, 2016
- Messages
- 6,656
- Points
- 728
PART 38
(note: not all names of the sails translated and you will find other words that seem to not spell anything recognizable in English)

I haven't made a yard yet, but it's a sail trace.
The white Y-shirt that can no longer be worn is taken apart to trace the Mizun Top Saill, Latin Sail,
and Main Top Stay Sail.
Carbon paper is sandwiched between the white Y-shirt and the drawing.

You can trace it neatly!
I am good at this kind of work.

Here are the main lower sail, main top sail, and main gel sale... There is carbon paper on the side.
These too are hard to come by recently. If you go to a stationery store near you and ask for it...
I went to the home center and found it at the stationery store.
Is it such a thing?
Speaking of which, the iron brush also disappeared from the stationery store.
High-end drafting machines have disappeared.

This is a junior for forerlower sale, fore top sale, forgern suru and fore tire sail.

Since the sail has been traced, it is a commemorative photo with the tools.
After this, I handed the traced white Y-shirt cloth to Yamagami-sama for sewing with a sewing machine.
As always, the sewing machine won't let me use it. It seems to be troublesome if it is destroyed...
When I think about it, I wouldn't let women use carpentry tools (it would be hard if I got hurt)
It would be normal for me not to use sewing machines...
Well, sew it quickly~

Two days later, I started sewing. Since the sail will eventually turn black, I said that the thread
could be any color, so I started sewing with black thread.

First, cut the unnecessary black thread and iron it...
(note: not all names of the sails translated and you will find other words that seem to not spell anything recognizable in English)
I haven't made a yard yet, but it's a sail trace.
The white Y-shirt that can no longer be worn is taken apart to trace the Mizun Top Saill, Latin Sail,
and Main Top Stay Sail.
Carbon paper is sandwiched between the white Y-shirt and the drawing.
You can trace it neatly!
I am good at this kind of work.
Here are the main lower sail, main top sail, and main gel sale... There is carbon paper on the side.
These too are hard to come by recently. If you go to a stationery store near you and ask for it...
I went to the home center and found it at the stationery store.
Is it such a thing?
Speaking of which, the iron brush also disappeared from the stationery store.
High-end drafting machines have disappeared.
This is a junior for forerlower sale, fore top sale, forgern suru and fore tire sail.
Since the sail has been traced, it is a commemorative photo with the tools.
After this, I handed the traced white Y-shirt cloth to Yamagami-sama for sewing with a sewing machine.
As always, the sewing machine won't let me use it. It seems to be troublesome if it is destroyed...
When I think about it, I wouldn't let women use carpentry tools (it would be hard if I got hurt)
It would be normal for me not to use sewing machines...
Well, sew it quickly~
Two days later, I started sewing. Since the sail will eventually turn black, I said that the thread
could be any color, so I started sewing with black thread.
First, cut the unnecessary black thread and iron it...
Last edited:
- Joined
- Dec 1, 2016
- Messages
- 6,656
- Points
- 728

Leaf bands and linings were attached with handicraft bonds, dried and cut with a design knife.
If I thought that handicraft bonds were the same as woodworking bonds, they seemed to have the
same ingredients but different blending ratios with water.
47% Bond Vinyl Acetate Resin for Handicraft , 53% Water
Woodworking Bond
vinyl acetate resin 40%, water 60%

I will attach the bolt rope with handicraft bond.

The corners of the sail are glued together like a clew like this.

I attached bolt ropes to all sails and made the corners look like clew.
Still, the parts of the sail are variously attached, and the sail is dyed black.
Even though it is dyed, Mr. I just let the color matte black soak into it.

I use lacquer paint so I am working in the garage.
Mr. Brushed with matte black color, it is in a dry state.
Since it was diluted with thinner and painted, there is unevenness.

This is a photograph immediately after the second brush painting is finished. It's not dry,
so there's still a part of it.

After all, the sail of the Black Pearl is patchy.
I patched it in about the same position as the 1/60 BP.
When I first saw the patched sail in the movie, I was very surprised.
At the same time, I was the only person who thought that it was so fresh...

After finishing patching with the fore, mizzen, stisle, jib, and finally the patching of the main mast sails.

Finished patching of all sails!
So it's a commemorative photo.

From the right of the picture above, from the bottom, the foresight sale and jib sail

From the bottom lower sale, fore top sale, fore top galant sail
(Sail may be abbreviated to top galant sale, and Tgerrunsur may be abbreviated to lower sail.)

From the bottom, the main stay sale, the main top stay sail,

From the bottom, main lower sale, main top sale, main top galant sail

From below, Latin sale, Mizzen top sail
The lower yard part of the Mizzen mast is called a cross jack yard (abbreviated black jack)
and it seems that the sail was not stretched.
Then what was the yard for? Is it just to put up a Mizzen Top Sail...?

I put dirt on the white cloth patch.
I used Tamiya's enamel paint.
Before the picture above gets dirty
After the photo below is dirty.
It's different from actually seeing it with a photograph. The patchwork is actually a bit darker.
I managed to make a patch of sails. After that, attach leaf points to the side sails and attach a
kringle to complete the sail..
Last edited:
- Joined
- Dec 1, 2016
- Messages
- 6,656
- Points
- 728
PART 39

The main and fore lower cell and topsail side sail have leaf points.

This is where the kringle is attached. It's like sewing. The instant adhesive is used for the stop.
I am using an instant adhesive for woodwork sold at a 100 yen shop.

Make an adhesive like this in this condition.

I just stopped it with an instant adhesive. I think that's what happened.

Then, add more and more kringles where you need them.

Stisle wears a ring through which Sty passes.

I have finished attaching the ring.
Also attach a ring to the jib to let the jib stay pass.

Mizzen Top Sale and Latin Sale with leaf points and kringles. I have a trace of damage.
Even though it was a damage mark, I just made a hole...

The main lower sale, the main top sale, and the top galant sale with leaf points and kringles.
Each has a trace of damage.

After attaching the ring to the main stissle and the main top stissle, I made a mark of damage.

These are the forerlower sale and fore top sale with leaf points and kringles, and the fore top galant sale.
Each has a trace of damage.

From the top, with jib and forestisle, after attaching rings respectively, I made damage marks.

You can't see anything like Reef Point, Kringle, Bow Line, Tuck in movies.

Attach the vertical sail first!
It's a little different from the first Pearl. Added main top stissle.
You wore it in the duel scene in the big swirl of the third movie.
Even in the 4th movie, it seems that the Pearl which had become a bottleship was also installed...
I changed the running rigging of vertical sails accordingly.
Rigging changes depending on the scene in the movie, and even if you try to do the same, it is impossible.
So I'm doing it properly by looking at the model of the sailing ship and by referring to the book
of the Endeavor of Western books.

This is the port side.

Another one at your favorite angle...
The back is out of focus. It's with my head~
The vertical sail has been installed. After that, make a yard, combine it with side sails,
attach it to each mast, make an anchor and attach it... Ah, I have to make a sea... (sweat)
The main and fore lower cell and topsail side sail have leaf points.
This is where the kringle is attached. It's like sewing. The instant adhesive is used for the stop.
I am using an instant adhesive for woodwork sold at a 100 yen shop.
Make an adhesive like this in this condition.
I just stopped it with an instant adhesive. I think that's what happened.
Then, add more and more kringles where you need them.
Stisle wears a ring through which Sty passes.
I have finished attaching the ring.
Also attach a ring to the jib to let the jib stay pass.
Mizzen Top Sale and Latin Sale with leaf points and kringles. I have a trace of damage.
Even though it was a damage mark, I just made a hole...
The main lower sale, the main top sale, and the top galant sale with leaf points and kringles.
Each has a trace of damage.
After attaching the ring to the main stissle and the main top stissle, I made a mark of damage.
These are the forerlower sale and fore top sale with leaf points and kringles, and the fore top galant sale.
Each has a trace of damage.
From the top, with jib and forestisle, after attaching rings respectively, I made damage marks.
You can't see anything like Reef Point, Kringle, Bow Line, Tuck in movies.
Attach the vertical sail first!
It's a little different from the first Pearl. Added main top stissle.
You wore it in the duel scene in the big swirl of the third movie.
Even in the 4th movie, it seems that the Pearl which had become a bottleship was also installed...
I changed the running rigging of vertical sails accordingly.
Rigging changes depending on the scene in the movie, and even if you try to do the same, it is impossible.
So I'm doing it properly by looking at the model of the sailing ship and by referring to the book
of the Endeavor of Western books.
This is the port side.
Another one at your favorite angle...
The back is out of focus. It's with my head~
The vertical sail has been installed. After that, make a yard, combine it with side sails,
attach it to each mast, make an anchor and attach it... Ah, I have to make a sea... (sweat)

The detail in your work is amazing to me. I have troubles just rigging a one mast sailboat with a main and a jib sail. Yours are wonderful. I'm using an old fine linen sheet for my sails. I tried a cotton T-shirt, but it was too flexy for me to sew correctly. The sheet seems to hold it's shape easier.
EJ
EJ
- Joined
- Dec 1, 2016
- Messages
- 6,656
- Points
- 728
PART 40

Six cypresses with a thickness of 0.5 mm, a width of 3 mm, and a length of 10 mm are stacked,
and only the ends are bonded. Draw the shape of the parrel and make two holes.

We carve it into the shape of parrel.

Sharpen the shape drawn with a pencil.

It looks like a B! After shaving, it is cut free.

If you cut off the other one, you can get six B shapes.

Pass the thread through the parrel, then the bead balls, then the parel,
and then pass the beads and parrel alternately.

Tie the thread at the red arrow with the sixth piece of parrel.

Completion of the apparel. Use this parrel in the topyard of each mast.
It is a part that attaches the yard to the mast.
Also used for the Latin yard.
6 pieces of parrel board are for top mast, and 8 pieces of parel board are for main yard.
I made the main yard after finishing the top yard.

Stick 2mm square bars on the lower yard and top yard, and stick four
1.5mm square bars on the top liarant yard.

I am building the fore top yard. Cut one corner of the square bar diagonally about 0.5 mm.
This is to put a 0.5mm brass wire inside.

If you cut it like this...

I will stick the two. It looks like this.

Insert 0.5mm brass wire.

Stick the other two together...

Put the brass wire together and stick them together.
Put brass wire in each yard and stick them together.

Put the sticked square bar on the table carved in V shape,
shave it into an octagon with a plane, and then shave it with a cutter / design knife etc.
and finish it like the part diagram.

It's perfect, and it's not exactly as the drawing says. It's crap.
Well, it would be nice to have an atmosphere.
I attach a Latin yard for a mist mast and a three-sided sail.
It's a mizzen top yard and a sail.
Mizzen Lower Yard... It's called Cross Jack Yard... I attached it
to the Mizzen Mast before taking a picture.

This is a cross jack yard attached to the Mizzen mast. It is sometimes called a black jack.
Is it Adana? (Lol)

Each yard of the main mast.

This is each yard of the fore mast.

After installing the Mizun Amast Cloakjack, I put on the top yard and the sail,
the Latin yard and the sail...it took me a whole day...it took a long time.
For the time being, a photo from the port side

This is a photograph from the starboard side

Photo at your favorite angle
A photo from the starboard side at your favorite angle
For the time being, do my best... (sweat)
Six cypresses with a thickness of 0.5 mm, a width of 3 mm, and a length of 10 mm are stacked,
and only the ends are bonded. Draw the shape of the parrel and make two holes.
We carve it into the shape of parrel.
Sharpen the shape drawn with a pencil.
It looks like a B! After shaving, it is cut free.
If you cut off the other one, you can get six B shapes.
Pass the thread through the parrel, then the bead balls, then the parel,
and then pass the beads and parrel alternately.
Tie the thread at the red arrow with the sixth piece of parrel.
Completion of the apparel. Use this parrel in the topyard of each mast.
It is a part that attaches the yard to the mast.
Also used for the Latin yard.
6 pieces of parrel board are for top mast, and 8 pieces of parel board are for main yard.
I made the main yard after finishing the top yard.
Stick 2mm square bars on the lower yard and top yard, and stick four
1.5mm square bars on the top liarant yard.
I am building the fore top yard. Cut one corner of the square bar diagonally about 0.5 mm.
This is to put a 0.5mm brass wire inside.
If you cut it like this...
I will stick the two. It looks like this.
Insert 0.5mm brass wire.
Stick the other two together...
Put the brass wire together and stick them together.
Put brass wire in each yard and stick them together.
Put the sticked square bar on the table carved in V shape,
shave it into an octagon with a plane, and then shave it with a cutter / design knife etc.
and finish it like the part diagram.
It's perfect, and it's not exactly as the drawing says. It's crap.
Well, it would be nice to have an atmosphere.
I attach a Latin yard for a mist mast and a three-sided sail.
It's a mizzen top yard and a sail.
Mizzen Lower Yard... It's called Cross Jack Yard... I attached it
to the Mizzen Mast before taking a picture.
This is a cross jack yard attached to the Mizzen mast. It is sometimes called a black jack.
Is it Adana? (Lol)
Each yard of the main mast.
This is each yard of the fore mast.
After installing the Mizun Amast Cloakjack, I put on the top yard and the sail,
the Latin yard and the sail...it took me a whole day...it took a long time.
For the time being, a photo from the port side
This is a photograph from the starboard side
Photo at your favorite angle
A photo from the starboard side at your favorite angle
For the time being, do my best... (sweat)
Attachments
- Joined
- Dec 1, 2016
- Messages
- 6,656
- Points
- 728
PART 41

The 1/72 Black Pearl will be exhibited at the 26th Modelers Joint Work Exhibition,
the world's largest model exhibition at the Shizuoka Hobby Show 2015.
It will be exhibited at WPMC & Re.Gek. It's incomplete, but if you're interested,
come visit us!
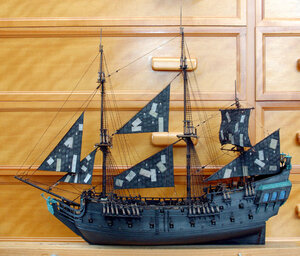
Now, for the Black Pearl to be exhibited, I managed to add a sail and a yard.
I was crazy about making it in time for the Shizuoka Hobby Show.
So I didn't take any photos of the installation...
I attached the bow line and reach line to the Misun top sale and the main lower sale, but it takes time,
so the rest of the sails are omitted for the time being.
If you do this, you may not be in time (sweat)...
After the Shizuoka Hobby Show is over, I'll slowly add a bow line and reach line.

Running rigging is quite different from 1/60BP.
I don't understand at all in the movie.
If anyone understands, I would like to know.
Omitted because I couldn't make it if I made a bundle of ropes, so I omitted it when I made an anchor.

It looks like this, but I managed to show it, so I'm happy with this.
After the Shizuoka Hobby Show is over, create the omitted parts.


I shot it at my favorite angle.
Please enjoy!
The 1/72 Black Pearl will be exhibited at the 26th Modelers Joint Work Exhibition,
the world's largest model exhibition at the Shizuoka Hobby Show 2015.
It will be exhibited at WPMC & Re.Gek. It's incomplete, but if you're interested,
come visit us!
Now, for the Black Pearl to be exhibited, I managed to add a sail and a yard.
I was crazy about making it in time for the Shizuoka Hobby Show.
So I didn't take any photos of the installation...
I attached the bow line and reach line to the Misun top sale and the main lower sale, but it takes time,
so the rest of the sails are omitted for the time being.
If you do this, you may not be in time (sweat)...
After the Shizuoka Hobby Show is over, I'll slowly add a bow line and reach line.
Running rigging is quite different from 1/60BP.
I don't understand at all in the movie.
If anyone understands, I would like to know.
Omitted because I couldn't make it if I made a bundle of ropes, so I omitted it when I made an anchor.
It looks like this, but I managed to show it, so I'm happy with this.
After the Shizuoka Hobby Show is over, create the omitted parts.
I shot it at my favorite angle.
Please enjoy!
- Joined
- Dec 1, 2016
- Messages
- 6,656
- Points
- 728
PART 42
Although it is 1/72BP, my left hand did not move as I expected because I lay down on my left shoulder,
but I was doing a lot of unhealthy work.
It is an anchor work.

Assemble the cypress material into the arrow shape according to the drawing...

Cut the shank and crown according to the drawing and glue the palm part.

I made the stock part by matching it to the drawing.


The two photos above show the combination of the stock and the ring on the shank.


Make a hoop from a 0.1 mm thick copper plate and bond it to the stock, and reproduce
the wooden plug after the nail with a toothpick. I can't see the other side, so I haven't
attached a wooden plug.
It was crazy to make this far.
I will paint next.

I'm tired of making anchors, so I'll make the sea.
I made waves using "light clay" from a 100 yen shop.
My left shoulder is asleep and painful and my left hand doesn't move as
I expected, but I managed to make waves and apply gesso for the undercoat.


Gesso dries and is painted with acrylic paint, below is the photo.
My left hand didn't move as I expected, so it was a mess.
Still, it looks like the sea, so is this okay?
When the acrylic paint has dried, apply a clear lacquer spray can evenly
and leave it with a glittery finish.

Since the sea of the 1/72 BP display stand was created, when I put on the BP,
the white waves seemed to look like something, so I remade the waves.
I'm busy, but for some reason I'm doing something tough.
Although it is 1/72BP, my left hand did not move as I expected because I lay down on my left shoulder,
but I was doing a lot of unhealthy work.
It is an anchor work.
Assemble the cypress material into the arrow shape according to the drawing...
Cut the shank and crown according to the drawing and glue the palm part.
I made the stock part by matching it to the drawing.
The two photos above show the combination of the stock and the ring on the shank.
Make a hoop from a 0.1 mm thick copper plate and bond it to the stock, and reproduce
the wooden plug after the nail with a toothpick. I can't see the other side, so I haven't
attached a wooden plug.
It was crazy to make this far.
I will paint next.
I'm tired of making anchors, so I'll make the sea.
I made waves using "light clay" from a 100 yen shop.
My left shoulder is asleep and painful and my left hand doesn't move as
I expected, but I managed to make waves and apply gesso for the undercoat.
Gesso dries and is painted with acrylic paint, below is the photo.
My left hand didn't move as I expected, so it was a mess.
Still, it looks like the sea, so is this okay?
When the acrylic paint has dried, apply a clear lacquer spray can evenly
and leave it with a glittery finish.
Since the sea of the 1/72 BP display stand was created, when I put on the BP,
the white waves seemed to look like something, so I remade the waves.
I'm busy, but for some reason I'm doing something tough.
- Joined
- Dec 1, 2016
- Messages
- 6,656
- Points
- 728
PART 43

When I was looking at an online model store, there was this.
It seems to be a 1/72 zombie pirates figure.
If you order immediately...

The inside of the box looks like this, but if you look closely...
Oh, Debbie Jones, oops! This is Hector Barbossa.
Jack Sparrow is in the third row from the top.
And the others are 7 fish people, 2 skeleton pirates,
You can use this.

When I took it out of the box, it had 12 figures and one runner, and it contained 4 sets.
Apparently, it's used as a board game piece.
The material is vinyl resin. With this, it will peel off immediately after painting.

I made three replicas of Jack Sparrow, Debbie Jones, and Hector Barbossa with silicone
and duplicated them with resin.
The left is a resin, the right is a vinyl resin, and the bottom is a silicone mold.

I cut the bases of the three feet of Debbie Jones, Jack Sparrow, and Hector Barbossa that
were duplicated with the resin, grounded it with Mr. color Sandy Brown, and then painted it
with Turner's acrylic color. When it dries, it becomes matte. I was able to paint it surprisingly well.
Is the hiding power reasonable?

I recreated the white wave, which was terrible, and tried to keep the white wave modest.
I have Jack Sparrow and Hector Barbossa on board.

View from the front. Shiranami is also like this.

I shot it from the right back.

Jack Sparrow and Hector Barbossa.
It's laughable that the scale is correct.
When I was looking at an online model store, there was this.
It seems to be a 1/72 zombie pirates figure.
If you order immediately...
The inside of the box looks like this, but if you look closely...
Oh, Debbie Jones, oops! This is Hector Barbossa.
Jack Sparrow is in the third row from the top.
And the others are 7 fish people, 2 skeleton pirates,
You can use this.
When I took it out of the box, it had 12 figures and one runner, and it contained 4 sets.
Apparently, it's used as a board game piece.
The material is vinyl resin. With this, it will peel off immediately after painting.
I made three replicas of Jack Sparrow, Debbie Jones, and Hector Barbossa with silicone
and duplicated them with resin.
The left is a resin, the right is a vinyl resin, and the bottom is a silicone mold.
I cut the bases of the three feet of Debbie Jones, Jack Sparrow, and Hector Barbossa that
were duplicated with the resin, grounded it with Mr. color Sandy Brown, and then painted it
with Turner's acrylic color. When it dries, it becomes matte. I was able to paint it surprisingly well.
Is the hiding power reasonable?
I recreated the white wave, which was terrible, and tried to keep the white wave modest.
I have Jack Sparrow and Hector Barbossa on board.
View from the front. Shiranami is also like this.
I shot it from the right back.
Jack Sparrow and Hector Barbossa.
It's laughable that the scale is correct.
- Joined
- Dec 1, 2016
- Messages
- 6,656
- Points
- 728
THE END
i want to thank Mellpapa for allowing his build log to be presented on Ships of Scale
i want to thank Mellpapa for allowing his build log to be presented on Ships of Scale
THE END
And I want to thank YOU as well Dave for all your work in translating and bringing this spectacular build here for all of us to enjoy
")
Mellpapa, you sir are a modelling genious!
Clair

Well Dave, you have proven to the haters that you do indeed finish models. Hope you produce this as a kit one-day.
- Joined
- Jun 28, 2020
- Messages
- 560
- Points
- 403

Dear Dave.THE END
i want to thank Mellpapa for allowing his build log to be presented on Ships of Scale
Thank you for translating my poorly written "The Making of the Black Pearl" and putting it on ships of scale.
Thank you very much.
Dave, you also have wonderful crafting skills.
I hope that everyone who read this, please make a more beautiful "Black Pearl" than the one I made.
Now, if you'll excuse me.