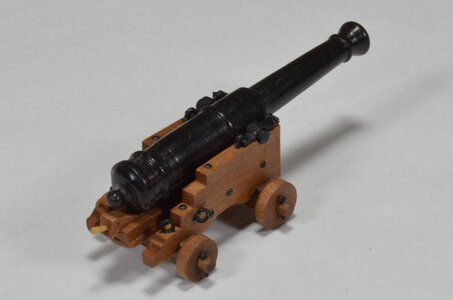
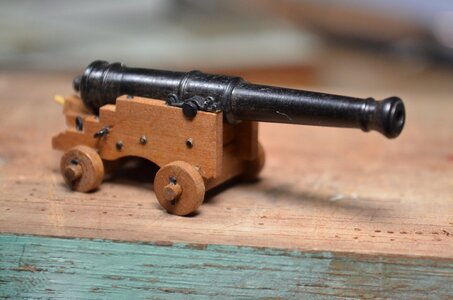
The Inspiration & Challenge that is "La Salamandre" 1:48

my error Kortes is not building the Jacinthe ...it is a danish ship he is building
Hello @smelly and @tonphil1960 Kortes (Alexander) did build Le Jasinte from ANCRE plans


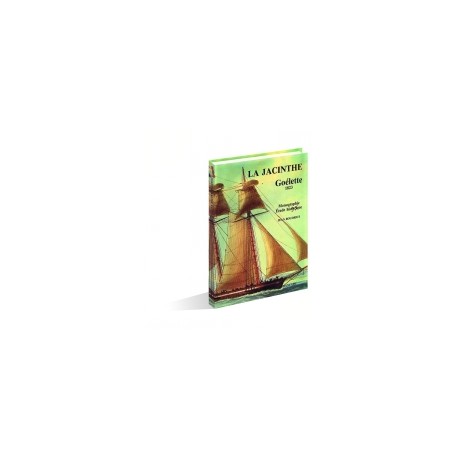
Here is the nice companion: the monograph and planet from ANCRE publication. If you decide to build one, this book will help you a lot. It is inexpencive, thought.

 
Hello @smelly and @tonphil1960 Kortes (Alexander) did build Le Jasinte from ANCRE plans


Here is the nice companion: the monograph and planet from ANCRE publication. If you decide to build one, this book will help you a lot. It is inexpencive, thought.

Yes I ordered that monograph yesterday... expecting it in 3 weeks
 
Hallo Jimmy,
we wish you all the BEST and a HAPPY BIRTHDAY
Enjoy your day
Birthday-Cake
Hope to see soon some updates of your great Salamandre .....
As with the rest of SoS applauding and congratulating your well spent five months or dedicated carving I cannot say enough, completely astounded at your skills, both with carving tools making and their application. You set a high standard for others to follow. PT-2
 
Hi Brian077. Thanks for asking about my tree nailing.

I used 2 different materials to make the trunnels -- pear wood for use in the ebony planking and holly decking, and bamboo for the pear planking. To my eye this keeps them from being too contrasty, yet they are easily visible. I make trunnel stock by pulling small strips of wood (10 to 12 inch lengths) through a Jim Byrnes draw plate. I used to use a draw plate from MicroMark, but the Jim plate is much better quality for about the same price.

I use a carbon pencil and a flexible straightedge (card stock is great) to draw vertical lines on the hull, or athwardship lines on the deck, exactly along the length of the frame or beam where I want my trunnels to go. Note that, in order to end up with 2 staggered trunnels in each plank, you will need 2 parallel pencil lines along each frame or deck beam. All holes are subsequently drilled on the pencil line, but the exact placement along the line is determined by eye. For example, if I'm tree nailing the ship's topside planking, the first vertical pencil line might have holes drilled nearer to the top of each plank. Then the next vertical will have holes drilled nearer to the bottom of each plank, and so on. Small vertical variations will be virtually unnoticeable. I hope I'm not screwing up this explanation, but please let me know if it's not clear. I promise I won't be insulted.

Once I have drilled 50 to 100 holes, I will stop drilling and insert trunnels. There may be much better ways of doing this, but this is what I do. First the holes need to be an easy fit. Snug holes have a way stopping trunnels from seating sufficiently once there is glue on the trunnel. I keep a piece of 200 grit sand paper on the bench where I can drag the end of my trunnel strip over the paper to remove any burrs and give the trunnel a slight bevel on the tip. I also have a bit of card stock on which I put a pea-sized drop of glue (I used Elmer's Carpenter's Glue and one pea-size drop is enough for 15-20 trunnels). So I dip the tip of my trunnel strip in the glue and shove it in a hole in the planking. Then I immediately use a pair of side-cutting nippers to bite it off close to the planking. Then back to the sandpaper to clean up the tip of my trunnel strip before dipping in the glue again and so forth. When the trunnel strip gets too short for easy handling, I use a forcep to hold it until it's used up. And that's it. Just sand off the protruding ends after the glue dries.
hello a very nice and well done model ship! I too have the plans from ancre, for this fine ship,how do you go abut drilling the holes for the trunnels?

Michel
 
Thanks Wilber.

And yes, Smelly, I think I recall that you ordered the ancre plans. Can't wait to see some pictures of your start-up. Regarding the drilling for trunnels, I used a long thin pin vice for some holes in softer wood like the holly decking. But in denser wood I liked a Dremel with flexible shaft, but only running on slow speeds with a foot pedal switch. It's too easy for the power drilling to walk around and create havoc unless you are on slow speed and can place the drill tip exactly where you want it before stepping on the pedal.
 
Thank you jimmy, much appreciated to have someone to answer questions. I fact just this morning i resawed some elm logs. I would have liked to use maple, I have plenty of both, we have a sugar bush on the other property, so lots of both,maple and elm. Maple is one of those really hard woods , elm is a bit softer. So gonna use elm. I cut a few pieces down for the keel assembly, just need to pass them through the sander to bring them to what I figured out from the drawing, .350 x .400 I took some of the plans to be copied this morning, will pick them up tomorrow morning on my way back from work, a short detour. So between working on my other ship and this one will be quite busy this winter. These day have extra chores to do ,winterising the house,storm windows,tune up the snow blower, install winter tires,and have to cut firewood for next year , and what ever real life throws at us. I have been taking pics so when i get going a bit I will post a build log of this new ship the bomb ship Salamandre 1752.
Another question when looking at the plans for the hull, looks like a single plank job, am I correct ?
 
So glad to hear that you've begun work on your Salamander, Smelly! I haven't worked with elm but certainly have made a few smaller detailed ship parts out of maple. You're also correct about the planking. The original Salamander was single planked with heavy planking and close frames. A proper war ship.
 
Thanks for the reply, I have been studying the plans intensively, trying to get myself between the timbers. Some spots have me wondering, but am sure things will workout as I procede along. Need to get the build board set up.
 
Thank you jimmy, much appreciated to have someone to answer questions. I fact just this morning i resawed some elm logs. I would have liked to use maple, I have plenty of both, we have a sugar bush on the other property, so lots of both,maple and elm. Maple is one of those really hard woods , elm is a bit softer. So gonna use elm. I cut a few pieces down for the keel assembly, just need to pass them through the sander to bring them to what I figured out from the drawing, .350 x .400 I took some of the plans to be copied this morning, will pick them up tomorrow morning on my way back from work, a short detour. So between working on my other ship and this one will be quite busy this winter. These day have extra chores to do ,winterising the house,storm windows,tune up the snow blower, install winter tires,and have to cut firewood for next year , and what ever real life throws at us. I have been taking pics so when i get going a bit I will post a build log of this new ship the bomb ship Salamandre 1752.
Another question when looking at the plans for the hull, looks like a single plank job, am I correct ?
Would be great to see also yours ..... :cool:
 
When I was a youngster in the '50's, the old "James Bliss" catalog contained a kit to build a naval mortar. At the time I couldn't afford anything in that catalog, but that mortar, and the sailing ships that used it, absolutely intrigued me. So it seems odd that it has taken this long for me to finally build one. Certainly, the emergence of Boudriot and Berti's monograph and plan set had a lot to do with my decision to take on this project. I started building "Salamandre" in January of 2017. The scale is 1:48.


View attachment 137926


Before I even knew what ship I was going to build next, I had to cut down a pear tree in the corner of my yard where it was threatening my neighbor's fence. All I knew was that I wanted to build an admiralty board style ship (which I'd never done before), and that this pear wood should be be ideal for such a project. The logs were left to season for 2 years while I searched for a project to build. After initial seasoning, these photos show the first step of cutting up the logs into pieces. These pieces were then left to season for a few more months during which they underwent their final warping and twisting and became stable. Then I can just square them up and began slicing off finished model building timber as needed. I do my final processing of miniature lumber with a Proxxon table saw and a Jim Byrnes thickness sander.


View attachment 137929


View attachment 137930

This is 6 months into the build and all frames and the bow structure are built and have undergone initial fairing. The building jig is visible to the left. Somehow I did not retain any photos of the keel assembly and the associated stem and stern post. The little dowel pins in each frame where it meets the keel were my idea. obviously no one will ever see them in the model. However they provided absolute accuracy in the thwartship direction as I was constantly inserting and removing them during the initial assembly and construction work.

View attachment 137936


View attachment 137937


View attachment 137938

So here is a good look at the stern post and at least part of the keel. The carving of the rabbet is complete here.

View attachment 137942

One can finally see the shape of Salamander's bow at this point. I certainly wasted more than an hour or two admiring the shape of it. Oops! there is another ship in the background shadows here. I promise a full build log on that one in the near future.

View attachment 137948

The first piece of ebony wood was a thrill. Inboard, the gun deck clamps are in as well so the structure is becoming quite stable now. The little spacers that you see at the turn of the bilge are temporary.

View attachment 137961


Gun ports and stern timbers. Oh yeah !

View attachment 137962


View attachment 137963


View attachment 137964


View attachment 137965


View attachment 137966


View attachment 137967

View attachment 137968

View attachment 137969

View attachment 137970

View attachment 165836

View attachment 165837

View attachment 165835

View attachment 137971
Dear Jimmy
you are doing excellent & Beautiful work Thumbsup Thumbsup
 
So it's been a while since I had some progress on my Salamandre model that I could share. I'll blame it on the current world condition, but it might be me. It seems like the duties and the chores of day-to-day living are more complicated and take so much longer to do these days.

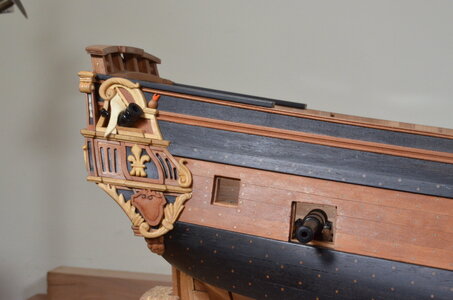
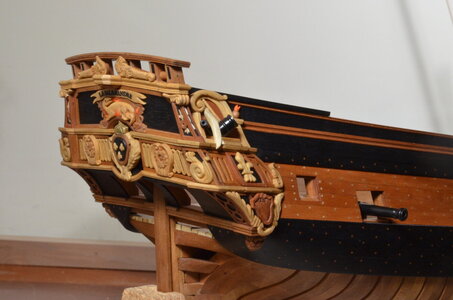
Ah, but the moments I spend at the work bench with La Salamandre are still restorative. In my last posting I was just getting ready to start building the top third of the quarter galleries. That area includes, among other things, carvings of a mortar barrel, a long-gun barrel, and a flag. Jean Boudriot, as he often does, has drawn these features quite differently in different plates. I know that a few of you have the drawings so I will simply mention that he draws this area as a relief carving in PL. X and as more of a shadow-box carving in PL. XII. Truly, the differences are fascinating and if you have access to the drawings it will take some very close scrutiny to fully grasp the points I am referring to. And I will also admit that I may be lending a tiny bit of personal bias, because I really wanted to addhe dramatic effect of the shadow-box approach to my model.

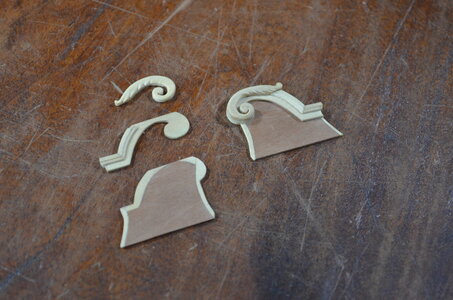
The middle and lower sections of the quarter gallery carvings required filler blocks before the carvings could be added, but the shadow-box method only required that I make a backdrop and frame, into which carvings could be installed. The photo below is the 2 backdrops - one assembled.

DSC_0001.JPG


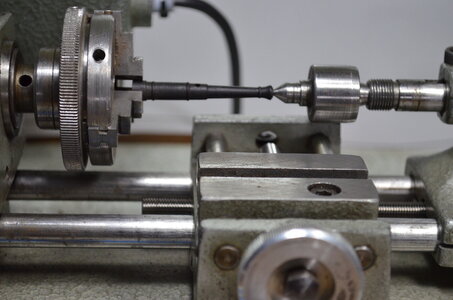
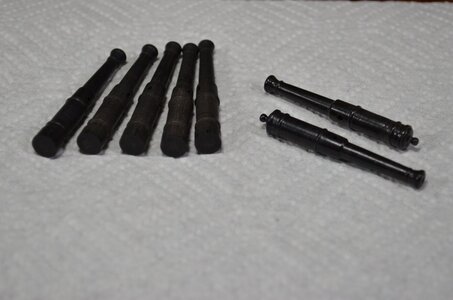
Since this is not a relief carving, I turned both gun barrels and the flaming bomb on the lathe. Guns are ebony and the bomb is pear. The flag is holly and it kept me up a few nights. It's not perfect but I'm happy!

Oh that gun wasn't there in my last post. I'll get to that in a moment.

DSC_0009 (1).JPG

DSC_0008 (1).JPG


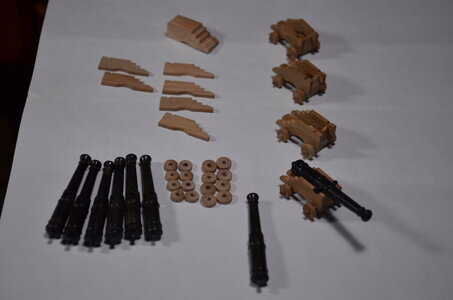
No special tricks here. Just careful measurements, tiny pencil marks, and constant use of calipers. Fortunately this isn't a ship of the line!

DSC_0005.JPG

DSC_0008 (2).JPG


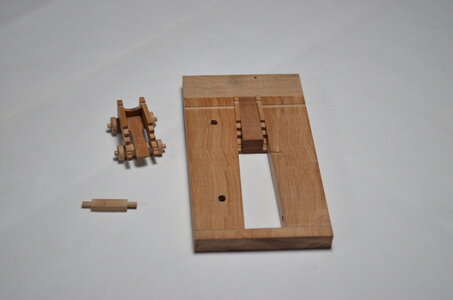
Obviously, the carriage cheeks were all sliced from the block at the top center. I find the most challenging aspect of building these carriages to be gluing them together so their sides are perfectly plumb and they splay out aft at the correct angle, and they're actually symmetrical, etc. So I built a jig for that which is demonstrated in my next two photos.

DSC_0003.JPG


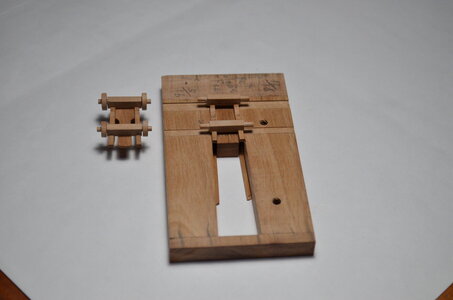
I placed an assembled carriage next to the working jig so the viewer can easily make out the 2 checks that are clamped in the jig. The jig consists of 2 parts, the outer frame and the wedge between the carriage cheeks. Also there is an axletree in the picture. The carriage will become a stable unit once a pair of axletrees is glued to the bottom of it. So we next flip the jig over to make that possible.

DSC_0006.JPG


There were notches cut in the cheeks while they were in the jig. That gives them the precise splay angle. You can see the rabbit cuts in the jig where the saw blade travelled. The same saw settings were used to notch all 16 cheeks.

Next note two thin strips of wood to either side of the interior of the jig. They are lifting the cheeks about one sixteenth of an inch higher than the underside of the jig, at this stage of the assembly process, so the axletrees can be easily glued without gluing everything to the jig. I used a fairly liquid form of superglue. A snug joint and almost no glue at all does a great job here. FYI, these carriages are about an inch long.

DSC_0007.JPG


Here's the first one. Now back to the bench to finish the rest. That will no doubt take me another week.

DSC_0007 (2).JPG
 
So it's been a while since I had some progress on my Salamandre model that I could share. I'll blame it on the current world condition, but it might be me. It seems like the duties and the chores of day-to-day living are more complicated and take so much longer to do these days.

Ah, but the moments I spend at the work bench with La Salamandre are still restorative. In my last posting I was just getting ready to start building the top third of the quarter galleries. That area includes, among other things, carvings of a mortar barrel, a long-gun barrel, and a flag. Jean Boudriot, as he often does, has drawn these features quite differently in different plates. I know that a few of you have the drawings so I will simply mention that he draws this area as a relief carving in PL. X and as more of a shadow-box carving in PL. XII. Truly, the differences are fascinating and if you have access to the drawings it will take some very close scrutiny to fully grasp the points I am referring to. And I will also admit that I may be lending a tiny bit of personal bias, because I really wanted to addhe dramatic effect of the shadow-box approach to my model.

The middle and lower sections of the quarter gallery carvings required filler blocks before the carvings could be added, but the shadow-box method only required that I make a backdrop and frame, into which carvings could be installed. The photo below is the 2 backdrops - one assembled.

View attachment 193076


Since this is not a relief carving, I turned both gun barrels and the flaming bomb on the lathe. Guns are ebony and the bomb is pear. The flag is holly and it kept me up a few nights. It's not perfect but I'm happy!

Oh that gun wasn't there in my last post. I'll get to that in a moment.

View attachment 193119

View attachment 193120


No special tricks here. Just careful measurements, tiny pencil marks, and constant use of calipers. Fortunately this isn't a ship of the line!

View attachment 193142

View attachment 193143


Obviously, the carriage cheeks were all sliced from the block at the top center. I find the most challenging aspect of building these carriages to be gluing them together so their sides are perfectly plumb and they splay out aft at the correct angle, and they're actually symmetrical, etc. So I built a jig for that which is demonstrated in my next two photos.

View attachment 193144


I placed an assembled carriage next to the working jig so the viewer can easily make out the 2 checks that are clamped in the jig. The jig consists of 2 parts, the outer frame and the wedge between the carriage cheeks. Also there is an axletree in the picture. The carriage will become a stable unit once a pair of axletrees is glued to the bottom of it. So we next flip the jig over to make that possible.

View attachment 193145


There were notches cut in the cheeks while they were in the jig. That gives them the precise splay angle. You can see the rabbit cuts in the jig where the saw blade travelled. The same saw settings were used to notch all 16 cheeks.

Next note two thin strips of wood to either side of the interior of the jig. They are lifting the cheeks about one sixteenth of an inch higher than the underside of the jig, at this stage of the assembly process, so the axletrees can be easily glued without gluing everything to the jig. I used a fairly liquid form of superglue. A snug joint and almost no glue at all does a great job here. FYI, these carriages are about an inch long.

View attachment 193146


Here's the first one. Now back to the bench to finish the rest. That will no doubt take me another week.

View attachment 193150
Beautifully and precisely done at this small scale. What are the dimensions? I think that your assembly jig was aa great idea and a project within itself both in the conception and then construction. Time spent well paid back! I stand in awe of your carving skills. Well done all the way around. Rich (PT-2)
 
Thanks PT-2. Shaky fingers make jigs like that an absolute necessity.

The scale is 1:48 and the guns are 6 pounders. A finished carriage is 1-1/16" long and 13/16" wide at the axletrees. A complete gun is 2-1/8" long including the handle on the elevation wedge.
It is difficult to see but the capstock pieces securing the trunnions in place are also meticulous with the hinge and fore locking pin. Can you please send an elevation photo of that area? Sorry to be a pest put I have not been very successful in the hinge and pin areas. I used sheet copper to bend as needed and then blacken but on my actual firing cannon have used round head brass screws. . . something to consider for appearance but more-so in the actual recoil forces. Thanks, Rich
 
Thanks for noticing that Rich. The whole time I was creating those capstocks I was wondering if anyone would ever appreciate them!! And I still have 14 more to build. Yes they are complete. The actual cap squares are made of .018" brass. I machined 2 little pieces of scrap bronze into a stamp that I can use in a vice to squeeze a strip of .018" brass into the shape desired. The pins lying on top at the front and back of each cap are 22 gauge wire that I soldered in place with Stay-Brite solder. I kept the wire long until it was successfully soldered. Then cut it off and filed/sanded the final shape to the cap squares. the hinge is completed by bending the same 22 gauge wire into a tack shape. On the aft hinge side of the cap, there is only one hole needed to slip the tack over the pin and form the hinge -- pretty easy that one. The fore-locking mechanism is two holes rather than the proper slot. Here I drilled holes for a much narrower tack that could be a close fit for a thin metal key. Once everything was superglued in place, I squeezed a bit of wire and filed it into the L-shape of a retainer key and dipped it into a tiny bit of superglue before pressing it into the fore-lock.

You'll think you are out of your mind if you go to these extremes, but I think the result will make you grin.
It is difficult to see but the capstock pieces securing the trunnions in place are also meticulous with the hinge and fore locking pin. Can you please send an elevation photo of that area? Sorry to be a pest put I have not been very successful in the hinge and pin areas. I used sheet copper to bend as needed and then blacken but on my actual firing cannon have used round head brass screws. . . something to consider for appearance but more-so in the actual recoil forces. Thanks, Rich

DSC_0001 (3).JPG
 
Hallo Jim,
very good work on your Salamandre - I like the contrast in color at your stern - black, pear and boxwood - looking very good and very well done.
And also very good carriages and muzzles - From my side you are getting an "A"
 
Back
Top