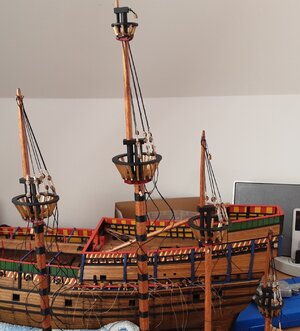
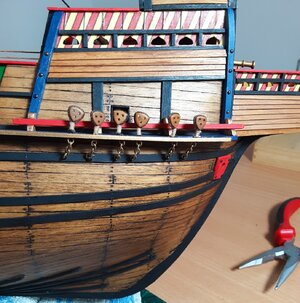
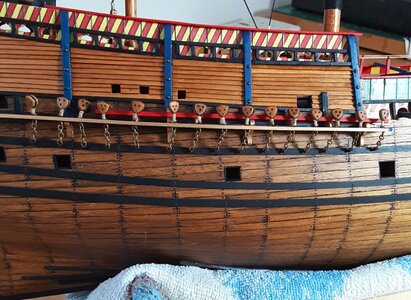
I am happy to see you back working on this model - Great 
-

Win a Free Custom Engraved Brass Coin!!!
As a way to introduce our brass coins to the community, we will raffle off a free coin during the month of August. Follow link ABOVE for instructions for entering.
-

PRE-ORDER SHIPS IN SCALE TODAY!
The beloved Ships in Scale Magazine is back and charting a new course for 2026!
Discover new skills, new techniques, and new inspirations in every issue.
NOTE THAT OUR FIRST ISSUE WILL BE JAN/FEB 2026
You are using an out of date browser. It may not display this or other websites correctly.
You should upgrade or use an alternative browser.
You should upgrade or use an alternative browser.
The Mary Rose
- Thread starter Graham
- Start date
- Watchers 53
-
- Tags
- caldercraft mary rose
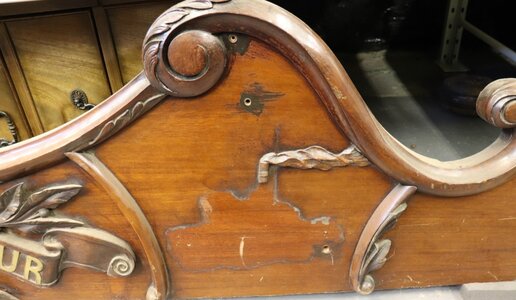
I have been doing some volunteer conservation work with the Hull Maritime Museum (England). The project was the memorial boards which were in the Seaman's Mission on the wall of the Chapel in Hull. It is thought to have been taken down in 1944. Very interesting work to achieve the restoration - cleaning, wax filling, creating the missing mouldings and trawler from epoxy putty, recreating rigging, colour matching and French polishing. It was in a bit of a state, as you can see from the before and after pictures below! The boards (three in total) commemorate 240 missing trawlermen, which is a fraction of those lost in the pursuit of fishing from Hull. They will be mounted in a purpose built building alongside the newly restored Arctic Corsair trawler. However, that is a couple of years away yet, so they are now boxed and stored. I think the missing men and their families would be quite pleased with it.
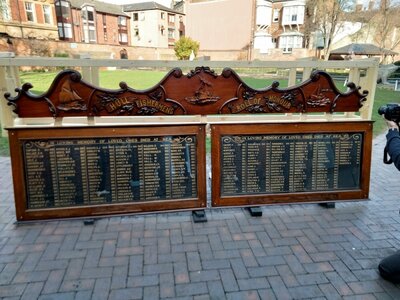
The three ship carvings, before and after -
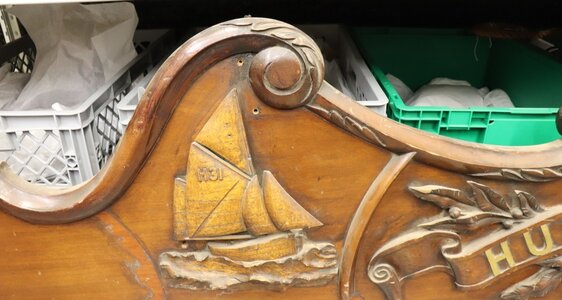
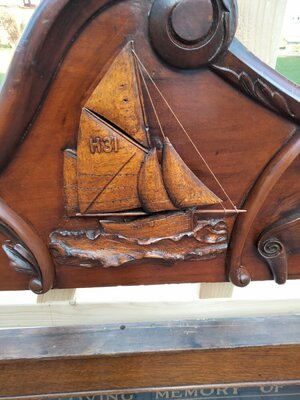
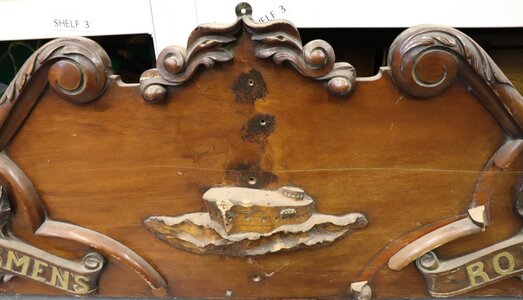
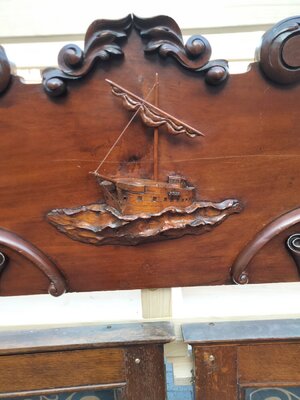
Replacement trawler modelled in epoxy wood putty -
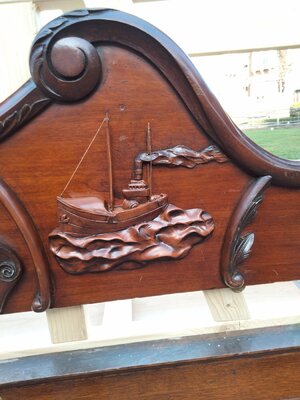

The three ship carvings, before and after -


Replacement trawler modelled in epoxy wood putty -

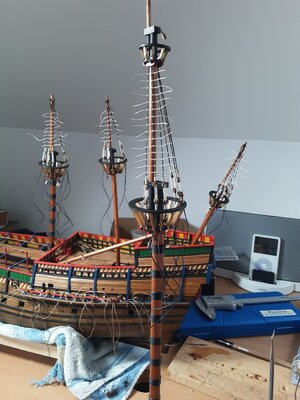
The masts have now been stepped off the ship and necessary blocks and cleats attached -
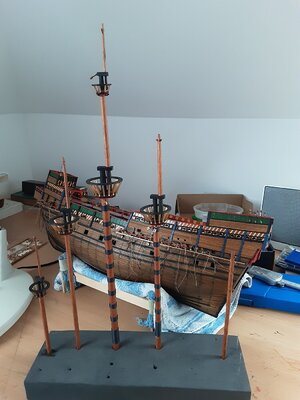
The masts appear to reflect the Anthony Roll and also an inventory of the ship undertaken in 1514 by way of the mast configurations; archaeology broadly supports the shroud and chains layout.
Very little remains of the actual masts and spars The ship sank in July 1545 and by early August a salvage crew had been put together of 30 Venetian mariners and one carpenter, assisted by 60 English mariners and they had recovered her sails and yards and 'to her masts there is typed three cables with other ingens to wey her upp, and on every side of her a hulk to sett her uppright'. In 1983 the archaeologists found that great cables had been hauled under her hull as far as amidships which would have been attached to the hulks Jesus and Sampson. Her foremast was broken in the attempt, but confidence must have been high as correspondence from the Lord Chancellor to the King exists regarding a new mast for the ship.
However, despite great efforts and 22 tuns of beer (around 37,000 pints!) the ship could not be raised and the two lead salvors were paid off in December with 20 marks each as a reward. I guess they almost made it, but what they salvaged plus storm and trawler damage leaves us where we are today.
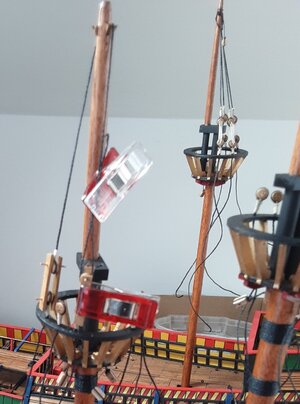
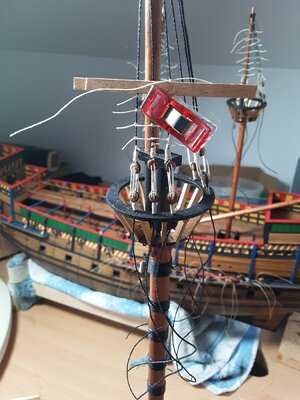
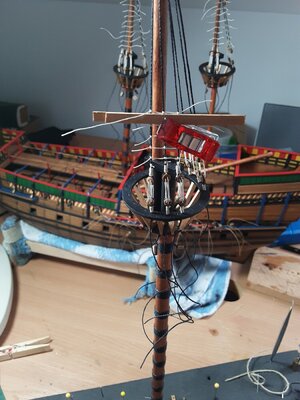
I am now adding shrouds to the upper masts - still off the model. In order to get the deadeye spacing something like consistent I made a coupe of jigs as in the photo. It is simply a couple of brass eyelets put through a plank and then CA'd. This is then slotted through a finished (whipped on) deadeye and the lower one and another piece with the same hole spacings clamped on. I think the photo explains it better. It seems to be going okay, if slowly, so on we go.

- Joined
- Aug 14, 2018
- Messages
- 825
- Points
- 403

TOP MAN Cheers JJ..I am now adding shrouds to the upper masts - still off the model. In order to get the deadeye spacing something like consistent I made a coupe of jigs as in the photo. It is simply a couple of brass eyelets put through a plank and then CA'd. This is then slotted through a finished (whipped on) deadeye and the lower one and another piece with the same hole spacings clamped on. I think the photo explains it better. It seems to be going okay, if slowly, so on we go.
View attachment 364230
Ratlines. To space these I use two strips of 0.5mm thick strip, glued at one end. This is slipped over the shrouds and fixed in place with a strong clip which stops the shrouds moving. Clove hitches are then tied right to left and when happy with the positioning I fix the knots with a dab of enamel lacquer. Everyone has their own way of doing this, a few of which I have tried, and this works for me.


Thank you, I hope it helps you.Good photos.give an understanding of how it was done.for a beginner like me, this is important.
The ship is now in the keel clamp and the masts have been glued in place -
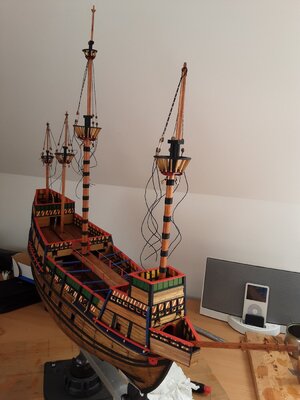
I can now start the standing rigging which runs fore to aft. Because I put on the extra fore and aft castle decks I can't use the tying off diagram which came with the kit for some of the associated lines. Where necessary I'll use my own ideas and we'll get somewhere close.
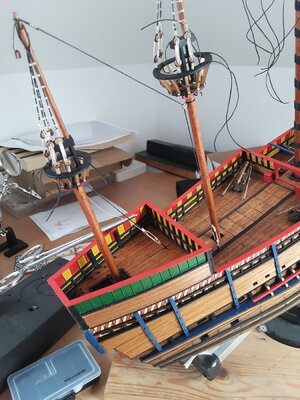
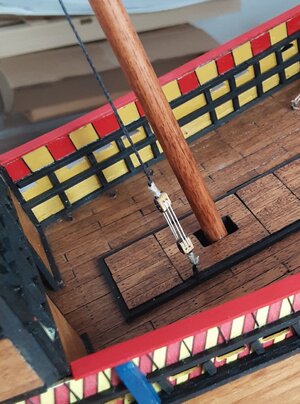

I can now start the standing rigging which runs fore to aft. Because I put on the extra fore and aft castle decks I can't use the tying off diagram which came with the kit for some of the associated lines. Where necessary I'll use my own ideas and we'll get somewhere close.


Wow, I do not saw your build since a long time. It look really better than what we can see on salers web site in general. I love your colors.
You are a lucky man, I did not found these book anywhere. Do you have a hint for purchase them ?My next build will be the Mary Rose, a ship I have been interested in since she was found in 1971 and raised in 1982. Since then she has been the subject of intense conservation, from the timbers to the everyday objects of those who were onboard her when she sank in 1545 within sight of King Henry VIII who had built her.
Let's have a look in the box -
View attachment 32752View attachment 32753View attachment 32754View attachment 32755View attachment 32756View attachment 32757View attachment 32758View attachment 32761View attachment 32770View attachment 32771
In addition there are 8 pages of plans. First impressions are that the wood looks of good quality and the laser cutting seems fine. After my experience with the HMS Snake build regarding the poor quality of the white metal castings I am pleased to see that the cannon castings in this kit look OK with minimal flashings.
I also got the following publication -
View attachment 32772
The book is an excellent publication which details all parts of the ship, what has been learned from the remains, what might be assumed for the missing structure and what is still left to be further investigated. I have found it very readable and, thank goodness, it includes a glossary for all of the many names given to the various parts of the ship. Accompanying the book is a separate publication containing fifteen plans and sections showing what has been found as superimposed on a fully scaled schematic of the likely complete ship -
View attachment 32773
The drawings are very good and I think that any scratch builder (not me!) could build with them and make a very good model. One of the drawings shows the possible sail configuration (no sails are included in the kit) so that is something I might well do, but it's early days yet. You will appreciate that I can not show photos from the book or plans due to copyright, but I will be using them in my build and will pass on what I hope are some interesting facts. No model of the Mary Rose can be an exact replica of the actual ship because what they have found is still being reconstructed, some timbers (the collapsed bow) are still on the seabed and yet to be recovered; therefore, assumptions have to be made around what has been lost due to time and tides. Still, the book contains a lot of useful information which goes a long way towards putting some flesh on the bones of both the ship and the people who sailed her.
You are a lucky man, I did not found these book anywhere. Do you have a hint for purchase them ?
Your Noblest Shippe: Anatomy of a Tudor Warship (archaeology of the mary rose): Marsden, Peter: 9780954402921: Amazon.com: Books
Your Noblest Shippe: Anatomy of a Tudor Warship (archaeology of the mary rose) [Marsden, Peter] on Amazon.com. *FREE* shipping on qualifying offers. Your Noblest Shippe: Anatomy of a Tudor Warship (archaeology of the mary rose)
www.amazon.com
It's great to see the masts on her and to see the overall pictures. Beautiful work.
Thank you. I am having to get on with some garden projects at the moment, but should be back on the build next week. Keep well.It's great to see the masts on her and to see the overall pictures. Beautiful work.
Thanks Uwek, Sorry I do not received your post or did not saw it before today in response to my demand.Your Noblest Shippe: Anatomy of a Tudor Warship (archaeology of the mary rose): Marsden, Peter: 9780954402921: Amazon.com: Books
Your Noblest Shippe: Anatomy of a Tudor Warship (archaeology of the mary rose) [Marsden, Peter] on Amazon.com. *FREE* shipping on qualifying offers. Your Noblest Shippe: Anatomy of a Tudor Warship (archaeology of the mary rose)www.amazon.com
The fore to aft standing rigging is now complete. The kit calls for a couple of the lines to be natural hemp, but it is rough stuff which comes with the kit and looks like parcel string; instead I used 1.0mm black line.
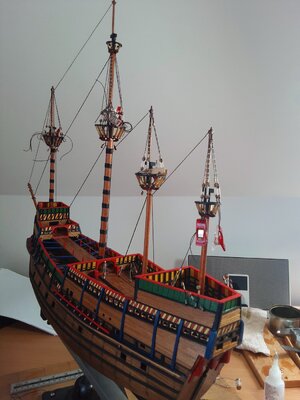
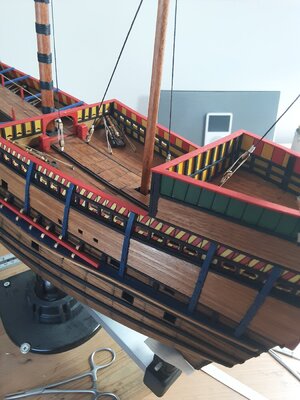
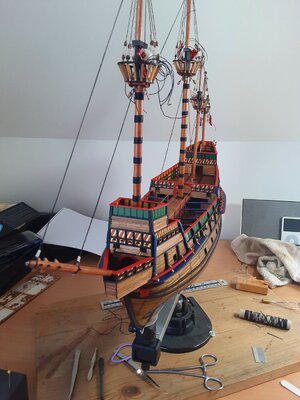
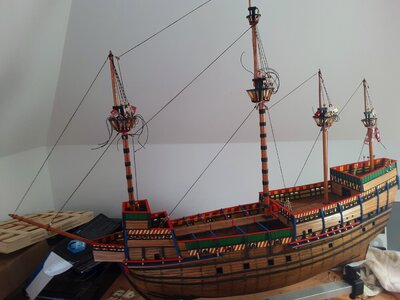
I need a change from ropework for a while, so it's on to the lower deadeyes. Running a thin cord up through the chain plate and following the line of the shroud to be fitted gives the location of the fixing point for the chain to the wale...
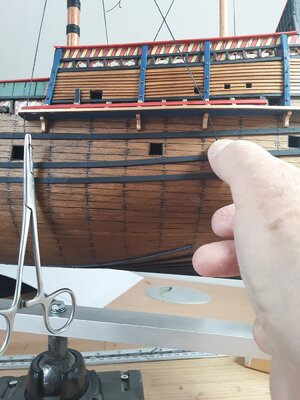


I need a change from ropework for a while, so it's on to the lower deadeyes. Running a thin cord up through the chain plate and following the line of the shroud to be fitted gives the location of the fixing point for the chain to the wale...

I have been working on the anchors in parallel to doing the chains and they are now finished . The actual stocks on the recovered anchors were made from two timbers joined by four wrought iron bolts which I have tried to replicate -
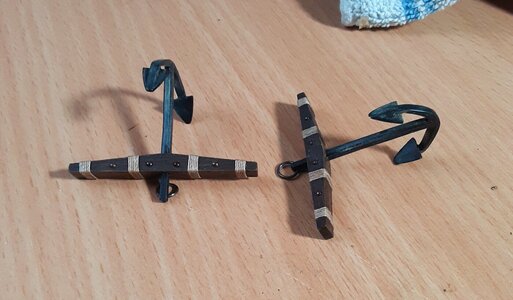
The 1514 inventory shows that she carried seven anchors of various sizes and for varying purposes e.g. 'keggers' for kedging and 'destrelles' used at the stern. Four have been excavated to date and three found in the past. There may have been more as the 1514 inventory only records those anchors which were removed from the ship at that time.
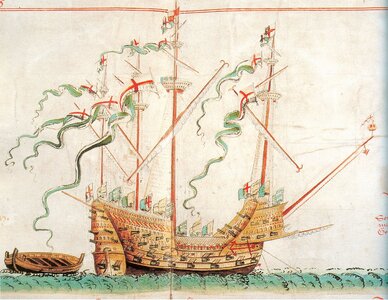
Interestingly, the Anthony Roll picture (below) shows the anchors painted red. I am all for historical accuracy, but I really can't bring myself to do that!
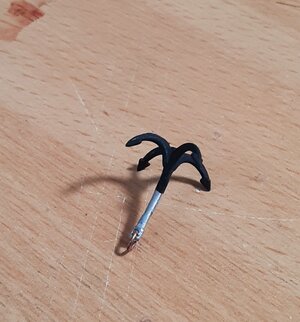
The picture above shows a grapnel on the end of the bowsprit and that is included in the kit -
Of further note in the Anthony Roll picture are the twin hooks on the ends of the main and fore lower yards to snag enemy rigging. This, together with the large number of archers and soldiers on board at the time of sinking, supports the theory that the tactics of the day were to grapple and board. Since the spars were salvaged after she sank the Anthony Roll is the only source of reference for this feature.
I will allow for these hooks as I shape the spars, but they will be a last fit item - otherwise I will be the one getting snagged.

The 1514 inventory shows that she carried seven anchors of various sizes and for varying purposes e.g. 'keggers' for kedging and 'destrelles' used at the stern. Four have been excavated to date and three found in the past. There may have been more as the 1514 inventory only records those anchors which were removed from the ship at that time.
Interestingly, the Anthony Roll picture (below) shows the anchors painted red. I am all for historical accuracy, but I really can't bring myself to do that!

The picture above shows a grapnel on the end of the bowsprit and that is included in the kit -

Of further note in the Anthony Roll picture are the twin hooks on the ends of the main and fore lower yards to snag enemy rigging. This, together with the large number of archers and soldiers on board at the time of sinking, supports the theory that the tactics of the day were to grapple and board. Since the spars were salvaged after she sank the Anthony Roll is the only source of reference for this feature.
I will allow for these hooks as I shape the spars, but they will be a last fit item - otherwise I will be the one getting snagged.
Last edited:
Kurt Konrath
Kurt Konrath
Red may be for emphasize as I doubt the masts and spars were also red.


