I know exactly what you're saying Dean, I too would like to see a little tighter squeeze on the stropping. I'll give your method a try.decided to use the vice to clamp everything enough for me to add a flat on the nail with a punch while everything was squeezed together.
-

Win a Free Custom Engraved Brass Coin!!!
As a way to introduce our brass coins to the community, we will raffle off a free coin during the month of August. Follow link ABOVE for instructions for entering.
-

PRE-ORDER SHIPS IN SCALE TODAY!
The beloved Ships in Scale Magazine is back and charting a new course for 2026!
Discover new skills, new techniques, and new inspirations in every issue.
NOTE THAT OUR FIRST ISSUE WILL BE JAN/FEB 2026
- Home
- Forums
- Ships of Scale Group Builds and Projects
- Bluenose PoF Group Build
- Bluenose Group Build Logs
You are using an out of date browser. It may not display this or other websites correctly.
You should upgrade or use an alternative browser.
You should upgrade or use an alternative browser.
The Schooner Bluenose 1921, POF Yuanqing Models 1:72 [COMPLETED BUILD]
Thank you, Grant!Good afternoon Daniel. Wow this is good work. Cheers Grant
Good morning, this post follows up on my post #670, the ships dead eyes.
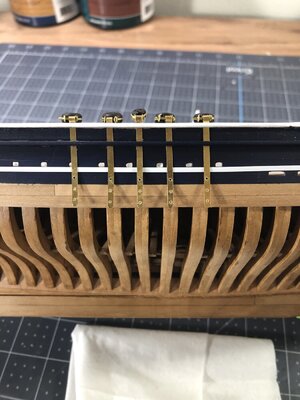
Here you can see one method of install and painting. The main problem I avoided by painting after insertion is scraping the paint off the straps because of the extreme tight fit of the slots against the straps and having to do touch up next to the natural wood finish. Check it out.
I marked locations for the bolts then removed straps and drilled them for the nails. set them back in place and drilled into the wood using the strap holes as my guide.

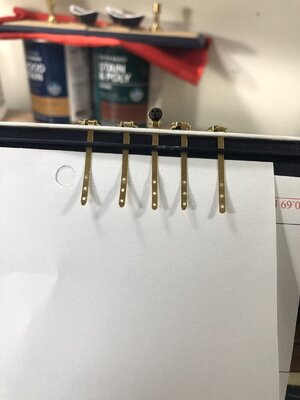
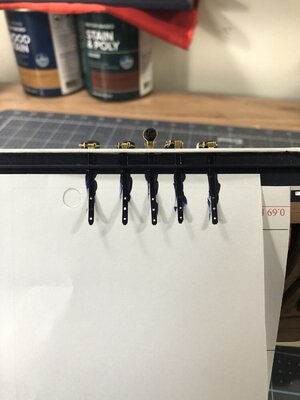
Next slid a paint shied behind the straps to protect the white stripe and the natural wood and painted the straps.


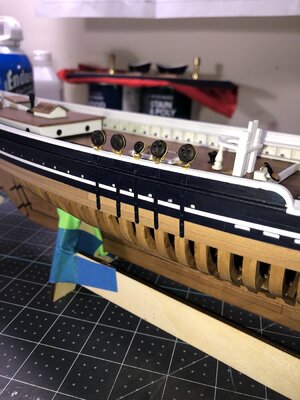
And the finished product after touch up of the nails and seal coat with matte finish clear poly.

I have to decide if I want to paint the strop hardware above the rail but the whole process of dead eye placement turns out to be pleasantly trouble free.
I hope you all enjoy the pictures.
Incidentally I used 0.6mm nails from Dry Dock
Here you can see one method of install and painting. The main problem I avoided by painting after insertion is scraping the paint off the straps because of the extreme tight fit of the slots against the straps and having to do touch up next to the natural wood finish. Check it out.
I marked locations for the bolts then removed straps and drilled them for the nails. set them back in place and drilled into the wood using the strap holes as my guide.

Next slid a paint shied behind the straps to protect the white stripe and the natural wood and painted the straps.


And the finished product after touch up of the nails and seal coat with matte finish clear poly.

I have to decide if I want to paint the strop hardware above the rail but the whole process of dead eye placement turns out to be pleasantly trouble free.
I hope you all enjoy the pictures.
Incidentally I used 0.6mm nails from Dry Dock
Last edited:
A well thought-out way of painting and applying. It looks neat and sleek, Daniel.Good morning, this post follows up on my post #670, the ships dead eyes.
Here you can see one method of install and painting. The main problem I avoided by painting after insertion is scraping the paint off the straps because of the extreme tight fit of the slots against the straps and having to do touch up next to the natural wood finish. Check it out.
I marked locations for the bolts then removed straps and drilled them for the nails. set them back in place and drilled into the wood using the strap holes as my guide.
View attachment 390969
Next slid a paint shied behind the straps to protect the white stripe and the natural wood and painted the straps.
View attachment 390970View attachment 390971
And the finished product after touch up of the nails and seal coat with matte finish clear poly.
View attachment 390972
I have to decide if I want to paint the strop hardware above the rail but the whole process of dead eye placement turns out to be pleasantly trouble free.
I hope you all enjoy the pictures.
Incidentally I used 0.6mm nails from Dry Dock
Regards, Peter
- Joined
- Sep 3, 2021
- Messages
- 5,198
- Points
- 738

I did paint the deadeye assemblies prior to installation and accepted the (minor) touch-up required. Smallest brush in the shipyard and no issues.Good morning, this post follows up on my post #670, the ships dead eyes.
Here you can see one method of install and painting. The main problem I avoided by painting after insertion is scraping the paint off the straps because of the extreme tight fit of the slots against the straps and having to do touch up next to the natural wood finish. Check it out.
I marked locations for the bolts then removed straps and drilled them for the nails. set them back in place and drilled into the wood using the strap holes as my guide.
View attachment 390969
Next slid a paint shied behind the straps to protect the white stripe and the natural wood and painted the straps.
View attachment 390970View attachment 390971
And the finished product after touch up of the nails and seal coat with matte finish clear poly.
View attachment 390972
I have to decide if I want to paint the strop hardware above the rail but the whole process of dead eye placement turns out to be pleasantly trouble free.
I hope you all enjoy the pictures.
Incidentally I used 0.6mm nails from Dry Dock
Good looking deadeye installation, Dan. This more than proves that using the YQ-hardware can yield a very convincing configuration.
Thanks Mark, I'm more than happy to share techniques.Great technique Daniel, thanks for sharing!
Thanks Shota!ditto

Thanks Johan, I am really glad to hear you say that. Personally, I don't mind straying too far from accurate scale, especially when it comes to rope size as long as there is a sense relational scale. My rope work will be 2 to 2.5 times bigger than actual scale, but it should all be proportional within itself.This more than proves that using the YQ-hardware can yield a very convincing configuration.
Thanks Peter, I'm always happy to get a passing grade from you or one of your outstanding suggestions.A well thought-out way of painting and applying. It looks neat and sleek, Daniel.
Regards, Peter
What a wonderful result Daniel!
Thank you, Paul!What a wonderful result Daniel!
- Joined
- Sep 3, 2021
- Messages
- 5,198
- Points
- 738

Well, Dan, you know I want my Bluenose model to show her actual size. Generally speaking, the YQ-kit does not accomodate just that; the diameters of the spars are off, as well as the diameters and sizes of ropes and blocks, to name a few, showing her smaller than she actually is.Thanks Johan, I am really glad to hear you say that. Personally, I don't mind straying too far from accurate scale, especially when it comes to rope size as long as there is a sense relational scale. My rope work will be 2 to 2.5 times bigger than actual scale, but it should all be proportional within itself.
That does not mean you can't build a beautiful Bluenose-model, predominantly using the kit-parts, as has been clearly demonstrated by (amongst others) Dean (@Dean62).
Following the YQ build instructions for this part, nor scratch building that component makes this an easy kit, quite the contrary, the kit inhibits many pitfalls and for me it's sheer dumb luck I've gotten as far as I did. (Plus quite a bit of help from my friends, that also did help...) So I appreciate the patience, perseverance and craftsmanship that goes into all the nitty-gritty details, ultimately resulting into one of the most beautiful ships ever designed (and no, I'm in no way prejudiced...
 ).
).Your last statement also rings true; proportionality. When you're able to balance relevant combinations to look natural, you're a winner, regardless of being true to scale.
Great discussion Johan, typically I don't like to place limitations on myself, but the reality for me is building everything on a 1:72 kit to accurate scale is beyond what I am willing to do. Most of the rope would be sub millimeter, even hair like in diameter. The sail cloth thickness, who knows how thin that would be. Having said that, I am in awe of those modelers such as yourself whom strive to make everything to accurate scale when working at scales 1:62 and smaller.When you're able to balance relevant combinations to look natural, you're a winner, regardless of being true to scale.
Good morning Daniel. Compliments are due. Brilliant. Personally I would not have the brass above the rail (a little bit of irony here as I’m using brass on my Xebec) however it doesn’t detract from the beauty of your BN. Cheers GrantGood morning, this post follows up on my post #670, the ships dead eyes.
Here you can see one method of install and painting. The main problem I avoided by painting after insertion is scraping the paint off the straps because of the extreme tight fit of the slots against the straps and having to do touch up next to the natural wood finish. Check it out.
I marked locations for the bolts then removed straps and drilled them for the nails. set them back in place and drilled into the wood using the strap holes as my guide.
View attachment 390969
Next slid a paint shied behind the straps to protect the white stripe and the natural wood and painted the straps.
View attachment 390970View attachment 390971
And the finished product after touch up of the nails and seal coat with matte finish clear poly.
View attachment 390972
I have to decide if I want to paint the strop hardware above the rail but the whole process of dead eye placement turns out to be pleasantly trouble free.
I hope you all enjoy the pictures.
Incidentally I used 0.6mm nails from Dry Dock
Thanks Grant, I appreciate your input. I do need to tone down the hardware above the railing I'm not sure about the color just yet.Good morning Daniel. Compliments are due. Brilliant. Personally I would not have the brass above the rail (a little bit of irony here as I’m using brass on my Xebec) however it doesn’t detract from the beauty of your BN. Cheers Grant
- Joined
- Jan 9, 2020
- Messages
- 10,566
- Points
- 938

Dear Daniel. What a beautiful deadeye assembly you have completed. The scale discussion is such an integral part of model building that it can never be ignored. There are simply just things that cannot be accurately presented in some of the scales that we build. Initially, when YQ introduced this kit, there were quite a few suggestions as to make the kit available in 1:48 as well. It sure would have alleviated many challenges that the 1:72 scale presents, but the actual model would simply have been too big for the majority of builders. I think 1:72 is a workable scale and when proportional integrity is factored into the builder's thinking many non-scale items can still appear to be in scale. Judging by the VASA, you have this ability in abundance so I have no doubt that your BN would be proportionally as accurate as dammit is to a swear word!
- Joined
- Sep 3, 2021
- Messages
- 5,198
- Points
- 738

1:72 Is about the minimum scale I'm more or less comfortable with. I have utmost respect for those going beyond and build very convincing models.Dear Daniel. What a beautiful deadeye assembly you have completed. The scale discussion is such an integral part of model building that it can never be ignored. There are simply just things that cannot be accurately presented in some of the scales that we build. Initially, when YQ introduced this kit, there were quite a few suggestions as to make the kit available in 1:48 as well. It sure would have alleviated many challenges that the 1:72 scale presents, but the actual model would simply have been too big for the majority of builders. I think 1:72 is a workable scale and when proportional integrity is factored into the builder's thinking many non-scale items can still appear to be in scale. Judging by the VASA, you have this ability in abundance so I have no doubt that your BN would be proportionally as accurate as dammit is to a swear word!
Regardless of the scale you build, one thing should never leave your mind: "What's her size in real life". (And no, I don't mean the confection size of the Admiral...) For the BN her WL length is 34m/112feet (Willem Barentsz' expedition ship was about 25m/82feet long.) That's a large ship. If one would add a figurine at scale 1:72, the figurine would measure approx 25mm/1"...
While 1:48 would have been a blast, and, while presenting countless customization possibilities, I think the model would receive an immediate veto from the Admiral.
WOW Heinrich, you present some interesting comparisons. I appreciate your input. So far, I have stayed with all the kit supplied materials and its given dimensions, except where I messed up with the transom and bulwark placement which caused me to add about 7mm to the overall length. I am definitely going to fudge when it comes to the rope work. If the shrouds with the rat lines come out below my expectations, I will not even present them here but will banish myself to the redo locker and start again.Dear Daniel. What a beautiful deadeye assembly you have completed. The scale discussion is such an integral part of model building that it can never be ignored. There are simply just things that cannot be accurately presented in some of the scales that we build. Initially, when YQ introduced this kit, there were quite a few suggestions as to make the kit available in 1:48 as well. It sure would have alleviated many challenges that the 1:72 scale presents, but the actual model would simply have been too big for the majority of builders. I think 1:72 is a workable scale and when proportional integrity is factored into the builder's thinking many non-scale items can still appear to be in scale. Judging by the VASA, you have this ability in abundance so I have no doubt that your BN would be proportionally as accurate as dammit is to a swear word!


