Thanks Paul, I now have to go vertical starting with my old friends the dead eyes!Now I see how you completed your Vasa so efficiently! No moss growing on this build...
-

Win a Free Custom Engraved Brass Coin!!!
As a way to introduce our brass coins to the community, we will raffle off a free coin during the month of August. Follow link ABOVE for instructions for entering.
-

PRE-ORDER SHIPS IN SCALE TODAY!
The beloved Ships in Scale Magazine is back and charting a new course for 2026!
Discover new skills, new techniques, and new inspirations in every issue.
NOTE THAT OUR FIRST ISSUE WILL BE JAN/FEB 2026
- Home
- Forums
- Ships of Scale Group Builds and Projects
- Bluenose PoF Group Build
- Bluenose Group Build Logs
You are using an out of date browser. It may not display this or other websites correctly.
You should upgrade or use an alternative browser.
You should upgrade or use an alternative browser.
The Schooner Bluenose 1921, POF Yuanqing Models 1:72 [COMPLETED BUILD]
Thanks Dean, its onward and upward now.Beautiful execution Daniel. Those tie in very well with your color scheme.
- Joined
- Sep 3, 2021
- Messages
- 5,198
- Points
- 738

Thanks to your post on the dories, I checked my own posts regarding those darn/darling little things.Thank you, Johan, my hat is off to anyone who builds a Billling Boat product.
I realized I did use the parts supplied by BB, but those have become a bit unrecognizable because of the customizations.
I still kept one of the dories from the YQ-KIT, just to remind me of how difficult they were to build.
Johan I just had to laugh at your dory build (I was just going over it) when you said, "truly evil design." I didn't mention it, but I agree with you 100 percent.Thanks to your post on the dories, I checked my own posts regarding those darn/darling little things.
I realized I did use the parts supplied by BB, but those have become a bit unrecognizable because of the customizations.
I still kept one of the dories from the YQ-KIT, just to remind me of how difficult they were to build.
Several choice words erupted out of my mouth during this when trying to get the very thin sides to glue up correctly. WOW not easy.
I’m living it!Thank you, Johan, my hat is off to anyone who builds a Billling Boat product.

Yes, Dean you are and doing extremely well with it.I’m living it!
Thanks Daniel, you did a great job on your Vasa!Yes, Dean you are and doing extremely well with it.
Good morning Daniel. Wow I’m away for a weekend and it took me a while to catch up. The winch and fore deck is one busy area. I wonder how the crew navigated that when required. It is stunning. Your anchor redo was so worth it. The dories. I never get these on the BN. One of the most beautiful ships ever built have these little bathtubs plonked on the deck  . Well you made beautiful “bathtubs” and I love the fact you blended them in with the overall colour scheme.- good thinking . You are owning this Daniel. Cheers Grant
 . Well you made beautiful “bathtubs” and I love the fact you blended them in with the overall colour scheme.- good thinking . You are owning this Daniel. Cheers Grant
One of the most beautiful ships ever built have these little bathtubs plonked on the deck.
 Thanks Grant, I suppose after being out all week fishing, those men can get pretty rank smelling so I'm sure they need a place to wash up before going home???

Last edited:
Since beginning this journey, I had built up in the back of my mind how difficult the dead eye install was going to be. Well, it turns out that this procedure is not as difficult as I had imagined. After fiddling around for an hour or so it dawned on me, I would need a jig of sorts to handle the small items securely while I assembled the parts. I got some ebony dead eyes from our friends at Dry Dock and went to work first with the jig which has three brass studs glued into a base board that I clamp down on my worktable. Then began stropping the dead eye for fit.
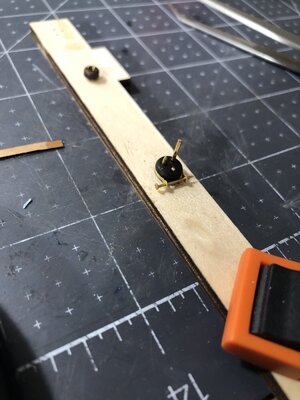
Next, I put a spot of CA on top, formed the loop on the end of the strap chain, placed a nail that came with the kit and squeezed it all tight for a few seconds to let the CA cure.
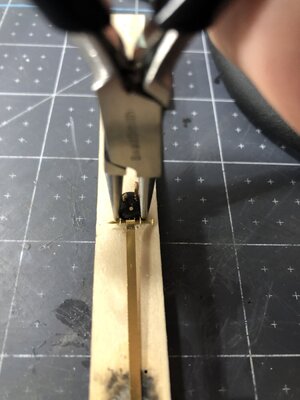
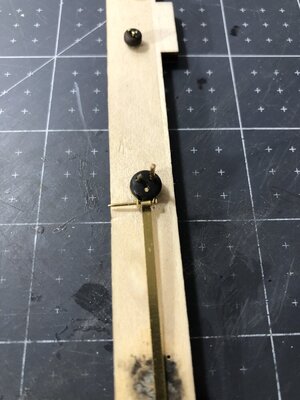
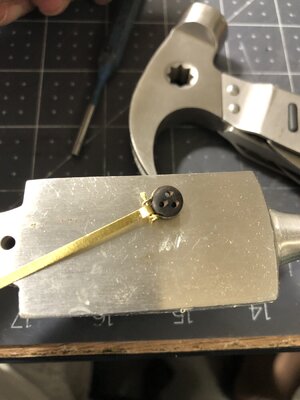
After that I nipped the end of the nail, placed it all on my mini anvil, took a flat punch and smashed the end flat so it stays put.
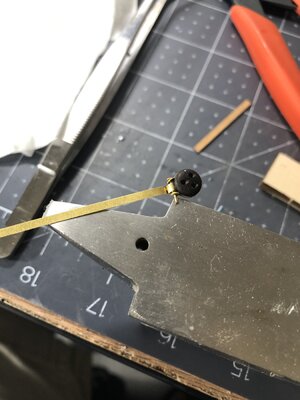
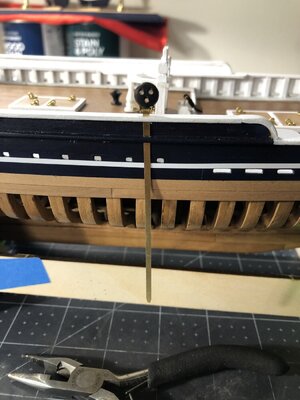
And finally placed as a dry fit and I believe this looks and works great.
Any comments or suggestions are always welcome.
Happy modeling!

Next, I put a spot of CA on top, formed the loop on the end of the strap chain, placed a nail that came with the kit and squeezed it all tight for a few seconds to let the CA cure.


After that I nipped the end of the nail, placed it all on my mini anvil, took a flat punch and smashed the end flat so it stays put.


And finally placed as a dry fit and I believe this looks and works great.

Any comments or suggestions are always welcome.
Happy modeling!
- Joined
- Sep 3, 2021
- Messages
- 5,198
- Points
- 738

I think the dories might have been rather esthetic when compared to the other stuff floating around on- and below decks: bait being put on the fishhooks, fish being hauled from the dories into the fishholds and fish being relieved from their entrails, the stench of fish everywhere...The dories. I never get these on the BN. One of the most beautiful ships ever built have these little bathtubs plonked on the deck.
Last edited:
- Joined
- Sep 3, 2021
- Messages
- 5,198
- Points
- 738

Nice process you developed for your deadeye attachments.Since beginning this journey, I had built up in the back of my mind how difficult the dead eye install was going to be. Well, it turns out that this procedure is not as difficult as I had imagined. After fiddling around for an hour or so it dawned on me, I would need a jig of sorts to handle the small items securely while I assembled the parts. I got some ebony dead eyes from our friends at Dry Dock and went to work first with the jig which has three brass studs glued into a base board that I clamp down on my worktable. Then began stropping the dead eye for fit.
View attachment 390818
Next, I put a spot of CA on top, formed the loop on the end of the strap chain, placed a nail that came with the kit and squeezed it all tight for a few seconds to let the CA cure.
View attachment 390819View attachment 390820
After that I nipped the end of the nail, placed it all on my mini anvil, took a flat punch and smashed the end flat so it stays put.
View attachment 390821View attachment 390822
And finally placed as a dry fit and I believe this looks and works great.
View attachment 390823
Any comments or suggestions are always welcome.
Happy modeling!
What diameter deadeyes are you using?
Hi Johan, the large are 7mm, small 5mm.Nice process you developed for your deadeye attachments.
What diameter deadeyes are you using?
- Joined
- Sep 3, 2021
- Messages
- 5,198
- Points
- 738

Aha, so you stuck to the original YQ dimensions, good.Hi Johan, the large are 7mm, small 5mm.
Following @Peter Voogt 's footsteps, I used smaller diameter deadeyes, resulting in not being able to use YQ's supplied hardware.
This first deadeye installation looks pretty neat; now I'm looking forward to see another19 of those.
Also those slots in the railings appear to line up correctly, great job.
Hey Johan, did you drill your straps for nails on ship or off ship?Also those slots in the railings appear to line up correctly, great job.
- Joined
- Sep 3, 2021
- Messages
- 5,198
- Points
- 738

I pre-drilled these holes off-ship. Unfortunately I painted the straps black before attaching them permanently, so I had a hard time locating the holes, once it came to final installation.Hey Johan, did you drill your straps for nails on ship or off ship?
- Joined
- Jan 9, 2020
- Messages
- 10,566
- Points
- 938

Excellent work, as per usual, Daniel! I really like what you have done with the dories. Not only do they blend in beautifully with the color of your mother ship, but the grey interior adds a workmanlike (industrial-looking) effect to them which is perfectly in character with their function. The re-honed anchors look much sleeker and now I believe that whether you choose this configuration or fully stowed, both are viable alternatives. The deadeye assembly looks very good - personally I am so glad that the WB deadeyes are assembled with rope - those metal/wire straps on deadeyes look to be a real pain in the butt to assemble so neatly!
Excuse my crude sketch, but hopefully you get the idea. I was not happy with the gaps and decided to use the vice to clamp everything enough for me to add a flat on the nail with a punch while everything was squeezed together.
That entails clamping the nail head and the rest of the assembly with the vice enough to keep it from moving while you do that. I actually pre bent the strap so the eyes were about 120 degrees from the strap.
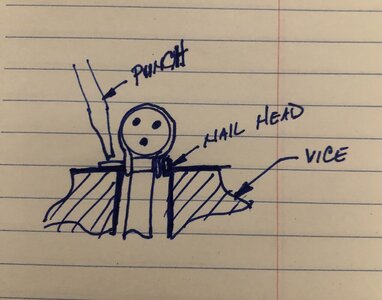
They will never be perfectly snug, because it’s hard to get right against the strap when you punch. But the closer the better.
Ps - another method I tried that worked, was to clamp everything together by holding the thumb of my left hand over the pin head while holding the assembly, and then pushing it together with a pair of needle nose pliers in my right hand and then squeezing the pin hard enough to flatten it once everything was clamped as far as I could get it together.
Either way I did it, afterwards I clipped the end of the nail off a little past where it flares out next to the strap.
That entails clamping the nail head and the rest of the assembly with the vice enough to keep it from moving while you do that. I actually pre bent the strap so the eyes were about 120 degrees from the strap.

They will never be perfectly snug, because it’s hard to get right against the strap when you punch. But the closer the better.
Ps - another method I tried that worked, was to clamp everything together by holding the thumb of my left hand over the pin head while holding the assembly, and then pushing it together with a pair of needle nose pliers in my right hand and then squeezing the pin hard enough to flatten it once everything was clamped as far as I could get it together.
Either way I did it, afterwards I clipped the end of the nail off a little past where it flares out next to the strap.
Last edited:
Good afternoon Daniel. Wow this is good work. Cheers GrantSince beginning this journey, I had built up in the back of my mind how difficult the dead eye install was going to be. Well, it turns out that this procedure is not as difficult as I had imagined. After fiddling around for an hour or so it dawned on me, I would need a jig of sorts to handle the small items securely while I assembled the parts. I got some ebony dead eyes from our friends at Dry Dock and went to work first with the jig which has three brass studs glued into a base board that I clamp down on my worktable. Then began stropping the dead eye for fit.
View attachment 390818
Next, I put a spot of CA on top, formed the loop on the end of the strap chain, placed a nail that came with the kit and squeezed it all tight for a few seconds to let the CA cure.
View attachment 390819View attachment 390820
After that I nipped the end of the nail, placed it all on my mini anvil, took a flat punch and smashed the end flat so it stays put.
View attachment 390821View attachment 390822
And finally placed as a dry fit and I believe this looks and works great.
View attachment 390823
Any comments or suggestions are always welcome.
Happy modeling!
Thank you, Heinrich, now if I can just attach the straps in a decent fashion and paint them all would be well. The sails however are beginning to loom heavy on my mind.Excellent work, as per usual, Daniel! I really like what you have done with the dories. Not only do they blend in beautifully with the color of your mother ship, but the grey interior adds a workmanlike (industrial-looking) effect to them which is perfectly in character with their function. The re-honed anchors look much sleeker and now I believe that whether you choose this configuration or fully stowed, both are viable alternatives. The deadeye assembly looks very good - personally I am so glad that the WB deadeyes are assembled with rope - those metal/wire straps on deadeyes look to be a real pain in the butt to assemble so neatly!

