
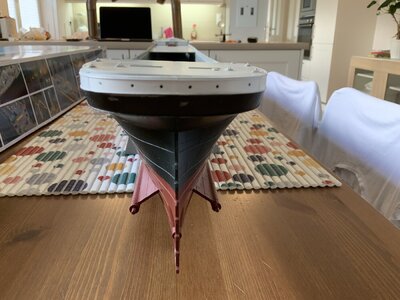
I had to drill the portholes on the stern of the 1/200 Trumpeter TitanicAdded stern port holes. I'm not a rivet counter. Not even a port hole counter but this seemed to obvious to overlook. I am a little surprised they were not on the new accuratized issue.

-

SUBSCRIBE TO SHIPS IN SCALE TODAY!
The beloved Ships in Scale Magazine is back and charting a new course for 2026!
Discover new skills, new techniques, and new inspirations in every issue.
NOTE THAT OUR NEXT ISSUE WILL BE July/August 2026 -

Win a Free Custom Engraved Brass Coin!!!
As a way to introduce our brass coins to the community, we will raffle off a free coin during the month of August. Follow link ABOVE for instructions for entering.
You are using an out of date browser. It may not display this or other websites correctly.
You should upgrade or use an alternative browser.
You should upgrade or use an alternative browser.
Titanic 1/350 MiniCraft Kit build
- Joined
- Aug 1, 2020
- Messages
- 108
- Points
- 88

Great to hear. now nothing standing in your way! I haven't touched mine for about a week but I do have some updates to post.Finally got my deck to fit and glue to the hull.")
- Joined
- Aug 1, 2020
- Messages
- 108
- Points
- 88
That seems odd for a Trumpeter kit. I have built several of their aircraft kits and they tend to be very liberal on rivets, etc.I had to drill the portholes on the stern of the 1/200 Trumpeter Titanic
- Joined
- Aug 1, 2020
- Messages
- 108
- Points
- 88
Looking good!Here's a picture showing the drilled out portholes.
Trumpeter models are pretty good, but they do miss quite alot of details.

Did the windows on the hull's outside bulkheads have glass panes in them? Or were they open? With windows on the inner walls?
The warpage on the inner promenade deck walls is awful. The plastic is so soft too.
- Joined
- Aug 1, 2020
- Messages
- 108
- Points
- 88
I believe there were glass windows. I didn't do anything with that though. you could attach a strip of clear plastic on the inside to simulate the glass. look at the ART BRAUNSCHWEIGER build for what he did!Did the windows on the hull's outside bulkheads have glass panes in them? Or were they open? With windows on the inner walls?
- Joined
- Aug 1, 2020
- Messages
- 108
- Points
- 88
Still not wanting tackle the funnel ladders and piping so I moved on to the life boats. I hollowed out boats H3. It would have been easier if I had done so before gluing the halves together but planning has never been my strong suit.

I used old newspaper ( unprinted border) for the canvas covers. I attached the paper with Elmer's all purpose glue. After completely dry I trimmed off the excess with a new razor blade. Any remaining paper I removed using sandpaper (400 grit) with downward strokes to prevent the sanding from dislodging the paper.

I did this for boats H2 and H4. I liked the color of the newpaper so I left it unpainted. I coated all the canvas liberally with Testor's Dull Cote.

I used old newspaper ( unprinted border) for the canvas covers. I attached the paper with Elmer's all purpose glue. After completely dry I trimmed off the excess with a new razor blade. Any remaining paper I removed using sandpaper (400 grit) with downward strokes to prevent the sanding from dislodging the paper.
I did this for boats H2 and H4. I liked the color of the newpaper so I left it unpainted. I coated all the canvas liberally with Testor's Dull Cote.
- Joined
- Aug 1, 2020
- Messages
- 108
- Points
- 88
I used Tamiya putty to build up the hulls of 2 of the H4 boats to replace the H3 boats (#'s 1 & 2) that I re-purposed as the emergency boats.

The 2 on the right are the "new" boats 1 & 2 after shaping the putty and painting. The one on the left is one of the emergency boats with some interior detail added

The 2 on the right are the "new" boats 1 & 2 after shaping the putty and painting. The one on the left is one of the emergency boats with some interior detail added
when you were placing the photo ech windows, did you remove the plastic frames or cover them? Some of the photo etch seem too large and others too small.
- Joined
- Aug 1, 2020
- Messages
- 108
- Points
- 88
yes, I removed any raised window frames that would be replaced by PE. Otherwise it would stick out too much. Many of the opening were to small for the PE. For those I filed the openings larger. If you don't do that then the wall will show inside the frames. I remember some openings being to large. for those I placed the frames inside the opening and filled any gaps. I hope this helps. If you have questions about specific frames I will try to address what I did and you can judge for yourself on what action to take.when you were placing the photo ech windows, did you remove the plastic frames or cover them? Some of the photo etch seem too large and others too small.
Have fun! Just wait until you get to that piping on funnel #3 !
- Joined
- Aug 1, 2020
- Messages
- 108
- Points
- 88
I finally got up the nerve to tackle the funnel ladders. It turned out not to be that big of a deal once I got the bending sequence down.
bending the rails around an old airbrush needle


bending rails perpendicular to platform


I didn't get a picture of bending the platforms. I used a pair of fine point curved tweezers for that
bending the rails around an old airbrush needle
bending rails perpendicular to platform
I didn't get a picture of bending the platforms. I used a pair of fine point curved tweezers for that
Beautiful job.
Still messing with the photo etched windows. Blackening photo etch with a chemical agent can get messy. I went to Hobby Lobby and purchased a set of Scripto magic markers in colors, the oil based ones. I have been using those on the window frames and on the photo etch. The markers adhere well to both plastic and photo etch. At $1.69, they are much cheaper than paint or blackening agent, and as long as you keep them capped, the pigment doesn't settle and the paint doesn't dry out. They don't spill either. But you must use the oil based markers. The tips come in two or three different sizes, and they are only good for small areas. They would never do for a hull!
- Joined
- Aug 1, 2020
- Messages
- 108
- Points
- 88
I pre-bent the PE for the lifeboat ropes. I added a little extra bend to each end so that it would snuggle up better at bow and stern. I attached with Elmer's. I painted a thin line of glue along the top edge of the boat and also on the inside edge of the PE. For some reason the PE seemed to adhere much better if I applied the glue to both surfaces

Finished life boats

This is the troublesome funnel #3. I elected to attach the piping to the funnel before attaching funnel to the ship. I felt this would give me more leverage to bend/shape the piping. I dipped it in boiled water to soften the plastic. I had to cut out a section of the starboard piping( the single pipe closest to center) at the base to get the proper angle. I then found that the horizontal portion of the piping was to long to fit. To remedy I cut out sections to shorten. I suppose I could have placed the piping higher on the funnel to take up some of the length but then the ends of the piping would not go all the way down to the to the base. IMO these should have been cast in multiple sections.

Finished life boats
This is the troublesome funnel #3. I elected to attach the piping to the funnel before attaching funnel to the ship. I felt this would give me more leverage to bend/shape the piping. I dipped it in boiled water to soften the plastic. I had to cut out a section of the starboard piping( the single pipe closest to center) at the base to get the proper angle. I then found that the horizontal portion of the piping was to long to fit. To remedy I cut out sections to shorten. I suppose I could have placed the piping higher on the funnel to take up some of the length but then the ends of the piping would not go all the way down to the to the base. IMO these should have been cast in multiple sections.
- Joined
- Aug 1, 2020
- Messages
- 108
- Points
- 88
thanksBeautiful job.
- Joined
- Aug 1, 2020
- Messages
- 108
- Points
- 88
I'll have to check those out. How fine is the smallest?Still messing with the photo etched windows. Blackening photo etch with a chemical agent can get messy. I went to Hobby Lobby and purchased a set of Scripto magic markers in colors, the oil based ones. I have been using those on the window frames and on the photo etch. The markers adhere well to both plastic and photo etch. At $1.69, they are much cheaper than paint or blackening agent, and as long as you keep them capped, the pigment doesn't settle and the paint doesn't dry out. They don't spill either. But you must use the oil based markers. The tips come in two or three different sizes, and they are only good for small areas. They would never do for a hull!
It's very fine. The fine point is tedious, I'm going to Hobby Lobby tomorrow for a larger size to see how it works.I'll have to check those out. How fine is the smallest?

