To victory and beyond ...

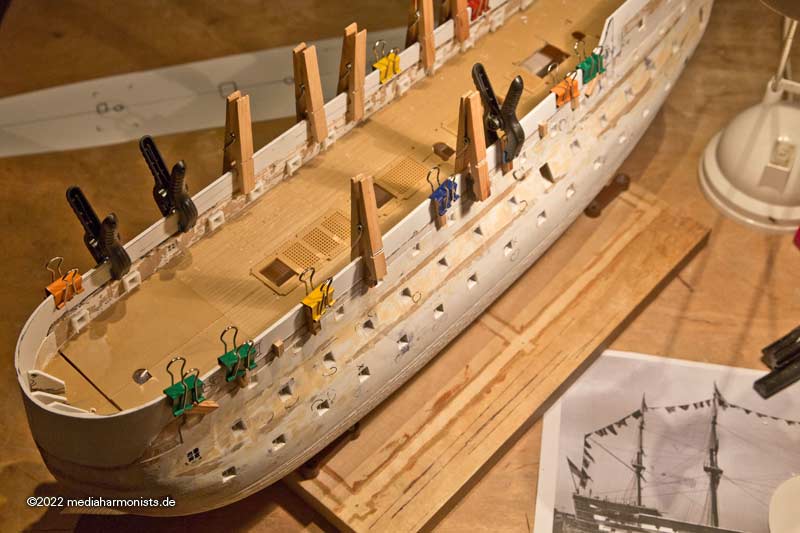
Here is a small excursion into the interior life of the Victory around 1900. The difficulty is that there are far fewer pictures and it is much more difficult to put them in chronological order.
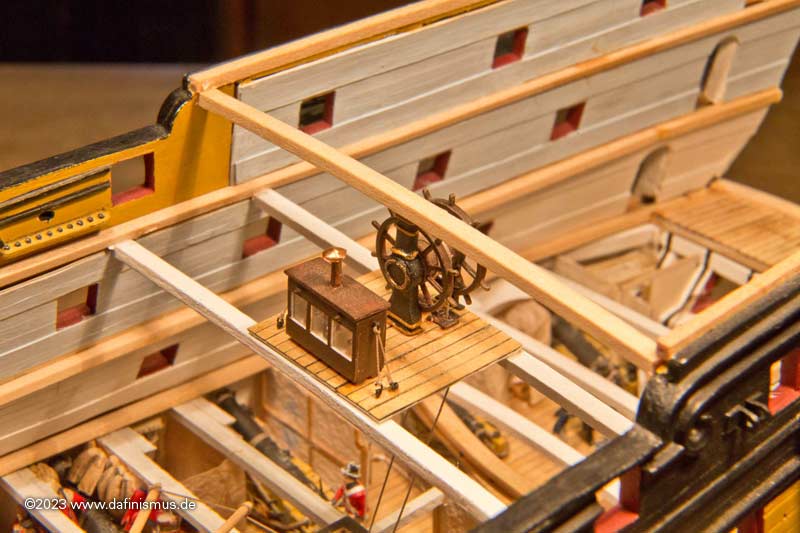
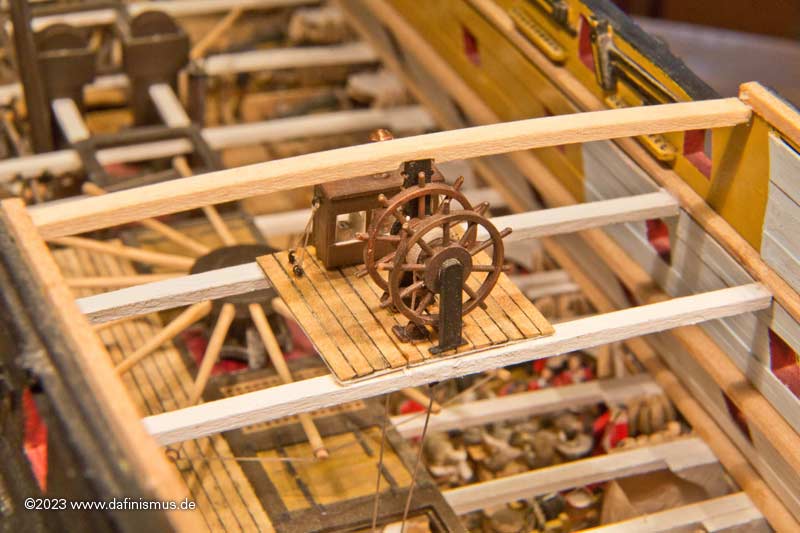
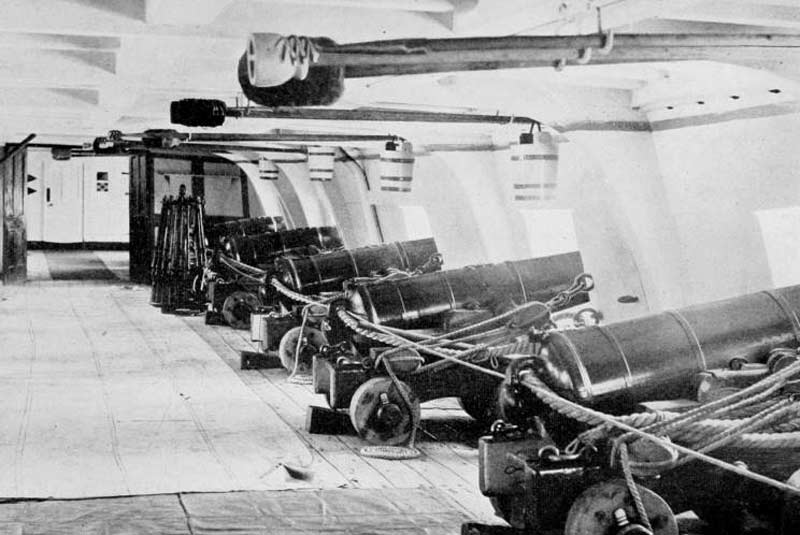
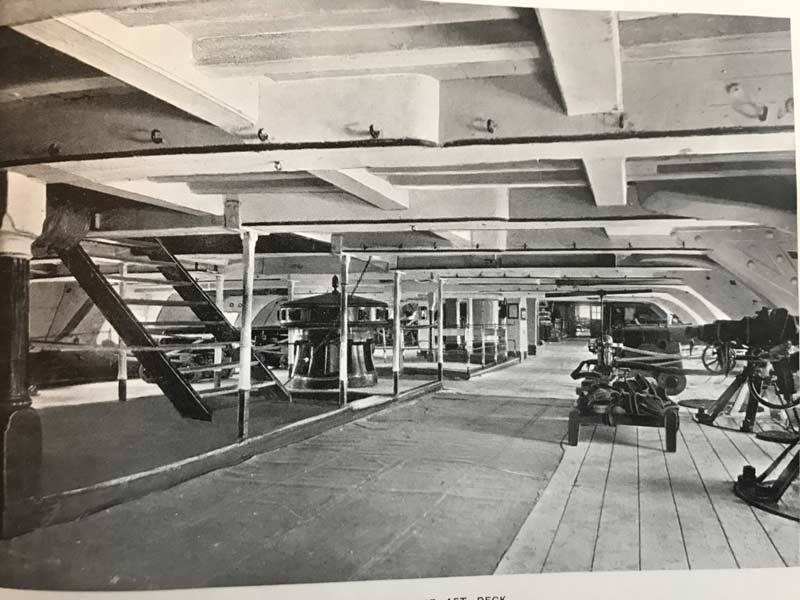
The first picture is of the upper gun deck, the photographer standing at the level of the foremast chains and looking aft.

Victory_Oberdeck1.jpg


So far this is the only picture showing the signal guns on the inside. All the supports for the deck beams are from iron. The space is empty so far, which seems to be the case in other interior pictures.

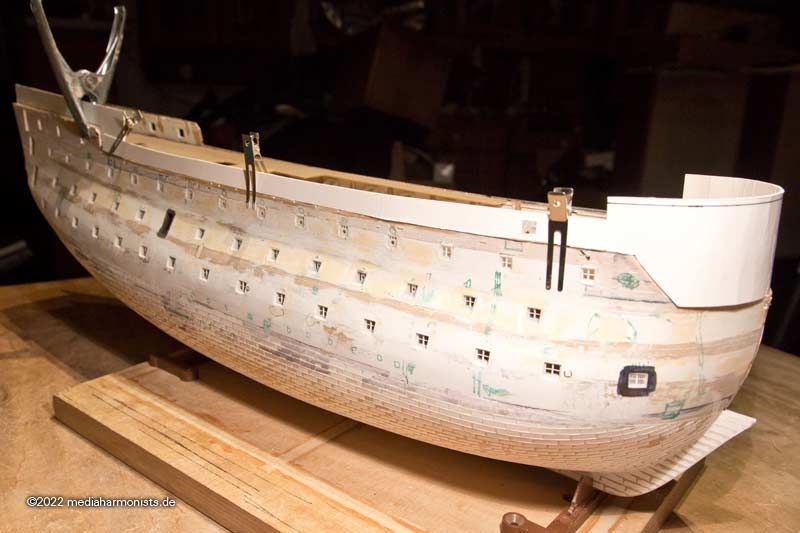
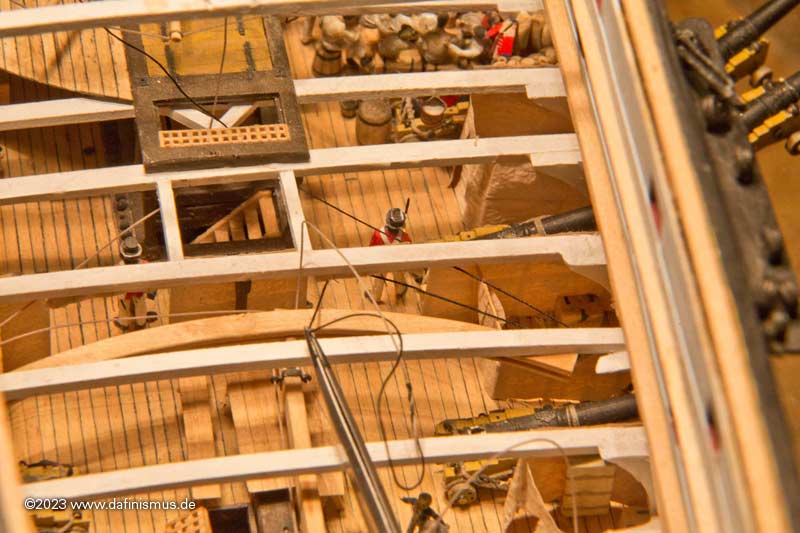
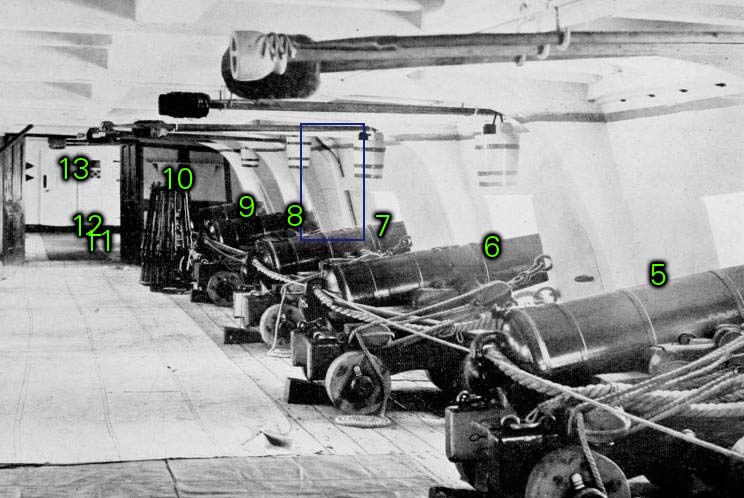
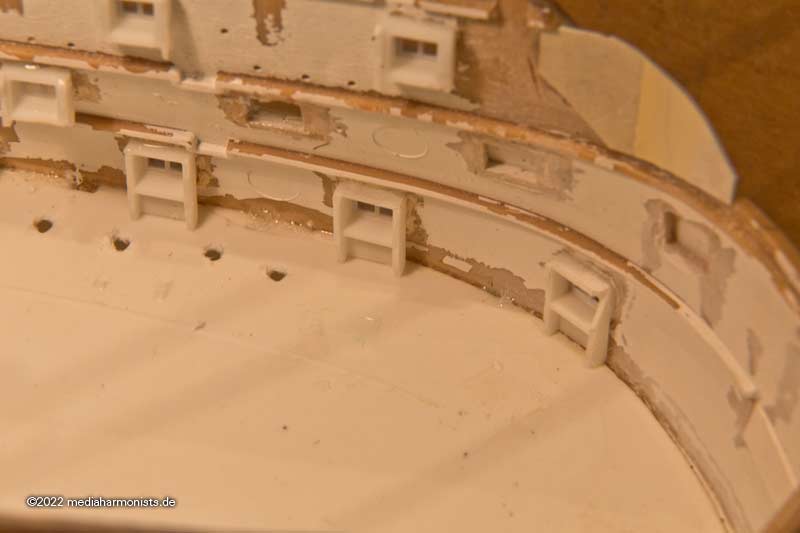
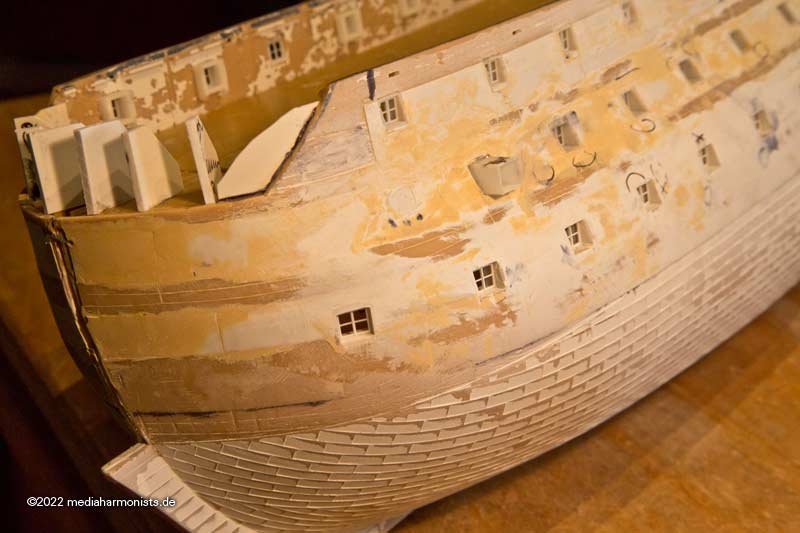
A picture further back in the ship - from about the middle of the waist - shows the 12-pounders.

victory_gun_deck.jpg


The structure behind the gun racks is interesting. My interpretation based on the shadow on the deck is a cabin in front of the red outlined window, the light area behind it could be 2 windows with the other guns, and then the partition to Nelson's cabins behind. Plans of 1830 show a bulkhead with doors at excately the same place, and as in the pictures the doors open to the head. So the shadow should not be the door´s one.

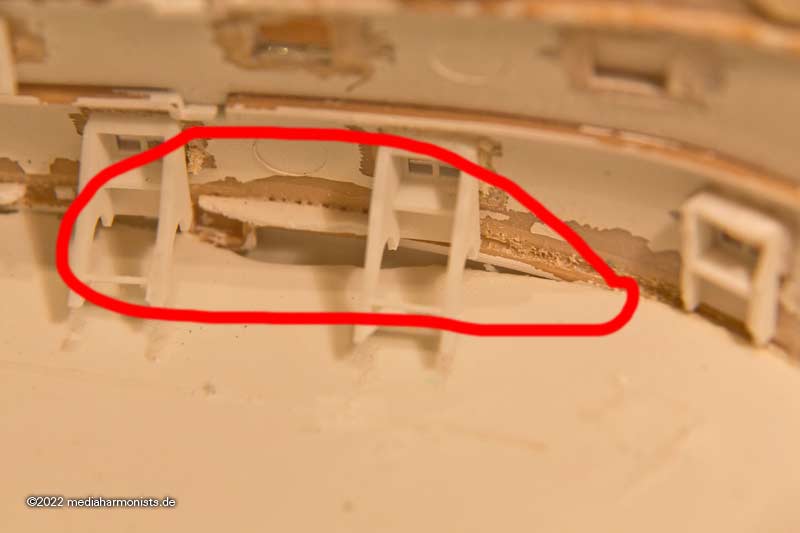
The chute outside should be between the last and the second last gun, but I can't find any indication of it on the inside. Possibly the small bend to the aft is a sign that a pipe comes from the direction of the window and the cabin, which could indicate sanitary rooms.

Victory1900hull.jpg


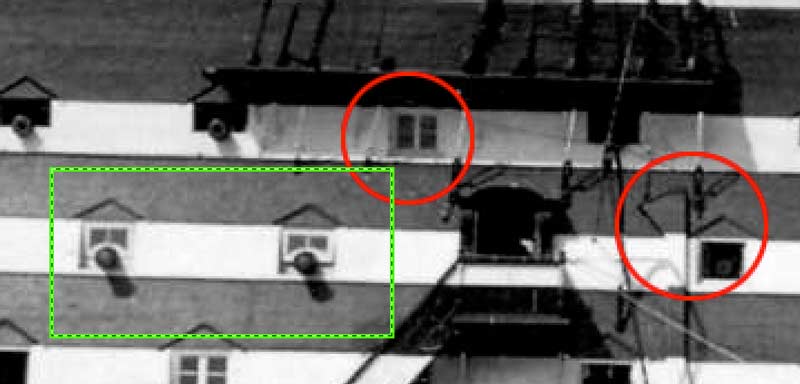
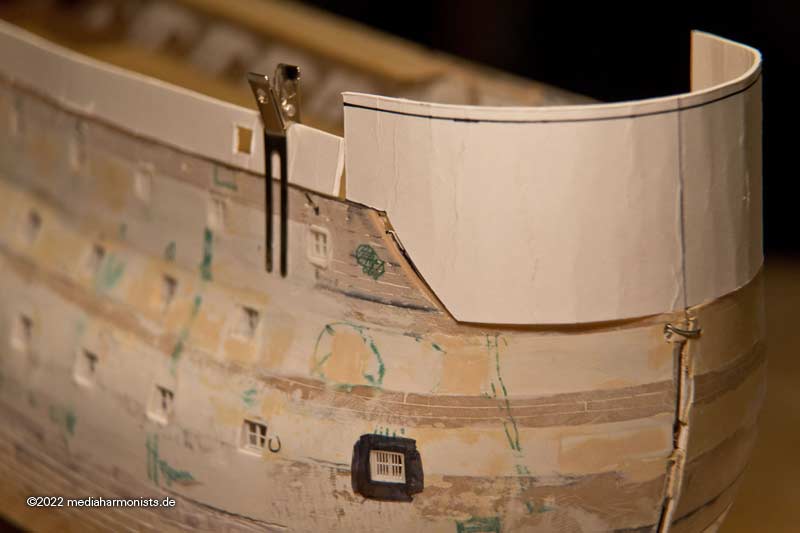
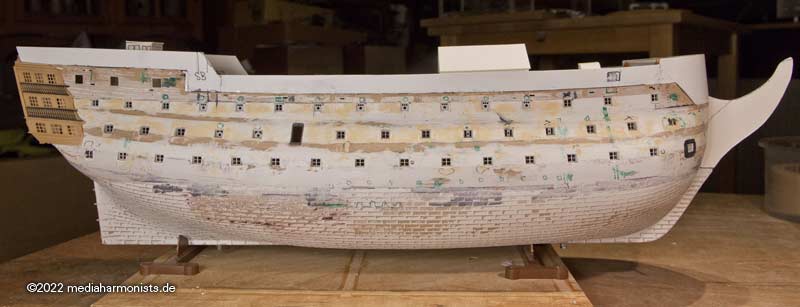
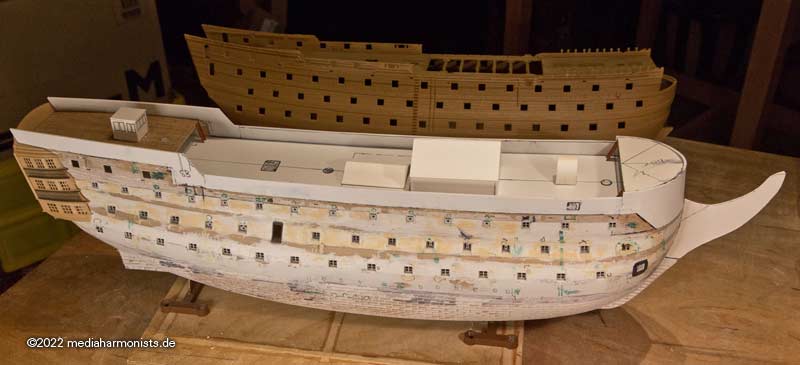
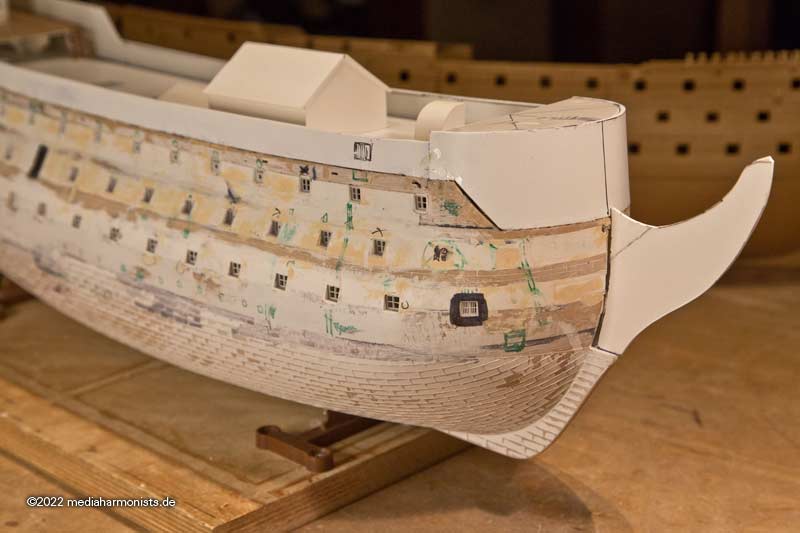
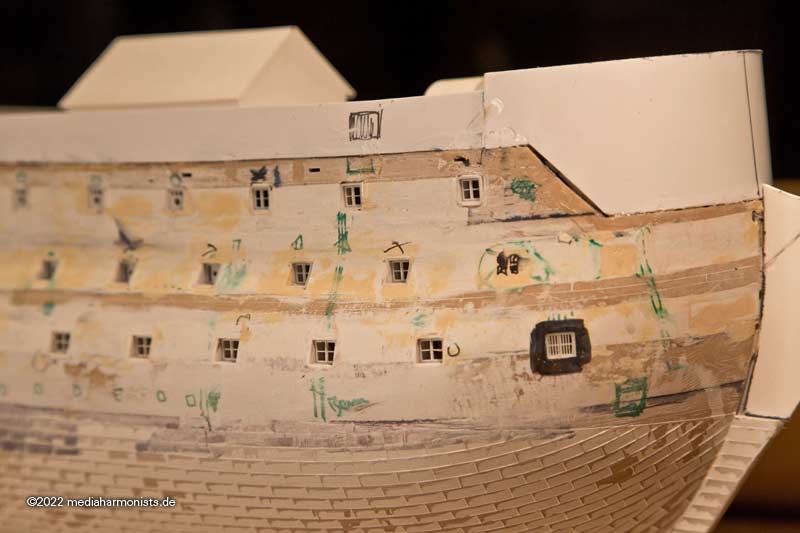
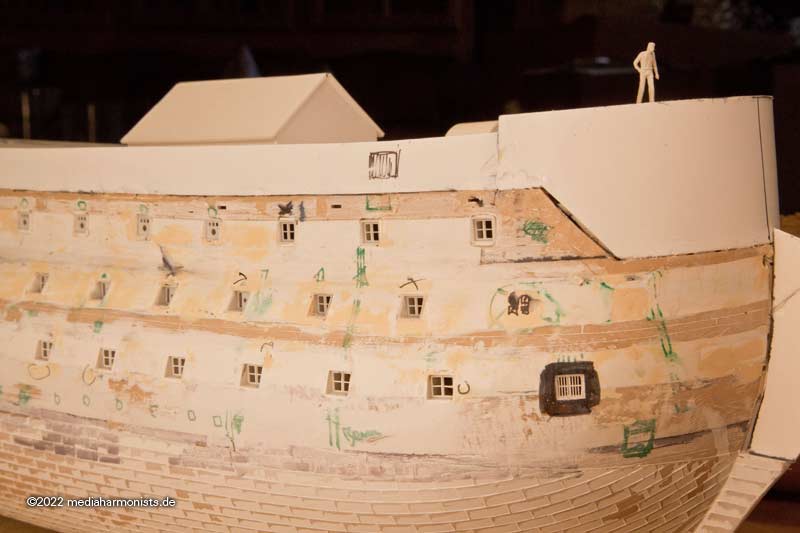
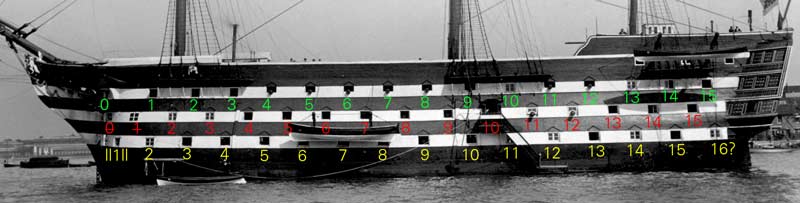
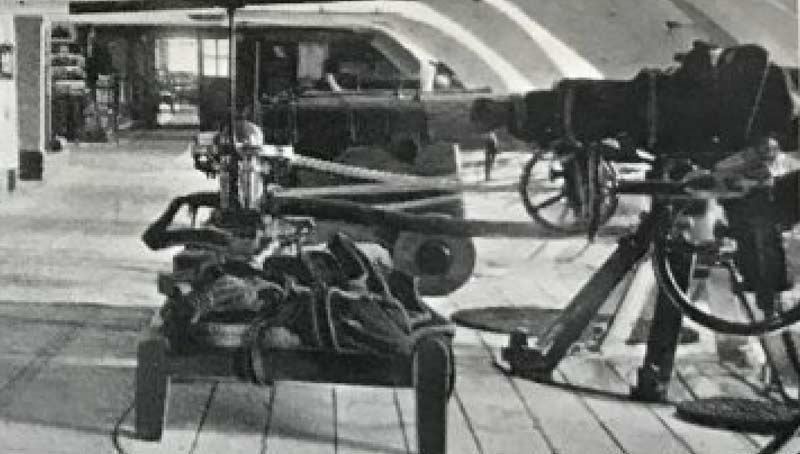
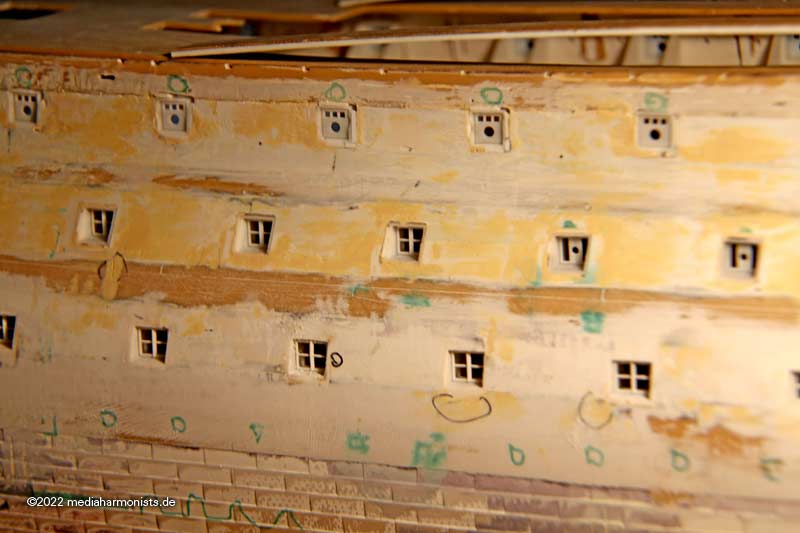
Another image concerns the two heavy Tarfalgar guns in the mid-deck, recognisable by the two-piece window and the larger angle of the ship's side, marked on the outside picture in the green frame.

Victory_Middle_deck.jpg


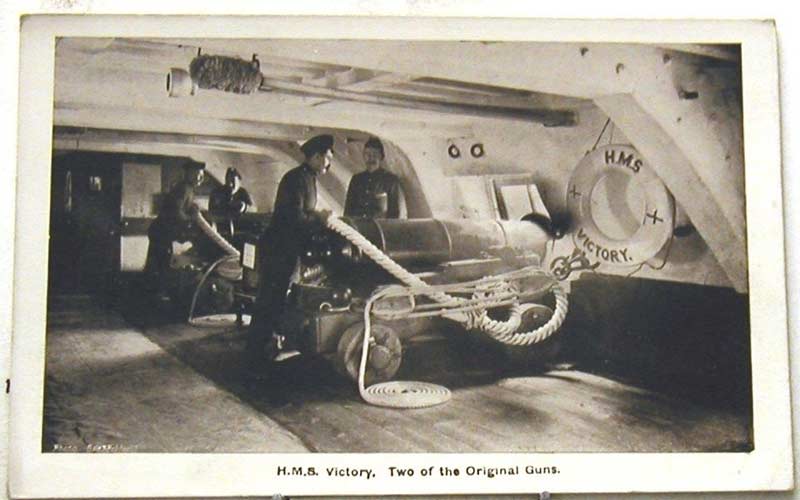
Whether the view is aft or towards the bow is not yet clear to me. Either the structure behind is the bulkhead to the officers' cabins or a booth of the entrance hatch.

But you can see that the gun carriage sits very low and that the gun therefore rests on the port frame below. On the other hand, on pictures of the upper battery deck you can see that the carriages there have significantly higher proportions, which also makes the gun barrels sit higher in the port.

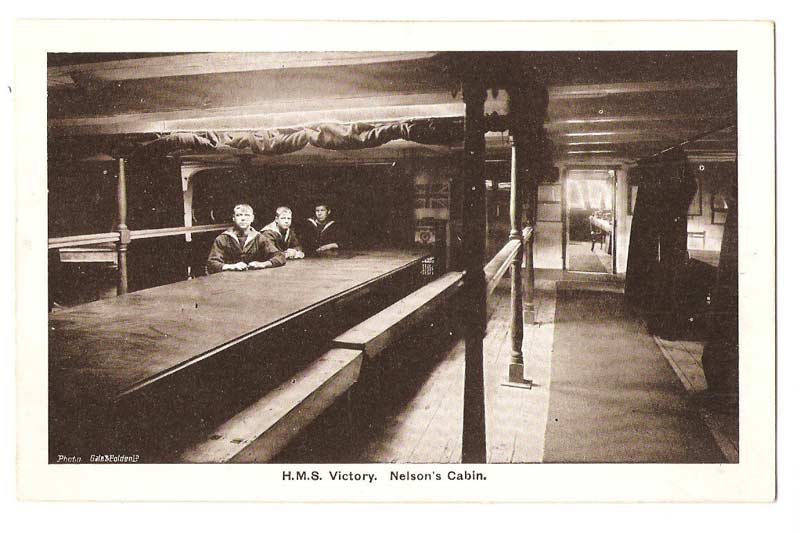
Here are two more pictures that I think are from the upper battery deck: One is probably the oldest picture of the series, showing Nelson's cabin, and the rooms in front of it ...

Victory_Nelsons_cabin.jpg


... and once probably also mid-deck with the heavy Trafalgar guns, judging by the slope of the ship's side.

Victory_Oberdeck2.jpg


It remains exciting :)

XXXDAn
 
Since I have once again scored some stupid mistakes, I recant all and everything and claim the opposite ;-)

First for orientation the side view with port numbering, the original photo is mirrored, as the following interior views also show the port side.

Victory1910ports.jpg


First the fat mistake: when I was sitting in front of the hull and wanted to sand it, I suddenly thought, oh my dear, since when are the signal guns not in the upper deck but in the middle deck?

Victory-1910_1507.jpg


Its because I had mistakenly assigned the following picture to the upper deck because of the gun mounts :-0

Victory_Oberdeck1.jpg


But it is clearly the middle deck, also recognisable by the top of the forward capstan. What confused me were the guns behind the signal guns.

So I looked at the photos again and rediscovered a detail I had already had forgotten a long time ago:

Victory1910portsguns.jpg


Windows 4,5,6 with the yellow circle are the signal guns of the middle deck, followed by an obscured window and then in 8 and 9 guns!

The interior view shows 3 guns at this place. Further beyond a gun can be seen at the very back, which has the breechline lying on it like in this picture:

Victory_Middle_deck.jpg


You can also see that there doesn't seem to be a booth at the entrance port, only a small indistinct structure can be seen.

Victory_Middledeck2.jpg


I have also numbered the picture of the upper deck according to the outside view for better understanding.

victory_gun_decknumbers.jpg


The pipe inside is between ports 7 and 8. The pipe outside can be seen just before port 9 and is probably hidden behind by the hanging knee.

As described before, I suspect a booth around of window 10 due to the shadow on the deck and the 2 guns - also guessable in the deck shadow - in 11 and 12 and behind the bulkhead gun 13.

It remains exciting, DAniel
 
Actually I only wanted to cut a new upper deck. To do this, I put the large 2mm polysterol sheet on the table, pushed the model to the edge and ...

Victory-damage-report-220219_1615.jpg


... must have been one of the active gale-force winds, I can't explain it any other way.

First look, everything went well. Second look, no, 2 windows are missing, stupid but no problem, I have already produced enough replacements.

But then ...

Victory-upgrade-220218_1611.jpg


... I had glued the struts for the elevation of the bow on a section of the upper battery deck shortly before. This, of course, was also loose. And when I tried to reattach it I noticed, shit, the hull is suddenly 2 mm wider than before !?!!

Victory-damage-report-220219_1617.jpg


The two upper decks were only put in without being glued in order to be able to take them out again for the installation of the window panes. But the gap on the side is clearly visible.

So I did what was only thought of much later, cut the "carriages" off the windows ...

Victory-damage-report-220219_1619.jpg


... and the upper 2 decks were succesively taken out and the culprit was discovered: the lower gun deck.

Victory-damage-report-220219_1620.jpg
.

This was the only one glued in and was it broken and tilted and so could not flex back.

So I drilled some holes and used hooks to lever the deck back up ...

Victory-damage-report-220219_1621.jpg


... and re-glued it well.

In the meantime I found 6 more loose windows, but they could all be kept in situ, only one at the very front I had to glue in a replacement part.

Victory-damage-report-220219_1624.jpg


The other decks are now also back inside and I could continue.

XXXDAnw
 
With working on the floor such accidents could not happen - but in our age and our back-problems no way ;)
I am happy, that you were able to repair the damages.
As usual, you show us very impressive work - I am looking forward to see you small "baby"-Vic in May this year in Augsburg ......
 
Thank you Uwe :)

One already suffers as a model builder ;-)

And when I'm not doing such nonsense, I'm busy at the moment with the elevations of the sides. During the rebuilding in 1816 the high round bow was installed according to Seppings. Everything was first a cardboard template. Here is the immensely high new bow ...

Victory-upgrade-220218_1602.jpg


... then along the upper deck ...

Victory-upgrade-220218_1606.jpg


... and the built poop.

Victory-upgrade-220218_1607.jpg


Victory-upgrade-220218_1609.jpg


A face that only a mother could love - or a dafi ;-)

Then transfer of the masks to 2 mm polysterol ...

Victory-upgrade-220218_1610.jpg


... warm up this round nose part ...

Victory-upgrade-220218_1612.jpg


... and pre-bend it.

Victory-upgrade-220218_1614.jpg


But 2 mm polysterol doesn't quite want to go the way I want, even with heat, so I cold bend it over the edge of the table until it's nice & soft.

Victory-1910-bow_1686.jpg


And for further help I had already installed supports inside ...

Victory-1910-bow_1688.jpg


... and since I still have concerns, I also glued something on the outside to hold it up, no, it's not hawse-pieces, that's coming off again :)


And somehow it was important now that I got the next parts done, just so for the sore soul ...

Victory-1910-upgrade_1690.jpg


Victory-1910-upgrade_1691.jpg


And now the worst part for me: patience to let it dry well!

XXXDAn
 
Last edited:
After raising the bow and stern, it was time for the upper deck. To do this, remove the deck, fix the polysterol strip for the new bulwark with clamps ...

Victory-1910-Upgrade-220224_1692.jpg


... and scribe the curve of the lower deck with a blade. Then set the cut, put the deck back in, clamped the fitted bulwark piece again and scribed it with a block on the inside to have a uniform height above the deck. Then removed, cut the height cleanly and ...

Victory-1910-Upgrade-220224_1694.jpg


... glued in place. You can hardly see it, there are little wooden blocks glued under the clamps on the outside of the hull, just like on the bow, so that it is flush on the outside.

And slowly it's becoming something :)

Victory-1910-Upgrade-220225_1697.jpg


The elements on the deck are still orientation aids made of cardboard and not dimensionally adjusted, but you can already see where it's going.

Victory-1910-Upgrade-220225_1696.jpg


The raised bow ...

Victory-1910-Upgrade-220225_1699.jpg


... the quarterdeck with Nelson's sloop under the poop ...

Victory-1910-Upgrade-220225_1700.jpg


... the small guard house, behind it two flag boxes still missing and probably the biggest surprise for the most of you ...

Victory-1910-Upgrade-220225_1704.jpg


... the forecastle over the forecastle, the fore-fore-castle so to speak.

Victory-1910-Upgrade-220225_1701.jpg


Hardly visible from the outside ...

Victory-1910-Upgrade-220225_1706.jpg


... unless someone is standing on it :)

Victory-1910-Upgrade-220225_1707.jpg


XXXDAn
 
Wahrscheinlich glatt wie ein Kinderpopo ......
I guess it is smooth like a popo / bum of a baby ;)
 
After the stressful pre-Christmas period, I actually managed to leave the computer on the side for almost 3 weeks. At least I just managed to finish the programming of the 1803 figurehead of the Victory :)

Now here is the addendum from Käpt dafi, who was really looking forward to the painting. Attached are the parts as they came out of the printer.

Victory-figure-head--221219_8364.jpg


Victory-figure-head-221219_8366.jpg


The motto "Honi soit ..." is already imprinted, but with the etched parts it comes a bit more concise, so scratch out one letter at a time, with a thin wooden stick ...

Victory-figure-head-221220_8370.jpg


... set some not immediately setting superglue to the respective place ...

Victory-figure-head-221220_8372.jpg


... using another stick to move the letter to the right place ...

Victory-figure-head-221220_8373.jpg


... ... and with a thicker chopstick pressed the letter to the curve by tilting it in and out.

Victory-figure-head-221220_8375.jpg


Victory-figure-head-221220_8377.jpg


Here's one with the letters imprinted ...

Victory-figure-head-221227_4507.jpg


... and once with etched parts glued on.

Victory-figure-head-221227_4525.jpg


The back also finally has volume and sits neatly on the head.

Victory-figure-head-221226_4495.jpg


And for the sake of completeness here the comparison to Heller's original part, the painted one finally slightly inked to get the necessary depth.

Victory-figure-head-230104_4639.jpg


Dear greetings and a happy new year to you all, Daniel
 
Here we go again, here we go, here we go, here we go.

Awakened from the slumber, she is,my little chubby one with the black and yellow stripes that make slim. She must become pretty. Last September weekend, this sweetie wants to go out to party,wants to party to Amsterdam, into the ship museum. She is looking forward to it, and I am looking forward to it

XXXDAn
 
To warm up and get into the groove, I finally gave the Brodie Stove its colors.

Since more than 2 years it stands a bit naked on the middle deck ...

Image


... so I sprayed it a little black and put a touch of graphite on it ...

Image


Image


... and up to the place with it
:-)


Image


Image


Image


Image


XXXDAn
 
A long time ago, I had once packed the night house and the steering wheel on a small vignette to protect them, but this small deck then broke in the middle. Fortunately without further damage to the important parts. So the thought was to glue the parts back together, put two deck beams into the hull, the vignette on top and all is tidied up and safe. So I reinforced the bottom of the vignette because of the crack and placed it on the deck beams, fixed tiller rope underneath and rejoiced.

Victory-Steering-Wheel-230429_9433.jpg


Victory-Steering-Wheel-230429_9438.jpg


Then I noticed that the rudder was then no longer moving, especially the tiller was nice to look at so far.

So what follows: Demolition of the just built. The plan was to run the tiller rope in a loop under the night house to keep the movability. But the rope was already short trimmed ...

Victory-Steering-Wheel-230429_9439.jpg


So I threaded the old rope back, threading an auxiliary thread through it to thread the new one in. Was tricky, but worked. Then the new rope was in quickly and the loop was laid quickly too.

But what a mess. The friction in the system was too high, rudder and tiller could not be moved. FUHUCK!

Victory-Steering-Wheel-230429_9441.jpg


Sewing machine oil didn't help either. Why? The friction just allowed to move the rudder when pulling on one side of the rope, but with the added other side, it was now just too much for the system. So the new rope with auxiliary thread were threaded out again and the old threaded back in ...

But it still was a good decision, as the guys in the gunroom can no longer bang their heads against the tiller. Due to the thick skulls down there, the tiller sweep was already limited for a long time anyway. Ok, mobility is missing, but so there are at least no blokes that would have literally been knocked off the their stools.

But in the meantime the small piece of deck looked a bit piddly to me, so it followed what had to follow - demolition: dafi is back in the modeler's life.
 
The ever curious modeler's eye certainly did not miss it in the last picture: Next step were then the crews at the capstan.

In my stock of pre-Frankensteiners I still had a pack of cheap copies of Preiser figures that I had once received as a gift.

Image


For single figures too sloppy reproduced, in the bunch I thought still quite useful. So once again I broke bones and mixed everything up. Since I quickly noticed that I would have been lost with single figures, I had built a sample capstan bar for the assembly. And it came what had to come: Bones were broken, joints were twisted, heads were chopped off and put on again.

Image


Image


Image


Especially that with correct posture the arms were stretched under the bar and that the pressure was transferred with the chest, was a little tricky in the assembly. This posture prevented kinetic energy from building up when the bars struck backwards, the bars could not hit the guys in the chest area with force. So they were simply pushed backwards with less risk of injury.

Since the space on the capstan bars is quite tight, the guys were glued together right away in six-packs, because I wouldn't have been able to fit them together inside of the ship.

Then the sixpacks were sent to dress. Thereby I remembered again a small detail, which is shown on a contemporary document. The inner 5 men are red dressed Marins, the outer man at the bar is a blue dressed sailor. There is also a bluecoat at the swifter, the circulating rope that stabilizes the bars. This had the advantage as the marines could not do anything else except shoot, turn and pull were stuck in the middle, while the highly qualified sailors could quickly get out and away for maneuvers if necessary.

So the inner five guys conjured up short coattails, painted and also provided for the white belts. A few had allowed themselves suit relief, the jackets and belts hang afterwards over the guns shoved to the side.

Image


Fit trials outside then looked like this.

Image


Image


Image


First test fittings looks still quite fluffy. But you can already see one thing, the expected fiddler sitting on the capstan drum does not fit there because of the next deck.

Image


Image


Image


Image


Image


Image


Image


One coan see, it works with the guns, tight fit, but it works.

But it gets more claustrophobic once the deck beams are added.

Image


Image


Image
 
I am jealous ...... hope to hear more, where this photo was made ....
 
Back
Top