-

Win a Free Custom Engraved Brass Coin!!!
As a way to introduce our brass coins to the community, we will raffle off a free coin during the month of August. Follow link ABOVE for instructions for entering.
-

PRE-ORDER SHIPS IN SCALE TODAY!
The beloved Ships in Scale Magazine is back and charting a new course for 2026!
Discover new skills, new techniques, and new inspirations in every issue.
NOTE THAT OUR FIRST ISSUE WILL BE JAN/FEB 2026
You are using an out of date browser. It may not display this or other websites correctly.
You should upgrade or use an alternative browser.
You should upgrade or use an alternative browser.
USS Gambier Bay (CVE -73) 1/350 by Hasegawa with Hasegawa photo etch [COMPLETED BUILD]
- Thread starter Will @ Trilogy
- Start date
- Watchers 16
Davidp again thanks for looking with a critical eye and positive comments & questions.
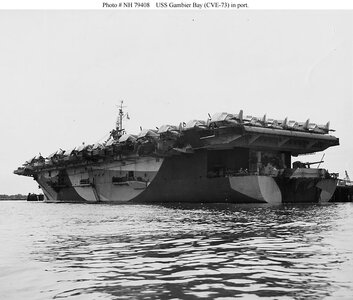
No. I am not using the box art. During research I found some original navy drawings detailing measure 32 design 15A camouflage and inside the kit box is a full size (1/350) poster. The poster is a very close approximation of the navy drawings I've found in Naval History and Heritage Command pictures
80-G-170033 and 80-G-170034. Also found in wikipedia the same photos but in much better resolution and when viewed in a tiff format you can read the approval signature and the date of 3/6/44.
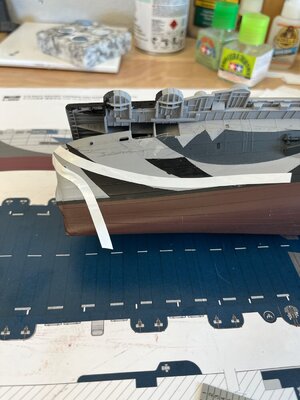
A lot of verbiage to say I'm trying to be as accurate as I can be. The mistake I made was trying to trace the poster making templates and tracing them to the ship. First mistake was the forward 5BK swish did not start far enough forward at the bow and this led to the second swish being to far aft. The aft shift of the swishes caused the balance of the next pattern to be shorter than the photos.
I still have not whether to start over or leave it as i've done.
After the mistake of using templates and with a soft H pencil to trace the template I think I will just draw with the soft pencil. I printed the Heritage photos (which have a scale) so I will be able to extrapolate the shapes. Should I start over your opinion matters?
Thanks I'll give that a try. Yes I've got painters tape.
Why all the black on both sides first? Good idea on the flight deck and galleries. Paint take about 2 hours to handle and 6 to 8 for hard to withstand tapping.
- Joined
- Jan 21, 2023
- Messages
- 372
- Points
- 138

because you have already starting taping the black on the port bow. each color would be done in stages with the 5-L next then 5-O & lastly 5-P. use the previous tape color before removing to put the next color tape against as the previous tape color has the shape you want without having to pencil again that shape.
- Joined
- Jan 21, 2023
- Messages
- 372
- Points
- 138

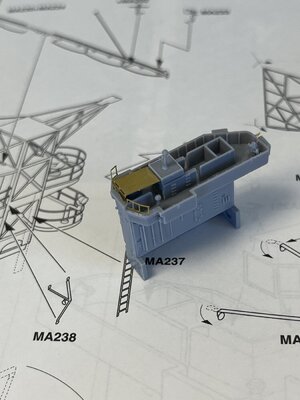
what does the instructions call that thing that looks like a ball atop of a post on top of the island?
port side profile of the island https://www.navsource.org/archives/03/0307311.jpg look at the paint work to see if it matches your camo scheme. that profile might come in handy when building the mast as will this. https://www.navsource.org/archives/03/0307317.jpg
what time period is your USS Indianapolis as i have the Booklet of General Plans 1944/45 of that ship?
I believe that the thing you reference is a searchlight under a canvas cover. Both the kit instructions and the Hasegawa pe reference that to be a searchlight. Yeh, you've been studying the Gambier Bay instead of working on the Akagi. lol
- Joined
- Jan 21, 2023
- Messages
- 372
- Points
- 138

sheet 5 Island Structure of the CVE-90 USS Thetis Bay Booklet of General Plans 1945 that i think i linked you does not show it as a search light but something else. see if sheet 3 agrees with your instructions & search light locations.
not working on the Akagi but doing photo editing of the Booklet of General Plans 1941 of the heavy cruiser CA-24 USS Pensacola. i have over 140 plus sets of Booklet of General Plans of various USN ships both complete & incomplete.
not working on the Akagi but doing photo editing of the Booklet of General Plans 1941 of the heavy cruiser CA-24 USS Pensacola. i have over 140 plus sets of Booklet of General Plans of various USN ships both complete & incomplete.
Well looking at sheet 5 I guess the object in question is the magnetic compass on its pedestal. I build the USS Indianapolis as she was in 1945 no camouflage as the camouflage was painted over while in the yard just prior to sailing on the secret mission.
- Joined
- Jan 21, 2023
- Messages
- 372
- Points
- 138

is not a magnetic compass as that is what is in the right hand corner of your island model. the 2 objects on the leftside of your island model are called
pelorus https://en.wikipedia.org/wiki/Pelorus_(instrument)
USS Indianapolis was painted Measure 22 camouflage at the time of her sinking. https://www.navsource.org/archives/04/035/04035.htm
pelorus https://en.wikipedia.org/wiki/Pelorus_(instrument)
USS Indianapolis was painted Measure 22 camouflage at the time of her sinking. https://www.navsource.org/archives/04/035/04035.htm
My bad. I thought it the compass you asked about earlier. The kit has two pelorus but the booklet of plans calls for one. Could be the difference between CVE-73 and CVE-90 who knows?
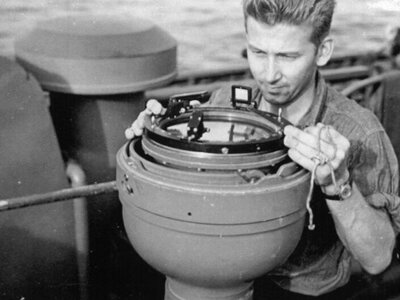
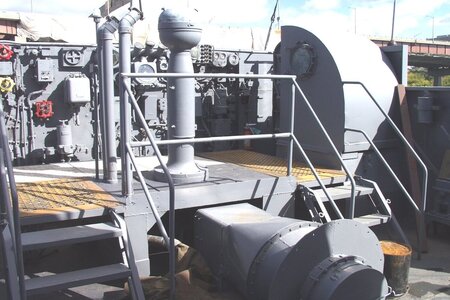
Now your as to a pelorus it is an instrument to keep on course without a compass. Looking for pelorus I found these pictures of the USS Slater a museum ship in Albany, New York.
Pelorus aboard USS HILBERT DE-742
Pelorus after restoration
Learned something today and it is very interesting. Got lost in web searching and spent several hours looking a USS Slater pictures great web site. USS Slater.org
Now your as to a pelorus it is an instrument to keep on course without a compass. Looking for pelorus I found these pictures of the USS Slater a museum ship in Albany, New York.
Pelorus aboard USS HILBERT DE-742

Pelorus after restoration

Learned something today and it is very interesting. Got lost in web searching and spent several hours looking a USS Slater pictures great web site. USS Slater.org
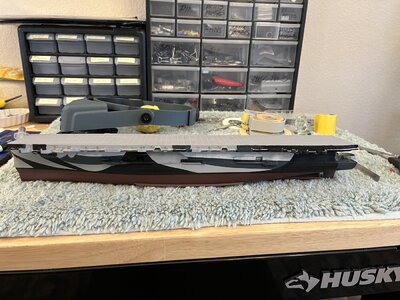
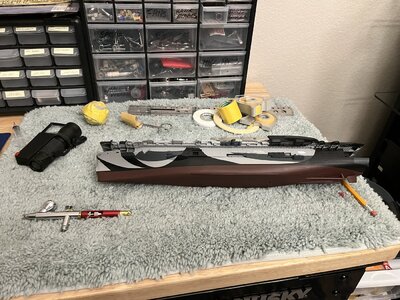
Finally finished the black swishes forward on the post side. I used the information from the CVE-90 USS Thetis Bay Booklet of General Plans 1945 and the Naval History and Heritage Command photo graphs that have the camouflage patterns and a scale below each photo. The scale allowed me to get a very close approximation of the patterns.
Having to spray the forward portion of the hull with light grey 5-L and then tape the patterns along with the entire hull to prevent overspray. This leaves only the pale grey 5-P to be taped off and sprayed. I mentioned that I airbrush to spray using a Harder-Steenbeck infinity with a .4 needle and 12psi.
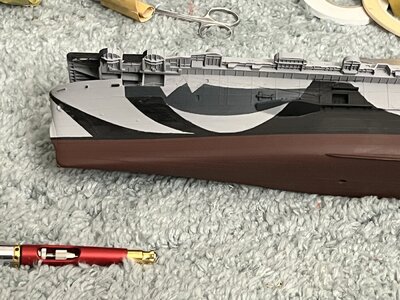
Closeup of the swishes
Having to spray the forward portion of the hull with light grey 5-L and then tape the patterns along with the entire hull to prevent overspray. This leaves only the pale grey 5-P to be taped off and sprayed. I mentioned that I airbrush to spray using a Harder-Steenbeck infinity with a .4 needle and 12psi.

Closeup of the swishes


